
Popular categories
Looking for a yarn?


Comments / Questions (27)
![]() Michelle wrote:
Michelle wrote:
J'ai oublié d'indiquer le nom du pull.... il s'agit du pull sans manches Autumn Roads 216-36
27.03.2026 - 18:53
![]() Michelle wrote:
Michelle wrote:
J'ai commencé le devant, mais la diagramme n'est pas adapté pour tricoter en aller-retour.... j'ai même essayé de lire ce diagramme de gauche à droite pour les rangs pairs, sans succès... Quelles solutions me proposez-vous ?
27.03.2026 - 18:40DROPS Design answered:
Bonjour Michelle, sur l'envers, suivez bien la mention "sur l'envers" de la légende des symboles, autrement dit, vous allez tricoter A.1 ainsi sur l'envers: 2 m env, 3 m end, 2 m env, 7 m end, 2 m env, 3 m end, 2 m env. Bon tricot!
07.04.2026 - 08:13
![]() Michelle wrote:
Michelle wrote:
J'ai commencé le devant, mais le diagramme n'est pas adapté pour tricoter en aller-retour...j'ai même essayé de lire le diagramme de gauche à droite pour les rangs impairs....sans succès...quelles solutions me proposez-vous ?
27.03.2026 - 18:37
![]() Fernanda wrote:
Fernanda wrote:
Har vridit och vänt men får inte en förståelse för vilken stickstorlek jag ska använda 😅 kan jag få hjälp med detta så jag kan få börja med projektet? Ser fram emot att få sticka denna väst.
26.01.2026 - 19:12
![]() Anja wrote:
Anja wrote:
Als ik het voorpand apart heen en weer moet breien, betekend dat dat het patroon ook averecht gebreid moet worden? Dus ook de kabelsteken andersom? Is er geen manier om alleen de goede kant te breien?
10.12.2025 - 17:30DROPS Design answered:
Dag Anja,
Bij het heen en weer breien, brei je inderdaad de tricotsteken averecht aan de verkeerde kant. Als je ervoor zorgt dat je de oneven naalden van het telpatroon aan de goede kant breit, hoef je niet te kabelen aan de verkeerde kant.
10.12.2025 - 19:33
![]() Romina wrote:
Romina wrote:
Está mal la espalda? Dice Fila 1 (derecho): cerrar 2 pts → tejes el resto → quedan 73 Fila 2 (revés): cerrar 2 pts → tejes el resto → quedan 71 Fila 3 (derecho): cerrar 1 pt → quedan 70 Fila 4 (revés): cerrar 1 pt → quedan 69 Fila 5 (derecho): cerrar 1 pt → quedan 68 pero en el patrón son 61 puntos al disminuir las 3 veces 1 punto, en talla M no calza con lo escrito.
12.04.2025 - 05:39
![]() Luciana wrote:
Luciana wrote:
Hola, como se cierran las sisas? No entiendo esa parte en la talla M es un cierre simple?
12.04.2025 - 03:06DROPS Design answered:
Hola Luciana, el cuerpo se trabaja en redondo. Cuando alcanzas la altura para las sisas cierras 6 puntos para cada sisa. Comienzas 3 puntos antes del hilo marcador y cierras 6 puntos, trabajas hasta que queden 3 puntos antes del hilo marcador y cierras otros 6 puntos y trabajas hasta el final de la vuelta. Este tipo de remate es normal, los puntos a cerrar se trabajan como cuando rematas al final. Y ahora trabajas el delantero y la espalda por separado.
13.04.2025 - 23:24
![]() Crystal wrote:
Crystal wrote:
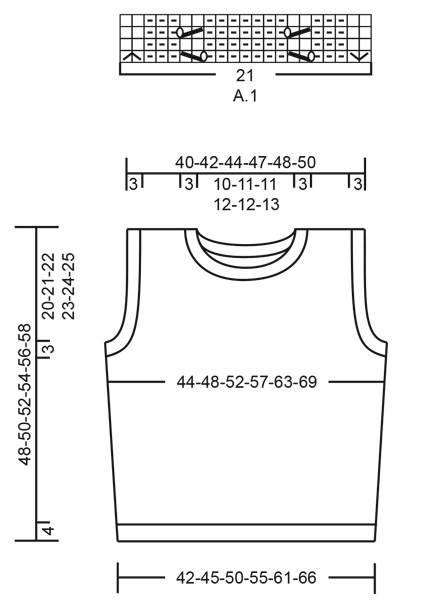
I do not completely understand the A.1 chart, specifically the first 2 and last 2 stitches on the first row of chart. Would you please explain? Thank you.
15.03.2025 - 21:52DROPS Design answered:
Dear Crystal, these 2 symbols correspond to small cables. In this video you can see how to work cables by placing stitches in front or behind the piece on a cable needle, before working them (in the case of this pattern, instead of 3 stitches, you have 1 stitch). Happy knitting!
16.03.2025 - 20:09
![]() Sandie wrote:
Sandie wrote:
Why are the shoulder stitches for the front piece not adding up correctly? I end up with 5 more stitches than what is stated. I do not see any errata for this pattern. I am doing the 4th size. Please advise. Thank you.
24.02.2025 - 21:46DROPS Design answered:
Dear Sandie, after dividing you get 91 sts then you cast off for armholes on each side: 4 sts x 2 + 3 sts x 1 = 11 sts on each side, there are 91-22=69 sts left. Then slip the middle 11 sts on a thread for neck = (69-11)/2= 29 sts for each shoulder. Then cast off at the beg of every row from neck: 3 sts x 1 + 2 sts x 2 + 1 st x 3 = 10 sts = 29-10=19 sts left. Happy knitting!
26.02.2025 - 10:14
![]() Natasha wrote:
Natasha wrote:
How do I determine what size I am?
15.06.2024 - 18:51DROPS Design answered:
Dear Natasha, please see the schematic drawing on the bottom of the pattern, which has all the relevant measurements. If you are unsure, take a garment that is similar style and fits the intended wearer and compare measurements. Happy Knitting!
16.06.2024 - 07:59
|
||||||||||||||||||||||
Autumn Roads#autumnroadsvest |
||||||||||||||||||||||
 |
 |
|||||||||||||||||||||
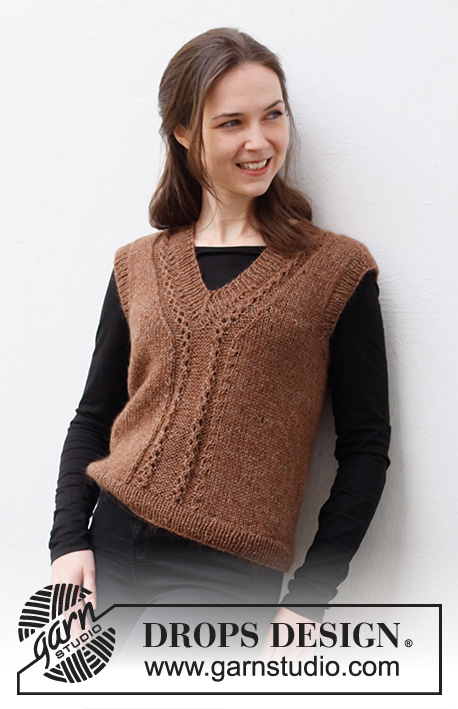
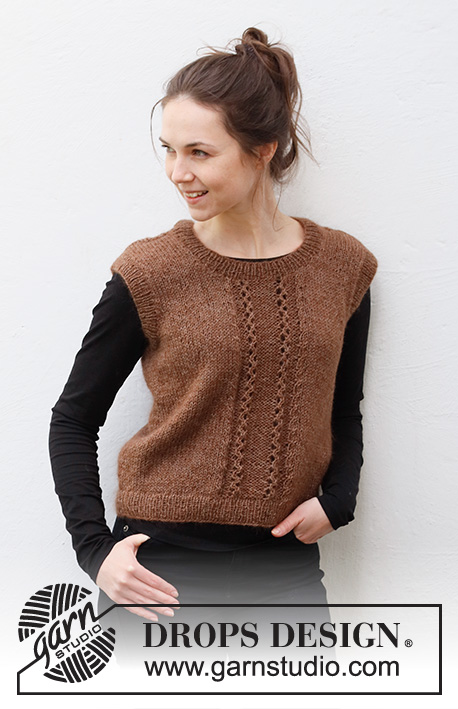
Knitted vest / slipover in DROPS Flora and DROPS Kid-Silk. Sizes S - XXXL.
DROPS 216-36 |
||||||||||||||||||||||
|
------------------------------------------------------- EXPLANATIONS FOR THE PATTERN: ------------------------------------------------------- PATTERN: See diagram A.1. The diagram shows all rows from the right side. DECREASE TIP (evenly spaced): To work out how to decrease evenly, count the total number of stitches on needle (e.g. 170 stitches) and divide by number of decreases to be made (e.g. 28) = 6.1. In this example decrease by knitting each 5th and 6th stitch together. INCREASE TIP (for sides of body): Work until there are 2 stitches left before the marker thread, make 1 yarn over, knit 4 (marker thread sits between these 4 stitches) make 1 yarn over (= 2 stitches increased). On the next round knit the yarn overs twisted to avoid holes. Then work the new stitches in stocking stitch. CASTING-OFF TIP: To avoid the cast-off edge being tight you can cast off with a larger size needle. If the edge is still tight, make 1 yarn over after approx. each 4th stitch at the same time as casting off; the yarn overs are cast off as normal stitches. ------------------------------------------------------- START THE PIECE HERE: ------------------------------------------------------- VEST – SHORT OVERVIEW OF THE PIECE: The piece is worked in the round with circular needle bottom up, as far as the armholes, after which the front and back pieces are finished separately, back and forth. Ribbed edges are worked around the neck and armholes. BODY: Cast on 170-184-204-224-248-272 stitches with circular needle size 5 mm and 1 strand Flora and 1 strand Kid-Silk (= 2 strands). Change to circular needle size 4 mm and knit 1 round. Then work rib in the round (= knit 1, purl 1) for 4 cm. Change back to circular needle size 5 mm and knit 1 round where you decrease 28-30-34-38-42-46 stitches evenly spaced – read DECREASE TIP = 142-154-170-186-206-226 stitches. Insert 1 marker thread at the beginning of the round and 1 marker thread after 71-77-85-93-103-113 stitches (= sides of body). Allow the threads to follow your work onwards; they will be used when increasing in the sides. Work 25-28-32-36-41-46 stitches in stocking stitch, A.1 (= 21 stitches mid front) and stocking stitch to the end of the round. Continue this pattern. REMEMBER THE KNITTING TENSION! When the piece measures 9-9-10-10-11-11 cm, increase 1 stitch on each side of both marker threads – read INCREASE TIP (= 4 stitches increased). Repeat this increase when the piece measures 18-18-20-20-22-22 cm = 150-162-178-194-214-234 stitches. When the piece measures 25-26-27-28-29-30 cm, cast off for the armholes as follows: Start 3 stitches before the marker thread at the beginning of the round and cast off 6 stitches, work as before until there are 3 stitches left before the next marker thread and cast off 6 stitches. Work as before to end of round. Back and front pieces are finished separately. BACK PIECE: = 69-75-83-91-101-111 stitches. Work stocking stitch back and forth and cast off for the armholes at the beginning of each row as follows: Cast off 3 stitches 0-0-0-0-1-1 time, 2 stitches 1-2-3-4-4-5 times and 1 stitch 4-3-3-3-4-5 times = 57-61-65-69-71-75 stitches left. Continue working until the piece measures 45-47-49-51-53-55 cm. On the next row cast off the middle 23-25-25-27-27-29 stitches for the neck and each shoulder is finished separately. Work stocking stitch and cast off 2 stitches on the next row from the neck = 15-16-18-19-20-21 stitches left on shoulder. Continue working until the piece measures 48-50-52-54-56-58 cm. Cast off a little loosely. Work the other shoulder in the same way. FRONT PIECE: = 69-75-83-91-101-111 stitches. Work stocking stitch and A.1 back and forth and cast off for the armholes at the beginning of each row as follows: Cast off 3 stitches 0-0-0-0-1-1 time, 2 stitches 1-2-3-4-4-5 times and 1 stitch 4-3-3-3-4-5 times. AT THE SAME TIME when the piece measures 37-38-39-40-41-42 cm, place the middle 7-9-9-11-11-13 stitches on 1 thread for the neck and each shoulder is finished separately. Work stocking stitch and pattern as before and cast off at the beginning of each row from the neck as follows: Cast off 3 stitches 1 time, 2 stitches 2 times and 1 stitch 3 times = 15-16-18-19-20-21 stitches left on the shoulder. Continue working until the piece measures 48-50-52-54-56-58 cm. Cast off a little loosely. Work the other shoulder in the same way. ASSEMBLY: Sew the shoulder seams inside the cast-off edge. SLEEVE EDGE: Starting from the right side at the bottom of the armhole, knit up approx. 92 to 114 stitches inside the 1 edge stitch around the armhole using short circular needle size 4 mm and 1 strand of each quality (the number of stitches should be divisible by 2). Work rib in the round (= knit 1, purl 1) for 3 cm. Loosely cast off with knit over knit and purl over purl – read CASTING-OFF TIP! Work the other sleeve edge in the same way. NECK: Start from the right side at one of the shoulder seams and knit up approx. 84 to 106 stitches around the neck (including the stitches on the thread mid front), using short circular needle size 4 mm and 1 strand of each quality (the number of stitches should be divisible by 2). Work rib in the round (= knit 1, purl 1) for 3 cm. Loosely cast off with knit over knit and purl over purl – remember CASTING-OFF TIP! |
||||||||||||||||||||||
Diagram explanations |
||||||||||||||||||||||
|
||||||||||||||||||||||
 |
||||||||||||||||||||||
Have you finished this pattern?Tag your pictures with #dropspattern #autumnroadsvest or submit them to the #dropsfan gallery. Do you need help with this pattern?You'll find 30 tutorial videos, a Comments/Questions area and more by visiting the pattern on garnstudio.com. © 1982-2026 DROPS Design A/S. We reserve all rights. This document, including all its sub-sections, has copyrights. Read more about what you can do with our patterns at the bottom of each pattern on our site. |
||||||||||||||||||||||


With over 40 years in knitting and crochet design, DROPS Design offers one of the most extensive collections of free patterns on the internet - translated to 17 languages. As of today we count 324 catalogues and 12290 patterns translated into English (UK/cm). 12290
We work hard to bring you the best knitting and crochet have to offer, inspiration and advice as well as great quality yarns at incredible prices! Would you like to use our patterns for other than personal use? You can read what you are allowed to do in the Copyright text at the bottom of all our patterns. Happy crafting!
Post a comment to pattern DROPS 216-36
We would love to hear what you have to say about this pattern!
If you want to leave a question, please make sure you select the correct category in the form below, to speed up the answering process. Required fields are marked *.