
Popular categories
Looking for a yarn?


|
||||||||||||||||||||||
Autumn Roads |
||||||||||||||||||||||
 |
 |
|||||||||||||||||||||
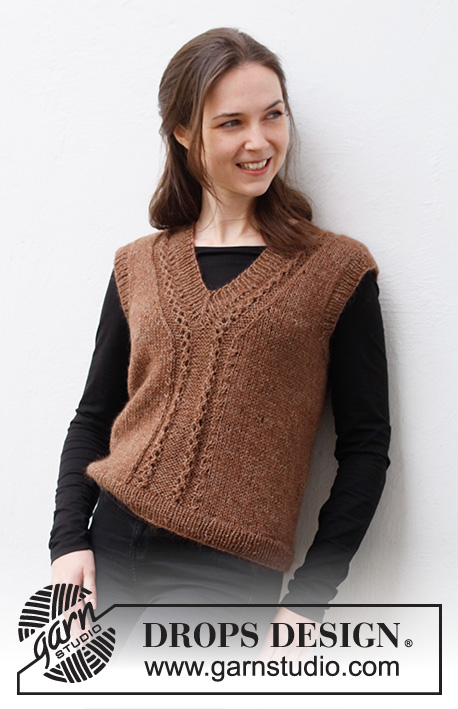
Knitted vest / slipover in DROPS Flora and DROPS Kid-Silk. Sizes S - XXXL.
DROPS 216-36 |
||||||||||||||||||||||
|
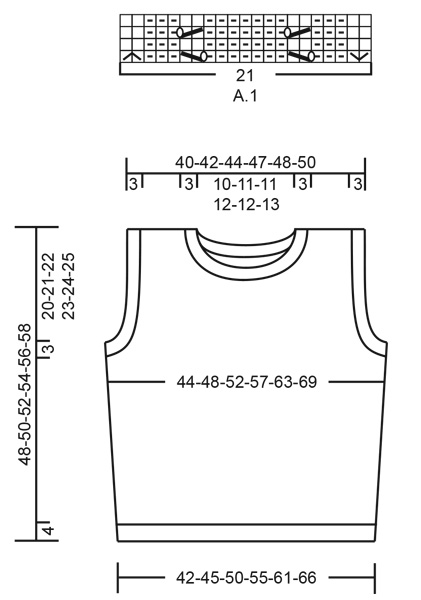
------------------------------------------------------- EXPLANATIONS FOR THE PATTERN: ------------------------------------------------------- PATTERN: See diagram A.1. The diagram shows all rows from the right side. DECREASE TIP (evenly spaced): To work out how to decrease evenly, count the total number of stitches on needle (e.g. 170 stitches) and divide by number of decreases to be made (e.g. 28) = 6.1. In this example decrease by knitting each 5th and 6th stitch together. INCREASE TIP (for sides of body): Work until there are 2 stitches left before the marker thread, make 1 yarn over, knit 4 (marker thread sits between these 4 stitches) make 1 yarn over (= 2 stitches increased). On the next round knit the yarn overs twisted to avoid holes. Then work the new stitches in stocking stitch. CASTING-OFF TIP: To avoid the cast-off edge being tight you can cast off with a larger size needle. If the edge is still tight, make 1 yarn over after approx. each 4th stitch at the same time as casting off; the yarn overs are cast off as normal stitches. ------------------------------------------------------- START THE PIECE HERE: ------------------------------------------------------- VEST – SHORT OVERVIEW OF THE PIECE: The piece is worked in the round with circular needle bottom up, as far as the armholes, after which the front and back pieces are finished separately, back and forth. Ribbed edges are worked around the neck and armholes. BODY: Cast on 170-184-204-224-248-272 stitches with circular needle size 5 mm and 1 strand Flora and 1 strand Kid-Silk (= 2 strands). Change to circular needle size 4 mm and knit 1 round. Then work rib in the round (= knit 1, purl 1) for 4 cm. Change back to circular needle size 5 mm and knit 1 round where you decrease 28-30-34-38-42-46 stitches evenly spaced – read DECREASE TIP = 142-154-170-186-206-226 stitches. Insert 1 marker thread at the beginning of the round and 1 marker thread after 71-77-85-93-103-113 stitches (= sides of body). Allow the threads to follow your work onwards; they will be used when increasing in the sides. Work 25-28-32-36-41-46 stitches in stocking stitch, A.1 (= 21 stitches mid front) and stocking stitch to the end of the round. Continue this pattern. REMEMBER THE KNITTING TENSION! When the piece measures 9-9-10-10-11-11 cm, increase 1 stitch on each side of both marker threads – read INCREASE TIP (= 4 stitches increased). Repeat this increase when the piece measures 18-18-20-20-22-22 cm = 150-162-178-194-214-234 stitches. When the piece measures 25-26-27-28-29-30 cm, cast off for the armholes as follows: Start 3 stitches before the marker thread at the beginning of the round and cast off 6 stitches, work as before until there are 3 stitches left before the next marker thread and cast off 6 stitches. Work as before to end of round. Back and front pieces are finished separately. BACK PIECE: = 69-75-83-91-101-111 stitches. Work stocking stitch back and forth and cast off for the armholes at the beginning of each row as follows: Cast off 3 stitches 0-0-0-0-1-1 time, 2 stitches 1-2-3-4-4-5 times and 1 stitch 4-3-3-3-4-5 times = 57-61-65-69-71-75 stitches left. Continue working until the piece measures 45-47-49-51-53-55 cm. On the next row cast off the middle 23-25-25-27-27-29 stitches for the neck and each shoulder is finished separately. Work stocking stitch and cast off 2 stitches on the next row from the neck = 15-16-18-19-20-21 stitches left on shoulder. Continue working until the piece measures 48-50-52-54-56-58 cm. Cast off a little loosely. Work the other shoulder in the same way. FRONT PIECE: = 69-75-83-91-101-111 stitches. Work stocking stitch and A.1 back and forth and cast off for the armholes at the beginning of each row as follows: Cast off 3 stitches 0-0-0-0-1-1 time, 2 stitches 1-2-3-4-4-5 times and 1 stitch 4-3-3-3-4-5 times. AT THE SAME TIME when the piece measures 37-38-39-40-41-42 cm, place the middle 7-9-9-11-11-13 stitches on 1 thread for the neck and each shoulder is finished separately. Work stocking stitch and pattern as before and cast off at the beginning of each row from the neck as follows: Cast off 3 stitches 1 time, 2 stitches 2 times and 1 stitch 3 times = 15-16-18-19-20-21 stitches left on the shoulder. Continue working until the piece measures 48-50-52-54-56-58 cm. Cast off a little loosely. Work the other shoulder in the same way. ASSEMBLY: Sew the shoulder seams inside the cast-off edge. SLEEVE EDGE: Starting from the right side at the bottom of the armhole, knit up approx. 92 to 114 stitches inside the 1 edge stitch around the armhole using short circular needle size 4 mm and 1 strand of each quality (the number of stitches should be divisible by 2). Work rib in the round (= knit 1, purl 1) for 3 cm. Loosely cast off with knit over knit and purl over purl – read CASTING-OFF TIP! Work the other sleeve edge in the same way. NECK: Start from the right side at one of the shoulder seams and knit up approx. 84 to 106 stitches around the neck (including the stitches on the thread mid front), using short circular needle size 4 mm and 1 strand of each quality (the number of stitches should be divisible by 2). Work rib in the round (= knit 1, purl 1) for 3 cm. Loosely cast off with knit over knit and purl over purl – remember CASTING-OFF TIP! |
||||||||||||||||||||||
Diagram explanations |
||||||||||||||||||||||
|
||||||||||||||||||||||
|
||||||||||||||||||||||
|
Have you made this or any other of our designs? Tag your pictures in social media with #dropsdesign so we can see them! Do you need help with this pattern?You'll find tutorial videos, a Comments/Questions area and more by visiting the pattern on garnstudio.com. © 1982-2024 DROPS Design A/S. We reserve all rights. This document, including all its sub-sections, has copyrights. Read more about what you can do with our patterns at the bottom of each pattern on our site. |
||||||||||||||||||||||


With over 40 years in knitting and crochet design, DROPS Design offers one of the most extensive collections of free patterns on the internet - translated to 17 languages. As of today we count 304 catalogues and 11422 patterns - 11422 of which are translated into English (UK/cm).
We work hard to bring you the best knitting and crochet have to offer, inspiration and advice as well as great quality yarns at incredible prices! Would you like to use our patterns for other than personal use? You can read what you are allowed to do in the Copyright text at the bottom of all our patterns. Happy crafting!
Comments / Questions (18)
Hey! Wat is afkanten met recht over recht en averechts over averechts? Dit moet je doen na de boord.
15.11.2023 - 14:17DROPS Design answered:
Dag Suzanne,
Als je afkant haal je steeds de voorlaatste steek over de laatst gebreide steek en je breit de steken in boordsteek dus averecht waar averecht gebreid was en recht waar recht gebreid was.
18.11.2023 - 15:05Kan ik eerst de voorpand maken inplaatsvan de acherkant? Ik heb garen met kleurverloop en als ik de voorkant eerst doe gaat het kleurverloop mooier.
02.11.2023 - 17:44DROPS Design answered:
Dag Suzanne,
Jazeker kan dat, geen probleem. Indien je de panden los van elkaar heen en weer wilt breien, kun je de instructie lezen om een patroon aan te passen om op rechte naalden te breien. Deze vind je hier.
05.11.2023 - 19:43Het gaat over maat M. Ik ben op het punt dat ik de eerste keer afgekant heb voor de armsgaten. Nu wordt het voor en achterpand apart verder gebreid. Dit begrijp ik, maar er staat bij het afkanten voor mijn maat 0 keer 3 steken afkanten. Mijn vraag is of ik deze toeren wel moet breien (maar zonder afkanten of dat ik deze over moet slaan en gelijk bij de volgende (2 keer 2 steken afkanten) moet beginnen.
04.01.2023 - 17:03DROPS Design answered:
Dag Ellen,
Je kunt gelijk verder gaan met 2 steken afkanten, dus inderdaad, deze naald waar 0 staat voor jouw maat, over slaan.
04.01.2023 - 20:48Pourquoi ne montrez-vous pas les explications plus complexes (comme une torsade) en tricotant à l'anglaise? Ne pourriez-vous pas intégrer les deux méthodes dans la même vidéo ? Merci d'avance pour votre reponse. Cordialement.
31.03.2022 - 23:49DROPS Design answered:
Bonjour Mme Pelletier, en Scandinavie, on tricote avec le fil dans la main gauche, raison pour laquelle les vidéos sont toutes filmées ainsi, toutefois, c'est la même technique quelle que soit la main où vous avez le fil, suivez les mailles et le fil sur/autour des mailles pour comprendre comment faire - retrouvez dans les vidéos de ce modèle 2 façons différentes de tricoter 1 m end et 3 de tricoter 1 m env. Bon tricot!
01.04.2022 - 08:05Et tip til diagram A: Der kan opstå tvivl i forhold til, om der er pinde imellem mønsterangivelse hvor der blot strikkes ret. Det fremgår ikke i beskrivelse af diagram. Det som sådan i orden med mig, jeg er en erfaren strikker, men jeg vil bruge mindre energi p å at forstå opskriften ved dette tip: skriv i kanten af diagrammet 12345 osv hvis der er mønster på hver mønsterpind. Hvis der er mønster på hver anden pind, så skriv : 1357 osv, det vil gøre opskriften mete forståelig.
28.12.2021 - 11:20Hej! Jag vill sticka denna väst i en melkangrå nyans. Vilka nyanser i Drops Flora och Drops Kid-Silk blr jag kombinera? /Cathrine
27.02.2021 - 21:44DROPS Design answered:
Hej Cathrine, du kan bruge både DROPS Flora 03 lysegrå og 04 mellemgrå sammen med DROPS Kid-Silk 10 grå :)
01.03.2021 - 15:04Hallo, kan dit patroon ook met rechte breinaalden worden gebreid in plaats van rondbreinaalden?
25.02.2021 - 15:54DROPS Design answered:
Dag Carla,
Ja, dat zou kunnen bij dit patroon. Om een patroon aan te passen om op rechte naalden te breien hebben we een instructie gemaakt. Deze vind je hier.
26.02.2021 - 11:44Hvor mye garn trenger jeg i Drops Big Merino str M? Klarer ikke å få garnkalkulatoren til å skifte fra 2 tråder til én tråd.
14.02.2021 - 20:02DROPS Design answered:
Hei Laila. I DROPS Flora trenger du 150 gram = 3 nøster. Ett nøste = 210 meter, 210 x 3 = 630 meter garn. Du trenger samme lengde meter i DROPS Big Merino, og 1 nøste Big Merino er 75 meter, så da trenger du 450 gram/9 nøster, 9 x 75 m = 675 meter Big Merino. God Fornøyelse!
15.02.2021 - 14:44Hvorfor står der man skal bruge 3 ngl flora og kun 2 kid silk når løbelængden er det samme på begge garner
07.02.2021 - 16:44In the pattern for the BACK Piece, the wording is confusing. To get from 75 to 61 sts, I have to decrease 14 sts. If I only decrease at the beginning of each row, I only decrease 7 sts total. Or do you decrease 2 times on each side (4 times total) for example? Thank you
05.02.2021 - 16:59DROPS Design answered:
Hi Verity! You have to cast off for the armholes at the beginning of each row (from the right side and from the wrong side of work) as follows: Cast off 2 stitches 2 times and 1 stitch 3 times = 61 stitches left. There are 7 stitches decreased from each side of your work and in total 14 stitches decreased. Happy knitting!
05.02.2021 - 18:03