
Popular categories
Looking for a yarn?


Comments / Questions (15)
![]() Hannah Hope wrote:
Hannah Hope wrote:
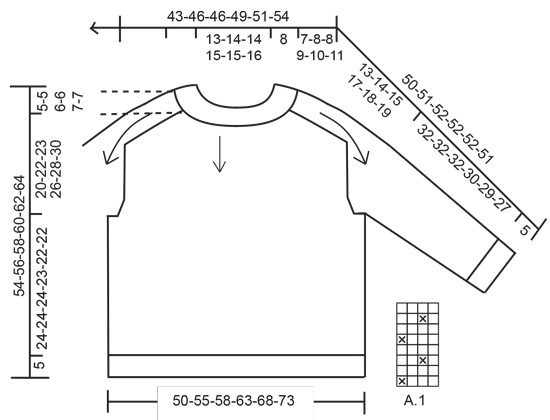
Where is the diagram A1? Many thanks
04.03.2023 - 11:08DROPS Design answered:
Dear Hannan, diagram A.1 you can find next to the first sketch. Happy knitting!
05.03.2023 - 09:44
![]() Yvonne wrote:
Yvonne wrote:
Hat dieser Pullover wirklich die Farbe 27 - Seegrün? Die Farbe 27 Seegrün erscheint viel heller, als die Farbe des Pullis im Bild. Wenn ich das Bild mit der Farbauswahl vergleiche, scheint es eher die Farbe 21 - Meerblau zu sein. Allerdings fehlen auf den Farbaufnahmen der Farbe 21-Meerblau die Rosa-Türkis-farbenen Dots im Garn. Ich möchte den Pulli gerne mit der Farbe stricken, die auf den Bildern ist, sie ist wunderschön.
20.12.2022 - 23:55DROPS Design answered:
Liebe Yvonne, dieser Pullover wird mit der Farbe 27 gestrickt - die Farben können je nach Bildschirmeinstellungen unterschiedlich aussehen ebenso können die Farben je nach Farbbad leichte Unterschiede ausweisen. Gerne wird Ihnen aber Ihr DROPS Händler die beste passende Farbe (auch per Telefon oder per E-Mail) empfehlen. Viel Spaß beim stricken!
21.12.2022 - 08:13
![]() Eugenia wrote:
Eugenia wrote:
Hello! I am size S, so 76 sts, increases 22 and insert marker 16/16/32/16/18. What am I doing wrong? Have a good day!
27.12.2021 - 18:45DROPS Design answered:
Hi Eugenia, it should be 16/1/16/32/1/16/16 = 98 stitches (there is 'work first stitch of A.1' twice). Happy knitting!
28.12.2021 - 09:21
![]() Carmela Anker Schafer wrote:
Carmela Anker Schafer wrote:
Sie können meinen Eintrag löschen. Ich habe etwas übersehen. Entschuldigung!
01.12.2021 - 20:11
![]() Carmela wrote:
Carmela wrote:
Liebes Drops-Team Ich frage mich, ob bei der Passe die erste Vorgabe nicht angepasst werden müsste: A.1 (= 4 Maschen) über 16-16-16-20-20-20 Maschen stricken (= 4-4-4-5-5-5 x in der Breite) A.1 (= 4 Maschen) über 16-16-20-20-20-20 Maschen stricken (= 4-4-5-5-5-5 x in der Breite) Grösse M (dritte Zahl). Die Gesamtzahl von 114 Maschen würde dann stimmen und die Verteilung der Maschen auf Schultern, Rücken- und Vorderteil würde stimmen. Danke!
01.12.2021 - 13:24DROPS Design answered:
Liebe Carmela, am Anfang der Runde stricken Sie 17 Maschen A.1 (= 4 x in der Breite + die 1. Masche) und am Ende der Runde stricken Sie 20 M A.1 (= 5 x in der Breite), so haben Sie genauso viele Maschen A.1 beim Rückenteil (= 16+1+20= 37 ) als beim Vorderteil (= 36+1=37) - und bei den Ärmeln sind es je 20 Maschen = 17+20+37+20+20=114 M. Viel Spaß beim stricken!
02.12.2021 - 08:42
![]() Riikka wrote:
Riikka wrote:
Hei, Ohjeen koossa M ensimmäisten lisäysten jälkeen silmukoita pitäisi olla 114. Ohjeen kaarrokkeen merkit tulisi laittaa 16, 20, 36, 20 ja 20 silmukan välein. Jos silmukat laskee yhteen, tästä tulee 112 silmukkaa. Onko ohjeen silmukkamäärät laskettu oikein?
10.10.2021 - 21:25DROPS Design answered:
Hei, kun olet neulonut 16 silmukalla piirroksen A.1 mallineuletta, piirroksen A.1 ensimmäinen silmukka neulotaan vielä kerran. Tämän jälkeen kiinnität 1.merkin työhön. Sama pätee ennen kuin kiinnität 3.merkin työhön. Eli kun olet neulonut 36 silmukalla mallineuletta, neulot piirroksen A.1 ensimmäisen silmukan vielä kerran.
21.10.2021 - 17:53
![]() Antje wrote:
Antje wrote:
Danke, aber könnten Sie mir bitte sagen, wie das Muster heisst (deutsch oder englisch, both fine).
22.02.2021 - 08:39DROPS Design answered:
Liebe Antje, sorry, keine Ahnung, wie dieses Muster heisst. Viel Spaß beim stricken!
22.02.2021 - 09:48
![]() Antje wrote:
Antje wrote:
Hallo, wie heißt das Muster auf der Vorder- und Rückseite? gibt es dazu irgendwo eine einzelne Beschreibung? Vielen Dank!
20.02.2021 - 16:18DROPS Design answered:
Liebe Antje, das Muster auf der Vorder- und Rückenteil wird wie beim Diagram A.1 gestrickt - das Diagram wird über 4 Maschen und 8 Reihen - siehe rechts von der Maßskizze. Hier lesen Sie mehr über Diagramme. Viel Spaß beim stricken!
22.02.2021 - 08:04
![]() Caroline De Wever wrote:
Caroline De Wever wrote:
Bij verdeling lijf en mouwen kom ik voor een maat L respectievelijk op 198 steken (41 basis + (2 x 18 meerderingen) + (2 x 5 meerderingen) + (2 x 12 steken opzetten) en 54 steken voor één mouw. Dus twee meer voor de mouwen en twee minder voor het lijf. Wat doe ik verkeerd? Dank voor uw antwoord
19.02.2021 - 12:05
![]() Alice wrote:
Alice wrote:
Hej, vad menas med att a1 repeteras på höjden? Nu har jag varje varv stickat a1 upprepat på bredden men får inte rätt mönster på tröjan. Mvh Alice
21.11.2020 - 20:57
|
|||||||||||||||||||
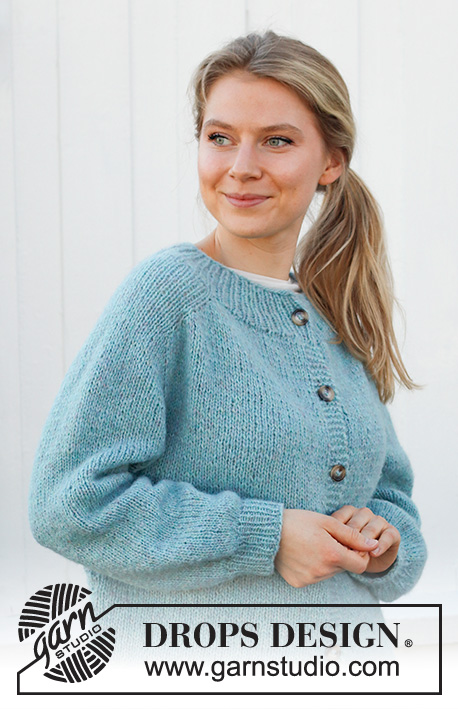
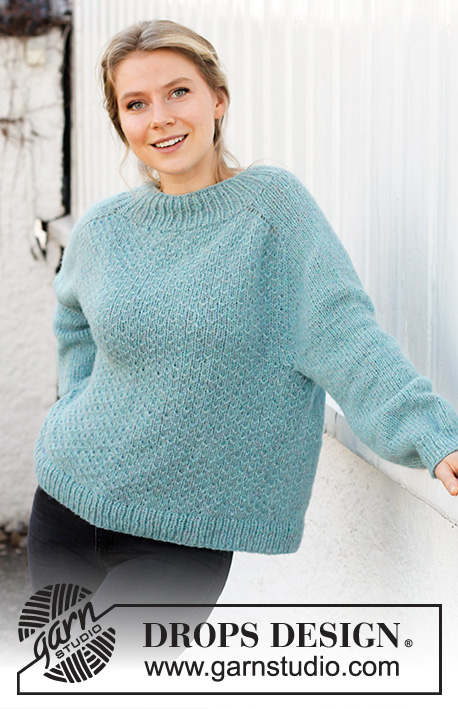
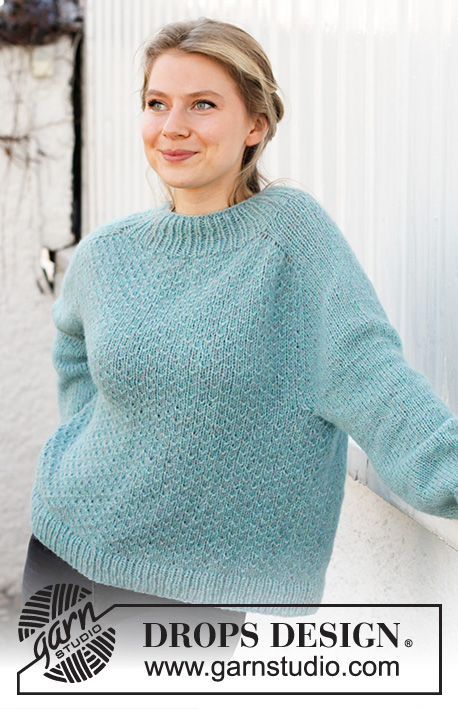
Frozen Lake#frozenlakesweater |
|||||||||||||||||||
 |
 |
||||||||||||||||||
Knitted jumper with shoulder increase for saddle shoulder in DROPS Air. Worked top down. Size XS–XXL.
DROPS 215-29 |
|||||||||||||||||||
|
------------------------------------------------------- EXPLANATION FOR THE PATTERN: ------------------------------------------------------- PATTERN: See diagram A.1. INCREASE/DECREASE TIP (evenly spaced): To calculate how to increase/decrease evenly, use the total number of stitches on row (e.g. 72 stitches) and divide stitches by number of increases/decreases to be done (e.g. 26) = 2.76. In this example increase by making 1 yarn over after approx. every 3rd stitch. On next round work yarn overs twisted to avoid holes. To decrease in this example knit approx. every 2nd and 3rd stitch together. INCREASE TIP (applies to increase for saddle shoulder increase): BEFORE MARKER: The new stitch will be twisted, leaning towards the right. Use left needle to pick up strand between 2 stitches from the row below, pick up strand from behind and knit stitch in front loop. AFTER MARKER: The new stitch will be twisted, leaning towards the left. Use left needle to pick up strand between 2 stitches from the row below, pick up strand from the front and knit stitch in back loop. DECREASE TIP (applies to sleeves): Decrease 1 stitch on each side of marker as follows: Work until 3 stitches remain before marker, knit 2 together, knit 2 (marker is between these stitches), slip 1 stitch knitwise, knit 1, pass slipped stitch over stitch worked. CAST-OFF TIP: To avoid a tight cast-off edge you may use a larger needle size. If this also is too tight, work a 1 yarn over after approx. every 4th stitch while casting off (cast off yarn overs as regular stitches). ------------------------------------------------------- START THE PIECE HERE: ------------------------------------------------------- JUMPER - SHORT OVERVIEW OF THE PIECE: Work neck edge and yoke in the round on circular needle from mid back, top down. Increase stitches out to saddle shoulder, then increase stitches for sleeves. Now divide yoke for body and sleeves. Body is worked in the round on circular needle, top down. Work sleeves in the round on double pointed needles, top down. NECK EDGE: Cast on 72-76-80-84-90-94 stitches on circular needle size 4.5 mm with Air. Knit 1 round. Then work rib = knit 1/purl 1. Continue rib like this for 8 cm. When rib is done, knit 1 round while increasing 26-22-34-38-36-40 stitches evenly - read DECREASE/INCREASE TIP = 98-98-114-122-126-134 stitches. Work 1 round in stocking stitch. Switch to circular needle size 5.5 mm. Insert 1 marker at the beginning of round (= mid back), measure yoke from this marker! YOKE: Increase stitches and work pattern as follows: Work next round and insert 4 markers between stitches as follows: Work A.1 (= 4 stitches) over 16-16-16-20-20-20 stitches (= 4-4-4-5-5-5 times in width), work first stitch of A.1 (this is done to make the pattern the same in both sides = approx. half back piece), insert 1st marker, 16-16-20-20-22-22 stitches in stocking stitch, insert 2nd marker (= shoulder stitches), A.1 over 32-32-36-40-40-44 stitches (= 8-8-9-10-10-11 times in width), work first stitch in A.1 (= front piece), insert 3rd marker, 16-16-20-20-22-22 stitches in stocking stitch, insert 4th marker (= shoulder stitch), A.1 over 16-16-20-20-20-24 stitches (= 4-4-5-5-5-6 times in width = approx. half back piece). SADDLE SHOULDER INCREASE: On next round increase for saddle shoulder as follows: Increase 1 stitch BEFORE 1st and 3rd marker, and increase 1 stitch AFTER 2nd and 4th marker – read INCREASE TIP (= 4 stitches increased). I.e. there are increases on back piece and front piece, number of shoulder stitches remain the same. REMEMBER THE KNITTING TENSION! Increase like this every round 14-16-16-18-20-22 times in total = 154-162-178-194-206-222 stitches. Work the increased stitches in pattern A.1 and repeat A.1 vertically. Piece now measures 7-8-8-9-10-11 cm from marker SLEEVE INCREASE: Continue in stocking stitch over shoulder stitches and pattern A.1 over front piece/back piece. On next row increase for sleeves as follows: Increase 1 stitch AFTER 1st and 3rd marker, and increase 1 stitch BEFORE 2nd and 4th marker (= 4 stitches increased). I.e. increase in shoulder stitches, number of stitches in front piece and back piece remains the same. Work the increased stitches in stocking stitch. Increase like this every other round 9-10-9-12-12-13 times in total = 190-202-214-242-254-274 stitches. Piece measures approx. 16-18-17-21-22-24 cm. Continue in stocking stitch and with pattern as before until piece measures 17-18-18-21-22-24 cm. YOKE INCREASE: On next round increase 1 stitch in each side of every marker as follows: Work until 1 stitch remains before 1st and 3rd marker, increase 1 stitch BEFORE marker, work 1 stitch, pass marker on to right needle and increase 1 stitch AFTER marker. Work until 2nd and 4th marker, increase 1 stitch BEFORE marker, pass marker on to right needle, work 1 stitch and increase 1 stitch AFTER marker (= 8 stitches increased in total). Increase like this every other round 3-4-5-5-6-6 times in total = 214-234-254-282-302-322 stitches. When increases are done, piece measures approx. 20-22-23-26-28-30 cm from marker in the neck. Now divide the piece for body and sleeves on next round as follows: Work the first 32-36-40-44-48-52 stitches as before (= half back piece), slip the next 39-41-47-53-55-57 stitches on a stitch holder for sleeve, cast on 12 new stitches on row (= in the side under sleeve), work 68-76-80-88-96-104 stitches (= front piece), slip the next 39-41-47-53-55-57 stitches on a stitch holder for sleeve, cast on 12 new stitches on row (= in the side under sleeve) and work the last 36-40-40-44-48-52 stitches as before (= half back piece). Then finish body and sleeves separately. NOW MEASURE PIECE FROM HERE! BODY: = 160-176-184-200-216-232 stitches. Continue pattern as before, adjust so that pattern fits vertically. Work pattern over stitches that were cast on under sleeve. Now repeat A.1 40-44-46-50-54-58 times in width. When piece measures 24-24-24-23-22-22 cm from division, increase 16 stitches evenly on next round= 176-192-200-216-232-248 stitches. Switch to circular needle size 4.5 mm. Then work rib = knit 1/purl 1. When rib measures 5 cm, cast off with knit over knit and purl over purl - read CAST-OFF TIP. Jumper measures approx. 54-56-58-60-62-64 cm from shoulder and down. SLEEVES: Slip the 39-41-47-53-55-57 stitches from stitch holder in one side of piece on double pointed needles size 5.5 mm. Pick up 1 stitch in each of the 12 new stitches under sleeve = 51-53-59-65-67-69 stitches. Insert 1 marker in the middle of the new stitches (= 6 new stitches on each side of marker). Work in stocking stitch in the round. When piece measures 3 cm from division, decrease 0-0-1-1-1-1 stitch on each side of marker, read DECREASE TIP. Decrease like this every 0-0-10-7-6-4 cm 0-0-2-4-4-5 times in total = 51-53-55-57-59-59 stitches. Work until sleeve measures 32-32-32-30-29-27 cm from division. Knit 1 round while decreasing 17 stitches evenly = 34-36-38-40-42-42 stitches. Switch to double pointed needles size 4.5 mm. Work rib (= knit 1/purl 1) in the round for 5 cm. Cast off with knit over knit and purl over purl - remember CAST-OFF TIP. Work the other sleeve the same way. |
|||||||||||||||||||
Diagram explanations |
|||||||||||||||||||
|
|||||||||||||||||||
 |
|||||||||||||||||||
 |
|||||||||||||||||||
Have you finished this pattern?Tag your pictures with #dropspattern #frozenlakesweater or submit them to the #dropsfan gallery. Do you need help with this pattern?You'll find 28 tutorial videos, a Comments/Questions area and more by visiting the pattern on garnstudio.com. © 1982-2026 DROPS Design A/S. We reserve all rights. This document, including all its sub-sections, has copyrights. Read more about what you can do with our patterns at the bottom of each pattern on our site. |
|||||||||||||||||||


With over 40 years in knitting and crochet design, DROPS Design offers one of the most extensive collections of free patterns on the internet - translated to 17 languages. As of today we count 324 catalogues and 12290 patterns translated into English (UK/cm). 12290
We work hard to bring you the best knitting and crochet have to offer, inspiration and advice as well as great quality yarns at incredible prices! Would you like to use our patterns for other than personal use? You can read what you are allowed to do in the Copyright text at the bottom of all our patterns. Happy crafting!
Post a comment to pattern DROPS 215-29
We would love to hear what you have to say about this pattern!
If you want to leave a question, please make sure you select the correct category in the form below, to speed up the answering process. Required fields are marked *.