
Popular categories
Looking for a yarn?


Comments / Questions (35)
![]() Mireille GABORIT wrote:
Mireille GABORIT wrote:
Merci pour la reponse à ma question sur les manches Concernant les devants : on part de 18m auxquelles on rajoute 2x12 m, on a donc 47m. On y intègre les 4 m de de points mousse, on arrive a 51m. Pourquoi laisser 54 m pour commencer le corps ? Je dois louper quelque chose. Merci d avance.
16.02.2022 - 15:28DROPS Design answered:
Bonjour Mme Gaborit, une partie des mailles de A.1 sont attribués aux devants et au dos - mais en M je trouve un résultat différent: on commence par 23 mailles pour le devant en taille M (22 en taille S), soit 19 m jersey + les 4 m devant. Bon tricot!
16.02.2022 - 16:57
![]() Mireille GABORIT wrote:
Mireille GABORIT wrote:
Bonjour, je n arrive pas au nombre de mailles apres les augmentations des manches. 18 m epaule + 2x 16 = 50 pas 48m pour la taille M.. Pour arriver à 48 m il ne faut faire que 15 augmentations. Du coup que dois je faire ?
15.02.2022 - 18:11DROPS Design answered:
Bonjour Mme Gaborit, vous avez tout juste, quand les augmentations des manches sont faites en taille M, vous avez bien 50 mailles pour chacune des manches, entre les marqueurs. Vous décalez ensuite ces marqueurs pour les mettre dans la 1ère et la dernière maille de chaque manche vous aurez ainsi: 1 m avec 1 marqueur, 48 mailles, 1 m avec 1 marqueur (= vos 50 mailles sont toujours là). Bon tricot!
16.02.2022 - 10:50
![]() Martina wrote:
Martina wrote:
Under Assembly, when the pattern says “ it is important the seam is elastic”, does that mean to use elastic thread to close the neck? Thank you!
15.10.2021 - 13:11DROPS Design answered:
Dear Martina, you should just cast off loosely and sew the cast off edge loosely on the inside of the jacket, this video shows how to sew such a folded neck edge on the inside of a jumper, it might help you. Happy knitting!
15.10.2021 - 13:29
![]() Segalen wrote:
Segalen wrote:
Bonjour. Je suis arrivée au bas de l ouvrage. Je bloque sur les augmentations. Tricoter un rang endroit sur l endroit et augmenter. 5 mailles pour 10cm et tricoter un rang envers sur l envers en augmentant 50 mailles pour taille s. Si on les fait sur l endroit on ne les recommence pas sur l envers. .
27.09.2021 - 16:23DROPS Design answered:
Bonjour Mme Segalen, toute cette partie n'avait pas lieu d'être là et a été supprimée, merci pour votre retour; autrement dit, en taille S, vous tricotez jusqu'à ce que l'ouvrage mesure 23 cm et tricotez 1 rang envers sur l'envers en augmentant 50 mailles à intervalles réguliers. Bon tricot!
27.09.2021 - 17:04
![]() Moeniesch wrote:
Moeniesch wrote:
Is iT possible to have this pattern in Dutch? Thank you in advance. Moeniesch
12.05.2021 - 00:17DROPS Design answered:
Dear Moeniesch, you can change the languages in the drop down menue just below the picture. Happy Knitting!
12.05.2021 - 00:35
![]() Viola wrote:
Viola wrote:
Non capisco come fare gli aumenti per lo sprone. Sono sulle maniche o sulle sulle parti frontale e posteriore?
28.03.2021 - 21:28DROPS Design answered:
Buonasera Viola, per gli aumenti sullo sprone: per la prima parte si aumenta sul davanti e sul dietro, in seguito anche sulle maniche. Buon lavoro!
28.03.2021 - 21:58
![]() HOURDEBAIGT wrote:
HOURDEBAIGT wrote:
Bonjour. Je fais ce modèle en M et j’en suis au Augmentations empiècement. Je ne comprends pas où il faut déplacer les marqueurs. Par rapport au diagramme est ce juste après et avant les 4 mailles au point mousse? Merci.
16.02.2021 - 09:46DROPS Design answered:
Bonjour Mme Hourdebaigt, placez vos marqueurs dans la maille avant et après les 48 mailles des manches = autrement dit, dans la maille juste avant et celle juste après les mailles des manches (après les augmentations des manches, vous devez avoir 48 mailles pour les manches, ces mailles doivent être celles entre les mailles avec les marqueurs). Bon tricot!
16.02.2021 - 09:54
![]() Machteld wrote:
Machteld wrote:
Ik ben nu bij het punt dat ik de mouwsteken op een hulpnaald moet zetten. Ik heb bij het voorpnad waar debknopen komen 41 steken, bij het andere voorpand 51 steken. Klopt dat of heb ik verkeerd gemeerderd? Het achterpand heeft bij mij 92 steken averecht en aan weerzijden totaal 8 steken recht. Totaal kom ik wel op 358 steken. Voordat ik alles weer ga uithalen, wil ik dit checken.
07.02.2021 - 15:40DROPS Design answered:
Dag Machteld,
Beide voorpanden moet precies hetzelfde aantal steken hebben. Bij het invoegen van de markeerdraden staat dit ook zo aangegeven; je houd na het plaatsen van de laatste markeerdraad evenveel steken over als vanaf het begin tot de eerste markeerdraad.
12.02.2021 - 12:33
![]() MJ wrote:
MJ wrote:
Thank you and the rest of the Drops team for correcting this pattern. I sincerely appreciate everyone's effort. Have a great day... KNITTING!
27.09.2020 - 02:02
![]() Brigitte Schmidhauser wrote:
Brigitte Schmidhauser wrote:
Ich lese in ihren Strickanleitungen immer wieder wenn die Maschenprobe mehr als 10 cm ergibt sollte man zu dickeren Nadeln wechseln. Meiner Meinung nach muss es genau umgekehrt sein. Ich habe jedenfalls die Erfahrung gemacht, dass bei einer Maschenprobe mehr als 10 cm Resultat sind eine kleinere Nadelgröße zu verwenden ist. Ich bin eine geübte Strickerin und stricke sehr viel. Vielleicht können sie das selber noch einmal überprüfen. mfg. Brigitte
26.09.2020 - 19:39
|
||||||||||||||||||||||
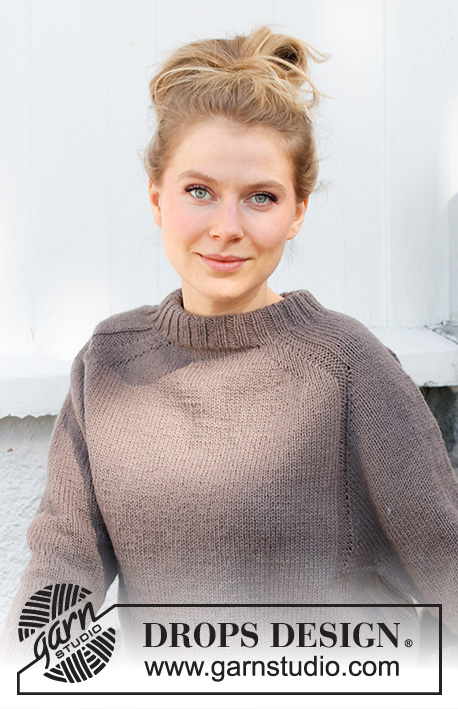
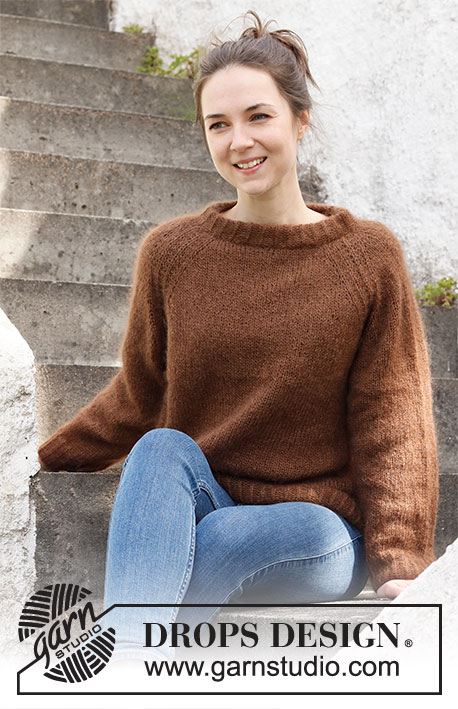
Country Muse Cardigan#countrymusecardigan |
||||||||||||||||||||||
 |
 |
|||||||||||||||||||||
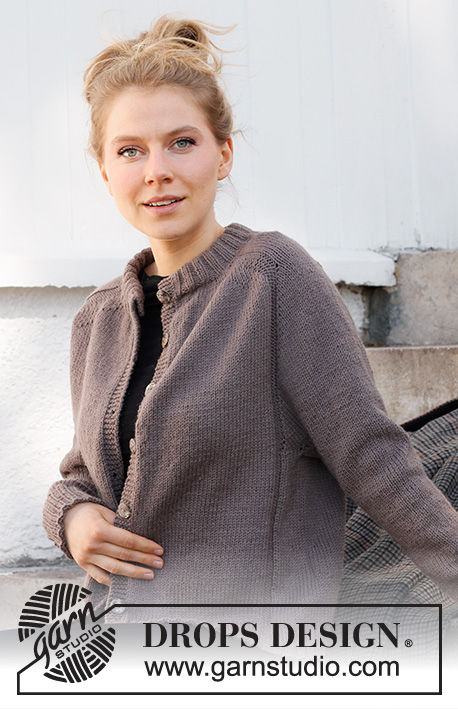
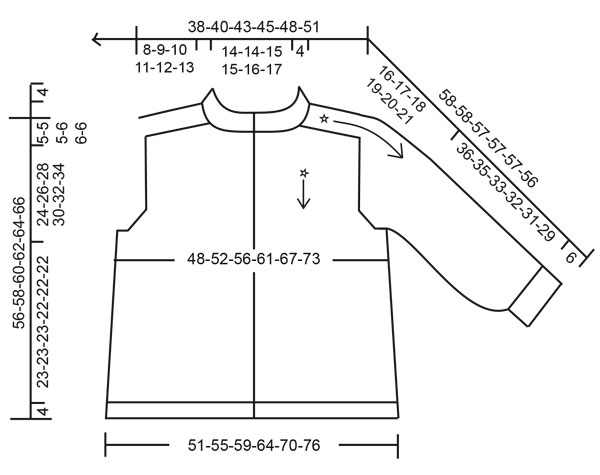
Knitted jacket in DROPS Lima. The piece is worked top down, with double neck and saddle shoulders. Sizes S - XXXL.
DROPS 216-39 |
||||||||||||||||||||||
|
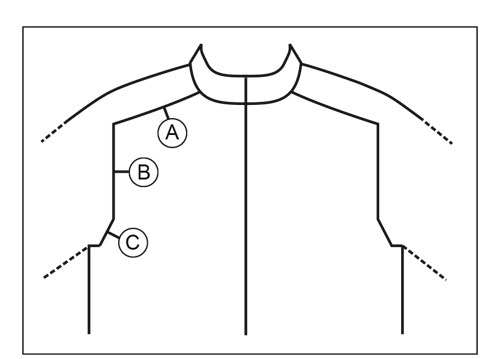
------------------------------------------------------- EXPLANATIONS FOR THE PATTERN: ------------------------------------------------------- RIDGE/GARTER STITCH (worked back and forth): Knit all rows. 1 ridge in height = Knit 2 rows. PATTERN: See diagram A.1. Choose diagram for your size. The diagram shows all rows in the pattern from the right side. INCREASE/DECREASE TIP (evenly spaced): To work out how to increase/decrease evenly, count the total number of stitches on needle (e.g. 104 stitches), minus the bands (e.g. 10 stitches) and divide the remaining stitches by the number of increases/decreases to be made (e.g. 26) = 3.6. In this example, increase by making 1 yarn over after alternately each 3rd and 4th stitch. On the next row work the yarn overs twisted to avoid holes. When decreasing, knit together alternately each 2nd and 3rd stitch and each 3rd and 4th stitch (approx.). INCREASE TIP-1 (for saddle shoulder increase): All increases are worked from the right side! Increase 2 stitches on each side of the 26-26-26-30-30-30 shoulder stitches by making 1 yarn over as described below. On the next row (wrong side) purl the yarn overs twisted to avoid holes. Then work the new stitches in stocking stitch. NOTE: The number of shoulder-stitches stays the same – the increased stitches become part of the front/back pieces. BEFORE MARKER: Start 4 stitches before the marker, make 1 tight yarn over, work 4 stocking stitches, make 1 tight yarn over (= 2 stitches increased). AFTER MARKER: Make 1 tight yarn over, work 4 stocking stitches, make 1 tight yarn over (= 2 stitches increased). INCREASE TIP-2 (for sleeve increase): All increases are worked from the right side! BEFORE MARKER: Use left needle to pick up strand between 2 stitches from the row below, pick up strand from behind and knit stitch in front loop (= 1 stitch increased) AFTER MARKER: Use left needle to pick up strand between 2 stitches from the row below, pick up strand from the front and knit stitch in back loop (= 1 stitch increased) INCREASE TIP-3 (yoke increase): Start before the marker-stitch, use left needle to pick up strand between 2 stitches from the row below, pick up strand from behind and knit stitch in front loop, work marker-stitch in stocking stitch as before, use left needle to pick up strand between 2 stitches from the row below, pick up strand from the front and knit stitch in back loop (= 1 stitch increased on each side of the marker-stitch). Work the new stitches in stocking stitch. INCREASE TIP-4 (for sides of body): All increases are worked from the right side! Work until there are 3 stitches before the marker thread, make 1 yarn over, work 6 stitches in stocking stitch (the marker thread sits in the middle of these 6 stitches), make 1 yarn over (= 2 stitches increased). On the next row (wrong side) purl the yarn overs twisted to avoid holes. Then work the new stitches in stocking stitch. DECREASE TIP (for sleeves): Start 3 stitches before the marker thread, knit 2 together, knit 2 (the marker thread sits in the middle of these 2 stitches), slip 1 as if to knit, knit 1 and pass the slipped stitch over the knitted stitch (= 2 stitches decreased). BUTTONHOLES: Work buttonholes on the right band (when the garment is worn). Work from the right side when there are 3 stitches left on the row as follows: Make 1 yarn over, knit 2 together and knit 1. On the next row (wrong side), knit the yarn over to leave a hole. The first buttonhole is worked when the rib on the neck measures 2 cm, the next when the neck measures 7 cm. These 2 buttonholes will match when the neck is folded double. Then work the other 6-6-6-7-7-7 buttonholes with approx. 8-8-8½-8-8-8½ cm between each one. KNITTING TIP (for rib at bottom of body): Work rib with knit 2 / purl 2 over all stitches as explained in pattern, and with 5 band stitches in garter stitch in each side towards mid front as before. If you want the 4 purled stitches (seen from right side) from A.1 to continue all the way down in the rib, you must adjust this when increasing stitches evenly before working rib. Make sure to knit 2 stitches on each side of the 4 purled stitches. CASTING-OFF TIP: To avoid the cast-off edge being tight you can cast off with a larger size needle. If the edge is still tight, make 1 yarn over after approx. each 8th stitch at the same time as casting off; the yarn overs are cast off as normal stitches. ------------------------------------------------------- START THE PIECE HERE: ------------------------------------------------------- JACKET – SHORT OVERVIEW OF THE PIECE: The neck and yoke are worked back and forth with circular needle from mid front and top down. Stitches are increased for the saddle shoulders, then for the sleeves and then for yoke. The yoke is divided for body and sleeves and the body continued back and forth. The sleeves are worked in the round with short circular needle/double pointed needles, top down. NECK: Cast on 104-108-112-116-120-124 stitches (including 5 band stitches on each side) with circular needle size 3.5 mm and Lima. Purl 1 row (= wrong side). The next row is worked as follows from the right side: 5 band stitches in GARTER STITCH – read description above, * knit 2, purl 2 *, work from *-* until there are 7 stitches left, knit 2 and 5 band stitches in garter stitch. Continue this rib for 9 cm – remember BUTTONHOLES on the right band – read description above. When the rib is finished, knit 1 row from the right side where you increase 26-26-30-38-38-42 stitches evenly spaced – read INCREASE/DECREASE TIP = 130-134-142-154-158-166 stitches. Purl 1 row from the wrong side (yarn overs purled twisted and bands knitted). Now work yoke as described below: YOKE: Change to circular needle size 4.5 mm. Insert 1 marker after the band at the beginning of the row. The yoke is measured from this marker! In addition insert 4 new markers as described below – these markers are inserted without working the stitches, and each marker is placed between 2 stitches. These markers are used when increasing for saddle shoulder and should be of a different colour to the marker on the neck. Start mid front, count 22-23-25-26-27-29 stitches (= front piece), insert marker 1 before the next stitch, count 26-26-26-30-30-30 stitches (= shoulder), insert marker 2 before the next stitch, count 34-36-40-42-44-48 stitches (= back piece), insert marker 3 before the next stitch, count 26-26-26-30-30-30 stitches (= shoulder), insert marker 4 before the next stitch. There are 22-23-25-26-27-29 stitches left after the last marker. Allow these markers to follow your work onwards; they will be used when increasing. SADDLE SHOULDER-INCREASE: Read the whole section before continuing! The piece is continued with stocking stitch on the front/back pieces, 5 band stitches in garter stitch on each side and with A.1 over the 26-26-26-30-30-30 stitches on each shoulder (between markers 1 and 2 and between markers 3 and 4) – remember BUTTONHOLES on the right band – read description above. AT THE SAME TIME on the first row from the right side, increase 8 STITCHES for the saddle shoulders as follows: Increase 2 stitches BEFORE markers 1 and 3 (i.e. before A.1), and increase 2 stitches AFTER markers 2 and 4 (i.e. after A.1) – read INCREASE TIP-1. Remember there are only increases on front pieces and back piece and number of shoulder stitches remains the same. Continue this pattern and increase like this every 2nd row (i.e. each row from the right side) a total of 10-12-13-14-16-17 times = 210-230-246-266-286-302 stitches. REMEMBER THE KNITTING TENSION! After the last increase, the piece measures approx. 8-9-10-11-12-13 cm from the marker on the neck. Now increase for the sleeves as follows: SLEEVE-INCREASES: Move the 4 markers from saddle shoulder-increase, so they are now on each side of the middle 18-18-18-22-22-22 stitches in A.1 on each shoulders – see arrows in A.1. Continue with stocking stitch, 5 band stitches in garter stitch on each side towards mid front and A.1 over A.1 as before. AT THE SAME TIME on the next row from the right side increase 4 stitches for the sleeves as follows: Increase 1 stitch AFTER markers 1 and 3 and increase 1 stitch BEFORE markers 2 and 4 – read INCREASE TIP-2. Remember there are only increases on sleeves and number of stitches in A.1 is increasing, but number of stitches on front piece and back piece remains the same – the increased stitches are knitted from right side and purled from wrong side. Increase like this every 2nd row (i.e. each row from the right side) a total of 15-16-16-18-19-19 times = 270-294-310-338-362-378 stitches. After the last increase, the piece measures approx. 11-12-12-13-14-14 cm from where the sleeve-increases started. Continue by increasing to a small raglan as described below. YOKE INCREASE: Move the 4 markers from the sleeves, and insert them in the outermost stitches on each side of both sleeves. There are 46-48-48-56-58-58 stitches between the markers on each sleeve. Continue with stocking stitch, 5 band stitches in garter stitch on each side towards mid front and 4 purled stitches (seen from the right side) from A.1 which should continue down the front pieces and back piece as before. AT THE SAME TIME, on the next row from the right side, increase 8 stitches for yoke increase as follows: Increase 1 stitch on each side of the 4 marker-stitches – read INCREASE TIP-3 (= 8 stitches increased). Increase like this every 2nd row (i.e. each row from the right side) a total of 5-5-6-7-7-8 times = 310-334-358-394-418-442 stitches. Continue working without further increases until the piece measures 16-17-18-19-20-21 cm from where the sleeve-increase started after saddle shoulder increase. The piece now measures approx. 24-26-28-30-32-34 cm from the marker by the neck. On the next row divide the yoke for the body and sleeves as follows: Work the first 50-54-57-62-67-72 stitches as before (= front piece), place the next 60-64-70-78-80-82 stitches on 1 thread for the sleeve, cast on 6-6-8-8-10-12 new stitches on the needle (in side under sleeve), work 90-98-104-114-124-134 stitches as before (= back piece), place the next 60-64-70-78-80-82 stitches on 1 thread for the sleeve, cast on 6-6-8-8-10-12 new stitches on the needle (in side under sleeve), work the last 50-54-57-62-67-72 stitches as before (= front piece). Remove all markers. Body and sleeves are finished separately. THE PIECE IS NOW MEASURED FROM HERE! BODY: = 202-218-234-254-278-302 stitches. Insert 1 marker thread 53-57-61-66-72-78 stitches in from each side (= sides of body). There are 96-104-112-122-134-146 stitches between threads on the back piece. Allow the threads to follow your work onwards – they will be used when increasing in the sides. Work stocking stitch back and forth with 5 band stitches in garter stitch on each side and 4 purled stitches (seen from the right side) which continue the line down the front and back pieces as before. When the piece measures 6 cm from the division, increase 1 stitch on each side of both marker threads – read INCREASE TIP-4 (= 4 stitches increased). Increase like this every 6 cm a total of 3 times on each side = 214-230-246-266-290-314 stitches. Continue working until the piece measures 23-23-23-22-22-22 cm from the division. There is approx. 4 cm left to finished length; try the jacket on and work to desired length. Purl 1 row from wrong side (work band stitches in garter stitch) and AT THE SAME TIME increase 50-54-58-66-70-78 stitches evenly spaced – read INCREASE/DECREASE TIP = 264-284-304-332-360-392 stitches. NOTE: Increase to prevent rib from contracting and pulling the piece together. Change to circular needle 3,5 mm. Work next row as follows from right side – read KNITTING TIP: Work 5 band stitches in garter stitch, * knit 2, purl 2 *, work from *-* until there are 7 stitches remaining on needle, knit 2 and finish with 5 band stitches in garter stitch. Continue this rib with garter stitch over garter stitch, knit over knit and purl over purl for 4 cm. Cast off with knit over knit, garter stitch over garter stitch and purl over purl – read CASTING-OFF TIP! The jacket measures approx. 56-58-60-62-64-66 cm from the shoulder down. SLEEVE: Place the 60-64-70-78-80-82 stitches from the thread on the one side of the piece on double pointed needles size 4.5 mm and knit up 1 stitch in each of the 6-6-8-8-10-12 stitches cast on under the sleeve = 66-70-78-86-90-94 stitches. Insert a marker thread in the middle of the 6-6-8-8-10-12 stitches under the sleeve; allow the thread to follow your work onwards; it will be used when decreasing under the sleeve. Start the round at the marker thread and work stocking stitch in the round. When the piece measures 2 cm from the division, decrease 1 stitch on each side of the marker thread – read DECREASE TIP. Decrease like this every 2-2-1½-1-1-1 cm a total of 7-8-11-14-15-16 times = 52-54-56-58-60-62 stitches. Continue working until the sleeve measures 36-35-33-32-31-29 cm from the division. There is approx. 6 cm left to finished length; try the jacket on and work to desired length (NOTE: shorter measurements in larger sizes due to broader shoulders and longer yoke). Knit 1 round where you decrease 4-6-4-6-4-6 stitches evenly spaced = 48-48-52-52-56-56 stitches. Change to double pointed needles size 3.5 mm and work rib (= knit 2, purl 2) for 6 cm. Cast off with knit over knit and purl over purl – remember CASTING-OFF TIP. The sleeve measures approx. 42-41-39-38-37-35 cm from the division. Work the other sleeve in the same way. ASSEMBLY: Fold the neck double to the wrong side. Sew down but, to avoid the neck being tight and rolling outwards, it is important the seam is elastic – make sure the 2 buttonholes on the neck match each other. Sew the openings on each side of the neck with small stitches. Sew the buttons onto the left band. |
||||||||||||||||||||||
Diagram explanations |
||||||||||||||||||||||
|
||||||||||||||||||||||
 |
||||||||||||||||||||||
 |
||||||||||||||||||||||
 |
||||||||||||||||||||||
Have you finished this pattern?Tag your pictures with #dropspattern #countrymusecardigan or submit them to the #dropsfan gallery. Do you need help with this pattern?You'll find 34 tutorial videos, a Comments/Questions area and more by visiting the pattern on garnstudio.com. © 1982-2026 DROPS Design A/S. We reserve all rights. This document, including all its sub-sections, has copyrights. Read more about what you can do with our patterns at the bottom of each pattern on our site. |
||||||||||||||||||||||


With over 40 years in knitting and crochet design, DROPS Design offers one of the most extensive collections of free patterns on the internet - translated to 17 languages. As of today we count 325 catalogues and 12298 patterns translated into English (UK/cm). 12298
We work hard to bring you the best knitting and crochet have to offer, inspiration and advice as well as great quality yarns at incredible prices! Would you like to use our patterns for other than personal use? You can read what you are allowed to do in the Copyright text at the bottom of all our patterns. Happy crafting!
Post a comment to pattern DROPS 216-39
We would love to hear what you have to say about this pattern!
If you want to leave a question, please make sure you select the correct category in the form below, to speed up the answering process. Required fields are marked *.