
Popular categories
Looking for a yarn?


Comments / Questions (50)
![]() Annette wrote:
Annette wrote:
Skall det vara mönster på både fram och bakstycket, förstår inte varför det bara skall ökas på framsidan.
19.10.2023 - 04:47DROPS Design answered:
Hej Anette. Det ska bara vara mönster på framstycket. Eftersom mönstret på framsidan gör att arbetet drar ihop sig där så ökas det maskor på framstycket. Mvh DROPS Design
19.10.2023 - 09:27
![]() Immanuvel Moses wrote:
Immanuvel Moses wrote:
After joining sleeves with body, you mentioned work 2-1-1-0-0-0 like, whats the meaning of that?
20.04.2023 - 15:35DROPS Design answered:
Dear Mr Moses, it's the number of rounds you have to work over all stitches before starting to decrease for raglan; this means in first size work 2 rounds, in 2nd and 3rd size work one round and in the last 3 sizes start decreasing for raglan with first round on yoke. Happy knitting!
20.04.2023 - 16:28
![]() Immanuvel Moses wrote:
Immanuvel Moses wrote:
Which method of cast off should we use for armholes , the six stiches., can you please share the video reference if available
17.04.2023 - 16:31DROPS Design answered:
Dear Mr Moses, in this video we show how to cast off from right side, you can use this technique for casting off the 6 sts for both armholes. Happy knitting!
18.04.2023 - 09:55
![]() Immanuvel Moses wrote:
Immanuvel Moses wrote:
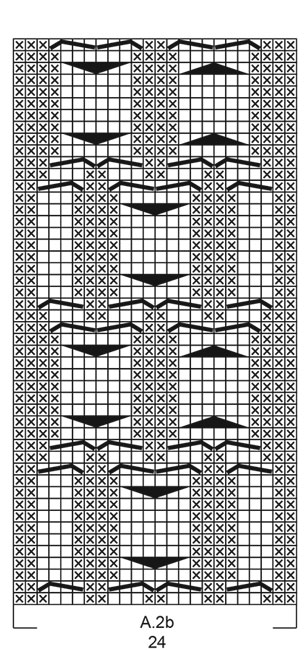
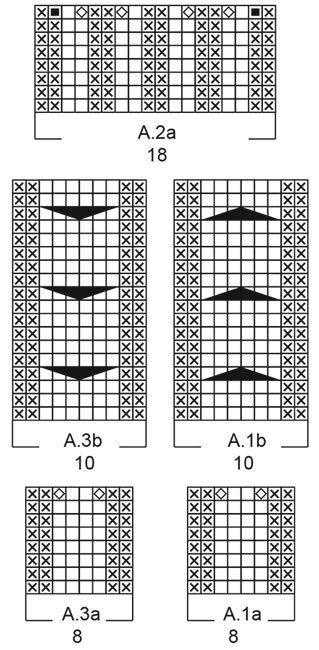
On body starting, A.1b over A.1a , A.2b over a.2a means? First a.1a then a.1b huh? 2. A.2a again has to come after a.2b right?
14.04.2023 - 10:00DROPS Design answered:
Dear Mr Moses, it means that when the 8 rows of A.1a / A.2a / A.3a have been worked, you will now work A.1b / A.2b / A.3b instead of the diagrams with a, you increased some stitches in the last row of each -a diagrams, you can now work the -b diagrams over the -a parts. And you will now repeat the -b diagrams in height (the -a are not worked anymore). Happy knitting!
14.04.2023 - 12:52
![]() Cathy P wrote:
Cathy P wrote:
Bonjour, Merci pour la précédente réponse. J'ai un autre doute sur ceci : vous dites "diminuer 4-4-4-4-4-4 mailles dans les torsades de A.2b" >> lesquelles de mailles si je suis sur le modèle taille L ? Merci.
19.03.2023 - 15:30DROPS Design answered:
Bonjour Cathy P, tout dépend à quel niveau vous en êtes du motif A.2b, mais tricotez simplement 2 mailles ensemble à l'endroit (4 fois au total) dans les mailles des torsades, si vous en êtes avec 3 séries de mailles endroit, diminuez 1 m dans les 3" premières m end, 2 m dans la torsade suivante et 2 m dans la dernière, si vous avez 2 groupes de mailles endroit, diminuez 2 m dans chacun de ces 2 groupes. Bon tricot!
20.03.2023 - 09:08
![]() Cathy P wrote:
Cathy P wrote:
Bonjour, Quand vous dites "rabattre 6 mailles de chaque côté pour les emmanchures (= 3 mailles de chaque côté de chaque marqueur)" : cela signifie que la maille sur laquelle il y a le marqueur ne doit pas être rabattue ? elle reste en attente entre 6 mailles (3 de chaque côté) rabattues ? Merci pour vos précisions. Cathy P.
15.03.2023 - 08:13DROPS Design answered:
Bonjour Cathy P, dans ce cas, on travaille sur un nombre de mailles pair depuis le début, les marqueurs se trouvent tous les 2 entre deux mailles et pas dans une maille, on va pouvoir ainsi simplement rabattre les 3 mailles avant le marqueur + les 3 mailles après le marqueur. Bon tricot!
15.03.2023 - 10:06
![]() Boutin wrote:
Boutin wrote:
Comment doit -je lire le diagramme si je tricote avec des aiguilles droites s'il vous plait?merci d'avance de votre réponse.
14.03.2023 - 12:22DROPS Design answered:
Bonjour Mme Boutin, les rangs avec les torsades doivent toujours être tricotés sur l'endroit - commencez A.1a et A.2b sur l'envers - lisez les rangs sur l'envers de gauche à droite et les rangs sur l'endroit de droite à gauche. Bon tricot!
14.03.2023 - 14:06
![]() Boutin wrote:
Boutin wrote:
Bonjour, serait il possible de savoir s'il y a les même explications avec des aiguilles à tricoté ? merci
12.02.2023 - 10:39DROPS Design answered:
Bonjour Mme Boutin, vous pensez à des aiguilles droites? Ce modèle est uniquement disponible en rond, sur aiguille circulaire, toutefois, cette leçon pourra vous aider à adapter ce modèle sur aiguilles droites si vous le souhaitez. Bon tricot!
13.02.2023 - 09:46
![]() Fausto wrote:
Fausto wrote:
Le maniche della taglia L partono davvero troppo strette su polsi e avambracci. Valutare di partite con 4 maglie in più e fare due aumenti in meno
08.02.2023 - 09:46DROPS Design answered:
Buonasera Fausto, può apportare al modello le modifiche che desidera. Buon lavoro!
10.02.2023 - 16:12
![]() Lisa wrote:
Lisa wrote:
I have finished the yoke and do not understand the Neck section. Knit up stitches for the neck - what does that mean? I have 12 stitches on a holder and the rest of the sweater has been knitted a few rows up to accommodate the decreases around the neck. Do I start knitting off the existing needle onto dp needles?
28.01.2023 - 22:18DROPS Design answered:
Dear Lisa, knit up means pick up stitches as if knitting. You need to pick up stitches both from the holder for the neck and the last round of the yoke. You can see how to pick up stitches here: https://www.garnstudio.com/video.php?id=59&lang=en. Happy knitting!
29.01.2023 - 22:47
|
|||||||||||||||||||||||||
Trails Head#trailsheadsweater |
|||||||||||||||||||||||||
 |
 |
||||||||||||||||||||||||
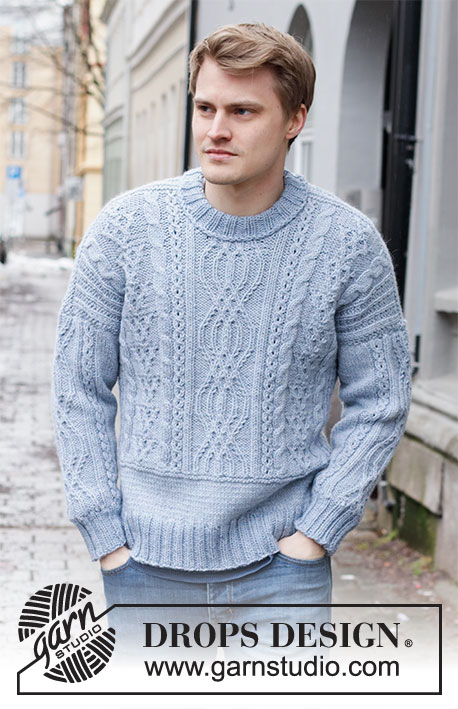
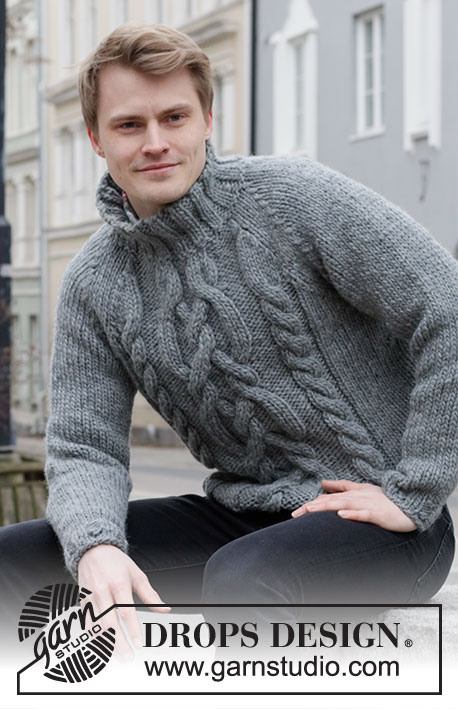
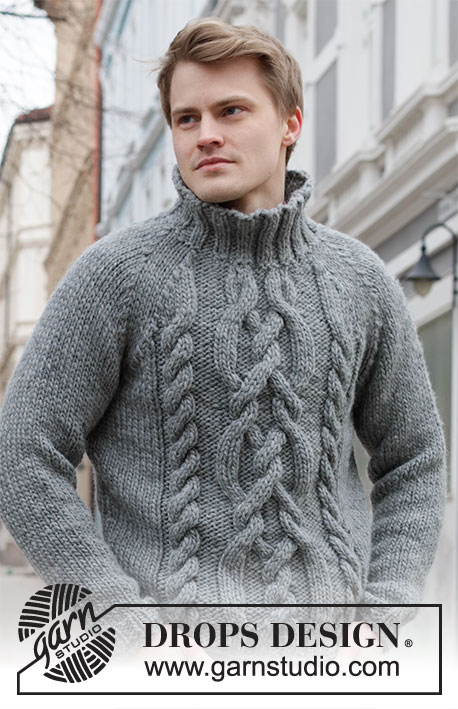
Knitted jumper with raglan, cables and high neck for men in DROPS Snow. Sizes S - XXXL.
DROPS 219-4 |
|||||||||||||||||||||||||
|
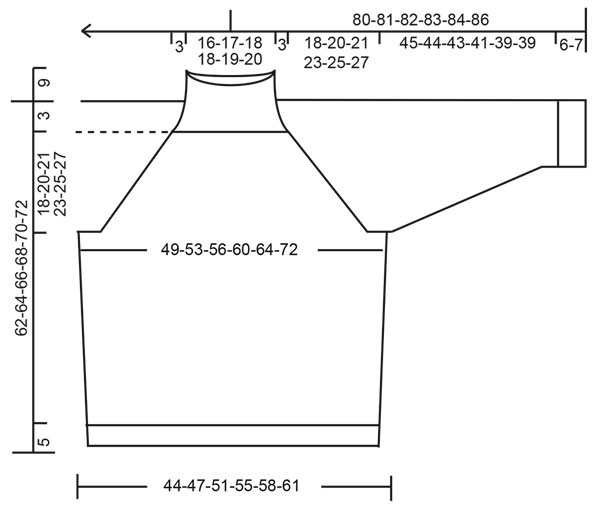
------------------------------------------------------- EXPLANATIONS FOR THE PATTERN: ------------------------------------------------------- PATTERN: See diagrams A.1 to A.3. The diagrams show all rows in the pattern from the right side. DECREASE TIP (for raglan): Decrease in each transition between body and sleeves every 2nd round – start 4 stitches before the marker thread and work as follows: Slip 1 stitch as if to knit, knit 1 and pass the slipped stitch over the knitted stitch, knit 4 (the marker sits in the middle of these 4 stitches) and knit 2 together. When the stitches for the neck have been placed on a thread, continue working back and forth – now decrease to raglan on each row from the right side. INCREASE TIP (for sides of body and mid under sleeves): Work as far as 1 stitch before the marker, make 1 yarn over, knit 2 (the marker sits between these 2 stitches), 1 yarn over = 2 stitches increased. On the next round knit the yarn overs twisted to avoid holes. ------------------------------------------------------- JUMPER – SHORT OVERVIEW OF THE PIECE: The body is worked in the round with circular needle as far as the armholes. The sleeves are worked in the round with double pointed needles (change to short circular needle when necessary). Then place the sleeves on the same circular needle as the body and continue the yoke in the round. The neck is worked in the round with double pointed needles or short circular needle. BODY: Cast on 96-104-112-120-128-148 stitches with circular needle size 7 mm and Snow. Insert 1 marker at the beginning of the round and a new marker after 48-52-56-60-64-74 stitches. Work 1 round of stocking stitch. Now work rib in the round, starting in the different sizes as follows: SIZES S, L and XXL: Start with purl 1, then work rib (knit 2, purl 2) over the next 6-10-14 stitches, continue as explained under all sizes below. SIZES M, XL: Start with knit 1, then work rib (purl 2, knit 2) over the next 8-12 stitches, continue as explained under all sizes below. SIZES XXXL: Start with purl 2, then work rib (knit 2, purl 2) over the next 18 stitches, continue as explained under all sizes below. ALL SIZES: Continue in the round as follows: Work diagram A.1a over 8 stitches, A.2a over 18 stitches, A.3a over 8 stitches, then rib (knit 2, purl 2) to end of round. On the last row in the diagrams increase stitches so there are 58-62-66-70-74-84 stitches on the front piece and you still have 48-52-56-60-64-74 stitches on the back piece. Piece measures now approx. 5 cm. Change to circular needle size 8mm and work stocking stitch over the first 7-9-11-13-15-20 stitches, A.1b over A.1a, A.2b over A.2a, A.3b over A.3a and stocking stitch to the end of the round. Continue this pattern. REMEMBER THE KNITTING TENSION! When the piece measures 12-12-12-12-12-12 cm, increase 1 stitch on each side of each marker – read INCREASE TIP in the explanations above. Repeat the increase every 6-10-10-10-10-10 cm a total of 3 times = 118-126-134-142-150-170 stitches. Work until the piece measures 41-41-42-42-42-42 cm. On the next round cast off 6 stitches each side for the armholes (= 3 stitches on each side of each marker) = 58-62-66-70-74-84 stitches on the front piece and 48-52-56-60-64-74 stitches on the back piece. Lay the piece to one side and work the sleeves. SLEEVE: Cast on 24-24-24-32-32-36 stitches with double pointed needles size 7 mm and Snow. Work 2 rounds of stocking stitch, then work rib (knit 2, purl 2) until the piece measures 6-6-6-7-7-7 cm. Change to double pointed needles size 8 mm and insert a marker at the beginning of the round, then continue with stocking stitch. When the piece measures 8-10-10-9-9-9 cm, increase 1 stitch on each side of the marker – read INCREASE TIP in the explanations above. Repeat the increase every 5½-4-3½-5-4½-4 cm a total of 8-10-11-8-9-9 times = 40-44-46-48-50-54 stitches. Work until the piece measures 51-50-49-48-46-46 cm. On the next round cast off 6 stitches mid under the sleeve (3 stitches on each side of the marker) = 34-38-40-42-44-48 stitches. Lay the piece to one side and work 1 more sleeve in the same way. YOKE: Place the sleeves on the same circular needle as the body – where stitches were cast off for the armholes = 174-190-202-214-226-254 stitches. Insert marker threads in each transition between the sleeves and the body = 4 marker threads. Work 2-1-1-0-0-0 rounds before beginning to decrease to raglan. READ THE WHOLE OF THE NEXT SECTION BEFORE CONTINUING! Decrease to raglan on each side of the 4 stitches at each marker thread - read DECREASE TIP in explanations above – every 2nd round, 13-15-16-17-18-21 times. AT THE SAME TIME when the piece measures 56-58-60-62-64-66 cm decrease 4-4-4-4-4-4 stitches over the cables in A.2b.Then place the middle 8-8-10-12-14-16 stitches on 1 thread for the neck. The piece is continued back and forth, continuing to decrease to raglan as before on each row from the right side. In addition, decrease for the neck at the beginning of each row as follows: Cast off 2 stitches 1 time and 1 stitch 1 time. After all the decreases to raglan and to the neck there are 52-52-54-56-58-60 stitches on the needle. NECK: Using double pointed needles size 7 mm knit up stitches for the neck and place the stitches from the thread onto the needles, so you have approx. 14 to 22 stitches on the front neck. There should be a total of 60 to 76 stitches on the needle (stitch-number needs to be divisible by 4). Purl 1 round, then work rib (knit 2, purl 2) for 9 cm. Loosely cast off with knit over knit and purl over purl. ASSEMBLY: Sew the openings under the sleeves. |
|||||||||||||||||||||||||
Diagram explanations |
|||||||||||||||||||||||||
|
|||||||||||||||||||||||||
 |
|||||||||||||||||||||||||
 |
|||||||||||||||||||||||||
 |
|||||||||||||||||||||||||
Have you finished this pattern?Tag your pictures with #dropspattern #trailsheadsweater or submit them to the #dropsfan gallery. Do you need help with this pattern?You'll find 31 tutorial videos, a Comments/Questions area and more by visiting the pattern on garnstudio.com. © 1982-2026 DROPS Design A/S. We reserve all rights. This document, including all its sub-sections, has copyrights. Read more about what you can do with our patterns at the bottom of each pattern on our site. |
|||||||||||||||||||||||||


With over 40 years in knitting and crochet design, DROPS Design offers one of the most extensive collections of free patterns on the internet - translated to 17 languages. As of today we count 324 catalogues and 12290 patterns translated into English (UK/cm). 12290
We work hard to bring you the best knitting and crochet have to offer, inspiration and advice as well as great quality yarns at incredible prices! Would you like to use our patterns for other than personal use? You can read what you are allowed to do in the Copyright text at the bottom of all our patterns. Happy crafting!
Post a comment to pattern DROPS 219-4
We would love to hear what you have to say about this pattern!
If you want to leave a question, please make sure you select the correct category in the form below, to speed up the answering process. Required fields are marked *.