
Popular categories
Looking for a yarn?


Comments / Questions (13)
![]() Oola wrote:
Oola wrote:
By helping me with the back neck depth, I mean that I'd like you to tell me the measurement down from the back neck knob. Ty.
23.09.2024 - 18:40DROPS Design answered:
Dear Oola, you will find all finished measurements in the chart for each size, measurements are taken flat from side to side. Neck edge is here 5 cm, hope it can help for your maths as we unfortunately cannot adjust every pattern to every single request; thanks for your comprehension. Happy knitting!
24.09.2024 - 08:57
![]() Oola wrote:
Oola wrote:
I prefer my pullovers to reach up to (start from) the knob at the back of the neck, and to be right up under my chin at the front. On the model the garment has what I'd call a Gappy Neck. Although the schematic shows the front neck depth, back depth is not mentioned. Please can you help me with the back depth, and how to make it less shallow than illustrated. I would make the XS size. Thank you.
23.09.2024 - 18:36DROPS Design answered:
Dear Oola, in this pattern neck will have same height on both front and back piece; you can choose to add some short rows to create an elevation mid back so that the neck will be deeper on front pieces. Happy knitting!
24.09.2024 - 08:56
![]() Annika wrote:
Annika wrote:
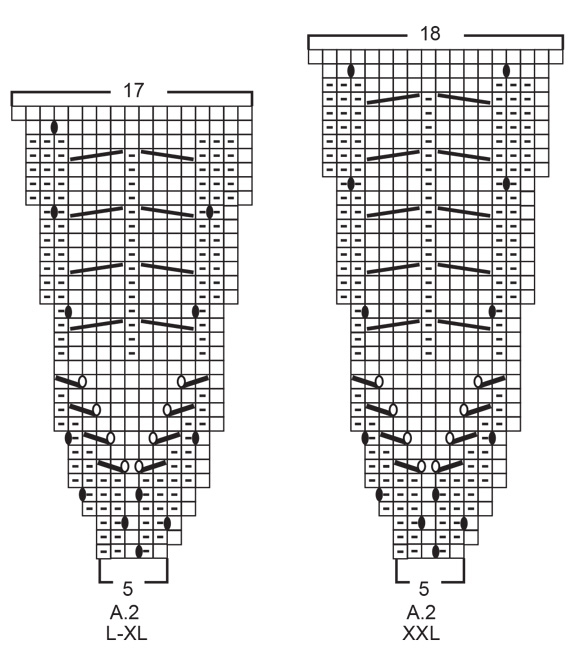
Fel i beskriviningen av flätstickningen i mönster A2, det står "sätt två maskor framför arbetet" på båda när de ena borde vara bakom.
10.12.2022 - 22:18DROPS Design answered:
Hej Annika. Tack för info, detta är nu rättat! Mvh DROPS Design
15.12.2022 - 14:42
![]() Annika wrote:
Annika wrote:
Fel i beskriviningen av flätstickningen i mönster A2, det står "sätt två maskor framför arbetet" på båda när de ena borde vara bakom.
10.12.2022 - 20:42
![]() Debbie Wheeler wrote:
Debbie Wheeler wrote:
When casting on, the pattern says to Cast on 54-54-59-59-64-64 stitches (including 4 band stitches on each side towards mid front). Does this mean that the 54 stitches already include the 4-band stitches for each side or do I need to add additional stitches for them with my cast on?
15.08.2022 - 22:07DROPS Design answered:
Hi Debbie, The band stitches are included in the 54 stitches, so 54 is the number of stitches you should cast on. Happy knitting!
16.08.2022 - 06:44
![]() Jessie Reedtz Adamsen wrote:
Jessie Reedtz Adamsen wrote:
Jeg kan ikke få maskerne til at stemme med udtagninger. Prøver nu selv at fordele til forstykke, ærmer og ryg. Har talt og regnet men får kun 185 m i stedet for 196 m i str. XL
04.06.2021 - 13:00DROPS Design answered:
Hej Jessie, Du strikker diagrammet 11 gange på omgangen og der er 12 udtagninger i hvert diagram i XL. 11x12=132+64=196 masker. God fornøjelse!
04.06.2021 - 13:58
![]() Sussi Petersen wrote:
Sussi Petersen wrote:
Jeg havde besvær med at finde videoen med en drejet vrang til at strikke omslag fra foregående pind. I sidste del af diagram A2 på str. L/XL opstår der huller. Det samme gør sig gældende tidligere i diagrammet, men der syner det som et ensartet mønster Mvh Sussi
28.01.2021 - 16:07
![]() Maya Lööf wrote:
Maya Lööf wrote:
Hej! Det är ett fel i den svenska översättningen. Den nedersta figuren i diagrammet där man ska sätta maskorna bakom, står felaktigt framför. // Maya
26.12.2020 - 18:08
![]() Kochan Jacqueline wrote:
Kochan Jacqueline wrote:
Bonjour c est bien de trouver des modéles gratuit un peut compliqué pour commandé de la laine
14.10.2020 - 11:44DROPS Design answered:
Bonjour Mme Kochan, vous trouverez ici la liste des magasins DROPS en France - si vous n'avez pas la chance d'avoir une boutique près de chez vous, vous pouvez vous adresser à l'une des boutiques en ligne. Bon tricot!
14.10.2020 - 13:12
![]() Lotta Welander wrote:
Lotta Welander wrote:
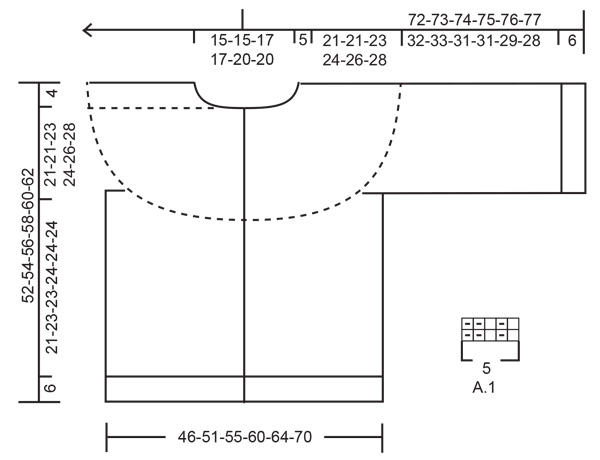
Letar efter mönster A 1
16.09.2020 - 22:14DROPS Design answered:
Hej Lotta. Du hittar det på höger sida av måttskissen längst ner på mönstret. Mvh DROPS Design
17.09.2020 - 07:40
|
|||||||||||||||||||||||||
Harvest Queen Jacket#harvestqueenjacket |
|||||||||||||||||||||||||
 |
 |
||||||||||||||||||||||||
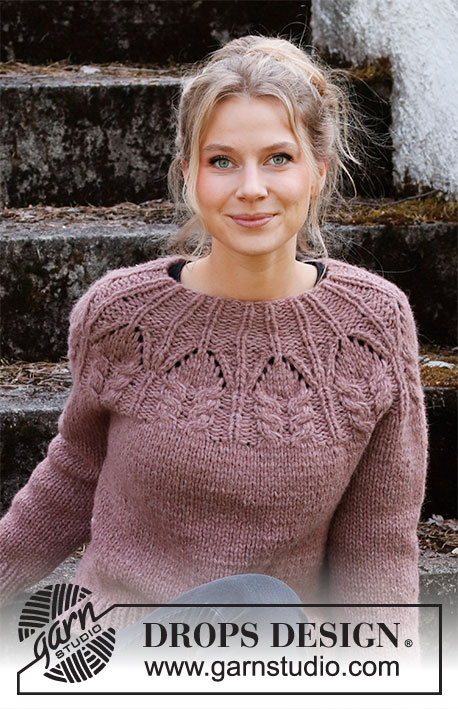
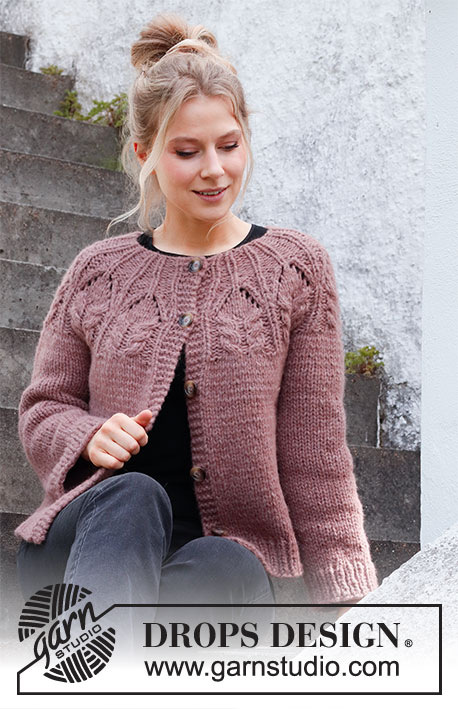
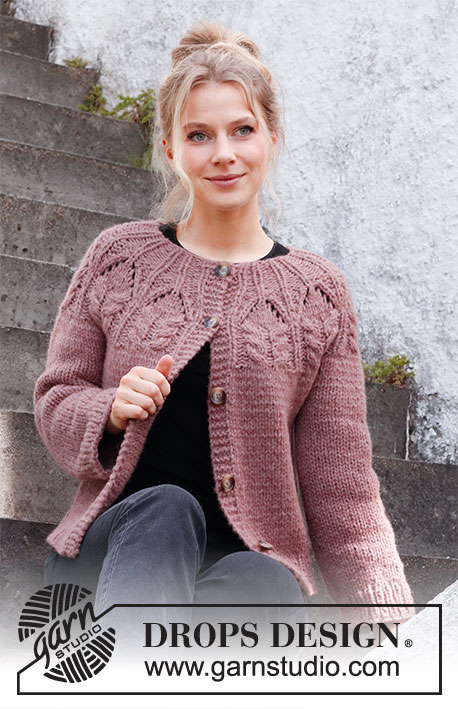
Knitted jacket in 2 strands DROPS Air or 1 strand DROPS Snow. The piece is worked top down with round yoke, lace pattern and cables. Sizes XS - XXL.
DROPS 218-2 |
|||||||||||||||||||||||||
|
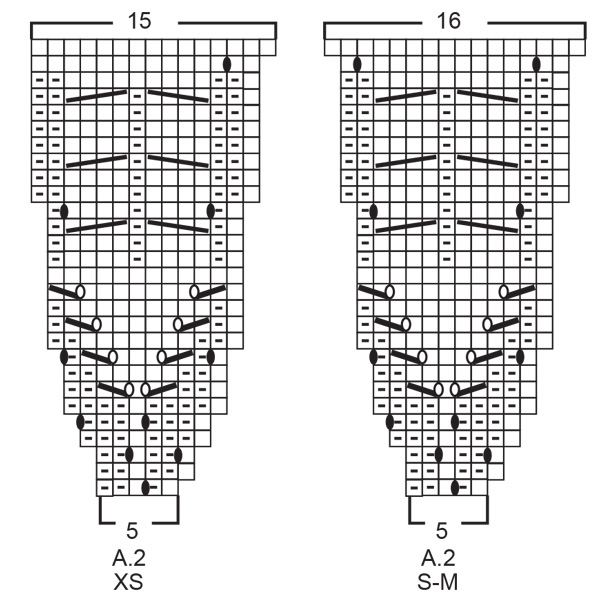
------------------------------------------------------- EXPLANATIONS FOR THE PATTERN: ------------------------------------------------------- RIDGE/GARTER STITCH (worked back and forth): Knit all rows. 1 ridge in height = Knit 2 rows. PATTERN: See diagrams A.1 and A.2. Choose diagram for your size (applies to A.2). The diagrams show all rows in the pattern from the right side. INCREASE TIP (evenly spaced): To work out how to increase evenly, count the total number of stitches on the needle (e.g. 153 stitches) minus bands (e.g. 8 stitches) and divide the remaining stitches by the number of increases to be made (e.g. 5) = 29. In this example, increase by making 1 yarn over after every 29th stitch. Do not increase on bands. On the next row work the yarn overs twisted to avoid holes. DECREASE TIP (for sleeves in sizes L-XL-XXL): Decrease 1 stitch on either side of the marker thread as follows: Work until there are 3 stitches left before the marker thread, knit 2 together, knit 2 (marker thread sits between these 2 stitches), slip 1 stitch as if to knit, knit 1 and pass the slipped stitch over the knitted stitch (2 stitches decreased). BUTTONHOLES: Work buttonholes on the right band (when the garment is worn). Work from the right side when there are 3 stitches left on the row as follows: Make 1 yarn over, knit 2 together and knit 1. On the next row (wrong side), knit the yarn over to leave a hole. The first buttonhole is worked when the rib on the neck measures approx. 2 cm. Then work the other 4-4-5-5-5-5 buttonholes with approx. 10-10-9-9-9-10 cm between each one. CASTING-OFF TIP: To avoid the cast-off edge being tight you can cast off with a larger size needle. If the edge is still tight, make 1 yarn over after approx. each 4th stitch at the same time as casting off; the yarn overs are cast off as normal stitches. ------------------------------------------------------- START THE PIECE HERE: ------------------------------------------------------- JACKET – SHORT OVERVIEW OF THE PIECE: The neck and yoke are worked back and forth with circular needle from mid front and top down. The yoke is divided for body and sleeves and the body continued back and forth. The sleeves are worked in the round with short circular needle/double pointed needles, top down. NECK: Cast on 54-54-59-59-64-64 stitches (including 4 band stitches on each side towards mid front) with circular needle size 8 mm and 2 strands Air or 1 strand Snow. Purl 1 row (= wrong side). The next row is worked as follows from the right side: Work 4 band stitches in GARTER STITCH – read description above, work A.1 (= 5 stitches) until there are 5 stitches left on the row (= 9-9-10-10-11-11 times in width), knit 1 and finish with 4 band stitches in garter stitch. Continue this rib for 5 cm. Insert 1 marker after the band at the beginning of the row; the yoke is measured from this marker! YOKE: Change to circular needle size 9 mm and work as follows from the right side: 4 band stitches in garter stitch, A.2 (= 9-9-10-10-11-11 repeats of 5 stitches), 1 stitch in stocking stitch (so the pattern is the same on both front pieces) and finish with 4 band stitches in garter stitch. Continue this pattern and increase as shown in diagram A.2. REMEMBER THE KNITTING TENSION! When A.2 has been worked 1 time in height there are 144-153-169-179-196-207 stitches on the needle. The piece measures approx. 20-20-20-23-23-26 cm from the marker on the neck. Work stocking stitch with 4 band stitches in garter stitch on each side. On the first row increase 0-5-0-0-0-5 stitches evenly spaced – read INCREASE TIP = 144-158-169-179-196-212 stitches. Work stocking stitch with 4 band stitches in garter stitch on each side until the piece measures 21-21-23-24-26-28 cm from the marker on the neck. Now divide the piece for body and sleeves on the next row as follows: Work the first 24-27-29-31-33-36 stitches (= front piece), place the next 26-28-30-32-36-38 stitches on 1 thread for the sleeve, cast on 4-4-4-6-6-6 new stitches on the needle (= in side under the sleeve), work the next 43-47-51-53-58-64 stitches (= back piece), place the next 26-28-30-32-36-38 stitches on 1 thread for the sleeve, cast on 4-4-4-6-6-6 new stitches on the needle (= in side under the sleeve) and work the remaining 25-28-29-31-33-36 stitches (= front piece). Body and sleeves are finished separately. BODY: = 100-110-117-127-136-148 stitches. Work stocking stitch with 4 band stitches in garter stitch on each side. When the piece measures 21-23-23-24-24-24 cm from the division (there is approx. 6 cm to finished length; try the jacket on and work to desired length), knit 1 row from the right side where you increase 11-11-12-12-11-11 stitches evenly spaced - remember INCREASE TIP = 111-121-129-139-147-159 stitches. Change to circular needle 8 mm. Work rib from the wrong side as follows: 4 band stitches in garter stitch, * purl1, knit 1 *, work from *-* until there are 5 stitches left, purl 1 and finish with 4 band stitches in garter stitch. Continue this rib for 6 cm. Cast off with garter stitch over garter stitch, knit over knit and purl over purl - read CASTING-OFF TIP! The jacket measures approx. 52-54-56-58-60-62 cm from the shoulder down. SLEEVE: Place the 26-28-30-32-36-38 stitches from the thread on the one side of the piece on double pointed needles/short circular needle size 9 mm and knit up 1 stitch in each of the 4-4-4-6-6-6 stitches cast on under the sleeve = 30-32-34-38-42-44 stitches. In the 3 largest sizes, insert a marker thread in the middle of the 6 stitches under the sleeve. It will be used when decreasing under the sleeve. Work stocking stitch in the round. When the sleeve measures 5 cm from the division, decrease 0-0-0-1-1-1 stitch on each side of the marker – read DECREASE TIP. Decrease like this every 7 cm a total of 0-0-0-2-3-3 times = 30-32-34-34-36-38 stitches. When the sleeve measures 32-33-31-31-29-28 cm from the division, knit 1 round where you increase 6 stitches evenly spaced = 36-38-40-40-42-44 stitches. Change to short circular needle size 8 mm and work rib (= knit 1, purl 1) for 6 cm. Cast off with knit over knit and purl over purl. The sleeve measures approx. 38-39-37-37-35-34 cm from the division. Work the other sleeve in the same way. ASSEMBLY: Sew the buttons onto the left band. |
|||||||||||||||||||||||||
Diagram explanations |
|||||||||||||||||||||||||
|
|||||||||||||||||||||||||
 |
|||||||||||||||||||||||||
 |
|||||||||||||||||||||||||
 |
|||||||||||||||||||||||||
Have you finished this pattern?Tag your pictures with #dropspattern #harvestqueenjacket or submit them to the #dropsfan gallery. Do you need help with this pattern?You'll find 30 tutorial videos, a Comments/Questions area and more by visiting the pattern on garnstudio.com. © 1982-2026 DROPS Design A/S. We reserve all rights. This document, including all its sub-sections, has copyrights. Read more about what you can do with our patterns at the bottom of each pattern on our site. |
|||||||||||||||||||||||||


With over 40 years in knitting and crochet design, DROPS Design offers one of the most extensive collections of free patterns on the internet - translated to 17 languages. As of today we count 324 catalogues and 12290 patterns translated into English (UK/cm). 12290
We work hard to bring you the best knitting and crochet have to offer, inspiration and advice as well as great quality yarns at incredible prices! Would you like to use our patterns for other than personal use? You can read what you are allowed to do in the Copyright text at the bottom of all our patterns. Happy crafting!
Post a comment to pattern DROPS 218-2
We would love to hear what you have to say about this pattern!
If you want to leave a question, please make sure you select the correct category in the form below, to speed up the answering process. Required fields are marked *.