
Popular categories
Looking for a yarn?


Comments / Questions (111)
![]() Miranda wrote:
Miranda wrote:
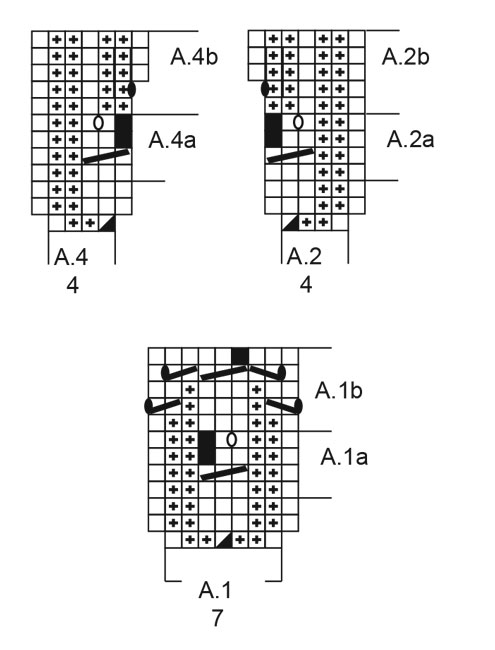
Hej! På sidan 4 står det "När sista repetition av A1a är färdigstickat på höjden, stickas A1b över varje A1a." Hur vet man vilken som är sista repetitionen av A1a? Jag ser inte att det står hur många gånger det skall repeteras. Tack på förhand!
18.03.2026 - 15:40DROPS Design answered:
Hej Miranda, du är färdig med A.1a när du har ökat alla maskor till raglan och delar arbetet till fram och bakstycke :)
08.04.2026 - 13:41
![]() Terezinha Origuela wrote:
Terezinha Origuela wrote:
Os graficos nao correspondem a foto da blusa, e a primeira vez que acontece isso,
25.10.2025 - 21:46DROPS Design answered:
Bom dia, Pode não parecer, mas correspondem, sim. Bons tricôs!
05.11.2025 - 10:42
![]() Else wrote:
Else wrote:
Beklager nu fik jeg nærlæst!!! Alt godt
28.09.2025 - 13:40
![]() Else wrote:
Else wrote:
På billedet er der de fine bobbelrækker på A2 og A4 ligesom i A1 og A3.a. Men der er ingen indtagning på pind 11 hvorfor det ser helt anderledes ud. Der står at A1,A2 og A4 skal gentages ovenpå hinanden men maskeantallet stemmer jo ikke. På A2 og A4 skal man gentage mønster som starter på 4 m ovenpå 7 m. Ligeledes på A1 skal man gentage mønster der starter på 7 m oven på 8 m. Jeg ser ingen hjælp selvom der står i har lavet en opdateret forklaring Ved at give op...
28.09.2025 - 12:25
![]() Maria wrote:
Maria wrote:
Nu har jeg læst igen og selv fundet svaret. 😀 Der er mange diagrammer at holde styr på...
03.08.2025 - 08:08
![]() Maria wrote:
Maria wrote:
Jeg strikker xxxl. Når A3a er strikket færdig mangler jeg stadig næsten halvdelen af raglanudtagningerne. Skal jeg gentage sidste række i A3a indtil jeg skal strikke ærmet og starte på A3b?
03.08.2025 - 00:05DROPS Design answered:
Hej Maria. Når A.3a er strikket 1 gang i høyden, strikkes A.3b (= 29-29-29-35-35-35 masker) over A.3a. Mvh DROPS Design
01.09.2025 - 09:21
![]() Paula wrote:
Paula wrote:
I am knitting the Spring Surrender in xxl. I am on my 1st sleeve at the cuff. Pattern says after the last round of A.3C I should have 100 stitches, which I do. Then switch to smaller needle and begin ribbing, after the 1st round I should have 102 stitches. This doesn't make sense, rib over 27 stitches, work A.2B, 6 stitches, work A.3C as is, 35 stitches, work A.4B, 6 stitches, rib over 24 stitches and purl 2. If you add up the stitches it equals 100. Help please. Thank you
29.06.2025 - 18:55DROPS Design answered:
Dear Paula, you work the entire charts indicated: A.2b and A.4b both have 1 increase on the 2nd round of the charts. So after finishing A.2b and A.4b once in height, you should now have 102 stitches (not right in the first round of the charts, but by the time you finish the 5 rounds of the new charts). Then you finish with knit over knit and purl over purl over all stitches until piece measures 11cm/ 4⅜". Happy knitting!
29.06.2025 - 19:57
![]() Lucie wrote:
Lucie wrote:
Bonjour, Joli modèle que je viens de débuter, je ne comprends pas "tricoter 1 tour comme avant"? Dois je faire le 1er rang à nouveau ? Comment faire pour les 3 mailles dans la maille ?? Merci pour votre réponse
11.06.2025 - 21:36DROPS Design answered:
Bonjour Lucie, après avoir tricoté le 1er rang de l'empiècement, tricotez le 2ème rang de la même façon: les mailles endroit à l'endroit et en même temps, tricotez le 2ème rang de chaque diagramme comme indiqué par le diagramme correspondant. Retrouvez ici, en vidéo comment faire cette augmentation. Bon tricot!
12.06.2025 - 09:19
![]() Elisabet Bohman wrote:
Elisabet Bohman wrote:
Diagram A.1 Första varvet stickar man en ökning mitt i men sedan på varv 2 så är det fortfarande endast 3 räta mitt i på diagrammet??? Jag har då fått 5 maskor där?
25.05.2025 - 15:04DROPS Design answered:
Hej Elisabeth, det er den midterste retmaske fra nederste pind som økes med 2 nye masker, på 2.pind bliver det da til 3 ret (med 2 vrang på hver side af de 3 ret)
27.05.2025 - 13:25
![]() Agnieszka wrote:
Agnieszka wrote:
Cześć, mam problem. W części karczek zapisano "Gdy zostaną przerobione 3 pierwsze rzędy schematów A.1, A.2 i A.4, powtarzać schematy A.1a, A.2a i A.4a na wysokość." Na jaką wysokość przerabiać A.1a,A.2a i A.4a?
23.05.2025 - 12:17DROPS Design answered:
Witaj Agnieszko, to oznacza, że przerabiasz schematy A.1a, A.2a i A.4a 1 raz, czyli 4 okrążenia. Pozdrawiamy!
23.05.2025 - 14:49
|
|||||||||||||||||||||||||||||||
Spring Surrender#springsurrendersweater |
|||||||||||||||||||||||||||||||
 |
 |
||||||||||||||||||||||||||||||
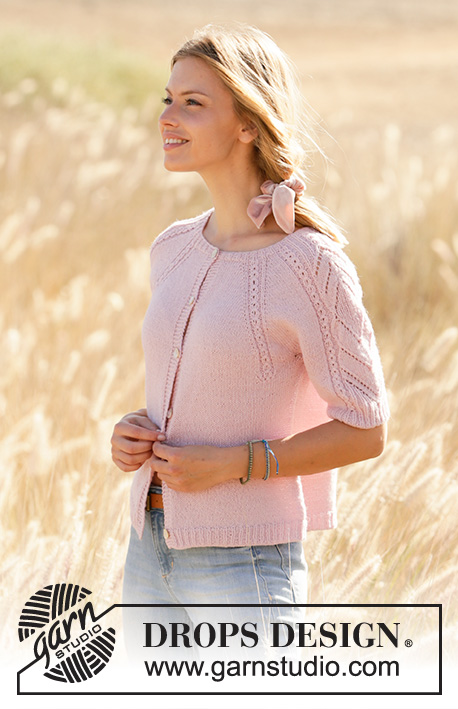
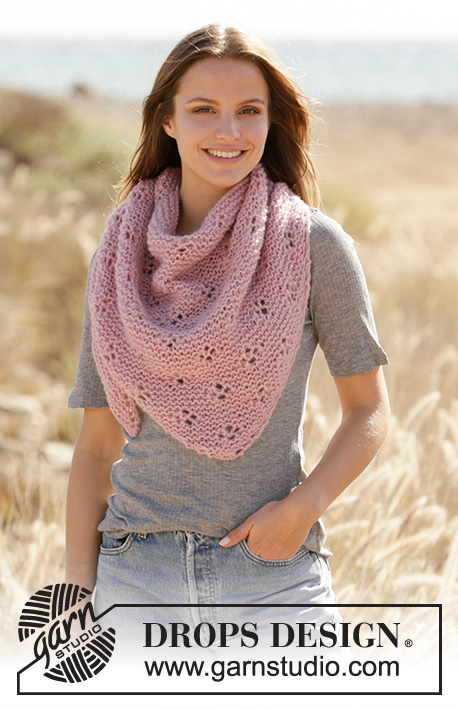
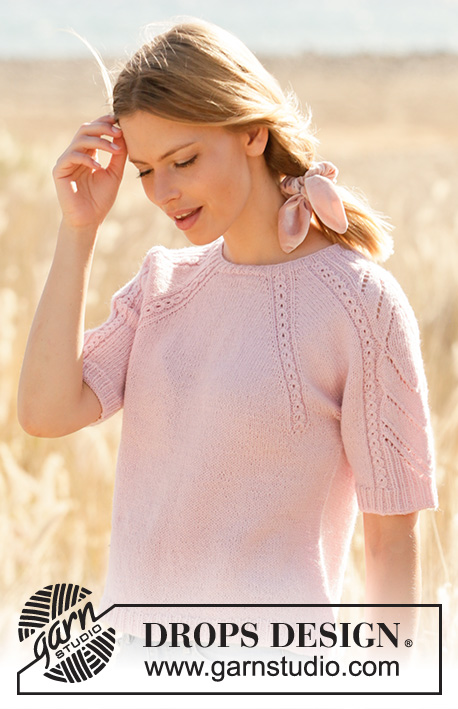
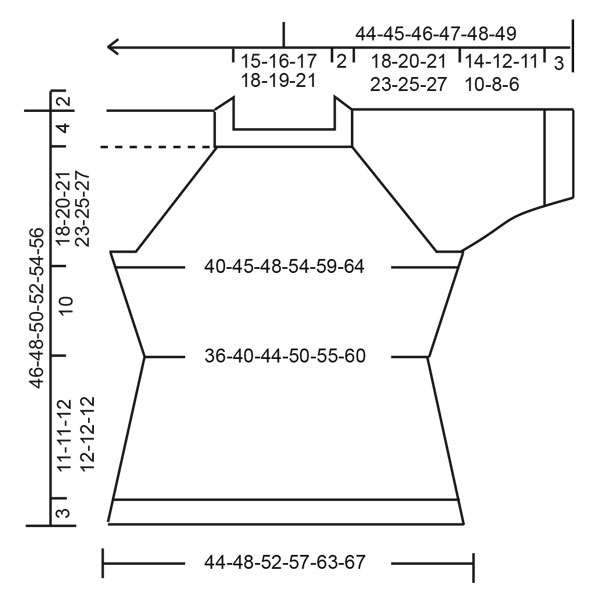
Knitted jumper with raglan in DROPS Alpaca. Piece is knitted top down with lace pattern and short sleeves. Size: S - XXXL
DROPS 212-40 |
|||||||||||||||||||||||||||||||
|
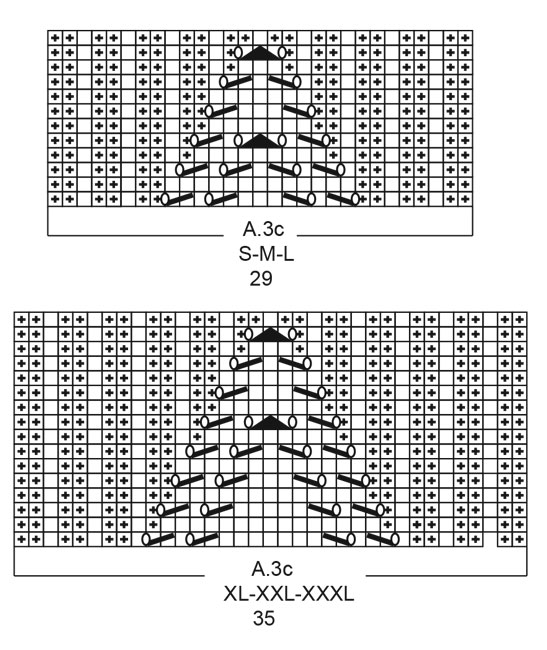
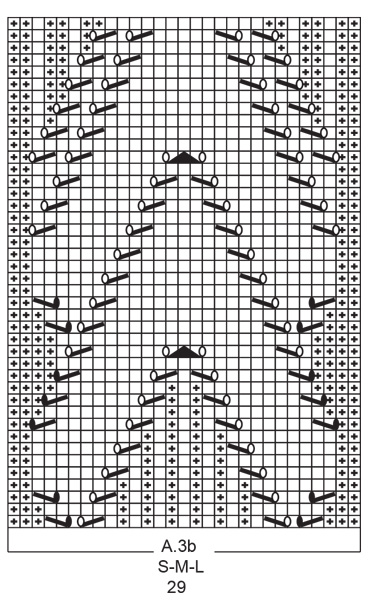
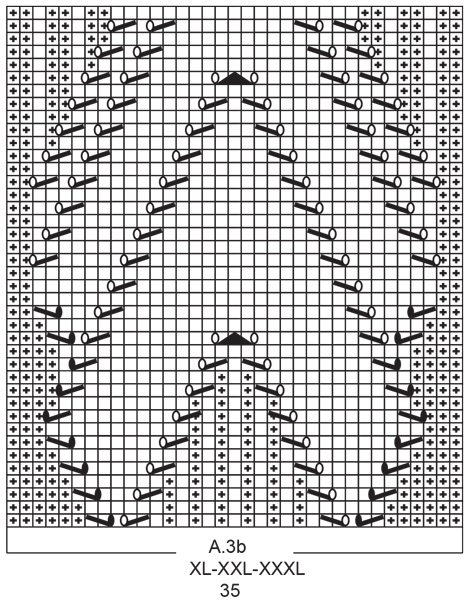
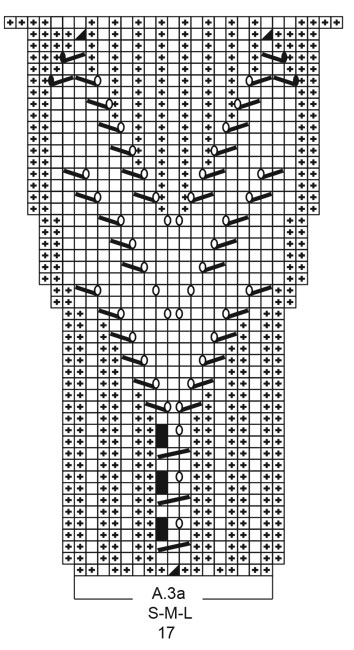
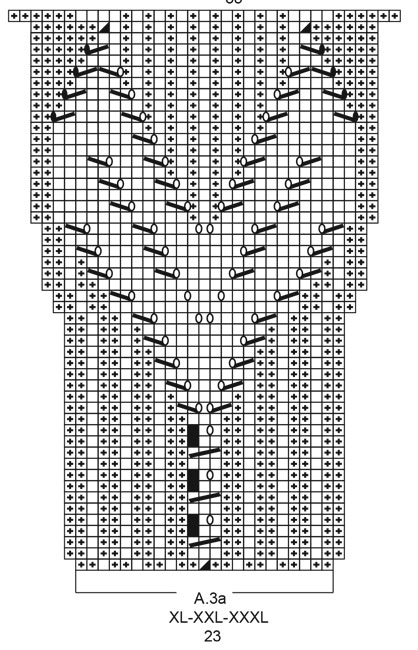
---------------------------------------------------------- EXPLANATION FOR THE PATTERN: ---------------------------------------------------------- PATTERN: See diagrams A.1 to A.4. Choose diagram for your size. INCREASE TIP-1 (applies to raglan): Increase 1 stitch by making 1 yarn over between 2 stitches. On next round knit yarn over twisted to avoid holes. Then work the new stitches in stocking stitch. INCREASE TIP-2 (applies to sides of body): Work until 2 stitches remain before marker thread, 1 yarn over, knit 4 (marker thread is in the middle of these stitches), 1 yarn over. On next round knit yarn overs twisted to avoid holes. Then work the new stitches in stocking stitch. DECREASE TIP (applies to side on body and sleeves): Decrease 1 stitch on each side of marker thread as follows: Work until 3 stitches remain before marker thread and knit 2 together, knit 2 (marker thread is between these stitches), slip 1 stitch knitwise, knit 1, pass slipped stitch over stitch worked. NUMBER OF STITCHES: As both increases and decreases are done in A.1a, A.2a, A.3a and A.4a, number of stitches vary according to which round it is counted on (depending on you are increasing/decreasing in pattern). CAST-OFF TIP: To avoid a tight cast-off edge you may use a larger needle. If this also is too tight, make 1 yarn over after approx. every 4th stitch and cast off these as regular stitches. ---------------------------------------------------------- START THE PIECE HERE: ---------------------------------------------------------- JUMPER - SHORT OVERVIEW OF THE PIECE: Work neck edge and yoke in the round on circular needle from mid back, top down. Now divide yoke for body and sleeves. Body is worked in the round on circular needle, top down. Work sleeves in the round on double pointed needles, top down. NECK EDGE: Cast on 108-120-126-132-135-144 stitches on circular needle size 2.5 mm with Alpaca. Knit 1 round. Work rib (= knit 1/purl 2). Continue rib like this for 2 cm. Switch to circular needle size 3 mm. Insert 1 marker at the beginning of round mid back, measure yoke from this marker! YOKE: Half back piece: Knit 6-9-9-9-9-12, A.1 (= 7 stitches). Right sleeve: Knit 2, A.2 (= 4 stitches), A.3a (= 17-17-17-23-23-23 stitches), A.4 (= 4 stitches), knit 2. Front piece: Work A.1 over 7 stitches, knit 11-17-22-17-19-23, A.1 over 7 stitches. Left sleeve: Knit 2, A.2 over 4 stitches, A.3a over 17-17-17-23-23-23 stitches, A.4 over 4 stitches, knit 2. Half back piece: Work A.1 over 7 stitches, knit 5-8-9-8-9-11. Work 1 round with the established pattern. On next round increase for raglan on each side of every A.1 – read INCREASE TIP-1 (= 8 stitches increased). REMEMBER THE KNITTING TENSION! Increase like this every other round 22-24-28-33-37-40 times in total. When the first 3 rows in pattern A.1, A.2 and A.4 has been worked, repeat A.1a, A.2a and A.4a in height. When A.3a has been worked 1 time vertically, work A.3b (= 29-29-29-35-35-35 stitches) over A.3a. When increase for raglan is done, there are 324-352-390-436-471-504 stitches on needle – read NUMBER OF STITCHES. Work in the established pattern until piece measures 18-20-21-23-25-27 cm from marker. Adjust so that next round is a round with total number of stitches (i.e. 324-352-390-436-471-504 stitches), this because number of stitches can vary because of decreases/increases in diagrams. On next round divide piece for body and sleeves as follows: Work over the first 45-50-54-61-68-73 stitches as before, slip the next 73-77-87-97-101-107 stitches on a stitch holder for sleeve and cast on 8 stitches under sleeve, work over the next 89-99-108-121-134-145 stitches, slip the next 73-77-87-97-101-107 stitches on a stitch holder for sleeve and cast on 8 stitches under sleeve and work the last 44-49-54-60-67-72 stitches. BODY: = 194-214-232-258-285-306 stitches. Insert 1 marker thread in the middle of the 8 stitches under over each sleeve (= in the sides of body). There are 97-107-116-129-142-153 stitches between marker threads on front piece and 97-107-116-129-143-153 stitches between marker threads on back piece. Move the marker threads upwards when working; they should be used for increase and decrease later in the sides. When last repetition of A.1a from the yoke has been worked vertically, work A.1b over every A.1a. When A.1b has been worked 1 time vertically, there are 190-210-228-254-281-302 stitches on needle. Continue in the round in stocking stitch. When piece measures 2 cm from division, decrease 1 stitch on each side of the marker thread in each side - read DECREASE TIP (= 4 stitches decreased). Decrease like this every 2 cm 4 times in total = 174-194-212-238-265-286 stitches. When piece measures 10 cm from division, increase 1 stitch on each side of marker threads in the sides - read INCREASE TIP-2(= 4 stitches increased). Increase like this every cm 9 times in total = 210-230-248-274-301-322 stitches. When piece measures 21-21-22-22-22-22 cm from division, increase 12-13-13-14-14-14 stitches evenly = 222-243-261-288-315-336 stitches. Switch to circular needle size 2.5 mm and work rib (= knit 1/purl 2). When piece measures 24-24-25-25-25-25 cm from division, cast off all stitches by knitting- read CAST-OFF TIP. SLEEVES: Slip the 73-77-87-97-101-107 stitches from stitch holder in one side of piece on double pointed needles size 3 mm and pick up 1 new stitch in each of the 8 stitches cast on under sleeve = 81-85-95-105-109-115 stitches – remember number of stitches. Insert 1 marker thread in the middle of the 8 new stitches. Move the marker thread upwards when working; it should be used for decrease mid under sleeve. READ ALL OF THE FOLLOWING SECTION BEFORE CONTINUING! Work pattern and decrease stitches mid under sleeve as follows: Work A.2a, A.3b and A.4a over the middle stitches, knit the remaining stitches. When A.3b has been worked, work A.3c over A.3b. When sleeve measures 1 cm from division, decrease 1 stitch on each side of marker thread (= 2 stitches decreased). Decrease like this every cm 3-3-3-3-5-5 times in total, then decrease every other cm 2-2-2-2-0-0 times in total = 71-75-85-95-99-105 stitches. On last round in A.3c increase 0-1-2-0-1-1 stitches before pattern, and 2-0-1-2-0-0 stitches after the pattern = 73-76-88-97-100-106 stitches. When A.3c has been worked 1 time vertically, piece measures approx. 14-12-11-10-8-6 cm from division. Switch to double pointed needles size 2.5 mm. Work next round as follows: * Knit 1, purl 2 *, work from *-* over the first 15-18-24-24-27-30 stitches, A.2b over A.2a, continue with knit over knit and purl over purl over stitches in A.3c, A.4b over A.4a, * purl 2, knit 1 *, work from *-* over 15-15-21-24-24-27 stitches and finish with purl 2 = 75-78-90-99-102-108 stitches. Continue with knit over knit and purl over purl until piece measures 17-15-14-13-11-9 cm from division, then cast off by knitting. Work the other sleeve the same way. |
|||||||||||||||||||||||||||||||
Diagram explanations |
|||||||||||||||||||||||||||||||
|
|||||||||||||||||||||||||||||||
 |
|||||||||||||||||||||||||||||||
 |
|||||||||||||||||||||||||||||||
 |
|||||||||||||||||||||||||||||||
 |
|||||||||||||||||||||||||||||||
 |
|||||||||||||||||||||||||||||||
 |
|||||||||||||||||||||||||||||||
 |
|||||||||||||||||||||||||||||||
Have you finished this pattern?Tag your pictures with #dropspattern #springsurrendersweater or submit them to the #dropsfan gallery. Do you need help with this pattern?You'll find 28 tutorial videos, a Comments/Questions area and more by visiting the pattern on garnstudio.com. © 1982-2026 DROPS Design A/S. We reserve all rights. This document, including all its sub-sections, has copyrights. Read more about what you can do with our patterns at the bottom of each pattern on our site. |
|||||||||||||||||||||||||||||||


With over 40 years in knitting and crochet design, DROPS Design offers one of the most extensive collections of free patterns on the internet - translated to 17 languages. As of today we count 324 catalogues and 12290 patterns translated into English (UK/cm). 12290
We work hard to bring you the best knitting and crochet have to offer, inspiration and advice as well as great quality yarns at incredible prices! Would you like to use our patterns for other than personal use? You can read what you are allowed to do in the Copyright text at the bottom of all our patterns. Happy crafting!
Post a comment to pattern DROPS 212-40
We would love to hear what you have to say about this pattern!
If you want to leave a question, please make sure you select the correct category in the form below, to speed up the answering process. Required fields are marked *.