
Popular categories
Looking for a yarn?


Comments / Questions (98)
![]() Janne wrote:
Janne wrote:
Tak for svaret men det er nu den ene maske hvori jeg tager ud midt på ærmet og får 5 masker ud af, som bliver et synligt hul. Måske det er en del af designet men jeg kan ikke se det på billedet. Og jeg kan ikke lige umiddelbart finde en måde at undgå det på. Er det korrekt med hullet eller bør jeg gøre det anderledes?
10.04.2026 - 08:50DROPS Design answered:
Hei Janne. Ja, det er korrekt at det blir et lite hull. Selv om det ikke er samme struktur, se på denne videoen, så ser du at det blir et tydelig hull. Se "Hvordan tages 4 masker ud i 1 maske" her. Mvh DROPS Design
13.04.2026 - 13:21
![]() Janne wrote:
Janne wrote:
Er det korrekt at jeg får nogle huller midt på ærmerne hvor jeg tager ud?
01.04.2026 - 13:55DROPS Design answered:
Hej Janne, hvis du ikke vil have huller, så skal du strikke omslaget drejet på næste pind (og der findes mange andre måder at tage ud på, både med og uden huller) :)
08.04.2026 - 14:23
![]() Fabienne wrote:
Fabienne wrote:
Bonjour, est-ce qu'il est possible de faire ce modèle avec la Daisy ? Merci pour votre disponibilité ;-)
04.02.2026 - 10:50DROPS Design answered:
Bonjour Fabienne, tout à fait, car Daisy appartient au groupe B, comme Puna et Soft Tweed, utilisez le convertisseur pour connaître la quantité correspondante. Bon tricot!
04.02.2026 - 17:44
![]() Andrea wrote:
Andrea wrote:
Wie ist die vierfache Zunahme in der Mitte der Ärmel gemeint? Muss ich tatsächlich dreimal in die gleiche rechte Masche einstechen um daraus vier Maschen zu gewinnen?
20.01.2026 - 12:31DROPS Design answered:
Liebe Andrea, die Zunahme bei den Ärrmel entsteht in der Mitte vom Ärmel - in diesem Video zeigen wir, wie man so zunimmt (nun werden die Maschen danach anders gestrickt, aber Zunahmetechnik ist hier die gleiche). Viel Spaß beim Stricken!
23.01.2026 - 07:43
![]() Kari Røkeness wrote:
Kari Røkeness wrote:
I mønsterbeskrivningen står det økt 4 masker på erme, hvor skal det økes 4 masker i en maske er det mot raglanlinjen eller økes det fire masker i en maske etter midtmasken på erme? det står også gjenta rapportene mot raglanlinjen? hvilke rapporter? har strikket i 40 år og strikket vanskelige engelske mønster men synes denne oppskriften var vanskelig å tyde.
09.10.2025 - 10:25DROPS Design answered:
Hei Karin. Det er satt 4 merker i arbeidet (= merketråd i hver overgang mellom bol og ermer). Det skal også settes 1 merke i den midterste masken på hvert erme, og når man kommer til 3.omgang i A.1/A.3 starter økning til ermene (Husk les: ØKNING ERME, se forklaring øverst i oppskriften / det økes i MIDTMASKEN, ikke i en maske etter midtmasken på erme). Når A.1 og A.3 er strikket ferdig i høyden, gjentas disse diagrammene (rapportene) mot raglanlinjen. mvh DROPS Design
20.10.2025 - 08:47
![]() Brenda wrote:
Brenda wrote:
I was surprised by the increase in the middle of the sleeves, and the hole it creates. Is there a way to increase 4 stitches in one without it looking messy or creating a hole? Or are there alternate direction for increasing stitches on the sleeves on the ends to avoid the break in continuity? I like the broken rib pattern but it looks messy where the increases fall. Or am I doing it wrong? Thanks!
05.07.2025 - 23:55DROPS Design answered:
Dear Brenda, you can watch this video to have an idea on how the hole should look like. Remember that, if you want to make the hole smaller you can work the yarn overs twisted in the next row. Happy knitting!
06.07.2025 - 23:11
![]() Justine wrote:
Justine wrote:
Bonjour, Un fois le tout premier rang augmentations fait ( = 120 mailles pour la taille M), comment compte-t-on les rangs pour les diagrammes ? Le prochain rang (début du raglan, juste après celui qui nous donne les 120 mailles) est-il considéré comme le rang 1 ou le rang 2 des diagrammes ? Merci par avance :)
21.03.2025 - 13:39DROPS Design answered:
Bonjour Justine, les diagrammes se lisent tous les tours de droite à gauche, vous avez tricoté le 1er tour en passant à 120 mailles. Au tour suivant, tricotez le 2ème tour des diagrammes: A.1 et A.3 = à l'endroit (les jetés se tricotent torse); pour A.2, tricotez (1 m end, 1 m env), et répétez de (à). Bon tricot!
21.03.2025 - 15:28
![]() Sophie wrote:
Sophie wrote:
Bonjour, Lors de l'augmentation des manches, je ne comprends pas comment ajouter 4 mailles dans une seule. J'arrive à tricoter la maille et faire un jeté et après je suis bloquée car je ne sais plus comment faire car ma maille initiales est alors sur l'aiguille droite , je ne comprends pas comment je pourrais la retricoter.... Merci pour aide !!
26.02.2025 - 14:48DROPS Design answered:
Bonjour Sophie, nous n'avons pas de vidéo spécifique, malgré tout celle-ci montre comment tricoter 5 fois la même maille pour augmenter 4 mailles, notez juste que les mailles seront ensuite tricotées différemment car le point dans la vidéo est différent de celui de ce pull, tricotez juste ces mailles en les incorporant aux côtes brisées. Bon tricot!
26.02.2025 - 17:57
![]() Tora wrote:
Tora wrote:
Denne oppskriften var forferdelig å forstå og i følge kommentarene så er det ikke bare meg som har store problemer. Jeg gir opp og må finne noe annet. Trist.
25.02.2025 - 11:28
![]() Tora wrote:
Tora wrote:
Jeg forstår ikke første del i bærestykke. Strikker S og har 100masker på pinnen, hvis jeg regner ut det som står i oppskriften uten økning så er det 4+1+40+1+7+1+40+1+3=98. Hvor kommer de to resterende maskene inn? Etter økning har jeg for mange masker på pinnen.
15.02.2025 - 09:21DROPS Design answered:
Hei Tora, Du har 4 + 1 +40 +1+ 1 (første maske i A.2 + A.3 over neste masken) + 7 +1 ++40 ++1 +1 (første masken i A.2 + A.3 over neste masken) + 3 = 100 masker. God fornøyelse!
17.02.2025 - 07:25
|
||||||||||
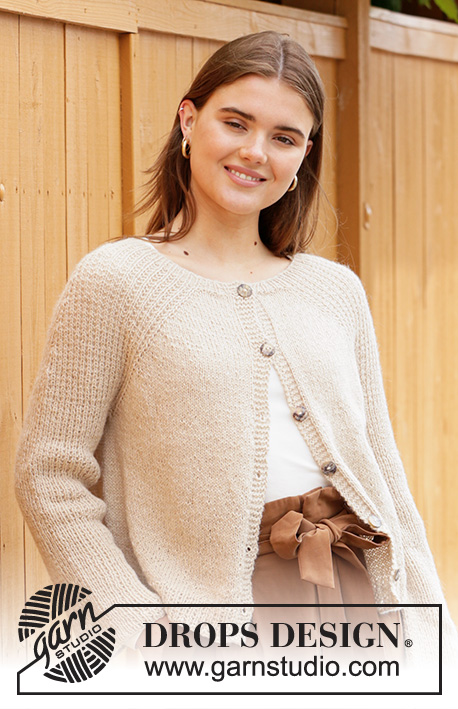
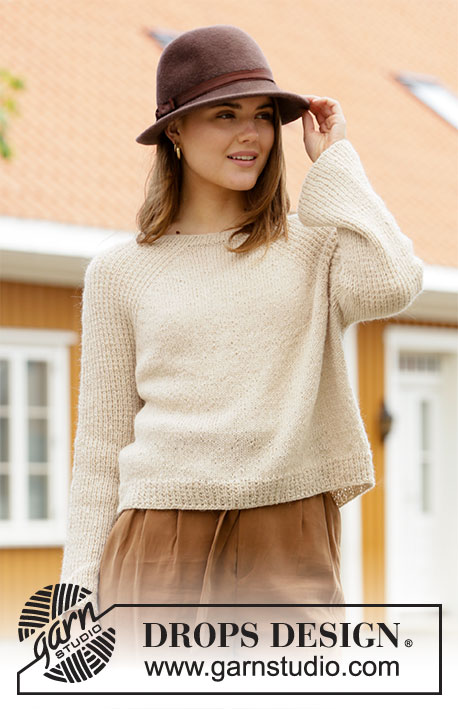
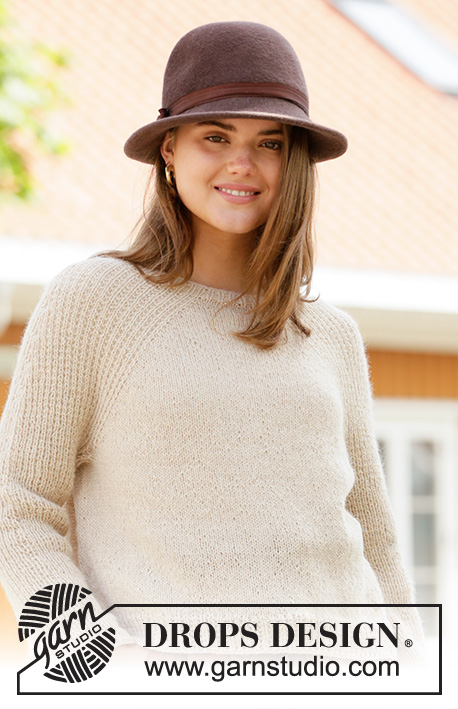
Winter Wheat#winterwheatsweater |
||||||||||
 |
 |
|||||||||
Knitted jumper with raglan in DROPS Puna or DROPS Soft Tweed. The piece is worked top down with textured pattern on the sleeves. Sizes S - XXXL.
DROPS 206-48 |
||||||||||
|
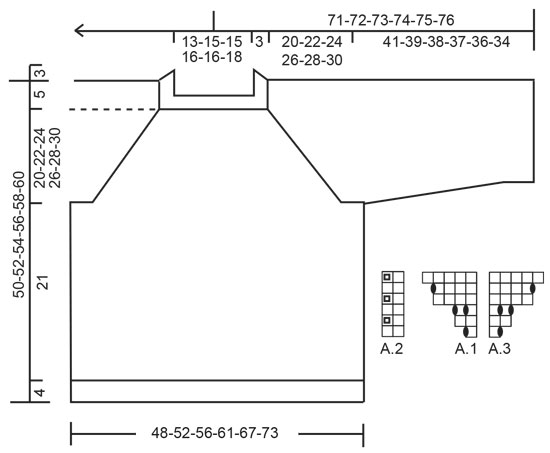
------------------------------------------------------- EXPLANATIONS FOR THE PATTERN: ------------------------------------------------------- PATTERN: See diagrams A.1 to A.3. INCREASE TIP (evenly spaced): To work out how to increase evenly, count the total number of stitches to be increased over (e.g. 4 stitches) and divide by the number of increases to be made (e.g. 4) = 1. In this example, increase by making 1 yarn over after each stitch. On the next round work the yarn overs twisted to avoid holes. INCREASE SLEEVES: Work as far as the mid-stitch on the sleeve (= stitch with marker), * knit 1, make 1 yarn over *, work from*-* a total of 2 times in the same stitch, knit 1 in the same stitch (= 4 stitches increased in the same stitch). Repeat on the other sleeve. The new stitches are worked into pattern A.2. DECREASE TIP (for sleeves): Decrease in the different sizes as follows: Sizes L and XXXL: Work until there are 2 stitches left before the stitch with the marker, knit 2 together, purl 1 (marker in this stitch), slip 1 stitch as if to knit, knit 1 and pass the slipped stitch over (= 2 stitches decreased). Sizes XL and XXL: Work until there are 3 stitches left before the stitch with the marker, knit 2 together, knit 3 (marker in the middle stitch of these 3), slip 1 stitch as if to knit, knit 1 and pass the slipped stitch over (= 2 stitches decreased). ------------------------------------------------------- START THE PIECE HERE: ------------------------------------------------------- JUMPER – SHORT OVERVIEW OF THE PIECE: The piece is worked in the round with circular needle, top down. The sleeves are worked in the round with double pointed needles/short circular needle. Stocking stitch is worked on the front and back pieces, textured pattern on the sleeves. NECK: Cast on 100-108-108-116-116-124 stitches with circular needle size 3 mm and Puna. Knit 1 round then work rib (= knit 1 / purl 1) in the round for 3 cm. Insert a marker here. THE PIECE IS NOW MEASURED FROM HERE! YOKE: Change to circular needle size 4.5 mm and work pattern as follows: Knit the first 4-6-6-8-8-10 stitches and increase at the same time 4-2-4-2-5-4 stitches evenly spaced – read INCREASE TIP, work A.1 over the next stitch, insert a marker thread here (= transition between half back piece and right sleeve), work A.2 over the next 40 stitches, work the first stitch in A.2, insert a marker thread here (= transition between right sleeve and front piece), work A.3 over the next stitch, knit 7-11-11-15-15-19 stitches and increase at the same time 7-4-7-3-9-7 stitches evenly spaced, A.1 over the next stitch, insert a marker thread here (= transition between front piece and left sleeve), work A.2 over the next 40 stitches, work the first stitch in A.2, insert a marker thread here (= transition between left sleeve and half back piece), work A.3 over the next stitch, knit 3-5-5-7-7-9 stitches and increase at the same time 3-2-3-1-4-3 stitches evenly spaced = 118-120-126-126-138-142 stitches on the needle. There is now 1 marker thread in each transition between body and sleeves (= 4 marker threads). Insert 1 marker in the mid-stitch on each sleeve (= knitted stitch). REMEMBER THE KNITTING TENSION! Continue in the round with pattern A.2 between the marker threads on the sleeves and A.1/A.3 + stocking stitch over the stitches on the front and back pieces – AT THE SAME TIME on round 3 in A.1/A.3 start INCREASE SLEEVES – read description above (= 4 stitches increased on each sleeve). Increase like this every 8th-8th-6th-6th-4th-4th round a total of 6-7-10-11-13-14 times. When A.1 and A.3 have been completed in height continue to repeat towards the raglan-lines 7-8-9-10-11-12 more times (a total of 8-9-10-11-12-13 times), then work the first 3-3-1-1-0-0 rounds in the diagrams. When all the increases to sleeves and front and back pieces are finished there are 302-328-366-390-430-458 stitches on the needle (24-28-40-44-52-56 stitches increased on each sleeve and 35-39-41-45-48-52 stitches increased on each side of the front and back pieces). The piece now measures 20-22-24-26-28-30 cm from the marker on the neck. If the piece is shorter than this continue working to the correct length. The next round is worked as follows: Work the first 44-48-52-56-62-67 stitches (= approx. half back piece), place the next 65-69-81-85-93-97 stitches on 1 thread for sleeve and cast on 9-9-9-11-11-13 new stitches on the needle (= in side under the sleeve), work the next 86-95-102-110-122-132 stitches (= front pieces), place the next 65-69-81-85-93-97 stitches on 1 thread for sleeve and cast on 9-9-9-11-11-13 new stitches on the needle (= in side under the sleeve) and work the remaining 42-47-50-54-60-65 stitches (= approx. half back piece). Body and sleeves are finished separately. THE PIECE IS NOW MEASURED FROM HERE! BODY: There are 190-208-222-242-266-290 stitches on the body. Continue in the round with stocking stitch until the piece measures 21 cm. Work an edge with pattern A.2 in the round. When the edge measures 4 cm, Cast off with knit over knit and purl over purl. The jumper measures approx. 50-52-54-56-58-60 cm from the shoulder down. SLEEVE: Place the 65-69-81-85-93-97 stitches from the thread on the one side of the piece on short circular needle size 4.5 mm and knit up 1 stitch in each of the 9-9-9-11-11-13 stitches cast on under the sleeve = 74-78-90-96-104-110 stitches. Work pattern A.2 in the round as before. The pattern should fit on the round. Work as follows in the different sizes: Sizes S, M: Work textured pattern until the sleeve measures 41-39 cm from the division. Cast off with knit over knit and purl over purl. Sizes L, XL, XXL and XXXL: Work textured pattern until the sleeve measures 4 cm from the division. Insert a marker in the middle stitch under the sleeve. On the next round begin to decrease under the sleeve – read DECREASE TIP. Decrease like this every 2nd round a total of 4-4-4-4 times = 82-88-96-102 stitches. Continue with textured pattern until the sleeve measures 38-37-36-34 cm. Cast off with knit over knit and purl over purl. Work the other sleeve in the same way. |
||||||||||
Diagram explanations |
||||||||||
|
||||||||||
 |
||||||||||
Have you finished this pattern?Tag your pictures with #dropspattern #winterwheatsweater or submit them to the #dropsfan gallery. Do you need help with this pattern?You'll find 26 tutorial videos, a Comments/Questions area and more by visiting the pattern on garnstudio.com. © 1982-2026 DROPS Design A/S. We reserve all rights. This document, including all its sub-sections, has copyrights. Read more about what you can do with our patterns at the bottom of each pattern on our site. |
||||||||||


With over 40 years in knitting and crochet design, DROPS Design offers one of the most extensive collections of free patterns on the internet - translated to 17 languages. As of today we count 324 catalogues and 12290 patterns translated into English (UK/cm). 12290
We work hard to bring you the best knitting and crochet have to offer, inspiration and advice as well as great quality yarns at incredible prices! Would you like to use our patterns for other than personal use? You can read what you are allowed to do in the Copyright text at the bottom of all our patterns. Happy crafting!
Post a comment to pattern DROPS 206-48
We would love to hear what you have to say about this pattern!
If you want to leave a question, please make sure you select the correct category in the form below, to speed up the answering process. Required fields are marked *.