
Popular categories
Looking for a yarn?


Comments / Questions (9)
![]() Patricia wrote:
Patricia wrote:
On the Yoke, after increasing for raglans, the instructions say: "Continue pattern as before [...] until piece measures 22-24-26-28-30-32 cm from marker thread on front piece". Then work A1b and A3b according to the arrow for my size (XL) on those charts. But the next paragraph gain says: "When piece measures 22-24-26-28-30-32 cm from where marker thread was inserted ..." I don't understand why the 2nd set of measures is the same - isn't the Yoke be longer at that point? Thank you!
23.01.2026 - 23:41DROPS Design answered:
Dear Patricia, just in case your tension is tighter you then just have work in pattern as stated, but if your tension is right then just divide when yoke measures 28 cm. Happy knitting!
27.02.2026 - 15:23
![]() Chris wrote:
Chris wrote:
Wenn ich nach Setzen der Markierungen anfange, das Muster zu stricken, habe ich 84 Maschen auf der Nadel. Nachdem ich den Teil Ärmel gestrickt habe und mit A1a weitermache (bei M=19 Maschen), bin ich schon in der Mitte des Vorderteils. Wenn ich nun noch A2a stricke, komme ich schon in den nächsten Ärmel. Was mache ich falsch? Danke!
15.12.2024 - 19:37DROPS Design answered:
Liebe Chris, in M sind es 10 Maschen zwischen den Markierungen für jeden Ärmel: die 1. ist die für Raglan, dann sind es8 Maschen glatt rechts und 1 M für Raglan - Diagramme stricken Sie nur beim Vorder- / Rückenteil so: (32 M zwischen den Markierungen): 1 Masche für Raglan, A.1a (= 1 M), A.2a (=28 M), A.3a (= 1 M) und 1 Masche für Raglan = 1+(1+28+1)+1=32 Maschen wie zwischen den Markierungen. Viel Spaß beim Stricken!
16.12.2024 - 11:09
![]() Charlotte Hinger wrote:
Charlotte Hinger wrote:
Should the sweater, Blue Melody, be blocked? I've had wonderful results with this yarn and I extended the pattern into a dress.
22.09.2022 - 23:12DROPS Design answered:
Dear Mrs Hinger, some knitters block some other never block, so that it might be a matter of personnal habits/taste - feel free to ask your DROP Store for their own tips or advices. Happy knitting!
23.09.2022 - 07:55
![]() Martine GIDON wrote:
Martine GIDON wrote:
Bonjour, je voulais savoir si les augmentations de chaque côté des raglans comprennent aussi les demi-raglans (je suis juste après le col). Merci.
22.02.2020 - 20:04DROPS Design answered:
Bonjour Mme Gidon, vous devez augmenter pour le raglan 8 mailles à chaque tour d'augmentations, autrement dit, répétez les augmentations de la même façon: après la 1ère m du tour, de chaque côté des 2 m des raglans et avant la dernière m du tour. Bon tricot!
24.02.2020 - 08:37
![]() Agnieszka wrote:
Agnieszka wrote:
Czy dobrze zrozumialam? Tył i przód tego swetra są identyczne?
25.12.2019 - 08:11DROPS Design answered:
Witaj Agnieszko! Dokładnie tak, przód i tył są identyczne. Pozdrawiamy!
30.12.2019 - 00:36
![]() Maribo wrote:
Maribo wrote:
Super řešení volného roláku, vypadá krásně měkce a pohodlně
15.10.2019 - 16:22
![]() Lesley wrote:
Lesley wrote:
I think it looks lovely, and will probably knit this, I love the softness of melody
17.08.2019 - 01:41
![]() Ellis wrote:
Ellis wrote:
To thick yarn and to big needles. quick knit for young beginners but I want more challenge and more elegance
09.06.2019 - 19:13
![]() Dianne wrote:
Dianne wrote:
It reminds me of something you can cuddle into.
09.06.2019 - 02:05
|
||||||||||||||||||||||||||||||||||||||||||||||
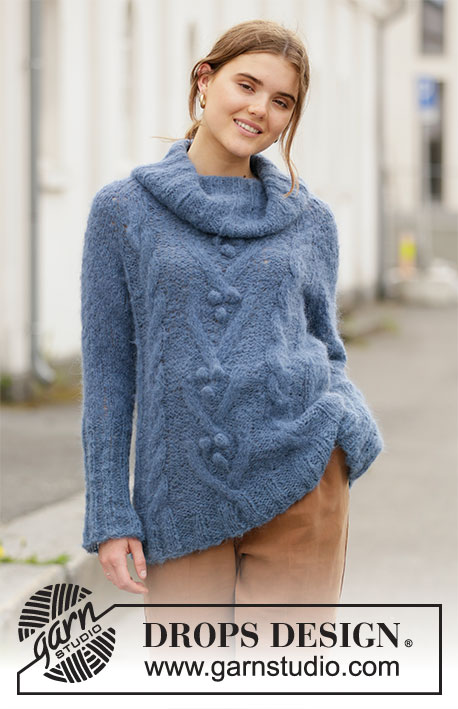
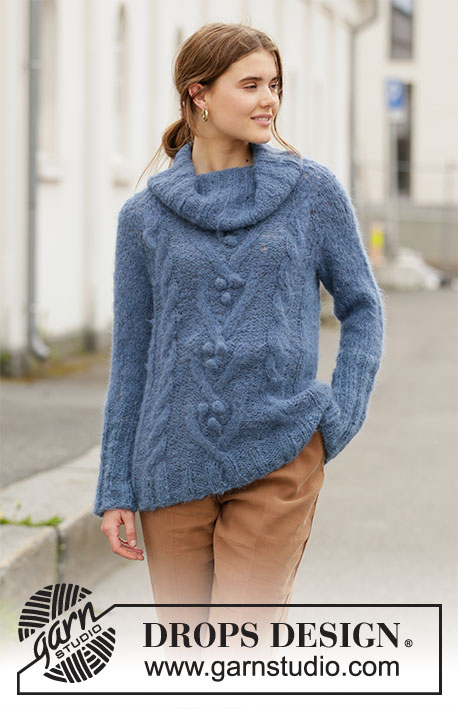
Blue Melody#bluemelodysweater |
||||||||||||||||||||||||||||||||||||||||||||||
 |
 |
|||||||||||||||||||||||||||||||||||||||||||||
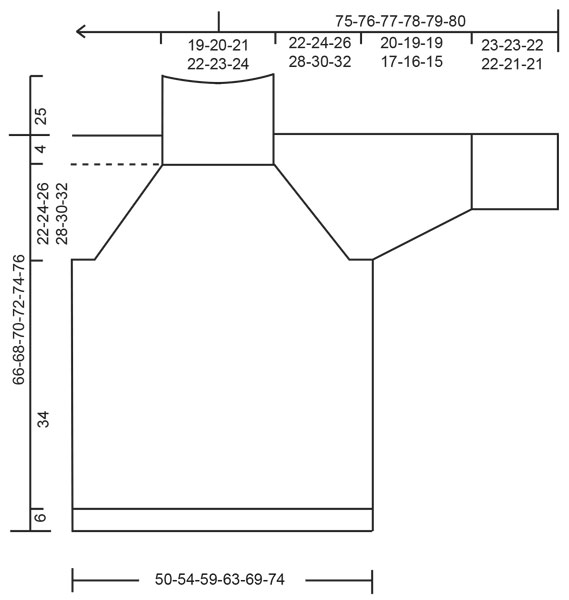
Knitted long jumper in DROPS Melody. Piece is knitted top down with raglan, cables and bobbles. Size: S - XXXL
DROPS 205-13 |
||||||||||||||||||||||||||||||||||||||||||||||
|
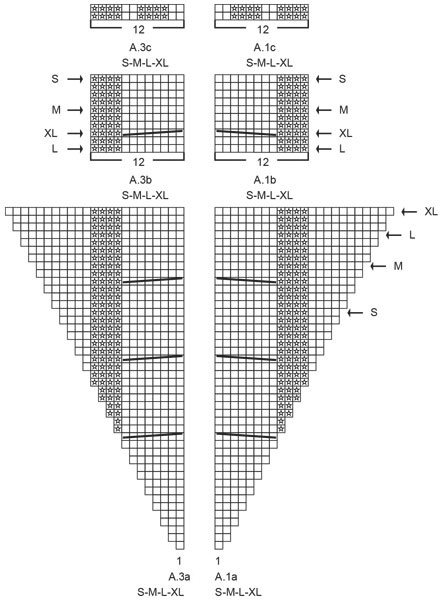
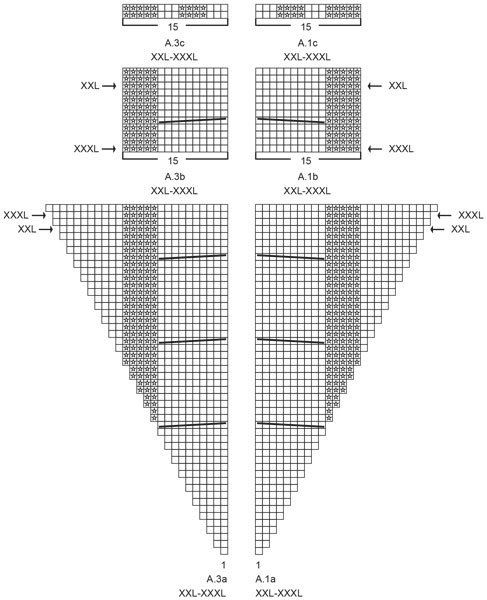
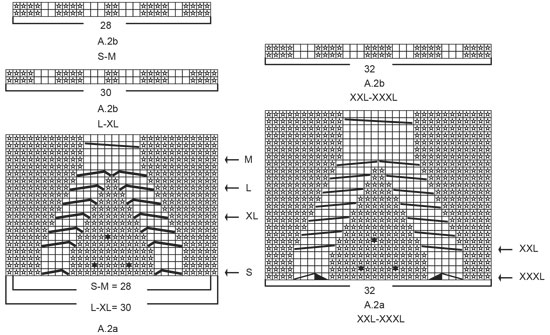
---------------------------------------------------------- EXPLANATION FOR THE PATTERN: ---------------------------------------------------------- RAGLAN: Increase 1 stitch on each side of 2 stitches in stocking stitch in every transition between body and sleeves (= 8 stitches increased on round). Increase 1 stitch by making 1 yarn over. On next round work yarn overs twisted to avoid holes. PATTERN: See diagrams A.1 to A.3. Choose diagram for your size. NOTE! In diagram A.1a and A.3a increase in pattern as shown in diagrams. The stitches increased for raglan have been drawn into diagrams (the increase for raglan is not been drawn). DECREASE/INCREASE TIP (evenly): To calculate how to decrease/increase evenly, count the number of stitches to increase/decrease over (e.g. 11 stitches) and divide stitches by number of increases/decreases to be done (e.g. 2) = 5.5. In this example decrease by alternately working every 4th and 5th stitch and every 5th and 6th stitch together. If increasing make 1 yarn over after alternately every 5th and 6th stitch in this example. On next round work yarn overs twisted to avoid holes. DECREASE TIP (applies to sleeves): Decrease 1 stitch on each side of marker thread as follows: Work until 3 stitches remain before marker thread and knit 2 together, knit 2 (marker thread is between these stitches), slip 1 stitch knitwise, knit 1, pass slipped stitch over stitch worked. ---------------------------------------------------------- START THE PIECE HERE: ---------------------------------------------------------- JUMPER - SHORT OVERVIEW OF THE PIECE: Neck edge and yoke are worked in the round on circular needle, top down. Now divide yoke for body and sleeves. Body is worked in the round on circular needle, top down. Work sleeves in the round on double pointed needles/a short circular needle, top down. NECK: Cast on 100-105-110-115-120-125 stitches on a short circular needle size 5 mm with Melody. Knit 1 round, then work rib in the round = knit 3/purl 2. When neck measures 8 cm, decrease all 3 knit stitches to 2 knit stitch by knitting 2 together at the beginning of every knit section = 80-84-88-92-96-100 stitches. Continue rib (= knit 2/purl 2) until piece measures 25 cm. YOKE: Now insert 4 markers in the piece as explained below. Markers mark raglan stitches and are used when increasing for raglan. NOTE! Insert markers without working. Insert 1 marker at beginning of round (= in transition between back piece and right sleeve when garment is worn), count 8-10-10-12-12-14 stitches (= sleeve), insert 1 marker, count 32-32-34-34-36-36 stitches (= front piece), insert 1 marker, count 8-10-10-12-12-14 stitches (= sleeve) and insert 1 marker. There are now 32-32-34-34-36-36 stitches until first marker (= back piece). Insert 1 marker thread in the middle of front piece. Measure yoke from this marker thread. Switch to circular needle size 6 mm, work next round as follows: Knit 1 (= half raglan line), make 1 yarn over (= increase), knit 6-8-8-10-10-12 (= sleeve), make 1 yarn over (= increase), work 2 stitches in stocking stitch (= raglan line), make 1 yarn over (= increase), work A.1a over next stitch, begin round marked with your size, work A.2a over the next 28-28-30-30-32-32 stitches and work A.3a over next stitch (= front piece), make 1 yarn over (= increase), knit 2 (= raglan line), make 1 yarn over (= increase), knit 6-8-8-10-10-12 (= sleeve), make 1 yarn over (= increase), knit 2 (= raglan line), make 1 yarn over (= increase), work A.1a over next stitch, begin on round marked with your size and work A.2a over the next 28-28-30-30-32-32 stitches, work A.3a over next stitch (= back piece), make 1 yarn over (= increase), and finish with knit 1 (= half raglan line). First increase for RAGLAN - read explanation above, is now done. Continue PATTERN like this - read explanation above. AT THE SAME TIME continue increase for raglan on each side of every raglan line every other round 16-19-21-22-24-25 times in total (including increase as explained on first round) – work the new stitches on front piece and back piece into pattern as A.1a and A.3a show. On sleeves work the new stitches in stocking stitch. The 20-20-20-20 24-24 rows in A.2a are repeated vertically until finished measurements. REMEMBER THE KNITTING TENSION! When all increases are done there are 208-236-256-268-288-300 stitches on row. Continue pattern as before, but without increase for raglan until piece measures 22-24-26-28-30-32 cm from marker thread on front piece, i.e. over the middle 52-52-54-54-62-62 stitches on front piece and on back piece work as follows: Work A.1b over the last 12-12-12-12-15-15 stitches in A.1a (begin on round marked with arrow in your size), continue A.2b as before over the next 28-28-30-30-32-32 stitches and work A.3b over the first 12-12-12-12-15-15 stitches in A.3a (begin on round marked with arrow in your size). Work the remaining stitches in stocking stitch. When piece measures 22-24-26-28-30-32 cm from where marker thread was inserted on front piece, divide yoke for body and sleeves, i.e. work next round as follows: Work the first 1-1-1-2-3-5 stitches (= on back piece), slip the next 38-46-50-52-54-54 stitches on 1 stitch holder for sleeve, cast on 8-8-8-10-10-12 new stitches on needle (= in the side under sleeve), work stocking stitch and pattern as before over the next 66-72-78-82-90-96 stitches (= front piece), slip the next 38-46-50-52-54-54 stitches on 1 stitch holder for sleeve, cast on 8-8-8-10-10-12 new stitches on needle and work stocking stitch and pattern over the remaining 65-71-77-80-87-91 stitches (= on back piece). Finish body and sleeves separately. NOW MEASURE THE PIECE FROM HERE! BODY: = 148-160-172-184-200-216 stitches. Work until the middle 8-8-8-10-10-12 stitches that were cast on under sleeve. Round begins here now, and work first round as follows: Work 11-14-16-19-19-23 stitches in stocking stitch, continue pattern A.1b, A.2a and A.3b as before over the next 52-52-54-54-62-62 stitches, work 22-28-32-38-38-46 stitches in stocking stitch (= in the side), continue pattern A.1b, A.2a and A.3b as before over the next 52-52-54-54-62-62 stitches, and finish with 11-14-16-19-19-23 stitches in stocking stitch. Continue pattern like this. Work until body measures approx. 34 cm from division – finish after one whole repetition vertically (if this measurements is not achieved, work knit over knit and purl over purl until correct measurements). Switch to circular needle size 5 mm. Work 11-14-16-19-19-23 stitches in stocking stitch, and adjust at the same time number of stitches to 9-15-15-21-21-21 – read DECREASE/INCREASE TIP, work A.1c over A.1b (= 12-12-12-12-15-15 stitches), work A.2b over A.2a (= 28-28-30-30-32-32 stitches), work A.3c over A.3b (= 12-12-12-12-15-15 stitches), work 22-28-32-38-38-46 stitches in stocking stitch, and adjust number of stitches to 21-27-33-39-39-45 stitches, work A.1c over A.1b (= 12-12-12-12-15-15 stitches), work A.2b over A.2a (= 28-28-30-30-32-32 stitches), work A.3c over A.3b (= 12-12-12-12-15-15 stitches), work 11-14-16-19-19-23 stitches in stocking stitch, and adjust number of stitches to 12-12-18-18-18-24. Then work rib, i.e. continue A.1c, A.2b and A.3c as before, work the remaining stitches in rib (= knit 3/purl 3) – begin with knit 3 (both at beginning of round and after A.3c). Continue like this until rib measures 6 cm. Loosely cast off with knit over knit and purl over purl (to avoid a tight cast-off edge use circular needle size 6 mm). Jumper measures approx. 66-68-70-72-74-76 cm from shoulder and down. SLEEVE: Slip the 38-46-50-52-54-54 stitches from stitch holder in one side of piece on a short circular needle/double pointed needles size 6 mm and pick in addition up 1 stitch in each of the 8-8-8-10-10-12 stitches cast on under sleeve = 46-54-58-62-64-66 stitches. Insert 1 marker thread in the middle of the 8-8-8-10-10-12 stitches under sleeve. Move the marker thread upwards when working; it should be used for decrease mid under sleeve. Work in stocking stitch in the round. When sleeve measures 2 cm from division, decrease 2 stitches mid under sleeve - read DECREASE TIP! Decrease like this every 2-1½-1½-1-1-1 cm 8-10-11-11-11-11 times in total = 30-34-36-40-42-44 stitches. When sleeve measures 20-19-19-17-16-15 cm from division, increase 2-2-4-0-2-4 stitches evenly = 32-36-40-40-44-48 stitches. Switch to double pointed needles size 5 mm. Work rib in the round (= knit 2/purl 2) until sleeve measures 43-42-41-39-37-36 cm (try the jumper on and work until desired length). NOTE! Shorter measurements in the larger sizes because of wider neck and longer yoke. Loosely cast off with knit over knit and purl over purl (to avoid a tight cast-off edge use circular needle size 6 mm). Work the other sleeve the same way. |
||||||||||||||||||||||||||||||||||||||||||||||
Diagram explanations |
||||||||||||||||||||||||||||||||||||||||||||||
|
||||||||||||||||||||||||||||||||||||||||||||||
 |
||||||||||||||||||||||||||||||||||||||||||||||
 |
||||||||||||||||||||||||||||||||||||||||||||||
 |
||||||||||||||||||||||||||||||||||||||||||||||
 |
||||||||||||||||||||||||||||||||||||||||||||||
Have you finished this pattern?Tag your pictures with #dropspattern #bluemelodysweater or submit them to the #dropsfan gallery. Do you need help with this pattern?You'll find 26 tutorial videos, a Comments/Questions area and more by visiting the pattern on garnstudio.com. © 1982-2026 DROPS Design A/S. We reserve all rights. This document, including all its sub-sections, has copyrights. Read more about what you can do with our patterns at the bottom of each pattern on our site. |
||||||||||||||||||||||||||||||||||||||||||||||


With over 40 years in knitting and crochet design, DROPS Design offers one of the most extensive collections of free patterns on the internet - translated to 17 languages. As of today we count 324 catalogues and 12290 patterns translated into English (UK/cm). 12290
We work hard to bring you the best knitting and crochet have to offer, inspiration and advice as well as great quality yarns at incredible prices! Would you like to use our patterns for other than personal use? You can read what you are allowed to do in the Copyright text at the bottom of all our patterns. Happy crafting!
Post a comment to pattern DROPS 205-13
We would love to hear what you have to say about this pattern!
If you want to leave a question, please make sure you select the correct category in the form below, to speed up the answering process. Required fields are marked *.