
Popular categories
Looking for a yarn?


Comments / Questions (234)
![]() Anke Heinen wrote:
Anke Heinen wrote:
Klopt het dat er steeds 2 omslagen gemaakt moeten worden tussen de telpatronen, en zijn dit dan ook de meerderingen
14.11.2019 - 09:50DROPS Design answered:
Dag Anke,
De meerderingen zijn al in het telpatroon opgenomen, dus als je de telpatronen gewoon volgt maak je ook de meerderingen. Je hoeft dus geen 2 omslagen te maken.
15.11.2019 - 12:16
![]() Titti wrote:
Titti wrote:
Ho fatto e rifatto più volte lo sprone, taglia XL, seguendo alla lettera le istruzioni ma , confermo, che arrivata al 3 giro dei diagrammi mancano punti e non si riesce a proseguire. Non so proprio cosa fare e, con molto dispiacere, a questo punto abbandono il progetto. Anche il negozio che mi ha venduto la lana non riesce a venirne a capo
22.10.2019 - 13:04DROPS Design answered:
Buonasera Titti, ci scusi per il ritardo. Abbiamo personalmente eseguito i primi giri dei diagrammi per la taglia XL e le assicuriamo che non ci sono errori e il numero dei punti è corretto. Per rederlo più facile può mettere un segnapunti alla fine di ogni motivo, così può controllare subito il numero delle maglie. E' sicura di lavorars correttamente il gettato prima delle 2 maglie insieme a rovescio? Buon lavoro!
29.10.2019 - 19:20
![]() Titti wrote:
Titti wrote:
Il 3 ferro di A3 , porta alla fine del giro completo. Avendo scelto la tg XL ho 64 m totali Lo lavoro da schema .2 D-G-2 m ins. a R Ritorto-D-G-D. Riesco a fare solo 2 D-G iniziali in quanto mi mancano le 4 m successive Forse dovrei mettere 68 m e non 64? Grazie ancora
16.10.2019 - 07:17DROPS Design answered:
Buongiorno Titti, prima della lavorazione dei diagrammi ha 64 maglie, ma già sul primo giro dei diagrammi A.1 e A.3 passano da 4 a 5 maglie, per cui dovrebbe avere 8 maglie in più sui ferri alla fine del primo giro. Controlli di aver fatto correttamente tutti gli aumenti. Buon lavoro!
16.10.2019 - 12:19
![]() Titti wrote:
Titti wrote:
Allora avevo capito giusto! Il problema nasce dal 3 ferro dei vari diagrammi in quanto le 2 maglie a r ritorto hanno in mezzo il segna punti ( A 2 - A3 ) e mi ritrovo a non completare tutto il giro in quanto ci sono meno maglie sul ferro Avendo scelto la taglia XL ho avviato 64 m Grazie per la disponibilità
15.10.2019 - 07:52DROPS Design answered:
Buonasera Titti, i segnapunti sono esterni ai diagrammi. Le ricordiamo che i diagrammi si leggono dal basso verso l'alto e da destra verso sinistra. Provi a scriverci in modo dettagliato come lavora il ferro 3 dei diagrammi e forse riusciremo ad aiutarla in modo più preciso. Buon lavoro!
15.10.2019 - 22:14
![]() Nidaa95 wrote:
Nidaa95 wrote:
One last question, are the charts read from right to left ?
14.10.2019 - 20:25DROPS Design answered:
Hi Nidaa, The charts are read from right to left and from the bottom up. Happy crafting!
15.10.2019 - 07:11
![]() Titti wrote:
Titti wrote:
Buonasera e grazie per la pazienza "Avrà quindi 4 segnapunti sul giro. A questo punto deve continuare a lavorare questi diagrammi fino alla freccia per la taglia" Da qui in poi devo seguire A1 +A2 +A3 oppure solo A1 e A3 ? Perchè facendo A1 +A2 +A3 non mi ritrovo con i punti giusti essendoci i segnapunti Ad esempio dovendo fare 2 m insieme a R ritorto , il segna punti è in mezzo...
14.10.2019 - 18:20DROPS Design answered:
Buonasera Titti, i segnapunti servono a delimitare il davanti/dietro e le maniche e sono esterni ai diagrammi. Dopo il loro posizionamento dovrà continuare a lavorare A,1, A.2, A.3 sul davanti, A,1, A.3 su una manica e poi ancora A.1, A.2, A.3 sul dietro e A.1 e A.3 sull'altra manica. In quale riga del diagramma trova difficoltà? Buon lavoro!
14.10.2019 - 22:12
![]() Nidaa95 wrote:
Nidaa95 wrote:
The tension is for the yarn named here. I mean if there a specific guage for the pullover that I can adjust my needle size for it ? You mentioned under the needle sizes no specific sts number.
14.10.2019 - 16:56DROPS Design answered:
Dear Nidaa 95, the tension required for this pattern is 10 stitches in width and 14 rows in height with stocking stitch = 10 x 10 cm. You can use the needle size that let you obtain this gauge. Happy Knitting
14.10.2019 - 17:13
![]() Titti wrote:
Titti wrote:
Grazie ma il mio quesito riguarda cosa fare dopo questo passaggio che copio : * inserire qui un segnapunti, A.1 sulle prime 3-3-3-4-4-4 maglie, A.2 sulle 14 maglie successive, A.3 sulle 4-4-4-5-5-5 maglie successive (= dietro/ davanti), inserire qui un segnapunti, A.1 sulle 3-3-3-4-4-4 maglie successive, A.3 sulle 4-4-4-5-5-5 maglie successive (= manica) *, lavorare *-* un’altra volta sul giro. Ora ci sono 4 segnapunti nel lavoro. Da questo punto non ho capito come devo proseguire
14.10.2019 - 10:53DROPS Design answered:
Buongiormo Titti, ad esempio per la taglia S che sta lavorando: deve inserire un segnapunti all'inizio del giro, lavorare A.1 sulle prime 3 maglie, A.2 sulle 14 maglie successive e A.3 sulle 4 maglie successive, poi deve inserire un altro segnapunti, lavorare A.1 sulle 3 maglie successive, A.3 sulle 4 maglie successive e ripetere tutto questo passaggio. Avrà quindi 4 segnapunti sul giro. Aquesto punto deve continuare a lavorare questi diagrammi fino alla freccia per la taglia S in cui avrà 192 maglie sul giro e il lavoro misurerà 29 cm dal bordo. Ci riscriva se ha ulteriore bisogno di aiuto. Buon lavoro!
14.10.2019 - 17:21
![]() Nidaa95 wrote:
Nidaa95 wrote:
Can you tell a particular gauge here please?
13.10.2019 - 23:42DROPS Design answered:
Dear Nidaa95, the pattern gives you the following gauge: "KNITTING TENSION: 10 stitches in width and 14 rows in height with stocking stitch = 10 x 10 cm with 1 thread Eskimo or 2 threads Air." (You can find these in the first paragraph, next to the picture of the modell. Happy Knitting!
14.10.2019 - 10:27
![]() Tittti wrote:
Tittti wrote:
Ora lavorare il motivo – scegliere il diagramma per la vostra taglia, come segue: * inserire qui un segnapunti, A.1 sulle prime 3-3-3-4-4-4 maglie, A.2 sulle 14 maglie successive, A.3 sulle 4-4-4-5-5-5 maglie successive (= dietro/ davanti), inserire qui un segnapunti, A.1 sulle 3-3-3-4-4-4 maglie successive, A.3 sulle 4-4-4-5-5-5 maglie successive (= manica) *, lavorare *-* un’altra volta sul giro. Ora ci sono 4 segnapunti nel lavoro. Come proseguo? Non mi è chiaro Grazie per l'aiuto
13.10.2019 - 15:26DROPS Design answered:
Buongiorno Titti. Se capiamo correttamente il suo quesito, dopo aver inserito i segnapunti, prosegue lavorando i diagrammi come impostato, seguendo il diagramma giusto per la sua taglia. Ci riscriva se non era questo il problema. Buon lavoro!
14.10.2019 - 10:16
|
|||||||||||||||||||
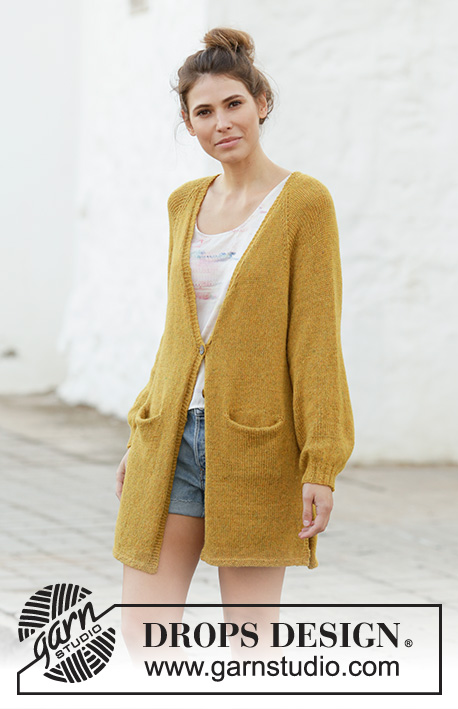
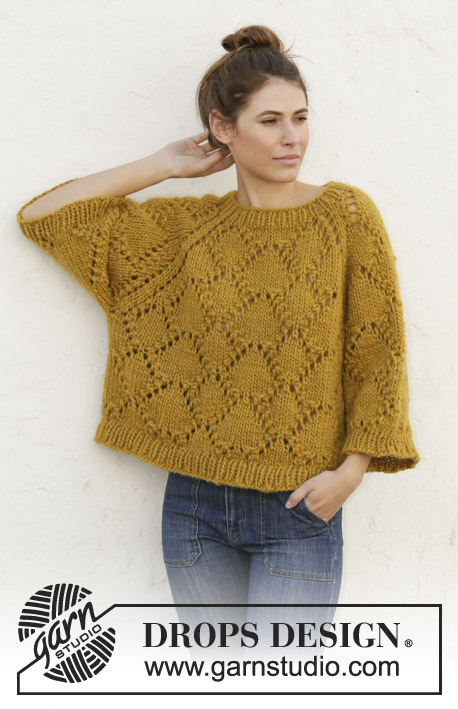
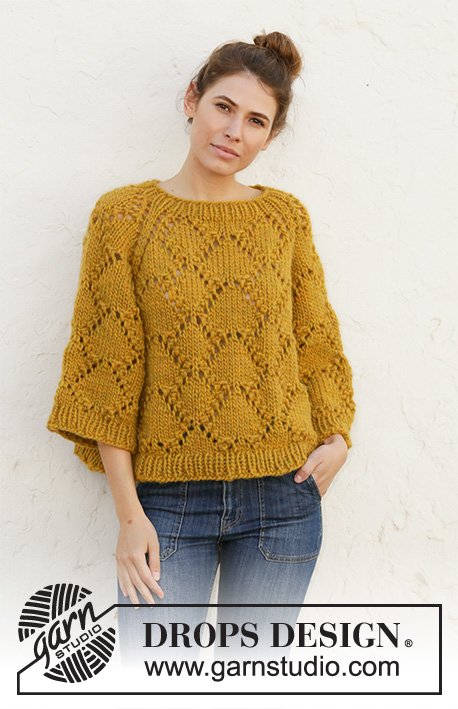
Summer Shells#summershellssweater |
|||||||||||||||||||
 |
 |
||||||||||||||||||
Knitted jumper with raglan with 1 thread DROPS Snow or 1 thread SROPS Wish or 2 threads Air. The piece is worked top down with lace pattern. Sizes S - XXXL.
DROPS 200-5 |
|||||||||||||||||||
|
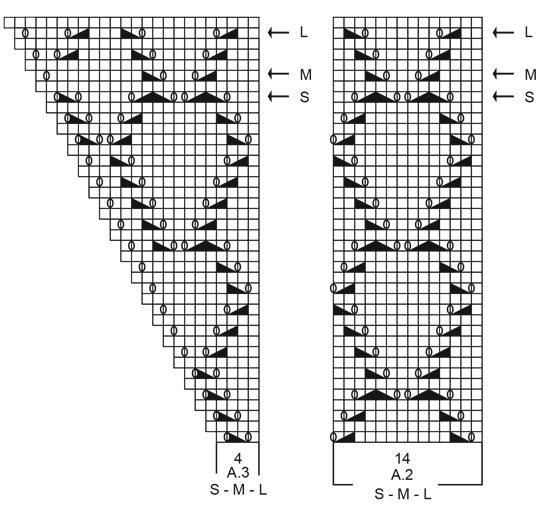
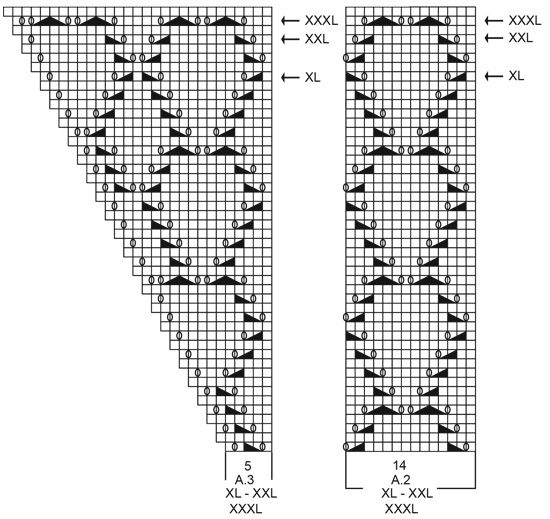
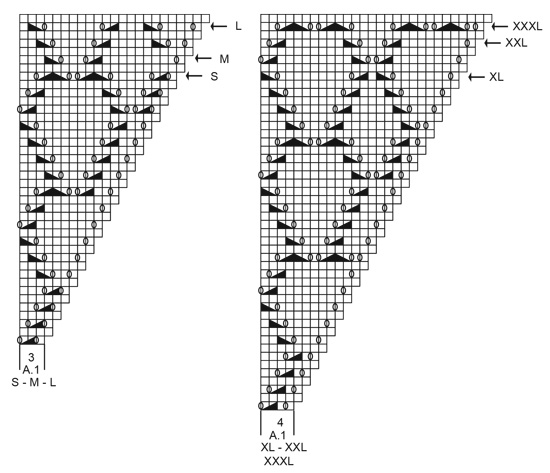
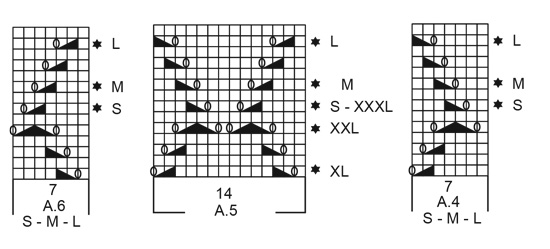
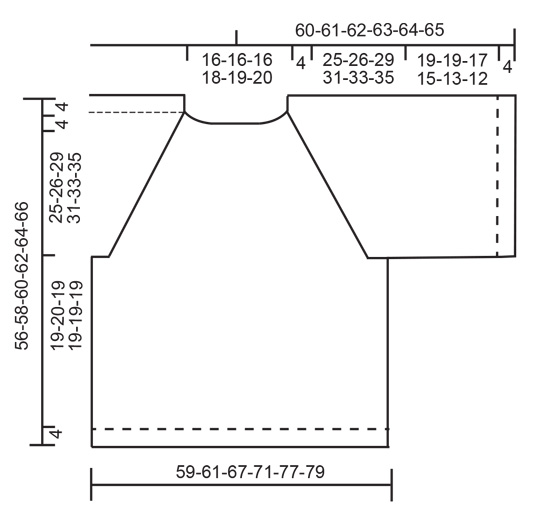
------------------------------------------------------- EXPLANATIONS FOR THE PATTERN: ------------------------------------------------------- PATTERN: See diagrams A.1 to A.6 (A.4 and A.6 apply to sizes S, M and L). Choose diagram for your size. DECREASE TIP (evenly spaced): To work out how to decrease evenly, count the total number of stitches on the needle (e.g. 58 stitches) and divide by the number of decreases to be made (e.g. 2) = 29. In this example decrease by knitting each 28th and 29th stitch together. INCREASE TIP (evenly spaced): To work out how to increase evenly, count the total number of stitches on the needle (e.g. 118 stitches) and divide by the number of increases to be made (e.g. 24) = 4.9. In this example increase by making 1 yarn over after approx. each 5th stitch. On the next row work the yarn overs twisted to avoid holes. ------------------------------------------------------- START THE PIECE HERE: ------------------------------------------------------- JUMPER - SHORT OVERVIEW OF THE PIECE: The piece is worked in the round with circular needle top down. Sleeves are worked in the round with short circular needle. JUMPER: NECK: Cast on 56-58-60-64-64-68 stitches with circular needle size 8 mm and 1 thread Snow, 1 thread Wish or 2 threads Air. Knit 1 round. Then work rib (knit 1, purl 1) for 4 cm. YOKE: Change to circular needle size 9 mm. Knit 1 round where you decrease 0-2-4-0-0-4 stitches evenly spaced – read DECREASE TIP = 56-56-56-64-64-64 stitches. Now work pattern – choose diagram for your size, as follows: * insert a marker thread here, A.1 over the first 3-3-3-4-4-4 stitches, A.2 over the next 14 stitches, A.3 over the next 4-4-4-5-5-5 stitches (= back/ front piece), insert a marker thread here, A.1 over the next 3-3-3-4-4-4 stitches, A.3 over the next 4-4-4-5-5-5 stitches (= sleeve) *, work from *-* 1 more time on the round. There are now 4 marker threads in the piece. They follow your work onwards and mark the transitions between body and sleeves. Continue this pattern in the round. Increase on each side of the diagrams to raglan (increases are drawn into the diagrams). REMEMBER THE KNITTING TENSION! When you have worked as far as the round with an arrow in the diagrams (see arrow for your size), there are 192-200-216-232-248-256 stitches on the round. The piece measures approx. 29-30-33-35-37-39 cm from the cast-on edge and down mid front. The next round is worked as follows: Work the first 55-57-61-65-69-71 stitches (= back piece), place the next 41-43-47-51-55-57 stitches on a thread (= sleeve), cast on 4-4-6-6-8-8 new stitches on the needle (= in side under sleeve), work the next 55-57-61-65-69-71 stitches (= front piece), place the next 41-43-47-51-55-57 stitches on a thread (= sleeve), cast on 4-4-6-6-8-8 new stitches under sleeve. THE PIECE IS NOW MEASURED FROM HERE! BODY: = 118-122-134-142-154-158 stitches. Insert a marker thread in each side, in the middle of the 4-4-6-6-8-8 new stitches cast on under the sleeves (= 2-2-3-3-4-4 new stitches on each side of the marker thread). Start the round by the marker thread on one side of the piece and work pattern, beginning on the round marked with a star for your size in the diagram(s) as follows: Sizes S, M and L: * Knit 1-2-5 stitches, A.4 over the next 7 stitches, A.5 over the next 42 stitches (= 3 repeats of 14 stitches), A.6 over the next 7 stitches, knit 2-3-6 stitches *, work from *-* 1 more time on the round. Sizes XL, XXL and XXXL: * Knit 0-3-4 stitches, A.5 over the next 70 stitches (= 5 repeats of 14 stitches), knit 1-4-5 stitches *, work from *-* 1 more time on the round. Continue in the round like this until the piece measures approx. 19-20-19-19-19-19 cm – adjust so that you finish after round 5 or 13 in A.5. Knit 1 round where you increase 24-24-26-28-30-32 stitches evenly spaced – read INCREASE TIP = 142-146-160-170-184-190 stitches. Change to circular needle size 8 mm. Work rib (knit 1, purl 1) in the round for 4 cm. Cast off with knit over knit and purl over purl. Make sure that the cast-off edge is not tight. Use a size larger needle if necessary. The jumper measures approx. 56-58-60-62-64-66 cm from the shoulder down. SLEEVE: Place the 41-43-47-51-55-57 stitches from the thread on the one side of the piece back on short circular needle size 9 mm and knit up 1 stitch in each of the 4-4-6-6-8-8 stitches cast on under the sleeve = 45-47-53-57-63-65 stitches. Insert a marker thread in the middle of the 4-4-6-6-8-8 stitches cast on under the sleeve (= 2-2-3-3-4-4 new stitches on each side of the marker thread). Start the round by the marker thread and work pattern, beginning on the round marked with a star for you size in the diagram(s) as follows: Sizes S, M and L: Knit 1-2-5 stitches, A.4 over the next 7 stitches, A.5 over the next 28 stitches (= 2 repeats of 14 stitches), A.6 over the next 7 stitches, knit 2-3-6 stitches. Sizes XL, XXL and XXXL: Knit 0-3-4 stitches, A.5 over the next 56 stitches (= 4 reports of 14 stitches), knit 1-4-5 stitches. Continue in the round like this until the piece measures approx. 19-19-17-15-13-12 cm – adjust so that you finish after round 5 or 13 in A.5. Knit 1 round where you increase 9-9-11-11-13-13 stitches evenly spaced = 54-56-64-68-76-78 stitches. Change to circular needle size 8 mm. Work rib (knit 1, purl 1) in the round for 4 cm. Cast off with knit over knit and purl over purl. Make sure that the cast-off edge is not tight. Use a size larger needle if necessary. The sleeve measures approx. 23-23-21-19-17-16 cm. Work the other sleeve in the same way. |
|||||||||||||||||||
Diagram explanations |
|||||||||||||||||||
|
|||||||||||||||||||
 |
|||||||||||||||||||
 |
|||||||||||||||||||
 |
|||||||||||||||||||
 |
|||||||||||||||||||
 |
|||||||||||||||||||
Have you finished this pattern?Tag your pictures with #dropspattern #summershellssweater or submit them to the #dropsfan gallery. Do you need help with this pattern?You'll find 26 tutorial videos, a Comments/Questions area and more by visiting the pattern on garnstudio.com. © 1982-2026 DROPS Design A/S. We reserve all rights. This document, including all its sub-sections, has copyrights. Read more about what you can do with our patterns at the bottom of each pattern on our site. |
|||||||||||||||||||


With over 40 years in knitting and crochet design, DROPS Design offers one of the most extensive collections of free patterns on the internet - translated to 17 languages. As of today we count 324 catalogues and 12290 patterns translated into English (UK/cm). 12290
We work hard to bring you the best knitting and crochet have to offer, inspiration and advice as well as great quality yarns at incredible prices! Would you like to use our patterns for other than personal use? You can read what you are allowed to do in the Copyright text at the bottom of all our patterns. Happy crafting!
Post a comment to pattern DROPS 200-5
We would love to hear what you have to say about this pattern!
If you want to leave a question, please make sure you select the correct category in the form below, to speed up the answering process. Required fields are marked *.