
Popular categories
Looking for a yarn?


Comments / Questions (234)
![]() Marie Rossen wrote:
Marie Rossen wrote:
Når man strikker mønster og slår om mellem 2 masker, er det så altid for-om pinden? Eller afhænger det af hvad der er strikket på de omkringliggende masker?
06.08.2020 - 11:19DROPS Design answered:
Hej Marie, nederst i opskriften finder du en antal videoer som er valgt ud til denne model. Her finder du også en som viser hvordan man strikke omslag. God fornøjelse!
06.08.2020 - 13:04
![]() Lenie Jacobs wrote:
Lenie Jacobs wrote:
Ik brei veel en graag, maar met dit patroon heb ik al meerdere keren fouten gemaakt. Ik ben nu bij rij 31, maar iedere keer als ik bij de raglan ben kom ik een paar steken te kort. En een patroon moet elke naald kloppen. Graag uw advies.groetjes Lenie
19.07.2020 - 22:13
![]() Breige McShane wrote:
Breige McShane wrote:
I do not understand the correction. Are these charts correct.
29.06.2020 - 01:25DROPS Design answered:
Dear Mrs McShane, diagrams are correct if you printed the pattern after they have been edited, otherwise it might be wise to print them one more time. Happy knitting!
29.06.2020 - 09:06
![]() Françoise wrote:
Françoise wrote:
Bonjour Je ne comprends pas le symbole jeté entre deux mailles: par exemple pour le schéma A1 premier rang au dessus de 3 mailles: ça donne 1 maille end , 1 jeté, deux mailles envers ensemble, 1 jeté : ça donne 4 mailles alors? Merci Cordialement Françoise
24.06.2020 - 00:55DROPS Design answered:
Bonjour Françoise, c'est exact, vous faites ici 1 jeté pour compenser la diminution (= le nombre de mailles reste le même, on crée le point ajouré) + 1 jeté pour augmenter = on a 4 m quand ce 1er rang est fait. On va ainsi toujours augmenter dans A.1 après la 1ère maille (et dans A.3, on augmente avant la dernière maile). Bon tricot!
24.06.2020 - 07:34
![]() Ellie Beckett wrote:
Ellie Beckett wrote:
Hi, I am attempting to work your design 'summer shells' I have been knitting for over 60 years, have kniited top down and worked from charts but I am struugling to understand your diagrams. Row 1 shows A1 worked over 3 st. but on completion is 4 st. Likewise A3 over 4 st but on completion is 5 st. The increase row shows total of 9 st but is in fact 11. Similarly row 3 shows worked over 9 st but I now have 11. Where am I going wrong!
13.06.2020 - 17:12DROPS Design answered:
Dear Mrs Beckett, the raglan increases are shown in the diagrams, that's the reason why there are 1 more stitch on every row in A.1 and A.3 - eg you have 2 yarn overs and 1 decrease on row 1 in A.1 = 1 increase. Read more about diagrams here. Happy knitting!
15.06.2020 - 08:41
![]() Jodie wrote:
Jodie wrote:
I am about 177cm in height and have a bust measurement of about 43.5 inches (approx 110cm). I am finding it hard to figure out which size to knit. Can you advise? Many thanks!
11.06.2020 - 10:44DROPS Design answered:
Dear Jodie, measure a similar garment you have and like the shape and compare these measurements to the one in the chart, this is the best way to choose our size. read more here about sizes. Happy knitting!
11.06.2020 - 13:29
![]() Lynne wrote:
Lynne wrote:
I find the shell pattern really hard to follow. The symbol graph really hard to follow I presume you start at the bottom working from right to left flicking from page and graph to next page and back! Is there a written version???
28.03.2020 - 08:59DROPS Design answered:
Dear Lynne, there is no written diagram to this pattern, but you will find here how to read knitting diagrams. Happy knitting!
30.03.2020 - 09:15
![]() Erika wrote:
Erika wrote:
Ik heb er lang over gedaan om deze trui te breien met precies dezelfde wil. Helaas kriebelt hij. Hebben hem gewassen met wasverzachter en hij is nu zo klein dat hij helaas niet meer past. Heel jammer het was zo’n leuk model
20.02.2020 - 19:49
![]() Anna Maria wrote:
Anna Maria wrote:
Scusate Vorrei realizzare questo modello tg xs e con ferri diritti È possibile?potrei iniziare il motivo dopo il raglan per facilitare il lavoro Non sono brava a seguire questo tipo di spiegazioni Mi aiutereste?grazie Userei una alpaca da lavorare con 3.5
20.02.2020 - 11:36DROPS Design answered:
Buongiorno Anna Maria, purtroppo in questa sede non possiamo fornire un'assistenza così personalizzata, ma può rivolgersi al suo rivenditore DROPS di fiducia, dove troverà tutto l'aiuto di cui avrà bisogno. Buon lavoro!
24.02.2020 - 09:19
![]() Cécile wrote:
Cécile wrote:
Bonjour je suis intéressé par le modèle ainsi que par la laine mais je ne comprends pas les explications pourrait-on les avoir en français. par avance je vous en remercie. Cécile
22.01.2020 - 07:57DROPS Design answered:
Bonjour Cécile, tous nos modèles sont disponibles en français, cliquez sur le menu déroulant sous la photo et sélectionnez "français". Bon tricot!
22.01.2020 - 10:23
|
|||||||||||||||||||
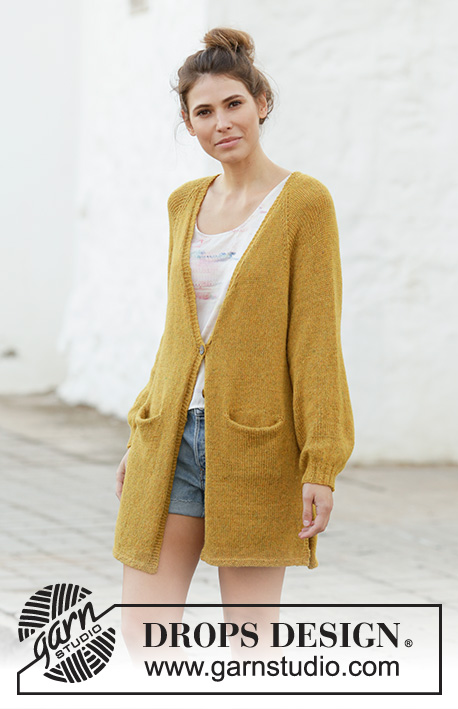
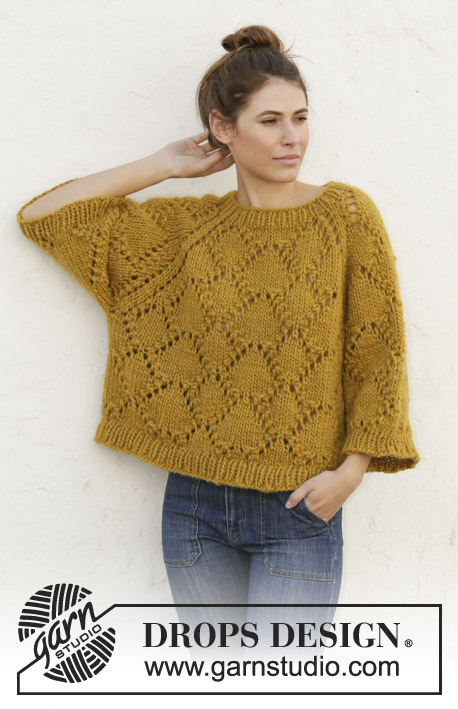
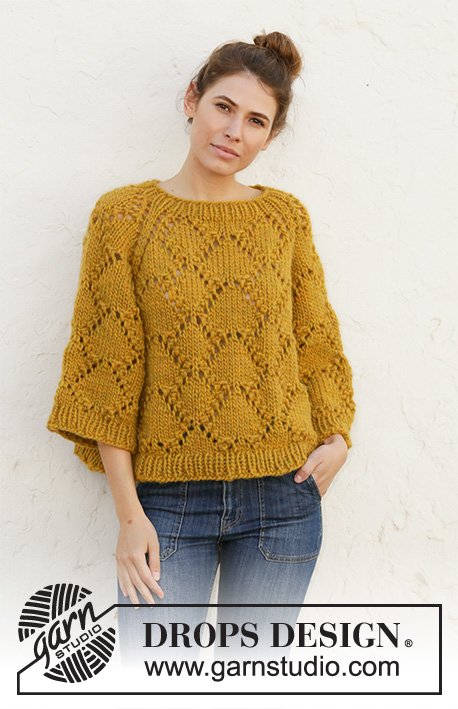
Summer Shells#summershellssweater |
|||||||||||||||||||
 |
 |
||||||||||||||||||
Knitted jumper with raglan with 1 thread DROPS Snow or 1 thread SROPS Wish or 2 threads Air. The piece is worked top down with lace pattern. Sizes S - XXXL.
DROPS 200-5 |
|||||||||||||||||||
|
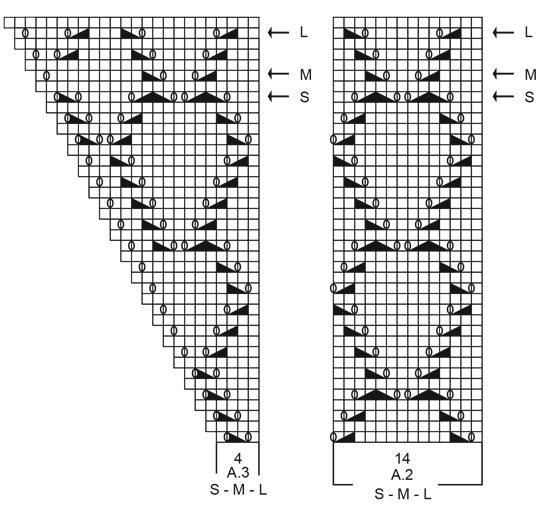
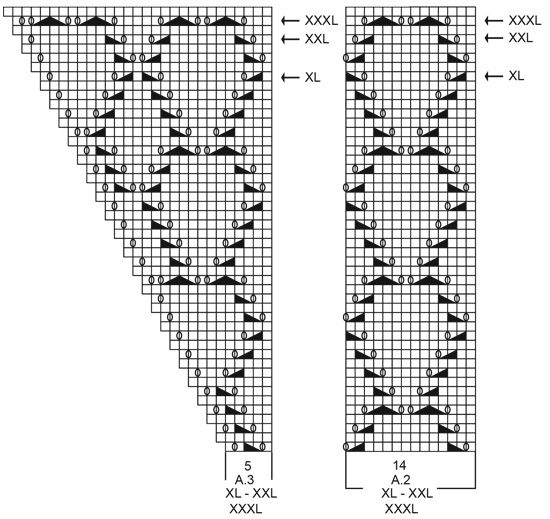
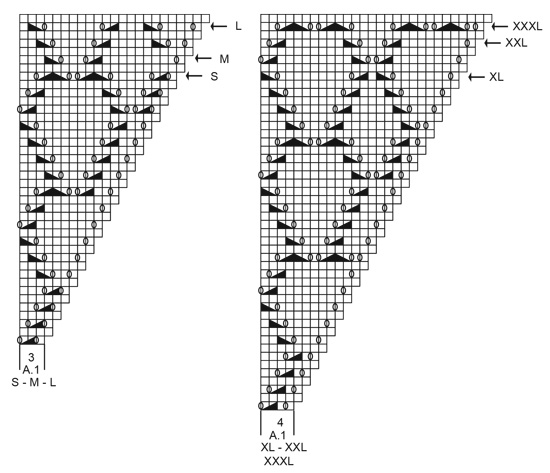
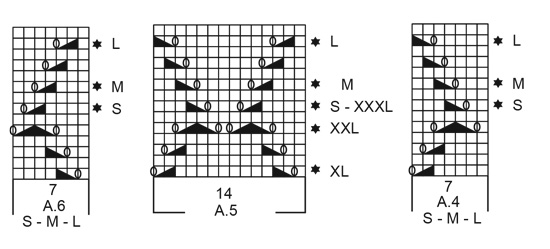
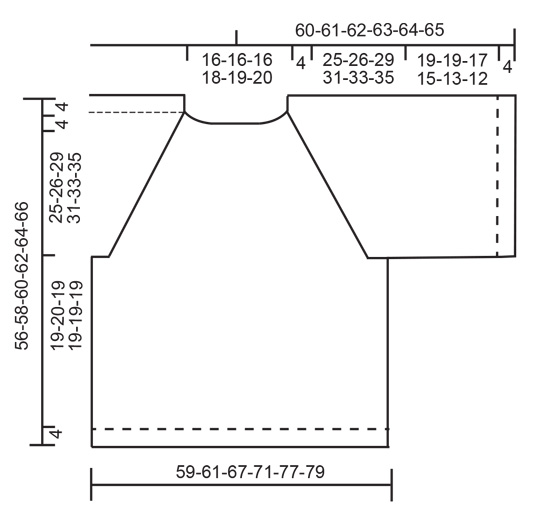
------------------------------------------------------- EXPLANATIONS FOR THE PATTERN: ------------------------------------------------------- PATTERN: See diagrams A.1 to A.6 (A.4 and A.6 apply to sizes S, M and L). Choose diagram for your size. DECREASE TIP (evenly spaced): To work out how to decrease evenly, count the total number of stitches on the needle (e.g. 58 stitches) and divide by the number of decreases to be made (e.g. 2) = 29. In this example decrease by knitting each 28th and 29th stitch together. INCREASE TIP (evenly spaced): To work out how to increase evenly, count the total number of stitches on the needle (e.g. 118 stitches) and divide by the number of increases to be made (e.g. 24) = 4.9. In this example increase by making 1 yarn over after approx. each 5th stitch. On the next row work the yarn overs twisted to avoid holes. ------------------------------------------------------- START THE PIECE HERE: ------------------------------------------------------- JUMPER - SHORT OVERVIEW OF THE PIECE: The piece is worked in the round with circular needle top down. Sleeves are worked in the round with short circular needle. JUMPER: NECK: Cast on 56-58-60-64-64-68 stitches with circular needle size 8 mm and 1 thread Snow, 1 thread Wish or 2 threads Air. Knit 1 round. Then work rib (knit 1, purl 1) for 4 cm. YOKE: Change to circular needle size 9 mm. Knit 1 round where you decrease 0-2-4-0-0-4 stitches evenly spaced – read DECREASE TIP = 56-56-56-64-64-64 stitches. Now work pattern – choose diagram for your size, as follows: * insert a marker thread here, A.1 over the first 3-3-3-4-4-4 stitches, A.2 over the next 14 stitches, A.3 over the next 4-4-4-5-5-5 stitches (= back/ front piece), insert a marker thread here, A.1 over the next 3-3-3-4-4-4 stitches, A.3 over the next 4-4-4-5-5-5 stitches (= sleeve) *, work from *-* 1 more time on the round. There are now 4 marker threads in the piece. They follow your work onwards and mark the transitions between body and sleeves. Continue this pattern in the round. Increase on each side of the diagrams to raglan (increases are drawn into the diagrams). REMEMBER THE KNITTING TENSION! When you have worked as far as the round with an arrow in the diagrams (see arrow for your size), there are 192-200-216-232-248-256 stitches on the round. The piece measures approx. 29-30-33-35-37-39 cm from the cast-on edge and down mid front. The next round is worked as follows: Work the first 55-57-61-65-69-71 stitches (= back piece), place the next 41-43-47-51-55-57 stitches on a thread (= sleeve), cast on 4-4-6-6-8-8 new stitches on the needle (= in side under sleeve), work the next 55-57-61-65-69-71 stitches (= front piece), place the next 41-43-47-51-55-57 stitches on a thread (= sleeve), cast on 4-4-6-6-8-8 new stitches under sleeve. THE PIECE IS NOW MEASURED FROM HERE! BODY: = 118-122-134-142-154-158 stitches. Insert a marker thread in each side, in the middle of the 4-4-6-6-8-8 new stitches cast on under the sleeves (= 2-2-3-3-4-4 new stitches on each side of the marker thread). Start the round by the marker thread on one side of the piece and work pattern, beginning on the round marked with a star for your size in the diagram(s) as follows: Sizes S, M and L: * Knit 1-2-5 stitches, A.4 over the next 7 stitches, A.5 over the next 42 stitches (= 3 repeats of 14 stitches), A.6 over the next 7 stitches, knit 2-3-6 stitches *, work from *-* 1 more time on the round. Sizes XL, XXL and XXXL: * Knit 0-3-4 stitches, A.5 over the next 70 stitches (= 5 repeats of 14 stitches), knit 1-4-5 stitches *, work from *-* 1 more time on the round. Continue in the round like this until the piece measures approx. 19-20-19-19-19-19 cm – adjust so that you finish after round 5 or 13 in A.5. Knit 1 round where you increase 24-24-26-28-30-32 stitches evenly spaced – read INCREASE TIP = 142-146-160-170-184-190 stitches. Change to circular needle size 8 mm. Work rib (knit 1, purl 1) in the round for 4 cm. Cast off with knit over knit and purl over purl. Make sure that the cast-off edge is not tight. Use a size larger needle if necessary. The jumper measures approx. 56-58-60-62-64-66 cm from the shoulder down. SLEEVE: Place the 41-43-47-51-55-57 stitches from the thread on the one side of the piece back on short circular needle size 9 mm and knit up 1 stitch in each of the 4-4-6-6-8-8 stitches cast on under the sleeve = 45-47-53-57-63-65 stitches. Insert a marker thread in the middle of the 4-4-6-6-8-8 stitches cast on under the sleeve (= 2-2-3-3-4-4 new stitches on each side of the marker thread). Start the round by the marker thread and work pattern, beginning on the round marked with a star for you size in the diagram(s) as follows: Sizes S, M and L: Knit 1-2-5 stitches, A.4 over the next 7 stitches, A.5 over the next 28 stitches (= 2 repeats of 14 stitches), A.6 over the next 7 stitches, knit 2-3-6 stitches. Sizes XL, XXL and XXXL: Knit 0-3-4 stitches, A.5 over the next 56 stitches (= 4 reports of 14 stitches), knit 1-4-5 stitches. Continue in the round like this until the piece measures approx. 19-19-17-15-13-12 cm – adjust so that you finish after round 5 or 13 in A.5. Knit 1 round where you increase 9-9-11-11-13-13 stitches evenly spaced = 54-56-64-68-76-78 stitches. Change to circular needle size 8 mm. Work rib (knit 1, purl 1) in the round for 4 cm. Cast off with knit over knit and purl over purl. Make sure that the cast-off edge is not tight. Use a size larger needle if necessary. The sleeve measures approx. 23-23-21-19-17-16 cm. Work the other sleeve in the same way. |
|||||||||||||||||||
Diagram explanations |
|||||||||||||||||||
|
|||||||||||||||||||
 |
|||||||||||||||||||
 |
|||||||||||||||||||
 |
|||||||||||||||||||
 |
|||||||||||||||||||
 |
|||||||||||||||||||
Have you finished this pattern?Tag your pictures with #dropspattern #summershellssweater or submit them to the #dropsfan gallery. Do you need help with this pattern?You'll find 26 tutorial videos, a Comments/Questions area and more by visiting the pattern on garnstudio.com. © 1982-2026 DROPS Design A/S. We reserve all rights. This document, including all its sub-sections, has copyrights. Read more about what you can do with our patterns at the bottom of each pattern on our site. |
|||||||||||||||||||


With over 40 years in knitting and crochet design, DROPS Design offers one of the most extensive collections of free patterns on the internet - translated to 17 languages. As of today we count 324 catalogues and 12290 patterns translated into English (UK/cm). 12290
We work hard to bring you the best knitting and crochet have to offer, inspiration and advice as well as great quality yarns at incredible prices! Would you like to use our patterns for other than personal use? You can read what you are allowed to do in the Copyright text at the bottom of all our patterns. Happy crafting!
Post a comment to pattern DROPS 200-5
We would love to hear what you have to say about this pattern!
If you want to leave a question, please make sure you select the correct category in the form below, to speed up the answering process. Required fields are marked *.