
Popular categories
Looking for a yarn?


Comments / Questions (25)
![]() Maria Giulia wrote:
Maria Giulia wrote:
Buonasera, ho realizzato il modello sk-002-bn con la lana consigliata drops Sky, per la taglia 11/12 anni, ho usato i ferri n.5, ma è risultato notevolmente piccolo, specialmente le maniche e lo sprone. Consiglio di rivedere le misure. Naturalmente sono rimasta,abbastanza delusa .
06.01.2026 - 18:32DROPS Design answered:
Buonasera Maria Giulia, il suo campione corrispondeva a quello indicato? Buon lavoro!
06.01.2026 - 22:09
![]() Mirjam wrote:
Mirjam wrote:
Moet ik in de vierde naald zowel voor de raglan als voor het achter/voor pand meerderen? Moet ik dan de draad 2 keer om de naald slaan of hoe wordt dit bedoelt? Mvrgr Mirjam
29.10.2024 - 08:59DROPS Design answered:
Dag Mirjam,
Als het goed is heb je 4 markeerdraden geplaatst. Deze markeerdraden geven de raglanlijnen aan, dus de scheidingen tussen de panden en de mouwen. Als je moet meerderen voor de raglan, doe je dit voor en/of na deze markeerdraden. Je meerdert eerst op iedere 2e naald op zowel de mouwen als de panden, dus voor en na iedere markeerdraad. Daarna meerder je op de panden op iedere 2e naald en op de mouwen op iedere 4e naald. (In de beschrijving staat hoe vaak je dat moet doen voor iedere maat.)
31.10.2024 - 20:23
![]() Mirjam wrote:
Mirjam wrote:
Het staat niet voldoende goed beschreven hoe je in een keer kunt meerderen voor zowel de mouwen als het lijfje. graag meer uitleg hierover
26.10.2024 - 19:01DROPS Design answered:
Dag Mirjam,
Bedoel je de meerderingen voor de raglan? Bovenaan bij 'uitleg voor het patroon' staat beschreven hoe je voor en na de markeerdraad moet meerderen. Elke markeerdraad zit tussen het lijf en de mouw. In de beschrijving staat aangegeven hoe vaak je moet meerderen voor het lijf en hoe vaak je voor de mouw moet meerderen. Kun je aangeven waar je precies tegenaan loopt? Dan kunnen we je hopelijk beter helpen.
27.10.2024 - 14:19
![]() Dinie Scholte wrote:
Dinie Scholte wrote:
Wil de kinder trui breien 34-8 Is mij niet duidelijk hoe ik moet meerderen De raglan meerderen geen probleem maar moet ook voor en achterpand meerderen? Hoe staat er niet bij Kunt u mij daarbij helpen?
09.08.2024 - 13:50DROPS Design answered:
Dag Dinie,
Voor de raglan meerder je verschillend op de panden en de mouwen (dus met een verschillende interval.) Dit staat beschreven in het patroon (MEERDER ALS VOLGT...) Als de pas (en dus de raglan) klaar is, hoef je verder niet meer te minderen op het lijf.
12.08.2024 - 17:25
![]() Gaynor Zanker wrote:
Gaynor Zanker wrote:
Hi, I need help with the increasing. I didn't follow the increasing tips on p2 and instead did yarn overs immediately before and after each marker. I have the right stitch count but I don't think I did it right. Should this section of increasing be done like "Raglan instructions on p2? I am unsure how to go about the next lot of increasing listed under "increase on front/back piece" at the same time as "increase as follows on sleeves".
30.06.2024 - 05:26DROPS Design answered:
Dear Gaynor, for shaping the raglan line, you should have followed the instructions for "RAGLAN" that has 5 stitches at each raglan, and increases before and after these 5 stitches (the marker is in the middle stitch out of the 5). Happy Knitting!
30.06.2024 - 15:54
![]() Dominique Chardon wrote:
Dominique Chardon wrote:
Bonjour, pouvez vous me dire ce que deviennent les 4 mailles qui portent un marqueur ? Rien n'est mentionné à leur sujet dans les explications !? Vont-elles rejoindre les mailles des manches ou bien dos et devant ? Merci pour votre réponse. Dominique
01.12.2023 - 14:19DROPS Design answered:
Bonjour Mme Chardon, suivez attentivement le décompte des mailles pour la taille que vous tricotez lors de la division, vous pouvez retirer les marqueurs car vous n'en avez plus besoin. En fonction des modèles et de la taille, les mailles des raglans et les augmentations sont parfois affectées à une autre partie que celle de l'empiècement, ainsi, seul le nombre de mailles compte pour bien avoir les mesures finales correctes. Bon tricot!
01.12.2023 - 15:41
![]() Kristin Lie Owren wrote:
Kristin Lie Owren wrote:
Hei. Skal vrangborden i halsen strikkes på rundpinne 4 som det står under bærestykket, eller skal man bruke rundpinne 3,5?
20.02.2023 - 14:28DROPS Design answered:
Hej Kristin, vrangborden i halsen strikkes på pind 4 :)
23.02.2023 - 15:17
![]() Silvia wrote:
Silvia wrote:
Al momento di dividere le maniche dal corpo, come divido per due le 5 maglie fra un gettato e l'altro degli aumenti? Grazie
23.01.2023 - 09:57DROPS Design answered:
Buonasera Silvia, per dividere il corpo e le maniche deve seguire le istruzioni riportate. Buon lavoro!
23.01.2023 - 21:51
![]() Rebecca wrote:
Rebecca wrote:
Hallo, Ich würde gerne den Kragen etwas schmaler machen, ist das möglich? Nehme ich dann zu Beginn zb 4 Maschen und nehme dann nach dem Kragen die 4 Maschen dazu ?
04.10.2022 - 15:10DROPS Design answered:
Liebe Rebecca, leider können wir nicht jede Anleitung nach jeder Anfrage anpassen; gerne können Sie aber Ihr DROPS Laden fragen, ob Sie Ihnen damit helfen können. Danke im voraus für Ihr Verständnis. Viel Spaß beim stricken!
04.10.2022 - 16:19
![]() Mevr Melinda Elen wrote:
Mevr Melinda Elen wrote:
Beste team, als ik deze trui in 1 kleur zou breien, hoeveel garen zou ik dan nodig hebben? Dankjewel
19.03.2022 - 23:46
|
|
Spring Lines#springlinessweater |
|
 |
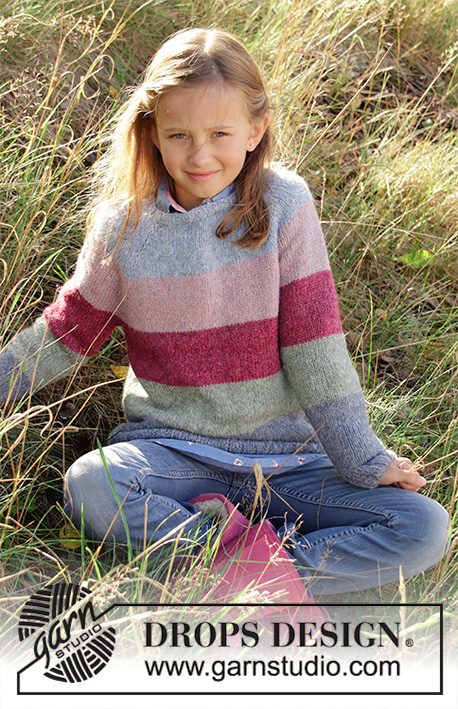 |
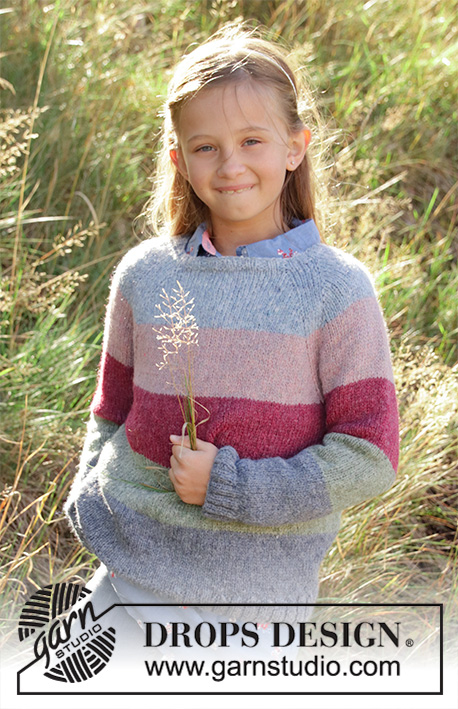
Knitted jumper for children in DROPS Sky. The piece is worked in the round, top down with stripes and raglan. Sizes 3-12 years.
DROPS Children 34-8 |
|
|
------------------------------------------------------- EXPLANATIONS FOR THE PATTERN: ------------------------------------------------------- STRIPES: The stripes have different widths in the different sizes. The order and length of stripes is: STRIPE 1: work with light jeans blue for 7-8-8½-9½-10 cm. STRIPE 2: work with light lilac for 7-8-8½-9½-10 cm. STRIPE 3: work with heather for 7-8-8½-9½-10 cm. STRIPE 4: work with light sea green for 7-8-8½-9½-10 cm. STRIPE 5: work with jeans blue to finished length in all sizes. INCREASE TIP: To work out how to increase evenly, count the total number of stitches on the needle (e.g. 148 stitches) and divide by the number of increases to be made (e.g. 24) = 6.2. In this example, increase by making 1 yarn over after approx. each 6th stitch. On the next round work the yarn overs twisted to avoid holes. RAGLAN: Increase to raglan on each side of the 4 markers as follows: Start 2 stitches before the stitch with the marker and make 1 yarn over, knit 5 (the marker sits in the middle of these 5 stitches), make 1 yarn over (= 2 stitches increased). On the next round knit the yarn overs twisted to avoid holes. DECREASE TIP (for sleeves): Decrease 1 stitch on each side of the marker thread as follows: Work until there are 3 stitches left before the marker thread, slip 1 stitch as if to knit, knit 1 and pass the slipped stitch over the knitted stitch, knit 2 (= marker thread sits in the middle of these 2 stitches), knit 2 together (= 2 stitches decreased). ------------------------------------------------------- START THE PIECE HERE: ------------------------------------------------------- JUMPER - SHORT OVERVIEW OF THE PIECE: The piece is worked in the round with circular needle, top down. It is divided for body and sleeves. The body is continued in the round with circular needle and sleeves are worked in the round with short circular needle/double pointed needles. The whole garment is worked in STRIPES – see description above. YOKE: Cast on 76-80-80-84-84 stitches with short circular needle size 4 mm and light jeans blue. Work 4 rounds of rib (= knit 2 / purl 2). The beginning of the round is mid-back of the jumper. Now work 1 round in stocking stitch and insert 4 markers which will be used when increasing to raglan as follows: Work 12-13-13-14-14 stitches (= half back piece), work 1 stitch and insert 1 marker in this stitch, work 12 stitches (= sleeve), work 1 stitch and insert 1 marker in this stitch, work 24-26-26-28-28 stitches (= front piece), work 1 stitch and insert 1 marker in this stitch, work 12 stitches (= sleeve), work 1 stitch and insert 1 marker in this stitch, work 12-13-13-14-14 stitches (= half back piece). REMEMBER THE KNITTING TENSION! Continue with stocking stitch and stripes as before and increase to RAGLAN – see description above. NOTE! The increases are different on body and sleeves, so pay attention while increasing. First increase as follows: INCREASE AS FOLLOWS ON FRONT/BACK PIECE/ SLEEVES: Increase 2 stitches to raglan at each of the 4 markers as described above (= 8 stitches increased on round): Increase every 2nd round 11-12-12-12-12 times. There are now 46-50-50-52-52 stitches on front/back piece, 34-36-36-36-36 stitches on each sleeve and 4 stitches with markers. A total of 164-176-176-180-180 stitches on the round. Then increase every 2nd round on front/back piece AT THE SAME TIME as you now increase on every 4th round on sleeves as follows: INCREASE AS FOLLOWS ON FRONT/BACK PIECE: Increase 1 stitch on each side of each front and back piece (= 4 stitches increased on round): Increase every 2nd round 10-10-12-12-14 times. You have increased a total of 21-22-24-24-26 times on the front and back pieces and have a total of 66-70-74-76-80 stitches on each front and back piece. INCREASE AS FOLLOWS ON SLEEVES: Increase 1 stitch on each side of each sleeve (= 4 stitches increased on round): Increase every 4th round 5-5-6-6-7 times. You have increased a total of 16-17-18-18-19 times on the sleeves and have 44-46-48-48-50 stitches on each one. After all the increases there are 224-236-248-252-264 stitches on the round. Work until the piece measures 16-16-18-18-19 cm from the cast-on edge mid back. The next round is worked as follows: Knit the first 34-36-38-39-41 stitches (= half back piece), place the next 44-46-48-48-50 stitches on a thread for sleeve, cast on 6-6-6-8-8 new stitches (= in side under sleeve), knit the next 68-72-76-78-82 stitches (= front piece), place the next 44-46-48-48-50 stitches on a thread for sleeve, cast on 6-6-6-8-8 new stitches (= in side under sleeve), knit the next 34-36-38-39-41 stitches (half back piece). Body and sleeves are finished separately. THE PIECE IS NOW MEASURED FROM HERE! BODY: There are 148-156-164-172-180 stitches on the needle. Continue with stocking stitch and stripes in the round as before. When the piece measures 17-21-23-27-30 cm from the division work 1 round where you increase 24-28-28-32-32 stitches evenly on round – read INCREASE TIP = 172-184-192-204-212 stitches. Change to circular needle size 3.5 mm and work rib (knit 2/ purl 2) until the piece measures 21-25-27-31-34 cm from the division. Loosely cast off with knit over knit and purl over purl. Cut and fasten the strand. The jumper measures approx. 40-44-48-52-56 cm from the shoulder down. SLEEVE: Place the stitches from the one thread on short circular needle/double pointed needles size 4 mm (= 44-46-48-48-50 stitches) and knit up 1 new stitch in each of the 6-6-6-8-8 new stitches on the body (= 50-52-54-55-58 stitches). Insert 1 marker thread in the middle of these 6-6-6-8-8 new stitches. Work stocking stitch and stripes in the round as before for 3 cm. Now decrease 1 stitch on each side of the marker thread - READ DECREASE TIP. Decrease like this every 2-3-3-3½-4 cm until you have decreased a total of 7-7-8-9-9 times = 36-38-38-38-40 stitches. Continue with stocking stitch and stripes until the sleeve measures 20-24-27-32-36 cm. Work 1 round where you increase 8-6-10-10-12 evenly on round = 44-44-48-48-52 stitches. Change to double pointed needles size 3.5 mm and work rib (knit 2 /purl 2) for 4 cm. Loosely cast off with knit over knit and purl over purl. Cut and fasten the strand. Work the other sleeve in the same way. |
|
 |
|
Have you finished this pattern?Tag your pictures with #dropspattern #springlinessweater or submit them to the #dropsfan gallery. Do you need help with this pattern?You'll find 26 tutorial videos, a Comments/Questions area and more by visiting the pattern on garnstudio.com. © 1982-2026 DROPS Design A/S. We reserve all rights. This document, including all its sub-sections, has copyrights. Read more about what you can do with our patterns at the bottom of each pattern on our site. |
|


With over 40 years in knitting and crochet design, DROPS Design offers one of the most extensive collections of free patterns on the internet - translated to 17 languages. As of today we count 324 catalogues and 12290 patterns translated into English (UK/cm). 12290
We work hard to bring you the best knitting and crochet have to offer, inspiration and advice as well as great quality yarns at incredible prices! Would you like to use our patterns for other than personal use? You can read what you are allowed to do in the Copyright text at the bottom of all our patterns. Happy crafting!
Post a comment to pattern DROPS Children 34-8
We would love to hear what you have to say about this pattern!
If you want to leave a question, please make sure you select the correct category in the form below, to speed up the answering process. Required fields are marked *.