
Popular categories
Looking for a yarn?


Comments / Questions (66)
![]() Jorun wrote:
Jorun wrote:
Er det ikke mye lettere å plukke opp en maske og strikke den vridd rett samtidig på rettomgangen i stedet for å lage kast og strikke vridd vrang på neste omgang?
02.04.2021 - 15:38DROPS Design answered:
Hei Jorunn, Når man plukker opp masker blir strikkinga tettere enn hvis man lager kast. Du må da sjekke at du holder strikkefastheten. God fornøyelse!
06.04.2021 - 07:43
![]() Anna wrote:
Anna wrote:
Bardzo prosze o wyjasnienie , czy dobrze rozumiem dodawanie oczek na dekolt V: w 5 oczkach brzegowych robię narzut, tzn 4 oczka prawe, narzut, jedno oczko prawe? I tak samo z drugiej strony 1 prawe, narzut i 4 prawe? Czy to oznacza ze ten ściągacz dzersejem w którym było na początku 5 oczek będzie coraz szerszy? Po pierwszym rzędzie gdzie był narzut ma być 6 oczek z każdej strony!
27.03.2021 - 15:31DROPS Design answered:
Witaj Aniu, na początku rzędu przerabiasz 5 oczek brzegowych na prawo, następnie 1 oczko prawe i teraz narzut (poszerza się część swetra dżersejem, a nie obszycie przodu ściegiem francuskim. Ono ma cały czas 5 o.). Na końcu rzędu przerabiasz, aż zostaje 6 oczek do końca, wykonujesz 1 narzut, 1 oczko prawe i 5 oczek obszycia przodu na prawo. Pozdrawiamy!
28.03.2021 - 22:26
![]() Konstanza wrote:
Konstanza wrote:
En los aumentos del escote debo tejer 5 del borde (musgo) 1derecho Jersey y hacer el aumento en lazada en cada lado y por el revés tejer la lazada retorcida y eso me da dos aumentos en la vuelta, o por el revés también debo hacer aumento?
09.03.2021 - 03:43DROPS Design answered:
Hola Konstanza, es correcto. Todos los aumentos por el escote son hechos por el lado derecho. Por el lado revés no debes hacer aumentos. Buen trabajo!
09.03.2021 - 06:13
![]() Manuela Ast wrote:
Manuela Ast wrote:
Bei der Raglanzunahme heisst es im letzten Satz: Es werden insgesamt 8 Maschen pro Zunahmereihe abgenommen. Ich verstehe nicht, es wird doch zugenommen? Und nicht 8 sondern 4 Maschen pro Hinreihe? herzlichen dank für eine Antwort
13.02.2021 - 15:19DROPS Design answered:
Liebe Frau Ast, also ja es werden 8 Maschen ingesamt zugenommen (und nicht abgenommen, Korrektur erfolgt, danke für den Hinweis) - es sind 1 Masche beidseitig der 4 Markierungen (= 2 -Raglanmaschen) zugenommen. Viel Spaß beim stricken!
15.02.2021 - 08:02
![]() Marisa Flores wrote:
Marisa Flores wrote:
Hola, no entiendo el aumento del escote V. Indica una lazada y un punto derecho. El punto derecho lo saco levantando una hebra o se refiere a los puntos ya tejidos? hay algún video de este aumento?
12.01.2021 - 22:53DROPS Design answered:
Hola Marisa, Para el escote V debes que hacer 1 lazada despues de/antes de 6 puntos del borde (5 puntos de borde delantero y 1 punto derecho). En la hilera siguiente (lado revés) tejer la lazada retorcida de revés para evitar un agujero. Después tejer el punto nuevo en punto jersey. Como hacer 1 lazada y tejer la lazada retorcida de revés esta AQUI. Buen trabajo!
18.01.2021 - 10:49
![]() Joke wrote:
Joke wrote:
Hoeveel boolen wol heb ik nodig voor deze vest?
07.01.2021 - 14:57DROPS Design answered:
Dag Joke,
Bovenaan bij de materialen staat per maat aangegeven hoeveel gram je nodig hebt. Voor maat S is dat bijvoorbeeld 400 gram, voor met M is dat 450 gram. (1 bol weegt 50 gram).
09.01.2021 - 09:23
![]() Paula wrote:
Paula wrote:
Hola, soy nueva en el tejido con patrones, he intentado seguir e interpretar las indicaciones del patron, sin embargo, me queda la duda con los aumentos del escote V, ya que me quedaron con 15 puntos haciendo los aumentos que se indican, y en la imagen de la chaqueta parece ser que tuviera solo un ancho de 5 puntos, habré hecho algo mal? Y, no me queda claro si las indicaciones para el frente y espalda se tejen por separado o bien se continúa tejiendo en una sola pieza? Gracias!
06.09.2020 - 04:52DROPS Design answered:
Hola Paula, Por el lado derecho, levantar 1 punto en cada uno de los 5 puntos del borde delantero de la pieza del frente derecho con aguja tamaño 3.5 mm. Tejer los 5 puntos del borde delantero en punto musgo de ida y vuelta. Si se desea, el borde delantero se puede tejer juntamente con la orilla del escote – leer TIP PARA TEJER. Cuando el borde mida aprox 14-14-15-15-16-16 cm, rematar. Tejer el borde de la pieza del frente izquierdo de la misma manera. Buen trabajo!
03.02.2021 - 14:59
![]() Layla wrote:
Layla wrote:
Hi! If I want to make this cardigan shorter, stopping before the pockets start, which part of the pattern do I begin with? Thank you :)
19.07.2020 - 11:21DROPS Design answered:
Dear Layla, we are unfortunately not able to adjust every pattern to every single request - for any individual assistance, please contact your DROPS store, even per mail or telephone - or any knitting forum. Happy knitting!
20.07.2020 - 09:49
![]() Jennifer Lee wrote:
Jennifer Lee wrote:
There are 6 quantities of yarn needed but only 5 sizes. How do I find out how many grams are for the size I want to make (XXL)
26.05.2020 - 02:25DROPS Design answered:
Dear Jennifer, there are six sizes (S - M - L - XL - XXL – XXXL) and six amounts (400-450-450-500-550-600 gramms) given for the yarn, thus for the largest size (XXL), you will need the last amount given, 600 gramms. Happy Knitting!
26.05.2020 - 02:30
![]() Sophie wrote:
Sophie wrote:
I've been knitting this pattern and am nearly ready to follow the BAND/NECK instructions (i would also like to knit into the neck using the knitting tip). I am super confused about where to pick band stitches from. I've looked at videos online and I believe I understand how to pick up stitches, but am I knitting into the band from the bottom (when worn) of the front-right piece? The pattern says "Knit up from the right side 1 stitch in each of the 5 band stitches" is this the edge stitch?
02.05.2020 - 21:00DROPS Design answered:
Dear Sophie, you cast on 1 stitch in each of the 5 stitch on one side of the jacket (the 5 sts worked in garter stitch on one side), and for the knitting tip, pick up (but do not knit up) 62-70 sts (see size) along the cast on edge (between the 5 sts in garter stitch on each side), and work the 4 new stitches then work together the 5th stitch from the neck band together with the first of the 62-70 sts, turn and work row back, continue like this, every other row (every row finishing towards neck) work the last of the 5 band stitches together with the next stitch picked up along neck. Happy knitting!
04.05.2020 - 12:24
|
|
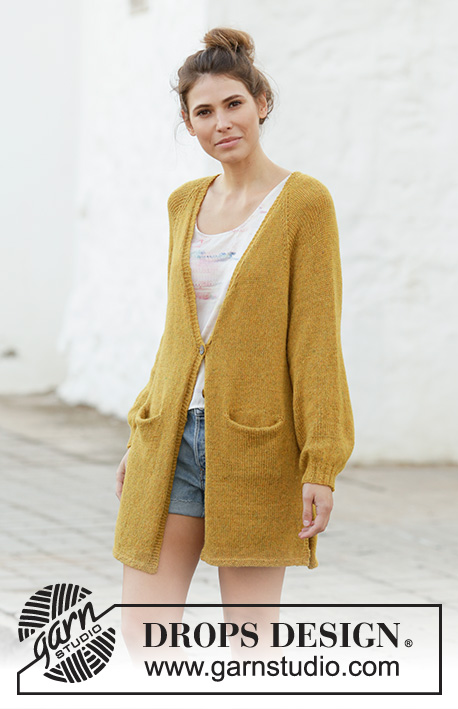
Meet the Sun#meetthesuncardigan |
|
 |
 |
Knitted long jacket with balloon sleeves and raglan in DROPS Sky. The piece is worked top down with V-neck, pockets and split in sides. Sizes S - XXXL.
DROPS 200-6 |
|
|
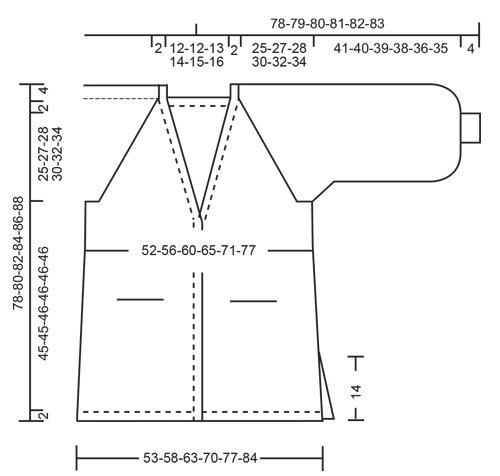
------------------------------------------------------- EXPLANATIONS FOR THE PATTERN: ------------------------------------------------------- RIDGE/GARTER STITCH (worked back and forth): Knit all rows. 1 ridge in height = Knit 2 rows. INCREASE/DECREASE TIP (evenly spaced): To work out how to increase/decrease evenly, count the total number of stitches on needle (e.g. 72 stitches), minus bands (e.g. 10 stitches) and divide the remaining stitches by the number of increases/decreases to be made (e.g. 4) = 15.5. In this example, increase by making 1 yarn over after alternately each 15th and 16th stitch. On the next row (wrong side) purl the yarn overs twisted to avoid holes. Do not increase on bands. When decreasing, work alternately each 14th and 15th stitch and each 15th and 16th stitch together. RAGLAN: All increases are worked from the right side! Increase to raglan in each transition between body and sleeves as follows: Work until there is 1 stitch left before the marker thread, make 1 yarn over, knit 2 (marker thread sits between these 2 stitches), make 1 yarn over (= 2 stitches increased). On the next row (wrong side) purl the yarn overs twisted to avoid holes. Then work the new stitches in stocking stitch. A total of 8 stitches increased on each increase-row. V-NECK: All increases are worked from the right side! Make 1 yarn over inside the 5 band stitches and knit 1 stitch (= 1 stitch increased). On the next row (wrong side) purl the yarn over twisted to avoid a hole. Then work the new stitch in stocking stitch. A total of 2 stitches increased on each increase-row. BUTTONHOLES: Work buttonholes on the right band (when garment is worn). Work from the right side when there are 4 stitches left on the row as follows: Make 1 yarn over, knit 2 together and knit 2. On the next row (wrong side), knit the yarn over to leave a hole. The first buttonhole is worked when the increases for the V-neck are finished. Then the second buttonhole is worked after 9 cm in all sizes. INCREASE TIP (for sides of body): Work until there are 2 stitches left before the marker thread, make 1 yarn over, knit 4 (marker thread sits in the middle of these 4 stitches), make 1 yarn over. On the next round work the yarn overs twisted to avoid holes. Then work the new stitches in stocking stitch. KNITTING TIP (for bands/neck): Knit up from the right side 62-62-66-66-68-70 stitches along the whole neck (not over bands) with a new needle. When working the bands, knit together 1 stitch from the band and 1 stitch from the new needle until half the stitches have been worked (= mid back). Work the remaining stitches together with the band on the opposite side. ------------------------------------------------- START THE PIECE HERE: ------------------------------------------------------- JACKET - SHORT OVERVIEW OF THE PIECE: Yoke and body are worked back and forth with circular needle from mid front, top down. One half of both pockets are worked before the yoke so that they can be worked into the piece. Pockets worked back and forth. Sleeves are worked in the round with short circular needle/double pointed needles, top down. Then the bands/neck are worked back and forth and sewn on to finish. POCKETS (first half): Cast on 28-28-30-30-32-32 stitches (including 1 edge stitch in each side) with double pointed needle/circular needle size 4 mm and Sky. Work stocking stitch with 1 edge stitch in GARTER STITCH – read description above, on each side. REMEMBER THE KNITTING TENSION! When the piece measures 12-12-13-13-14-14 cm cast off the edge stitches = 26-26-28-28-30-30 stitches. Place stitches on 1 thread and work 1 more pocket in the same way. Lay the pockets to one side and work yoke. The other half of the pocket is worked and assembled when the jacket is finished. YOKE: Cast on 72-74-76-76-78-80 stitches (including 5 band stitches on each side towards mid front) with circular needle size 3.5 mm and Sky. Purl 1 row from the wrong side with 5 band stitches in garter stitch on each side towards mid front. Knit 1 row where you increase 4-4-4-4-8-8 stitches evenly spaced – read INCREASE/DECREASE TIP = 76-78-80-80-86-88 stitches. Change to circular needle size 4 mm and purl 1 row from the wrong side with 5 band stitches in garter stitch on each side towards mid front. Insert 4 marker threads in the piece (without working the stitches) as follows: First marker thread is inserted after the first 7 stitches (= front piece), second after the next 16 stitches (= sleeve), third after the next 30-32-34-34-40-42 stitches (= back piece) and the fourth marker thread is inserted after the next 16 stitches (= sleeve). There are 7 stitches left after the last marker thread (= front piece). Continue with stocking stitch and 5 band stitches in garter stitch on each side – AT THE SAME TIME on the first row from the right side increase to RAGLAN in each transition between body and sleeves – read description above. Continue to increase to raglan every 2nd row (i.e. each row from the right side) until you have increased a total of 30-34-35-39-41-44 times on each side of the 4 marker threads. AT THE SAME TIME on row 6 (i.e. 3rd row from the right side) increase to V-NECK on each side towards mid front – read description above, as follows: Increase every 6th row a total of 13-14-13-15-10-9 times and then every 4th row a total of 0-0-2-0-8-10 times (= a total of 13-14-15-15-18-19 stitches increased in each side towards mid front). After the last increase to raglan the piece measures approx. 21-24-25-28-29-31 cm from the cast-on edge. Continue working without further raglan increases until the piece measures 25-27-28-30-32-34 cm, but continue to increase to V-neck as before. The next row from the right side is worked as follows: Work as far as the first marker thread, work 5-4-5-6-7-8 stitches after the marker thread (= front piece), place the next 66-76-76-82-84-88 stitches on 1 thread for sleeve, cast on 10-10-12-12-14-16 new stitches on the needle (= in side under sleeve), work 100-108-114-124-136-146 stitches (= back piece), place the next 66-76-76-82-84-88 stitches on 1 thread for sleeve, cast on 10-10-12-12-14-16 new stitches on the needle (= in side under sleeve), work as far as the fourth marker thread (= 5-4-5-6-7-8 stitches) and work to end of row (= front piece). Body and sleeves are continued separately. THE PIECE IS NOW MEASURED FROM HERE! BODY: Insert 1 marker thread in each side, in the middle of the 10-10-12-12-14-16 stitches cast on under each sleeve. Allow the marker threads to follow your work onwards; they will be used when increasing in the sides. Continue with stocking stitch, 5 band stitches in garter stitch on each side and increasing to V-neck as before. When the increases to V-neck are finished there are 230-246-262-282-310-334 stitches on the needle. The piece measures approx. 3-3-3-2-1-0 cm from the division (V-neck measures approx. 28-30-31-32-33-34 cm from the cast-on edge). Now work the first BUTTONHOLE on right band, read description above. When the piece measures 5 cm from the division increase 1 stitch on each side of both marker threads – read INCREASE TIP = 4 stitches increased. Increase like this every 0-20-12-7-5-4 cm a total of 1-2-3-5-6-7 times = 234-254-274-302-334-362 stitches. AT THE SAME TIME, when piece measures approx. 16-16-17-17-17-17 cm from the division, work next row from the right side as follows: Work the first 17-17-19-19-21-21 stitches, place the next 26-26-28-28-30-30 stitches on 1 thread (other half of the pocket will be worked here later), work the 26-26-28-28-30-30 stitches from the thread on the one pocket (make sure you continue from the right side of the pocket), work until there are 43-43-47-47-51-51 stitches left on the row, place the next 26-26-28-28-30-30 stitches on 1 thread (other half of the pocket will be worked here later), work the 26-26-28-28-30-30 stitches from the other pocket (make sure you continue from the right side of the pocket) and work the last 17-17-19-19-21-21 stitches on the row. Continue with stocking stitch and 5 band stitches in garter stitch on each side until the piece measures 32-32-33-33-33-33 cm from the division. Now divide the piece at the marker threads in the sides. BACK PIECE: = 112-122-132-146-162-176 stitches. Work stocking stitch with 4 edge stitches in garter stitch on each side until the piece measures 45-45-46-46-46-46 cm from the division. Change to circular needle size 3.5 mm and work 3 ridges. Loosely cast off; to avoid the cast-off edge being tight you can cast off with needle size 4 mm. The jacket measures approx. 76-78-80-82-84-86 cm from the shoulder. RIGHT FRONT PIECE: = 61-66-71-78-86-93 stitches. Work stocking stitch with 5 band stitches in garter stitch towards mid front and 4 edge stitches in garter stitch towards the side. Work until the piece measures 45-45-46-46-46-46 cm from the division. Change to circular needle size 3.5 mm and work 3 ridges. Loosely cast off; to avoid the cast-off edge being tight you can cast off with needle size 4 mm. The jacket measures approx. 76-78-80-82-84-86 cm from the shoulder. LEFT FRONT PIECE: Work as for the right front piece. SLEEVE: Place the 66-76-76-82-84-88 stitches from the thread on the one side of the piece on short circular needle/double pointed needles size 4 mm and knit up 1 stitch in each of the 10-10-12-12-14-16 stitches cast on under the sleeve = 76-86-88-94-98-104 stitches. Insert 1 marker in the middle of the 10-10-12-12-14-16 stitches under the sleeve; this is the beginning of the round. Start here and work stocking stitch in the round. When the piece measures 41-40-39-38-36-35 cm from the division (shorter measurements in larger sizes due to longer yoke) work 1 round where you decrease 32-38-36-42-42-44 stitches evenly spaced – remember INCREASE/DECREASE TIP = 44-48-52-52-56-60 stitches. Change to double pointed needles size 3.5 mm. Work rib (= knit 2 / purl 2) for 4 cm. Loosely cast off with knit over knit and purl over purl, but to avoid the cast-off edge being tight you can cast off with a needle size 4 mm. Work the other sleeve in the same way. BAND/NECK: Knit up from the right side 1 stitch in each of the 5 band stitches on the right front piece with needle size 3.5 mm. Work the 5 band stitches in garter stitch back and forth. If you wish the band can be worked together with the neck – read KNITTING TIP. When the band measures approx. 14-14-15-15-16-16 cm cast off. Work the band on the left front piece in the same way. Sew the 2 bands together mid back and then sew them to the neck of the jacket. POCKETS: Work back and forth with circular needle. Place the 26-26-28-28-30-30 stitches from the thread on the right front piece on needle size 4 mm. On the first row cast on 1 edge stitch on each side = 28-28-30-30-32-32 stitches. Work stocking stitch with 1 edge stitch in garter stitch on each side until the pocket measures 12-12-13-13-14-14 cm; loosely cast off. Work the pocket on the left front piece in the same way. ASSEMBLY: Sew the pockets inside the 1 edge stitch around the whole pocket. Then fasten to the inside of the jacket with one small neat stitch in each of the bottom corners (the stitches should not show on the right side of the jacket). Sew buttons onto left front piece. |
|
 |
|
Have you finished this pattern?Tag your pictures with #dropspattern #meetthesuncardigan or submit them to the #dropsfan gallery. Do you need help with this pattern?You'll find 28 tutorial videos, a Comments/Questions area and more by visiting the pattern on garnstudio.com. © 1982-2026 DROPS Design A/S. We reserve all rights. This document, including all its sub-sections, has copyrights. Read more about what you can do with our patterns at the bottom of each pattern on our site. |
|


With over 40 years in knitting and crochet design, DROPS Design offers one of the most extensive collections of free patterns on the internet - translated to 17 languages. As of today we count 324 catalogues and 12290 patterns translated into English (UK/cm). 12290
We work hard to bring you the best knitting and crochet have to offer, inspiration and advice as well as great quality yarns at incredible prices! Would you like to use our patterns for other than personal use? You can read what you are allowed to do in the Copyright text at the bottom of all our patterns. Happy crafting!
Post a comment to pattern DROPS 200-6
We would love to hear what you have to say about this pattern!
If you want to leave a question, please make sure you select the correct category in the form below, to speed up the answering process. Required fields are marked *.