
Popular categories
Looking for a yarn?


Comments / Questions (15)
![]() Lisbeth wrote:
Lisbeth wrote:
Stickar efter storlek 38/40, allt fungera fram till hälen är färdig och upp plockning efter sidorna , men nu skall det minskas på de mittersta 33maskorna(som är mönster på foten+sidmaskorna) då får jag ju minska på sidmaskorna och då blir de ju inte att stämma med sidmaskorna som skall följa hela vägen ner
09.05.2024 - 20:48DROPS Design answered:
Hej Lisbeth, jo når du placerer mærket i siderne, kommer det til at se ud som på billedet :)
14.05.2024 - 11:38
![]() Lill wrote:
Lill wrote:
Förlåt, min fråga var otydlig: V a r i mönstret utgår jag ifrån 31m, för att veta vilka 2m jag ska sticka ihop? Har 33m på ovansidan: Är det från A2 yttersta grå maska + A5b första/sista maska det ska minskas? (Enl. mönster nu 21m (23m inkl. 1 grå maska före +1m efter).
08.12.2023 - 20:05DROPS Design answered:
Hej Lill, sätt en markör innanför den yttersta maskan i varje sida av de 33 m (från ovansidan), så du har 31 maskor innanför markörerna. Sticka de 2 sista maskorna före markören räta tillsammans med mellangrå och sticka de 2 första maskorna efter markören (i den andra sidan) vridet räta tillsammans med mellangrå.
12.12.2023 - 10:31
![]() Lill wrote:
Lill wrote:
Ang. hällappen: 1. Mönstret anger ränder enligt A5; betyder det fortsätt A5a/A5b som tidigare eller varannan grå/vit? 2. Minska 2m före respektive 2m efter de mittersta 31m; Vilka maskor avses? Fotens ovansida har 33, 35, 37m - Är det de två maskorna som är före/efter A2 som ska minskas (dvs de 11,13,14 maskorna som plockats upp till hälen) eller vilka maskor avses?
06.12.2023 - 20:08DROPS Design answered:
Hej Lill, mønsteret A.5a+b er varannan grå/vitt, så det fortsätter du med. Om du stickar minsta storleken, skall du sticka ihop de 2 maskor som är före 31 m. (de 31-33-335m är oförändrat) och de 2 maskor som är efter 31m vridet räta tillsammans :)
07.12.2023 - 07:58
![]() Lill wrote:
Lill wrote:
Ang. hälens minskning: Vilken färg ska specifikt stickas med för att behålla ränderna när en maska lyfts över den andra osv. ? Följer man mönstret och stickar varannan grå/vit, stämmer det inte, utan blir grå över vit eller vice versa. Ränderna ”avbryts” och blir inte alls fint. Hur stickar jag för att upprätthålla ränderna under hela hälen? Vänligen Lill
23.11.2023 - 12:54DROPS Design answered:
Hej Lill, hvis indtagningen sker i forbindelse med den hvide stribe skal du strikke den med den hvide tråd (også selv om det var den grå du skulle have strikket) :)
28.11.2023 - 10:41
![]() Helene Forsberg wrote:
Helene Forsberg wrote:
Hej! Förstår inte detta: " När sista varvet i A.4 återstår, minskas det 2 maskor jämnt fördelat över de 23-25-27 maskorna i A.4 (de övriga maskorna stickas som förut utan minskningar) = 54-58-62 maskor Vilket är sista varvet på A4? För stickar jag de sista två varven så blir mönstret annorlunda...
14.03.2022 - 12:01DROPS Design answered:
Hej Helene. Det sista varvet i A.4 är varvet längst upp på diagrammet (diagrammet läses nedifrån och upp). Det är alltså på det varvet med bara mellangrå du minskar 2 maskor så det kommer inte påverka mönstret. Mvh DROPS Design
16.03.2022 - 13:50
![]() Yvonne wrote:
Yvonne wrote:
Hallo, ich bin etwas unsicher Chart A 4 hört ja früher auf als A3, strickt man dann A4 wieder von unten nach oben und was ist mit den 2 letzten Reihen bei A3 werden die dann nur über die Hälfte gestrickt😕 Herzliche Grüße
03.09.2020 - 09:43DROPS Design answered:
Liebe Yvonne, haben Sie die Antwort unten gesehen? Könnte Sie Ihnen helfen?
03.09.2020 - 09:48
![]() Yvonne wrote:
Yvonne wrote:
Hallo, ich bin etwas unsicher Chart A 4 hört ja früher auf als A3, strickt man dann A4 wieder von unten nach oben und was ist mit den 2 letzten Reihen bei A3 werden die dann nur über die Hälfte gestrickt😕 Herzliche Grüße
03.09.2020 - 09:13DROPS Design answered:
Liebe Yvonne, die Runden sind so gestrickt: A.2, A.3, A.2, A.4. Wenn A.3 einmal in der Höhe gestrickt wird, dann wiederholen Sie das Diagram von der 1. Reihe ab = die 1. Reihe von 2. Rapport A.3 in der Höhe wird bei der selben Runde als 9. Reihe in A.4 gestrickt. Viel Spaß beim stricken!
03.09.2020 - 09:24
![]() Agneta Marklund wrote:
Agneta Marklund wrote:
När alla varv på A3 är stickade (på skaftet), börjar man om då?
24.02.2020 - 15:36DROPS Design answered:
Hej Agneta, ja du stickar A.3 tills arb mäter 15 cm, fortsätt enligt mönstret. Lycka till :)
24.02.2020 - 16:33
![]() A Ellis wrote:
A Ellis wrote:
Decreases on each side of middle 33 stitches. Are these 25 A3 stitches plus 8 A2 stitches?
18.09.2019 - 15:27DROPS Design answered:
Dear Mrs Ellis, right you slipped 4 sts A.2 + 25 sts A.3 + 4 sts A.2 = 33 sts for mid upper foot. Happy knitting!
18.09.2019 - 15:44
![]() A Ellis wrote:
A Ellis wrote:
I don’t understand what is meant by the middle 33 stitches for decrease on top
17.09.2019 - 13:53DROPS Design answered:
Hello! This means you have to decrease on each side of the sock. Happy knitting!
25.09.2019 - 11:47
|
|||||||
Tip Toe Santa#tiptoesantasocks |
|||||||
 |
 |
||||||
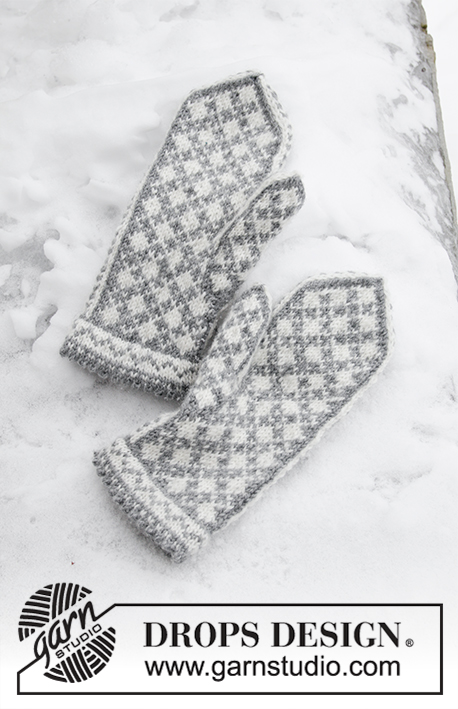
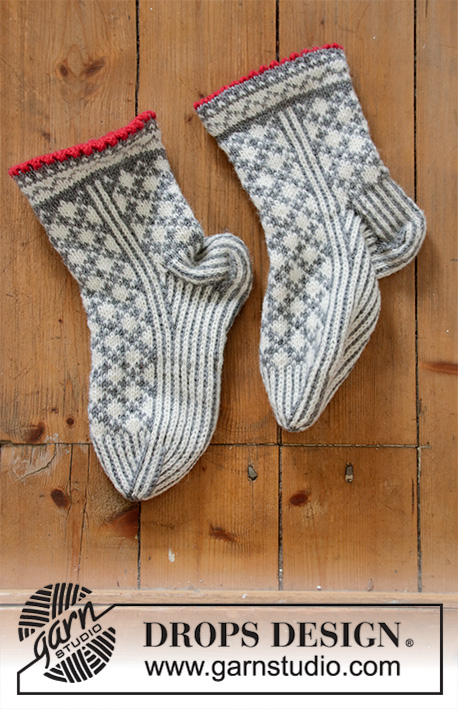
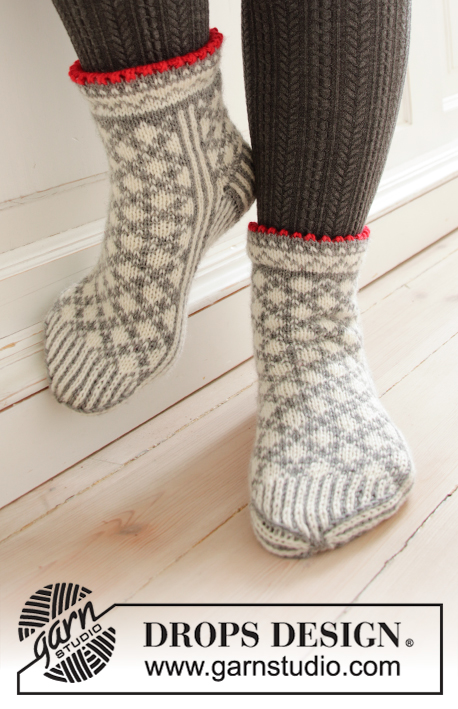
Knitted socks in DROPS Karisma. The piece is worked with Nordic pattern. Sizes 35 - 43. Theme: Christmas.
DROPS Extra 0-1433 |
|||||||
|
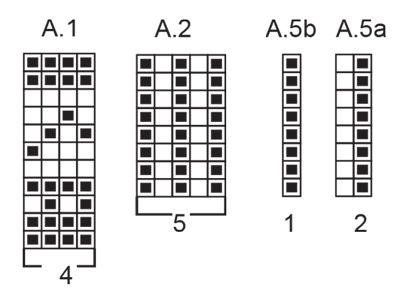
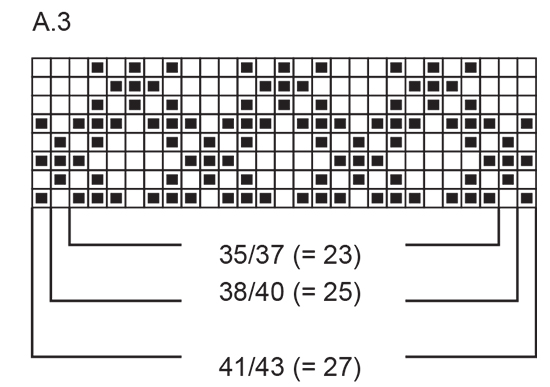
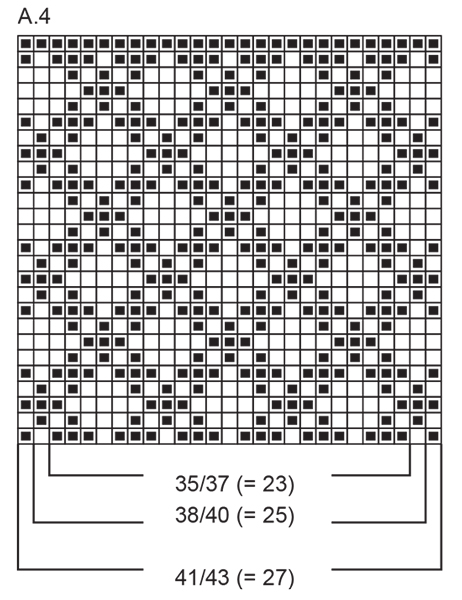
EXPLANATIONS FOR THE PATTERN: ------------------------------------------------------- PATTERN: See diagrams A.1 to A.5. Find your size in the diagrams (applies to A.3 and A.4). HEEL DECREASE: ROW 1 (right side): Knit until there are 7-8-7 stitches left, slip the next stitch as if to knit, knit 1, pass the slipped stitch over the knitted stitch, turn the piece. ROW 2 (wrong side): Purl until there are 7-8-7 stitches left, slip the next stitch as if to purl, purl 1, pass the slipped stitch over the purled stitch, turn the piece. ROW 3 (right side): Knit until there are 6-7-6 stitches left, slip the next stitch as if to knit, knit 1, pass the slipped stitch over the knitted stitch, turn the piece. ROW 4 (wrong side): Purl until there are 6-7-6 stitches left, slip the next stitch as if to purl, purl 1, pass the slipped stitch over the purled stitch, turn the piece. Continue to decrease like this by working until there is 1 less stitch left before slipping the next stitch and until there are 13-11-11 stitches left on the needle. DECREASE TIP (for toe): Decrease 1 stitch on each side of the 3 middle stitches in A.2 as follows: Work until there is 1 stitch left before A.2, knit 2 together with medium grey, work the 3 middle stitches in A.2 as before, knit the next 2 stitches twisted together with medium grey (= 2 stitches decreased). ------------------------------------------------------- START THE PIECE HERE: ------------------------------------------------------- SOCK - SHORT OVERVIEW OF THE PIECE: The piece is worked in the round with double pointed needles, top down. SOCK: Cast on 56-60-64 stitches with double pointed needles size 3 mm and red. Work 8 rounds in stocking stitch. Then work a round of holes (= folding edge) as follows: * Knit 2 together, make 1 yarn over *, repeat from *-* to end of round. Change to medium grey and work A.1 in the round (= 14-15-16 repeats of 4 stitches). When A.1 has been completed the piece measures approx. 6 cm from the cast-on edge. The next round is worked as follows: A.2 (= 5 stitches), A.3 (= 23-25-27 stitches), A.2 (= 5 stitches) and A.4 (= 23-25-27 stitches). Continue this pattern. REMEMBER THE KNITTING TENSION! When the last round in A.4 remains, decrease 2 stitches evenly spaced over the 23-25-27 stitches in A.4 (the other stitches are worked as before without decreases) = 54-58-62 stitches and the piece measures approx. 15 cm from the cast-on edge. Place the stitches in A.2 + A.3 + A.2 on a thread (= 33-35-37 stitches on top of foot on thread). There are now 21-23-25 stitches on the needle for the heel. Cast on 1 new stitch at the beginning of the row with medium grey and then work A.5a over the first 20-22-24 stitches on the heel, work A.5b (= 1 stitch) and cast on 1 new stitch at the end of the row with medium grey – the new stitches are edge stitches and worked with medium grey. Continue A.5a/A.5b back and forth over these 23-25-27 stitches. When you have worked 5½-6-6 cm over the heel stitches insert 1 marker in the middle of the row. Then work HEEL DECREASE – see description above (A.5 is continued at the same time as you decrease to heel). After the heel decrease work the next round as follows: Continue A.5 over the 13-11-11 heel stitches as before, knit up 11-13-14 stitches along the side of the heel, continue A.2 + A.3 + A.2 as before over the 33-35-37 stitches from the thread and knit up 11-13-14 stitches along the other side of the heel = 68-72-76 stitches. Continue this pattern with A.5 under the foot, A.3 on top of foot and A.2 in each side. AT THE SAME TIME decrease on each side of the middle 31-33-35 stitches on top of foot as follows: Knit together the 2 last stitches before the middle 31-33-35 stitches on top of foot using medium grey and knit twisted together the first 2 stitches after the middle 31-33-35 stitches using medium grey. Decrease like this every 2nd round a total of 6 times = 56-60-64 stitches. Continue this pattern until the piece measures 17-19-22 cm from the marker on the heel (there is now approx. 5 cm left to finished length; you can try the sock on and continue to desired length if necessary). Then finish the piece as follows: Continue patterns A.5a/A.5b as before over the stitches under the foot, work A.2 in the side, A.5a over the next 22-24-26 stitches on top of foot, work A.5b (= 1 stitch), continue A.2 in the side and A.5a over the remaining stitches under the foot. When the piece measures 18-20-23 cm from the marker in the heel, decrease to toe on each side of the middle 3 stitches in A.2 in each side – read DECREASE TIP (= 4 stitches decreased). Decrease like this each round a total of 10-11-12 times = 16 stitches. On the next round knit all stitches together 2 and 2 = 8 stitches. Cut the strands, pull them through the remaining stitches, tighten and fasten well. ASSEMBLY: Fold the top edge of the sock to the wrong side and sew down neatly with small stitches – make sure that the seam is not tight. Work the other sock in the same way. |
|||||||
Diagram explanations |
|||||||
|
|||||||
 |
|||||||
 |
|||||||
 |
|||||||
Have you finished this pattern?Tag your pictures with #dropspattern #tiptoesantasocks or submit them to the #dropsfan gallery. Do you need help with this pattern?You'll find 22 tutorial videos, a Comments/Questions area and more by visiting the pattern on garnstudio.com. © 1982-2026 DROPS Design A/S. We reserve all rights. This document, including all its sub-sections, has copyrights. Read more about what you can do with our patterns at the bottom of each pattern on our site. |
|||||||


With over 40 years in knitting and crochet design, DROPS Design offers one of the most extensive collections of free patterns on the internet - translated to 17 languages. As of today we count 324 catalogues and 12290 patterns translated into English (UK/cm). 12290
We work hard to bring you the best knitting and crochet have to offer, inspiration and advice as well as great quality yarns at incredible prices! Would you like to use our patterns for other than personal use? You can read what you are allowed to do in the Copyright text at the bottom of all our patterns. Happy crafting!
Post a comment to pattern DROPS Extra 0-1433
We would love to hear what you have to say about this pattern!
If you want to leave a question, please make sure you select the correct category in the form below, to speed up the answering process. Required fields are marked *.