
Popular categories
Looking for a yarn?


Comments / Questions (24)
![]() Pamela wrote:
Pamela wrote:
De acuerdo al comentario sobre la coincidencia del patrón, se solucionó?
02.06.2020 - 00:06
![]() Doul wrote:
Doul wrote:
Je voudrais tricoter un pull avec des aiguilles normales à la place des aiguilles rondes, est-ce possible ?
06.04.2020 - 13:33DROPS Design answered:
Bonjour Mme Doul, vous trouverez ici quelques informations sur l'adaptation d'un modèle sur aiguilles droites. Bon tricot!
09.04.2020 - 14:18
![]() Antonia wrote:
Antonia wrote:
Vorrei realizzare il vostro pullover Old Mill, ma avrei necessità di conoscere le misure in centimetri per la taglia S ed M per poterlo adattare alle mie misure. Vi ringrazio
05.04.2020 - 16:13
![]() Antonia wrote:
Antonia wrote:
Vorrei provare ad eseguire fedelmente il vostro progetto old mill pullover ma avrei necessità di conoscere le misure in centimetri corrispondenti alla taglia S ed M, per adattarlo al meglio alle mie misure. Vi ringrazio anticipatamente
05.04.2020 - 16:07DROPS Design answered:
Buonasera Antonia, in fondo alla pagina può trovare uno schema con le misure del maglione per tutte le taglie. Buon lavoro!
05.04.2020 - 17:36
![]() AidaH wrote:
AidaH wrote:
Thank you for this lovely pattern. I am excited to get started. . I have read through the pattern and wondered...: when converting terms from English-British to English-American, the term ‘ELEVATION’ in English-American refers to ‘SHORT ROWS’. I’m assuming I pick up the wrapped stitches together when continuing to knit the yoke? Also, for sleeves, when you yarn over, doesn’t that leave a hole? Is that part of the design? May I use ‘Make 1- L or R, instead?
29.03.2020 - 17:09DROPS Design answered:
Dear AidaH, the elevation is a few short rows knitted on the back of the sweater to have it sit higher than the front. Yes, you can pick up the wrap and knit together with the stitches. On the sleeves, you can use the increase sou feel comfortable with. Happy Knitting!
29.03.2020 - 22:50
![]() Nicole Bedard wrote:
Nicole Bedard wrote:
Est ce possible de commander un patron en français format papier comment faire
28.01.2020 - 22:45DROPS Design answered:
Bonjour Mme Bedard, contactez votre magasin DROPS par mail ou par téléphone, il pourra fort probablement vous le joindre à votre laine. Bon tricot!
29.01.2020 - 08:46
![]() Evelyn wrote:
Evelyn wrote:
Buenas. Estoy realizando este patrón y me gustaría saber si existe algún truco o técnica para que el dibujo coincida con el patrón en la unióm de las vueltas. Al tejer con agujas circulares no me coincide el dibujo y se ve horrible. Me pueden aconsejar algo para solucionar el problema? Gracias
09.01.2020 - 08:46
![]() Elisa wrote:
Elisa wrote:
Wie kann ich diesen Pullover am besten umwandeln in einen männerpullover? Unten würde ich ihn gerade verlaufen lassen. Oder ist es bei diesem Modell nicht empfehlenswert? LG!
02.08.2019 - 10:54DROPS Design answered:
Liebe Elisa, Hier lesen Sie, wie man eine Damengröße in eine Herrengröße umrechnen kann. Viel Spaß beim stricken!
08.08.2019 - 10:47
![]() Tove wrote:
Tove wrote:
Bolen ble veldig vid ... selv om strikkefastheten stemmer :/ Jeg er ganske høy og tenkte at jeg måtte strikke genseren i Large , det var feil 🙈 Syns ellers at oppskriften er superfin og enkel å følge
27.03.2019 - 14:21
![]() Helene Blomkvist wrote:
Helene Blomkvist wrote:
Ska man verkligen öka när det är dags för resåren på nederdelen av tröjan?Känns som den blir mycket vid då ivanliga fall öka man ju efter man stickat resår.
08.02.2019 - 07:46DROPS Design answered:
Hej, jo det ska ökas innan resåren eftersom resåren annars blir för snäv, då den drar ihop sig.
08.02.2019 - 16:21
|
||||||||||||||||
Old Mill Pullover#oldmillpullover |
||||||||||||||||
 |
 |
|||||||||||||||
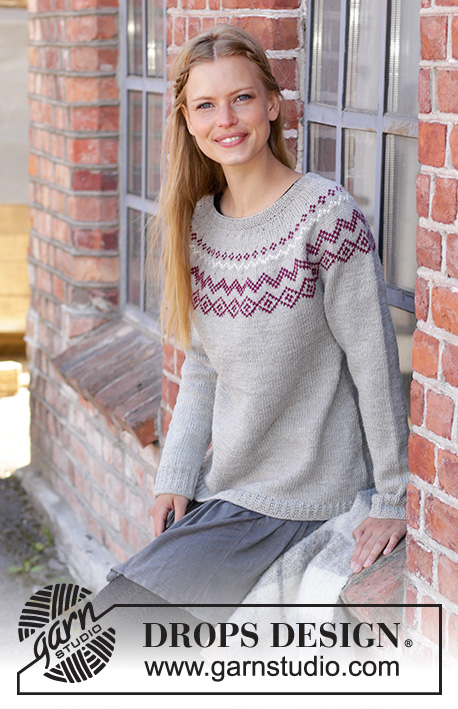
Knitted jumper in DROPS Karisma or DROPS Merino Extra Fine. The piece is worked top down with Nordic pattern. Sizes S - XXXL.
DROPS 197-4 |
||||||||||||||||
|
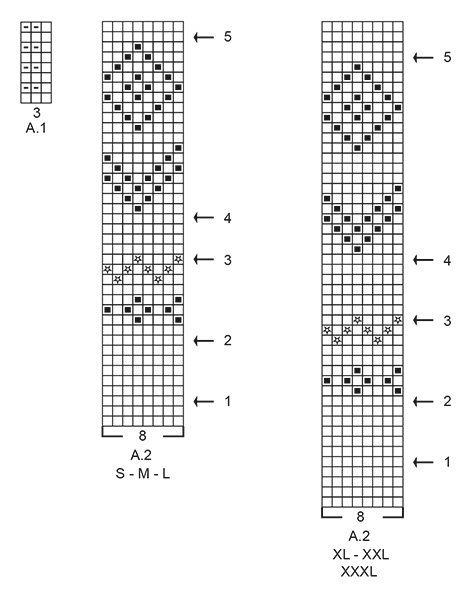
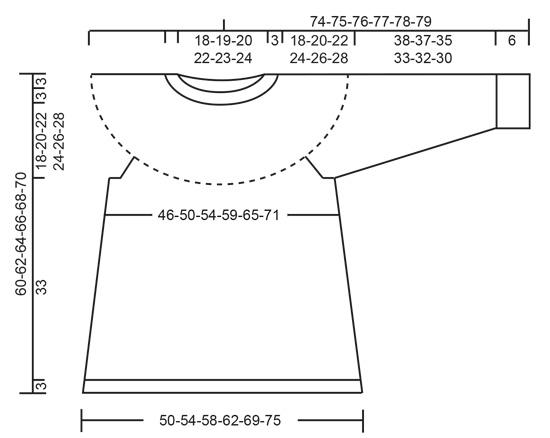
EXPLANATIONS FOR THE PATTERN: ------------------------------------------------------- PATTERN: See diagrams A.1 and A.2. Choose diagram for your size (applies to A.2). The diagrams show all rows in the pattern seen from the right side. INCREASE TIP-1 (evenly spaced): To work out how to increase evenly, count the total number of stitches on the needle (e.g. 99 stitches) and divide by the number of increases to be made (e.g. 29) = 3.4. In this example, increase by making 1 yarn over after alternately each 3rd and 4th stitch (approx.). On the next round knit the yarn overs twisted to avoid holes. ELEVATION (in back of neck): Skip this section if you do not want an elevation. Insert 1 marker at the beginning of the round (mid back). With light oak, knit 16-17-18-19-20-21 stitches past the marker, turn, tighten the strand and purl 32-34-36-38-40-42 stitches. Turn, tighten the strand and knit 48-51-54-57-60-63 stitches, turn, tighten the strand and purl 64-68-72-76-80-84 stitches. Turn, tighten the strand and knit 80-85-90-95-100-105 stitches, turn, tighten the strand and purl 96-102-108-114-120-126 stitches. Turn tighten the strand and knit to mid back. Then work YOKE as described in the text. KNITTING TIP: To avoid the knitting tension becoming tighter when working pattern, it is important that the strands at the back of the piece are not tight. You can use a size larger needle when working pattern if this is a problem. RAGLAN: Increase to raglan on each side of the 4 marker threads as follows: Start 1 stitch before the marker thread, make 1 yarn over, knit 2 (the marker thread sits in the middle of these 2 stitches), make 1 yarn over. On the next round knit the yarn overs twisted to avoid holes. Then work the increased stitches in stocking stitch! INCREASE TIP-2 (for sides of body): Work until there are 3 stitches left before the marker thread, 1 yarn over, knit 6 (the marker thread sits in the middle of these 6 stitches) 1 yarn over (= 2 stitches increased). On the next round knit the yarn overs twisted to avoid holes. Then work the new stitches in stocking stitch. DECREASE TIP (for mid under sleeves): Start 3 stitches before the marker thread, knit 2 together, knit 2 (= the marker thread sits in the middle of these 2 stitches), slip 1 stitch as if to knit, knit 1, pass the slipped stitch over the knitted stitch (= 2 stitches decreased). ------------------------------------------------------- START THE PIECE HERE: ------------------------------------------------------- JUMPER - SHORT OVERVIEW OF THE PIECE: Neck, yoke and body are worked in the round with circular needle, top down. The sleeves are worked in the round with short circular needle/double pointed needles, top down. NECK: Cast on 99-102-108-114-117-123 stitches with short circular needle size 3.5 mm and light oak. Knit 1 round. Then work A.1 in the round until the neck measures 3 cm from the cast-on edge. Knit 1 round where you increase 29-34-36-38-35-37 stitches evenly on round – read INCREASE TIP-1 = 128-136-144-152-152-160 stitches. Change to circular needle size 4 mm and knit 1 round. You can now work an elevation in the back of the neck so that the yoke is slightly higher at the back. This elevation can be left out; the neck is then the same front and back – work ELEVATION – read description above, or go straight to YOKE. YOKE: Read KNITTING TIP! Work A.2 in the round (= 16-17-18-19-19-20 repeats of 8 stitches). AT THE SAME TIME on each round marked with an arrow in A.2 increase evenly on round as described below – read INCREASE TIP-1 and REMEMBER THE KNITTING TENSION! On the round marked with arrow-1 increase 24-32-32-32-40-40 stitches evenly on round = 152-168-176-184-192-200 stitches (there is now room for 19-21-22-23-24-25 repeats of 8 stitches). On the round marked with arrow-2 increase 24-24-24-32-40-40 stitches evenly on round = 176-192-200-216-232-240 stitches (there is now room for 22-24-25-27-29-30 repeats of 8 stitches). On the round marked with arrow-3 increase 24-24-24-32-32-32 stitches evenly on round = 200-216-224-248-264-272 stitches (there is now room for 25-27-28-31-33-34 repeats of 8 stitches). On the round marked with arrow-4 increase 24-24-24-24-24-24 stitches evenly on round = 224-240-248-272-288-296 stitches (there is now room for 28-30-31-34-36-37 repeats of 8 stitches). On the round marked with arrow-5 increase 22-18-18-22-18-10 stitches evenly on round = 246-258-266-294-306-306 stitches. Work A.2 until it is finished. The piece now measures approx. 18-18-18-21-21-21 cm from the cast-on edge mid front. Insert 4 marker threads in the piece as follows (without working the stitches): Insert the first marker thread after the first 40-41-42-47-51-53 stitches (= ½ back piece), 2nd marker thread is inserted after the next 44-48-50-54-52-48 stitches (= sleeve), 3rd marker thread is inserted after the next 79-81-83-93-101-105 stitches (= front piece) and 4th marker thread is inserted after the next 44-48-50-54-52-48 stitches (= sleeve). There are 39-40-41-46-50-52 stitches left after the last marker thread (= ½ back piece). The marker threads will be used when increasing to raglan. Continue in the round with stocking stitch and light oak. AT THE SAME TIME on the next round increase to RAGLAN on each side of the 4 marker threads – read description above = 8 stitches increased. Increase like this every 2nd round a total of 5-8-10-10-12-15 times = 286-322-346-374-402-426 stitches. Continue working without increasing until the piece measures 21-23-25-27-29-31 cm from the cast-on edge mid front. The next round is worked as follows: Work 45-49-52-57-63-68 stitches in stocking stitch (= ½ back piece), place the next 54-64-70-74-76-78 stitches on 1 thread for sleeve, cast on 8-8-10-10-12-14 new stitches on the needle (= in side under sleeve), work 89-97-103-113-125-135 stitches in stocking stitch (= front piece), place the next 54-64-70-74-76-78 stitches on 1 thread for sleeve, cast on 8-8-10-10-12-14 new stitches on the needle (= in side under sleeve) and work the remaining 44-48-51-56-62-67 stitches in stocking stitch (= ½ back piece). Body and sleeves are finished separately. THE PIECE IS NOW MEASURED FROM HERE! BODY: = 194-210-226-246-274-298 stitches. Insert 1 marker thread in each side, i.e. in the middle of the 8-8-10-10-12-14 stitches cast on under the sleeves and allow the marker threads to follow your work onwards. The marker threads will be used when increasing on each side of the body. Continue in the round with stocking stitch and light oak. When the piece measures 4 cm from the division, increase 1 stitch on each side of both marker threads - read INCREASE TIP-2 = 4 stitches increased. Increase like this every 8 cm a total of 4 times in each side = 210-226-242-262-290-314 stitches. Continue working until the piece measures 33 cm from the division in all sizes. Knit 1 round where you increase 33-35-37-41-46-49 stitches evenly on round = 243-261-279-303-336-363 stitches. Change to circular needle size 3.5 mm and work A.1 in the round for 3 cm. Loosely cast off with knit. The jumper measures approx. 60-62-64-66-68-70 cm from the shoulder down. SLEEVE: Place the 54-64-70-74-76-78 stitches from the thread on the one side of the piece on short circular needle or double pointed needles size 4 mm and knit up with light oak 1 stitch in each of the 8-8-10-10-12-14 stitches cast on under the sleeve = 62-72-80-84-88-92 stitches. Insert 1 marker thread in the middle of the 8-8-10-10-12-14 stitches under the sleeve and allow the marker thread to follow your work onwards. The marker thread will be used when decreasing under the sleeve. Start the round by the marker thread and work stocking stitch in the round. When the piece measures 2 cm from the division, decrease 2 stitches mid under sleeve - read DECREASE TIP-1. Decrease like this every 1 cm a total of 0-0-4-6-8-12 times, every 2nd round a total of 3-7-6-12-11-8 times and then every 4-3-2½-0-0-0 cm a total of 7-7-7-0-0-0 times = 42-44-46-48-50-52 stitches. Continue working until the piece measures 38-37-35-33-32-30 cm from the division (shorter measurements in larger sizes due to longer yoke). Knit 1 round where you increase 6-4-5-6-4-5 stitches evenly on round = 48-48-51-54-54-57 stitches. Change to double pointed needles size 3.5 mm and work A.1 in the round (= 16-16-17-18-18-19 repeats of 3 stitches). Continue this pattern until the edge measures 6 cm. Loosely cast off with knit. The sleeve measures approx. 44-43-41-39-38-36 cm from the division. Work the other sleeve in the same way. |
||||||||||||||||
Diagram explanations |
||||||||||||||||
|
||||||||||||||||
 |
||||||||||||||||
 |
||||||||||||||||
Have you finished this pattern?Tag your pictures with #dropspattern #oldmillpullover or submit them to the #dropsfan gallery. Do you need help with this pattern?You'll find 29 tutorial videos, a Comments/Questions area and more by visiting the pattern on garnstudio.com. © 1982-2026 DROPS Design A/S. We reserve all rights. This document, including all its sub-sections, has copyrights. Read more about what you can do with our patterns at the bottom of each pattern on our site. |
||||||||||||||||


With over 40 years in knitting and crochet design, DROPS Design offers one of the most extensive collections of free patterns on the internet - translated to 17 languages. As of today we count 324 catalogues and 12290 patterns translated into English (UK/cm). 12290
We work hard to bring you the best knitting and crochet have to offer, inspiration and advice as well as great quality yarns at incredible prices! Would you like to use our patterns for other than personal use? You can read what you are allowed to do in the Copyright text at the bottom of all our patterns. Happy crafting!
Post a comment to pattern DROPS 197-4
We would love to hear what you have to say about this pattern!
If you want to leave a question, please make sure you select the correct category in the form below, to speed up the answering process. Required fields are marked *.