
Popular categories
Looking for a yarn?


Comments / Questions (60)
![]() Stine wrote:
Stine wrote:
Jeg er lige blevet færdig med nederdelen og er sluttet med 4 pinde retstrik.. og så lukke af. Det har jeg gjort. Men kanten krøller opad. Hvad gør jeg
27.01.2019 - 13:14DROPS Design answered:
Hej Stine, du kan dampe kanten let, sørg for at lægge et fugtigt viskestykke imellem. Start forsigtigt så arbejdet ikke filter. God fornøjelse!
30.01.2019 - 09:29
![]() Gaëlle Deray wrote:
Gaëlle Deray wrote:
Donc je termine le rang 11 comme le 10 en faisant un jeté avant la dernière maille pour ensuite tricoter ensemble la dernière maille du rang 11 à avec la première maille du rang 12 ?
24.01.2019 - 16:13DROPS Design answered:
Bonjour Mme Deray, le dernier A.1 du 11ème tour se termine par 1 m end (comme dans le diagramme) + le jeté que vous avez fait au début du tour et qui remplace la maille diminuée. Le tour suivant commence comme avant = la dernière maille de chaque A.1 = jeté. Bon tricot!
24.01.2019 - 17:05
![]() Gaëlle Deray wrote:
Gaëlle Deray wrote:
Bonjour, je suis à la fin du rang 10 et je ne comprends pas l'explication de l'étoile. Est ce que je dois tricoter ensemble la dernière maille du rang 10 et la première du rang 11? Merci
24.01.2019 - 13:10DROPS Design answered:
Bonjour Mme Deray, à la fin du tour 10, quand il reste 1 maille avant la fin du tour, faites 1 jeté (= 1ère m du tour 11 = dernière m du tour 10), tricotez la dernière maille du tour 10 ensemble à l'endroit avec la 1ère maille du tour 11 et continuez comme avant, tricotez la dernière m de A.1 avec la 1ère m du A.1 suivant (= le jeté juste avant = dernière m du premier A.1) et continuez ainsi. Bon tricot!
24.01.2019 - 13:15
![]() Gaëlle Deray wrote:
Gaëlle Deray wrote:
Bonjour, pour 204 m je dois augmenter à intervalles réguliers toutes 8,5m. Comment dois je m'y prendre? Merci
15.01.2019 - 16:09DROPS Design answered:
Bonjour Mme Deray, cette leçon explique comment répartir les augmentations en fonction de votre résultat. Bon tricot!
15.01.2019 - 16:52Eva wrote:
Hello! This pattern is amazing! I have started already, but I am stuck at the point where there is "no stitch". What does it mean? Because there is no decrease. I have the same number of stitches as before. Many Thanks, Eva
04.12.2018 - 23:28DROPS Design answered:
Dear Eva, on the rows with a small black star, you start this rows 1 st before the beg of round - see diagram key to the symbol, so that the last st of each repeat will be worked together with the first 2 sts on next repeat. Happy knitting!
05.12.2018 - 08:16
![]() Laura wrote:
Laura wrote:
Hallo, zou het kunnen dat het telpatroon A1 op de kop staat afgebeeld? Ik ben bovenaan begonnen maar zie nu dat op de voorbeeldfoto het patroon andersom is gemaakt. En jullie lijken met het verspringen van de eerste steek ook van onderaf te beginnen te tellen. Is het verkeerd dat ik bovenaan begonnen ben met het telpatroon? Ik hoor het graag.
10.10.2018 - 09:39DROPS Design answered:
Dag Laura, De telpatronen begin je altijd rechtsonder en dan werk je naar boven toe.
11.10.2018 - 16:33
![]() VIVIER Evelyne wrote:
VIVIER Evelyne wrote:
Bonsoir Pour la taille L vous dites augmenter 12m 2fois aux niveaux des flèches on obtient 264m je n ai pas ce nombre pourquoi Merci
24.08.2018 - 19:24DROPS Design answered:
Bonjour Mme Vivier, en taille L, vous avez d'abord 180 m. Vous augmentez d'abord 24 m = 204 m. Puis vous augmentez de nouveau 24 m: 204-24= 228 m. Et vous augmentez ensuite 12 m (Augmentations 4): 228+12= 240 m. Vous répétez ensuite A.1 en augmentant encore 2 fois 12 m à chacun des tours avec une flèche = 240 + 12 + 12 = 264 m. Bon tricot!
05.09.2018 - 14:06
![]() Lisa wrote:
Lisa wrote:
Was für ein tolles Muster! Ich würde mich rießig über dasStrickmuster freuen. *Fir green Dream*
10.07.2018 - 11:37
![]() Maria Isabel Berbegall wrote:
Maria Isabel Berbegall wrote:
Me encanta, debería de tener una chaqueta que sobrepasara el largo de la falda a juego. Muy bonita
11.06.2018 - 22:21
![]() Krysztasz wrote:
Krysztasz wrote:
Nagyon szép, szeretném, ha bekerülne a kiválasztott minták közé.
05.06.2018 - 21:00
|
||||||||||||||||||||||||||||
Mint Tulip#minttulipskirt |
||||||||||||||||||||||||||||
 |
 |
|||||||||||||||||||||||||||
Knitted skirt in DROPS Sky. The piece is worked top down with lace pattern and garter stitch. Sizes S - XXXL.
DROPS 196-38 |
||||||||||||||||||||||||||||
|
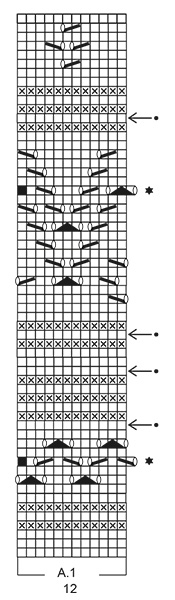
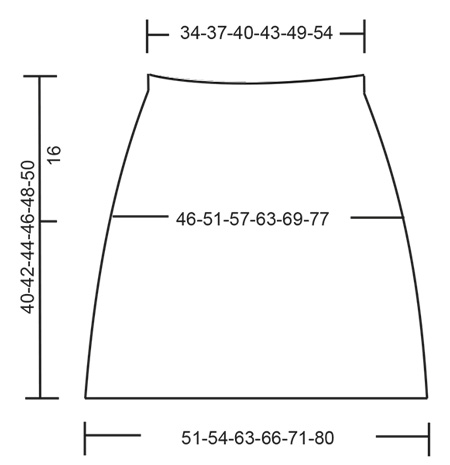
EXPLANATIONS FOR THE PATTERN: ------------------------------------------------------- RIDGE/GARTER STITCH (worked in the round): 1 ridge = 2 rounds. Knit 1 round and purl 1 round. PATTERN: See diagram A.1. INCREASE TIP (evenly spaced): To work out how to increase evenly, count the total number of stitches on the needle (e.g. 144 stitches) and divide by the number of increases to be made (e.g. 12) = 12. In this example, increase by making 1 yarn over after each 12th stitch. On the next round work the yarn overs twisted to avoid holes. ------------------------------------------------------- START THE PIECE HERE: ------------------------------------------------------- SKIRT - SHORT OVERVIEW OF THE PIECE: The piece is worked in the round with circular needle, top down. First a lining is worked, which is later used to thread the elastic through. You then continue with lace pattern and garter stitch. LINING: Cast on 144-156-168-180-204-228 stitches with circular needle size 3.5 mm and Sky. Work 1 RIDGE – read description above. Then work 4 rounds stocking stitch. Purl 1 round (= folding edge). Insert 1 marker in the piece. THE PIECE IS MEASURED FROM HERE! SKIRT: Work 2 ridges. Change to circular needle size 4 mm. Then work A.1 (= 12 stitches) a total of 12-13-14-15-17-19 times in the round. On rounds 11 and 41, the round is displaced by 1 stitch so that the lace pattern fits. On the round marked with an arrow, increase as follows: INCREASE 1: Increase 12-12-12-24-24-24 stitches evenly on round – read INCREASE TIP = 156-168-180-204-228-252 stitches. A.1 is then repeated 13-14-15-17-19-21 times in width. REMEMBER THE KNITTING TENSION! INCREASE 2: Increase 12-24-24-24-24-24 stitches evenly on round = 168-192-204-228-252-276 stitches. A.1 is then repeated 14-16-17-19-21-23 times in width. INCREASE 3: Increase 12-12-24-24-24-24 stitches evenly on round = 180-204-228-252-276-300 stitches. A.1 is then repeated 15-17-19-21-23-25 times in width INCREASE 4: Increase 12-12-12-12-12-24 stitches evenly on round = 192-216-240-264-288-324 stitches. A.1 is then repeated 16-18-20-22-24-27 times in width. Repeat A.1 in height and increase evenly 12 stitches on each round with an arrow 2-1-2-1-1-1 times more = 216-228-264-276-300-336 stitches. A.1 is then repeated 18-19-22-23-25-28 times in width. Continue with pattern until the piece measures 39-41-43-45-47-49 cm from the marker; adjust so that you finish neatly in relation to the pattern. Work 2 ridges. Then cast off with knit. The skirt measures approx. 40-42-44-46-48-50 cm from the marker. ASSEMBLY: Fold the lining towards the wrong side and sew down neatly, but leave a small opening to thread the elastic through. |
||||||||||||||||||||||||||||
Diagram explanations |
||||||||||||||||||||||||||||
|
||||||||||||||||||||||||||||
 |
||||||||||||||||||||||||||||
 |
||||||||||||||||||||||||||||
Have you finished this pattern?Tag your pictures with #dropspattern #minttulipskirt or submit them to the #dropsfan gallery. Do you need help with this pattern?You'll find 20 tutorial videos, a Comments/Questions area and more by visiting the pattern on garnstudio.com. © 1982-2026 DROPS Design A/S. We reserve all rights. This document, including all its sub-sections, has copyrights. Read more about what you can do with our patterns at the bottom of each pattern on our site. |
||||||||||||||||||||||||||||


With over 40 years in knitting and crochet design, DROPS Design offers one of the most extensive collections of free patterns on the internet - translated to 17 languages. As of today we count 324 catalogues and 12290 patterns translated into English (UK/cm). 12290
We work hard to bring you the best knitting and crochet have to offer, inspiration and advice as well as great quality yarns at incredible prices! Would you like to use our patterns for other than personal use? You can read what you are allowed to do in the Copyright text at the bottom of all our patterns. Happy crafting!
Post a comment to pattern DROPS 196-38
We would love to hear what you have to say about this pattern!
If you want to leave a question, please make sure you select the correct category in the form below, to speed up the answering process. Required fields are marked *.