Comments / Questions (61)
![]() Carin wrote:
Carin wrote:
Jeg bliver så opgiven ! Jeg får ikke strikkefastheden at passe ! hvis jeg strikker 21X28 på pind 4 bliver den kun 8,5 cm bred. Hvis jeg strikker 21X28 på pind 4,5 bliver den 9,5 men begynder at blive lidt for fluffy og løs. Hvad gør jeg ? Venlig hilsen Carin
21.03.2025 - 12:03DROPS Design answered:
Hei Carin. Ville ha prøvd å strikke noe løsere på pinne 4,0 mm. Ville også ha prøvd forskjellige kvaliteter på pinnnene, alminium / messing / tre / bambus og sjekket om du får samme strikkefasthet på de ulike materialene. Noen påstår at de kan få ulik strikkefasthet ved bytte av material, selv med samme str. mvh DROPS Design
24.03.2025 - 13:05
![]() Huguette Thiffault wrote:
Huguette Thiffault wrote:
Comme j aimerais avoir ce tutoriel en francais
03.01.2025 - 21:42
![]() Huguette Thiffault wrote:
Huguette Thiffault wrote:
Comme j aimerais avoir ce tutoriel
03.01.2025 - 21:40
![]() Eva Schrecklinger wrote:
Eva Schrecklinger wrote:
Hello, I‘m afraid I‘m stuck at row 11. I‘ve read Both the German and the French answers but still can‘t get the pattern right. Could you describe in words how to end row 10, start row 11 and finish row 11? That would be great!
16.07.2024 - 18:17DROPS Design answered:
Dear Eva, in row 10, you knit all stitches and work before the last stitch of the round. This last stitch will now be worked as the first stitch of round 11 (so if you have a marker marking the end of the rows, you should move it one stitch backwards, into the last worked stitch). Now work the symbols in the 11th round as usual, completely ignoring the black square; when you reach it, simply start working the round from the first symbol again. Continue like this the whole round. Work the last stitch of the round and then work the first stitch of the round again. This stitch will now be the last stitch, so move the marker back to the new end of the round (1 stitch forward). Happy knitting!
21.07.2024 - 18:34
![]() Veronique Begin wrote:
Veronique Begin wrote:
Avez-vous ce patron en français?
16.07.2024 - 02:53DROPS Design answered:
Bonjour Veronique, bien sur, vous le trouverez ICI. Bon tricot!
16.07.2024 - 08:08
![]() Anke wrote:
Anke wrote:
Ich habe eine Frage zu folgendem Teil der Anleitung: "A.1 in der Höhe wiederholen und in jeder Runde mit Zunahmepfeil 12 Maschen gleichmäßig verteilt noch weitere 2-1-2-1-1-1 x zunehmen = 216-228-264-276-300-336 Maschen." Soll ich also bei der Wiederholung von A1 4 x zunehmen oder nur einmal? Ich bin verwirrt, weil die angegebene Maschenzahl nur für die erste Zunahme in der Wiederholung gilt und keine Gesamtzahl der Maschen angegeben ist.
23.06.2024 - 11:34DROPS Design answered:
Liebe Anke, nach der 4. Zunahmerunde stricken Sie noch A.1 weiter (A.1 in der Höhe wiederholen), und dann je nach der Größe noch 2-1-2-1-1-1 Mal 12 Maschen regelmäßig verteilt zunehmen - die Zunahmen stricken Sie nur bei der Runde mit einem Pfeil. So nehmen Sie noch 24-12-24-12-12-12 Maschen = es sind dann 216-228-264-276-300-336 Maschen auf der Nadel. Viel Spaß beim Stricken!
24.06.2024 - 08:28
![]() Florence wrote:
Florence wrote:
Je suis désolée, je ne suis pas sûre d'avoir vraiment compris... J'arrive à la fin du tour 11 en tricotant ensemble les deux dernières mailles du motif du tour 10 (1 maille et 1 jeté). Cela me donne ma 11eme maille du dernier motif du tour 11. Dois-je simplement tricoter deux fois la prochaine maille qui est la première maille du tour en cours (soit le tour 11) pour revenir sur mes pattes? Faut-il bien décaler une seconde fois? Merci d'avance
01.03.2023 - 18:24DROPS Design answered:
Bonjour Florence, le 11ème tour commence par la dernière maille du tour 10: faites 1 jeté (= dernière maille du tour désormais), tricotez la dernière m et la 1ème m du tour ensemble (diminution), puis continuez le diagramme jusqu'à ce qu'il reste 1 m, faites 1 jeté (dernière m du motif), et tricotez cette dernière maille avec la 1ère m du A.1 suivant et continuez ainsi tout le tour. À la fin du tour, tricotez le jeté à l'endroit (c'est la dernière m du tour), et le tour commence après ce jeté = comme avant. Bon tricot!
02.03.2023 - 10:38
![]() Florence wrote:
Florence wrote:
Bonjour, Il y a un mot manquant au niveau de la légende du diagramme sur l'explication de l'étoile : "décaler le tour de nouveau en tricotant a l'endroit la ...........(?) Encore une fois a la fin du tour." Je suis désolée je ne sais pas remplir ce blanc... Merci d'avance pour l'éclaircissement.
01.03.2023 - 15:42DROPS Design answered:
Bonjour Florence, oups, il s'agit de la maille que l'on doit tricoter à la fin du tour (on commence le tour 1 m avant la fin du tour, puis la dernière maille de chaque motif se tricote avec les 2 premières mailles du motif suivant; après ce tour, les tours commencent de nouveau comme avant (après le jeté). Bon tricot!
01.03.2023 - 17:18
![]() Heidi wrote:
Heidi wrote:
Hej, når jeg skal gentage diagrammet a1 og skal tage ud fra 192 masker til 216 masker - skal jeg så lave en ny udregning? For kan ikke få det til at passe med at slå om efter hver 12. Maske (fra 192 til 204)??
24.12.2022 - 09:03DROPS Design answered:
Hei Heidi. Det skal ikke økes etter hver 12. maske, men jevnt fordelt. I str. S har du 192 masker etter 4. økning, deretter skal du repetere A.1 i høyden og øke 12 masker jevnt fordelt på hver omgang med økepil 2 ganger. Da blir det 192 + 12 = 204 ved 1.økepil og 204 + 12= 216 masker ved 2. økepil. mvh DROPS Design
02.01.2023 - 10:31
![]() Liesbeth wrote:
Liesbeth wrote:
Het rokje krult onderaan om. Waar kan dat door komen en wat zou ik eraan kunnen doen? Ik heb het gebreid met Drops Sky, naald nr 4, heb het telpatroon 1x herhaald + 3 toeren recht en twee ribbels en toen recht afgekant, precies zoals in de beschrijving.
30.09.2022 - 18:28DROPS Design answered:
Dag Liesbeth,
Dat komt omdat er geen boord aan de onderkant zit. Je zou het heel voorzichtig kunnen opperssen met het strijkijzer. Je legt dan een natte theedoek over de rand en dept heel voorzichtig met het strijkijzer op de theedoek (waar de rok dus weer onder zit). Let er op dat je dit echt heel erg voorzichtig doet, anders kun je de structuur van het breiwerk vernielen.
01.10.2022 - 17:48
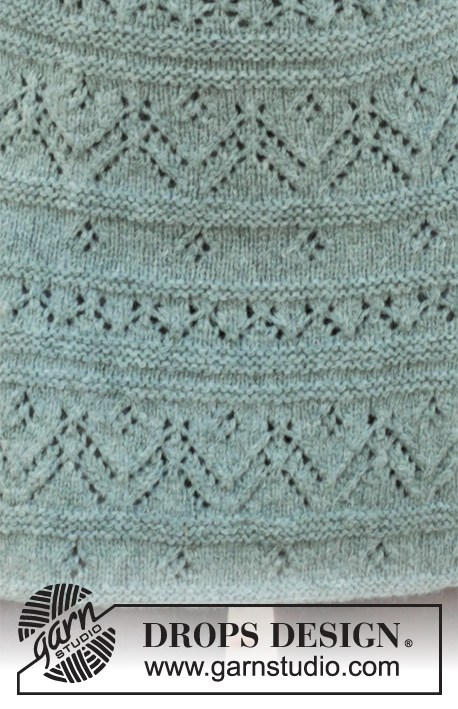
Mint Tulip#minttulipskirt |
||||||||||||||||||||||||||||
 |
 |
|||||||||||||||||||||||||||
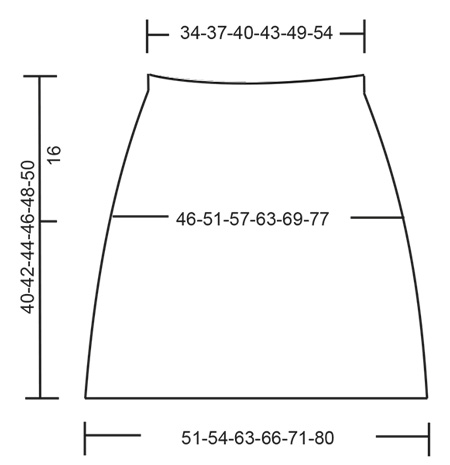
Knitted skirt in DROPS Sky. The piece is worked top down with lace pattern and garter stitch. Sizes S - XXXL.
DROPS 196-38 |
||||||||||||||||||||||||||||
|
EXPLANATIONS FOR THE PATTERN: ------------------------------------------------------- RIDGE/GARTER STITCH (worked in the round): 1 ridge = 2 rounds. Knit 1 round and purl 1 round. PATTERN: See diagram A.1. INCREASE TIP (evenly spaced): To work out how to increase evenly, count the total number of stitches on the needle (e.g. 144 stitches) and divide by the number of increases to be made (e.g. 12) = 12. In this example, increase by making 1 yarn over after each 12th stitch. On the next round work the yarn overs twisted to avoid holes. ------------------------------------------------------- START THE PIECE HERE: ------------------------------------------------------- SKIRT - SHORT OVERVIEW OF THE PIECE: The piece is worked in the round with circular needle, top down. First a lining is worked, which is later used to thread the elastic through. You then continue with lace pattern and garter stitch. LINING: Cast on 144-156-168-180-204-228 stitches with circular needle size 3.5 mm and Sky. Work 1 RIDGE – read description above. Then work 4 rounds stocking stitch. Purl 1 round (= folding edge). Insert 1 marker in the piece. THE PIECE IS MEASURED FROM HERE! SKIRT: Work 2 ridges. Change to circular needle size 4 mm. Then work A.1 (= 12 stitches) a total of 12-13-14-15-17-19 times in the round. On rounds 11 and 41, the round is displaced by 1 stitch so that the lace pattern fits. On the round marked with an arrow, increase as follows: INCREASE 1: Increase 12-12-12-24-24-24 stitches evenly on round – read INCREASE TIP = 156-168-180-204-228-252 stitches. A.1 is then repeated 13-14-15-17-19-21 times in width. REMEMBER THE KNITTING TENSION! INCREASE 2: Increase 12-24-24-24-24-24 stitches evenly on round = 168-192-204-228-252-276 stitches. A.1 is then repeated 14-16-17-19-21-23 times in width. INCREASE 3: Increase 12-12-24-24-24-24 stitches evenly on round = 180-204-228-252-276-300 stitches. A.1 is then repeated 15-17-19-21-23-25 times in width INCREASE 4: Increase 12-12-12-12-12-24 stitches evenly on round = 192-216-240-264-288-324 stitches. A.1 is then repeated 16-18-20-22-24-27 times in width. Repeat A.1 in height and increase evenly 12 stitches on each round with an arrow 2-1-2-1-1-1 times more = 216-228-264-276-300-336 stitches. A.1 is then repeated 18-19-22-23-25-28 times in width. Continue with pattern until the piece measures 39-41-43-45-47-49 cm from the marker; adjust so that you finish neatly in relation to the pattern. Work 2 ridges. Then cast off with knit. The skirt measures approx. 40-42-44-46-48-50 cm from the marker. ASSEMBLY: Fold the lining towards the wrong side and sew down neatly, but leave a small opening to thread the elastic through. |
||||||||||||||||||||||||||||
Diagram explanations |
||||||||||||||||||||||||||||
|
||||||||||||||||||||||||||||

|
||||||||||||||||||||||||||||

|
||||||||||||||||||||||||||||
Have you finished this pattern?Tag your pictures with #dropspattern #minttulipskirt or submit them to the #dropsfan gallery. Do you need help with this pattern?You'll find 20 tutorial videos, a Comments/Questions area and more by visiting the pattern on garnstudio.com. © 1982-2025 DROPS Design A/S. We reserve all rights. This document, including all its sub-sections, has copyrights. Read more about what you can do with our patterns at the bottom of each pattern on our site. |
||||||||||||||||||||||||||||


Post a comment to pattern DROPS 196-38
We would love to hear what you have to say about this pattern!
If you want to leave a question, please make sure you select the correct category in the form below, to speed up the answering process. Required fields are marked *.