
Popular categories
Looking for a yarn?


Comments / Questions (89)
![]() Céline wrote:
Céline wrote:
Bonjour, de combien d'aiguilles a-t-on besoin exactement pour réaliser ce modèle ? AIGUILLES DOUBLES POINTES ET CIRCULAIRES (40 et 60 ou 80 cm) DROPS n° 4,5 AIGUILLE CIRCULAIRE (40 et 60 ou 80 cm) DROPS n° 4 Il faut avoir les aiguilles doubles 40 et les circulaires 60 ou 80 en 4.5, et l'aiguille circulaire de 4, en quelle taille : 40, 60 ou 80 ? Je n'ai pas d'aiguilles et doit me les procurer et c'est un peu flou pour moi. Merci beaucoup !
11.03.2021 - 22:13DROPS Design answered:
Bonjour Céline, il vous faut ici des aiguilles circulaires en 40 cm (pour l'encolure et les manches) et en 60 ou bien 80 cm (au choix, vous les utiliserez lorsque vous aurez trop de mailles pour l'aiguille circulaire de 40 cm) - et chacune de ces aiguilles dans les 2 tailles - si vous voulez éviter les aiguilles doubles, vous pourrez tricoter les manches en magic loop avec une aiguille de 80 cm (voir vidéo). Donc il vous faut en 4: 1 aiguille circulaire de 40 + 1 de 60 ou 80 cm et en 4,5: la même chose: 1 en 40 + 1 en 60 ou 80. Bon tricot!
12.03.2021 - 08:32
![]() Petra Wisiak wrote:
Petra Wisiak wrote:
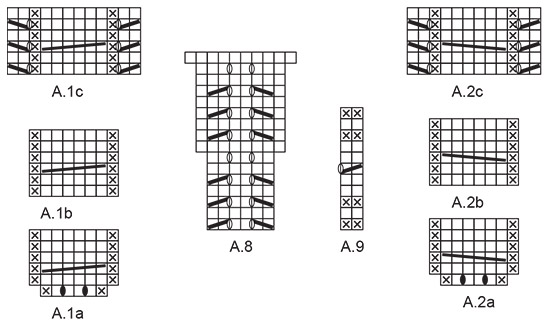
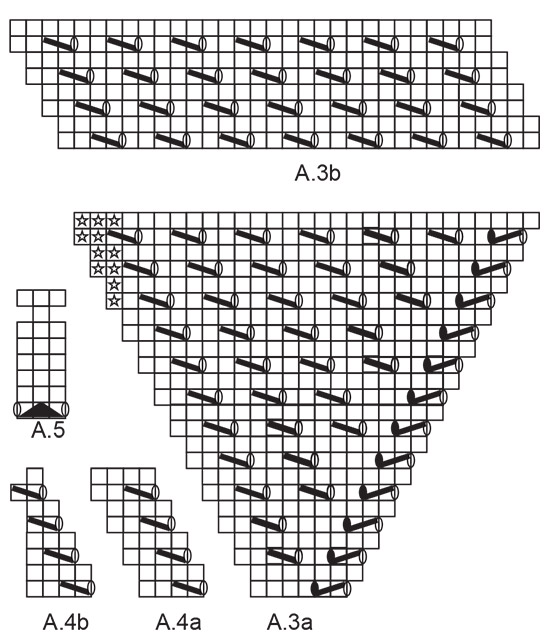
Hallo! Mit der Anleitung habe ich echt Probleme, ich hab schon viel von euch gestrickt, aber mit dem Muster kämpfe ich 😊A3b über A3a ist für mich nicht verständlich, wie muss ich vorgehen? Gibt es den verschränkt gestricktenAnfang bei A3a nicht mehr? Gibt es A4 und A6 nicht mehr? Fragen über Fragen.... Danke und liebe Grüße
09.12.2020 - 14:18DROPS Design answered:
Liebe Frau Wisiak, wenn A.3a und A.7a gestrickt sind, stricken Sie die Raglanzunahmen wie zuvor für Ihre Grösse (= Umschlag, rechts gestrickt um ein Loch zu bilden), aber das Lochmuster wird jetzt wie in A.3b und A.7b gestrickt (dh wie zuvorstricken aber immer weniger Maschen im Lochmuster, die in A.5 abgenommen sind (= so bildet sich die Spitze mit dem Lochmuster) - immer weniger Maschen werden auch im A.4 und A.6 gestrickt; hoffentlich kann es Ihnen helfen. Viel Spaß beim stricken!
09.12.2020 - 16:18
![]() Petra Wisiak wrote:
Petra Wisiak wrote:
Hallo! Ich weiß nicht, was ich machen soll, wenn A4 bis A6 das 1. Mal fertig gestrickt wurde. Ich habe dafür zu wenig Maschen, um es nochmal in die Höhe zu stricken, oder was verstehe ich an der Anleitung nicht. Bitte um Erklärung, vielen Dank! LG Petra
06.12.2020 - 22:31DROPS Design answered:
Liebe Frau Wisiak, hier fehlt es ein Wort - danke für den Hinweis. Wenn die Diagramme A.4 bis A.6 in der Höhe gestrickt werden, dann haben Sie jedes Mal weniger Maschen bzw einen Rapport weniger von A.4a und A.6b in der Breite. Viel Spaß beim stricken!
07.12.2020 - 08:45
![]() Caitlin wrote:
Caitlin wrote:
I'm making a large, and am stuck on the first raglan increase - the first round had knit 19 and make 1 (leaving 20 stitches) - then knit 1 round - but on the next round it says knit 19, 1 yarn over - but I already have 20 stitches from the first round. I'm confused. Thanks!
06.11.2019 - 17:59DROPS Design answered:
Dear Caitlin, the first round is a set-up round, when you have to increase on back piece, sleeves and front piece. On the first row with diagrams you will start to work pattern, ie 1 st from half back piece will be worked to the raglan (=A.1a) with the next 5 sts from sleeve; the last 5 sts on sleeve will be worked tog with the first st on front piece (= A.2A); the last st on front piece will be worked with the next 5 sts on sleeve (= A.1a) and the last 5 sts on sleeve will be worked with the first st on back piece (= A.2a). Happy knitting!
07.11.2019 - 08:50
![]() Imke wrote:
Imke wrote:
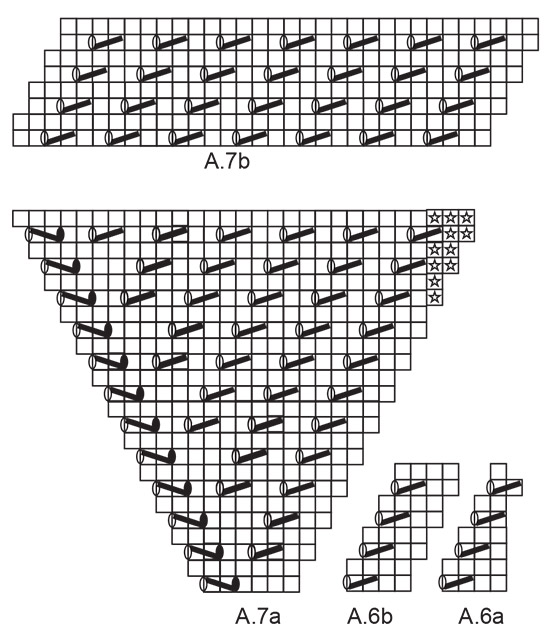
I don't understand what is meant with "Eyelet pattern in A.3a, A.4, A.6 and A.7a are displaced towards mid front and meet diagram A.5 (= mid front) where they are decreased together, i.e. there will be fewer and fewer eyelet lines when decreasing in A.5" . I can see in the picture that the gaps are decreasing in number when going down, but I cannot see this in the pattern. What does "where they are decreased together" mean?
25.09.2019 - 23:36DROPS Design answered:
Dear Imke, when working the diagrams A.3a, A.4, A.6 and A.7, they will be displaced to the mid front where you work A.5, A.5 = 2 stitches decreased, so that there will be by and by less stitches in these diagrams (they are "eaten" by A.5 in the middle). Happy knitting!
26.09.2019 - 10:34
![]() Valeria wrote:
Valeria wrote:
Meraviglioso !!!!!!
12.09.2019 - 10:30
![]() Caitlin wrote:
Caitlin wrote:
What kind of ease should I plan on when deciding the size? Thanks.
26.07.2019 - 22:11
![]() Nyllie wrote:
Nyllie wrote:
Stuck again.... row 27 which is the third row of chartA3b....I don’t understand how the chart shifts one stitch to the left. What happens to the first stitch. If I ignore and just knit the pattern I hav an extra stitch left before A5 which cannot be incorporated into A5... ive reknit this section for the forth time and I need help. Thanks
12.04.2019 - 01:30DROPS Design answered:
Dear Nyllie, the stitches before A.3b are worked in stocking stitch, then continue A.3b (lace pattern) and A.4a so that the holes will make a diagonal towards the middle (= work now A.5 to decrease 1 stitch in A.4a (= the number of stitches of the lace pattern will decrease gradually in the middle but the number of stitches in stocking stitch on each side of the lace pattern is increasing = number of stitches remains the same + raglan increases. Happy knitting!
12.04.2019 - 09:04
![]() Nyllie wrote:
Nyllie wrote:
Hi, Stuck on row 9 of the charts. Everything works fine until I try to repeat A4a and A4b from the bottom. Not enough stitches and not sure which is left out or rearranged??
08.04.2019 - 04:10DROPS Design answered:
Dear Nyllie, work row 9 in all diagrams as before, making sure that the sts in A.5 are always lined up = there will be more stitches in A.3a and in A.7a and less stitches worked in A.4a-b + in A.6a-b. Happy knitting!
08.04.2019 - 10:22
![]() Nele wrote:
Nele wrote:
Hallo ich verstehe A.5 nicht wird es nach 5 Reihen wiederholt oder was bedeutet nur 1 Masche in der Zeichnung nach der 5 Reihe? Muss ich dann 2 Maschen aufnehmen um wieder 3 zu bekommen und warum ist das nicht eingezeichnet?
19.03.2019 - 09:44DROPS Design answered:
Liebe Nele, bei der 7. Reihe in A.4b stricken Sie 1 Umschlag, 1 Abnahme, dann stricken Sie die mittlere Masche in A.5, und bei A.6a stricken Sie die letzte Masche in A.5 zusammen mit der ersten Masche in A.6a (+ 1 Umschlag), deshalb gibt es nur 1 Masche in A.5 bei 7. Reihe - bei der nächsten Reihe haben Sie wieder 3 M in A.5. Viel Spaß beim stricken!
19.03.2019 - 11:19
|
|||||||||||||||||||||||||||||||
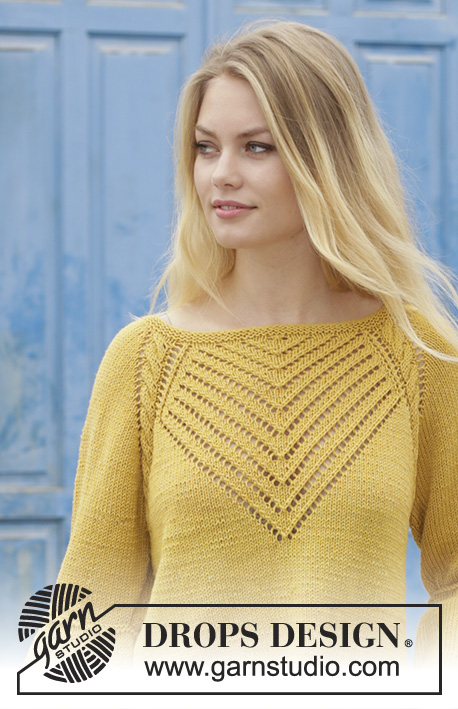
Hello Yellow#helloyellowsweater |
|||||||||||||||||||||||||||||||
 |
 |
||||||||||||||||||||||||||||||
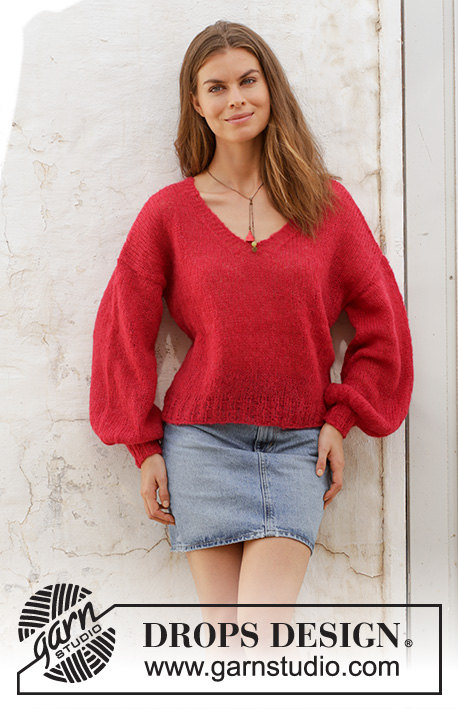
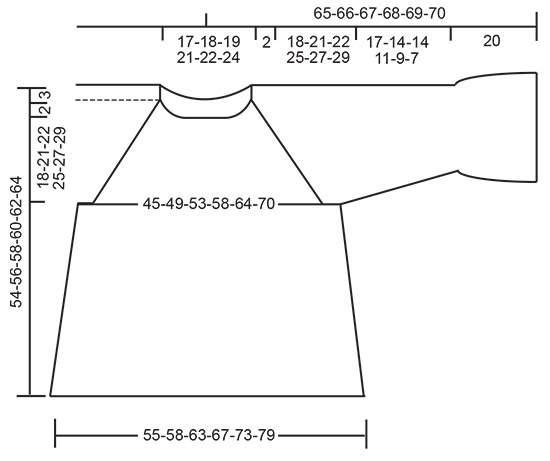
Jumper with cables, lace pattern, raglan and A-shape, knitted top down. Size: S - XXXL Piece is knitted in DROPS Cotton Merino.
DROPS 187-4 |
|||||||||||||||||||||||||||||||
|
INFORMATION FOR PATTERN: GARTER STITCH (worked in the round): 1 ridge = 2 rounds. Knit 1 round and purl 1 round. PATTERN: See diagrams A.1 to A.9. INCREASE TIP: Increase 1 stitch by making 1 yarn over between 2 stitches. On next round work yarn over twisted to avoid holes. DECREASE TIP (applies to sleeves): Decrease 1 stitch on each side of marker thread as follows: Work until 3 stitches remain before marker thread, slip 1 stitch knitwise, knit 1, pass slipped stitch over stitch worked, knit 2 (marker thread is in the middle of these stitches), knit the next 2 stitches together. ---------------------------------------------------------- JUMPER: Yoke and body are worked in the round on circular needle, top down. Work sleeves in the round on double pointed needles/a short circular needle. YOKE: Cast on 92-96-100-108-112-120 stitches on a short circular needle size 4 mm with Cotton Merino. Work 3 ridges in GARTER STITCH - see explanation above. Switch to circular needle size 4.5 mm. Work next round (round begins mid back) as follows: Knit 17-18-19-21-22-24 and increase 1 stitch – read INCREASE TIP (= half back piece), * 1 yarn over, knit 1 *, work from *-* 12 times in total (= 12 stitches increased = sleeve), knit 34-36-38-42-44-48 and increase 3-1-3-1-3-3 stitches evenly (= front piece), work from *-* 12 times in total (= 12 stitches increased = sleeve) and finish by knitting 17-18-19-21-22-24 and increasing 2-0-2-0-2-2 stitches evenly (= half back piece) = 122-122-130-134-142-150 stitches. Knit 1 round, work all yarn overs twisted, they should not make holes. Then work and increase for raglan on next round as follows: Knit 15-15-19-19-19-23, 1 yarn over (= half back piece = 1 stitch increased), A.1a (= 6 stitches), 1 yarn over (= 1 stitch increased), knit 18-18-14-16-20-16, 1 yarn over (= 1 stitch increased), A.2a (= 6 stitches) (= sleeve), A.3a (= 6 stitches, raglan increase is drawn in diagram), A.4a (= 4 stitches) over the next 4-4-8-8-8-12 stitches, A.4b (= 4 stitches), A.5 (= 3 stitches = middle of front piece), A.6a (= 4 stitches), repeat A.6b (= 4 stitches) over the next 4-4-8-8-8-12 stitches. A7a (= 6 stitches, raglan increase is drawn in diagram) (= front piece), A.1a over the next 6 stitches, 1 yarn over (= 1 stitch increased), knit 18-18-14-16-20-16, 1 yarn over (= 1 stitch increased), A.2a over the next 6 stitches (= sleeve), 1 yarn over (= 1 stitch increased) and finish by knitting 16-16-20-20-20-24 (= half back piece) (= 2 stitches increased in every A.1a and A.2a = 8 stitches increased. For raglan: 2 stitches have been increased on each sleeve and back piece and 1 stitch in A.3a and A.7a (= front piece) = 8 stitches increased for raglan = 16 stitches increased on round) = 138-138-146-150-158-166 stitches. Knit the increased yarn overs on each side of A.1 and A.2 on next round to make holes. REMEMBER THE KNITTING TENSION! Now increase for raglan AT THE SAME TIME work pattern, read both sections before continuing: PATTERN: When A.1a and A.2a have been worked 1 time vertically, work A.1b over A.1a and A.2b over A.2a. Repeat diagrams A.1b and A.2b vertically. Eyelet pattern in A.3a, A.4, A.6 and A.7a are displaced towards mid front and meet diagram A.5 (= mid front) where they are decreased together, i.e. there will be fewer and fewer eyelet lines when decreasing in A.5. Repeat diagram A.4 to A.6 vertically. I.e. there will be 1 less repeat of A.4a and A.6b in width for each repeat of A.4 and A.6 in hieight. When A.3a and A.7a have been worked 1 time vertically, work A.3b over A.3a and A.7b over A.7a. Eyelet pattern are decreased in A.5 as before, work the remaining stitches in stocking stitch and pattern as before. When all eyelet lines have been decreased, work in stocking stitch over stitches in A.3, A.5 and A.7. RAGLAN: Now increase for raglan as follows: NOTE! The first 12 increase rounds for raglan are drawn into diagram A.3a and A.7a on front piece but increase on each sleeve and on back piece as follows: Increase 1 stitch on each side of every A.1 and A.2 (= 2 stitches increased on back piece, 2 stitches on each sleeve, 1 stitch increased in A.3a and 1 stitch increased in A.7a = 8 stitches in total increased). Knit the increased stitches to make holes. Increase like this every other round 21-25-27-30-33-36 times in total (the first increase is explained above. When 12 increase rounds have been done in total, A.3a and A.7a have been worked 1 time vertically, increases for raglan is no longer drawn in diagram, so continue increase as on back piece = 8 stitches increased in total on every increase round). When all increases are done there are 298-330-354-382-414-446 stitches on row. Then work A.1c over A.1b and A.2c over A.2b (adjust which round to start on according to pattern, i.e. continue cable as before and work eyelet pattern on each side of every cable). Continue to work until piece measures 20-23-24-27-29-31 cm. Work 1 round while decreasing 2 stitches evenly over every A.1c and A.2c (= 8 stitches decreased in total) = 290-322-346-374-406-438 stitches. Continue working in stocking stitch over A.1c and A.2c. Now divide yoke for body and sleeves as follows: Work 40-44-48-53-59-65 stitches (= half back piece), slip the next 64-72-76-80-84-88 stitches on a stitch holder for sleeve, cast on 8 stitches under sleeve, insert 1 marker in the middle of the new stitches, work 81-89-97-107-119-131 stitches (= front piece), slip the next 64-72-76-80-84-88 stitches on a stitch holder for sleeve, cast on 8 stitches under sleeve, insert 1 marker in the middle of the new stitches and finish with 41-45-49-54-60-66 stitches (= half back piece) = 178-194-210-230-254-278 stitches. Finish body and sleeves separately. Insert 1 marker thread here. NOW MEASURE THE PIECE FROM HERE! BODY: = 178-194-210-230-254-278 stitches. Work A.8 (= 6 stitches) over the middle stitches in the side under each sleeve (= 3 stitches on each side of each marker), work the remaining stitches in pattern and stocking stitch. When lace pattern on front piece is done, continue in stocking stitch with A.8 under each sleeve. When piece measures 31-30-31-30-30-30 cm (there are approx. 218-230-250-266-290-314 stitches on needle) from where body was divided from sleeves, switch to circular needle size 4 mm and work 3 ridges. Cast off. Make sure to avoid a tight cast-off edge, cast off with 1 larger needle size if needed. SLEEVE: Work sleeve in the round on circular needle/double pointed needles. Slip the 64-72-76-80-84-88 stitches from stitch holder in one side of piece on double pointed needles size 4.5 mm and pick in addition up 1 new stitch in each of the 8 stitches cast on under sleeve = 72-80-84-88-92-96 stitches on needle. Insert a marker thread in the middle of the new stitches under the sleeve. Work in stocking stitch in the round. When piece measures 1 cm, decrease 2 stitches mid under sleeve - read DECREASE TIP. Decrease like this every 8th-4th-4th-3rd-2nd-2nd row 6-8-8-8-8-8 times in total = 60-64-68-72-76-80 stitches. When piece measures 17-14-14-11-9-7 cm from where sleeve was divided from body, continue as follows: Work 2 ridges. Work 2 rounds in stocking stitch. Work next round as follows: Work 0-2-1-0-2-1 stitches in stocking stitch, * knit 6, 1 yarn over *, work from *-* until 0-2-1-0-2-1 stitch remains, work 0-2-1-0-2-1 stitch in stocking stitch = 70-74-79-84-88-93 stitches. Work 2 rounds in stocking stitch (always knit yarn overs twisted to avoid holes). Work next round as follows: Work 0-2-1-0-2-1 stitches in stocking stitch, * knit 7, 1 yarn over *, work from *-* until 0-2-1-0-2-1 stitch remains, work 0-2-1-0-2-1 stitch in stocking stitch = 80-84-90-96-100-106 stitches. Work 2 rounds in stocking stitch (always knit yarn overs twisted to avoid holes). Work next round as follows: Work 0-2-1-0-2-1 stitches in stocking stitch, * knit 8, 1 yarn over *, work from *-* until 0-2-1-0-2-1 stitch remains, work 0-2-1-0-2-1 stitch in stocking stitch = 90-94-101-108-112-119 stitches. Continue in the round with stocking stitch until sleeve measures 34-31-31-28-26-24 cm in total from where sleeve was divided from body (knit yarn overs from first round twisted to avoid holes). Switch to circular needle size 4 mm and work A.9 in the round AT THE SAME TIME on first round increase 0-0-1-0-0-1 stitch = 90-94-102-108-112-120 stitches. When A.9 has been worked 1 time vertically, cast off by knitting. Make sure to avoid a tight cast-off edge, cast off with 1 larger needle size if needed. Sleeve measures 37-34-34-31-29-27 cm in total from where sleeve was divided from body. Work the other sleeve the same way. |
|||||||||||||||||||||||||||||||
Diagram explanations |
|||||||||||||||||||||||||||||||
|
|||||||||||||||||||||||||||||||
 |
|||||||||||||||||||||||||||||||
 |
|||||||||||||||||||||||||||||||
 |
|||||||||||||||||||||||||||||||
 |
|||||||||||||||||||||||||||||||
Have you finished this pattern?Tag your pictures with #dropspattern #helloyellowsweater or submit them to the #dropsfan gallery. Do you need help with this pattern?You'll find 24 tutorial videos, a Comments/Questions area and more by visiting the pattern on garnstudio.com. © 1982-2026 DROPS Design A/S. We reserve all rights. This document, including all its sub-sections, has copyrights. Read more about what you can do with our patterns at the bottom of each pattern on our site. |
|||||||||||||||||||||||||||||||


With over 40 years in knitting and crochet design, DROPS Design offers one of the most extensive collections of free patterns on the internet - translated to 17 languages. As of today we count 324 catalogues and 12290 patterns translated into English (UK/cm). 12290
We work hard to bring you the best knitting and crochet have to offer, inspiration and advice as well as great quality yarns at incredible prices! Would you like to use our patterns for other than personal use? You can read what you are allowed to do in the Copyright text at the bottom of all our patterns. Happy crafting!
Post a comment to pattern DROPS 187-4
We would love to hear what you have to say about this pattern!
If you want to leave a question, please make sure you select the correct category in the form below, to speed up the answering process. Required fields are marked *.