
Popular categories
Looking for a yarn?


Comments / Questions (45)
![]() TANIA SALINAS CAMBIZACA wrote:
TANIA SALINAS CAMBIZACA wrote:
Como empiezo a tejer despues de los 2 surcos en PUNTO MUSGO, NO TENGO CLARO ESTA PARTE?
05.02.2019 - 20:58DROPS Design answered:
Hola Tania. Después de 2 pliegues en PUNTO MUSGO, comenzamos con el patrón, es decir, comenzamos a trabajar el delantero, la espalda y las mangas en punto jersey y las partes de ráglan según el diagrama A.1.
11.02.2019 - 20:12
![]() Christine wrote:
Christine wrote:
Hi, ich habe ein Fragen zu dem Diagram: Es wurde schon mal gefragt, ob das Diagramm von rechts nach links gelesen wird, aber dann verstehe ich den Rest leider nicht. Was passiert mit der schwarzen Masche in Zeile 3 und 7. wird sie nur rechts abgehoben. Und wenn ich wie beschieben in Zeile 4 bzw. 8 dann wieder die erste Masche abhebe wäre das doch die gleiche Masche wieder. Oder lese ich das Diagramm doch vin links nach rechts?
10.01.2019 - 00:13DROPS Design answered:
Liebe Christine, A.1 wird über 5 bzw 4 Maschen gestrickt: bei der 1. Reihe nehmen Sie 1 Masche ab, bei der 2. Reihe stricken Sie 1 Umschlag zwischen den beiden re. Maschen = es sind wieder 5 M. Dieses Video zeigt, wie man dieses Zopf strickt. Viel Spaß beim stricken!
10.01.2019 - 09:56
![]() Sylvia wrote:
Sylvia wrote:
Liebes Team, ich verstehe die Zunahme nach dem Bündchen nicht. Woran erkenne ich den Unterschied in der Beschreibung der Zunahme Vorder- und Rückenteil zwischen Zunahme Ärmel. Für mich ist alles gleich beschrieben. Hinzu kommt, daß von Zunahme in der 2. und 4. Runde die Rede ist, in der Beschreibung oben in der 1. und 3. Runde. Wenn ich beim Ärmel dann nicht so wie beim Vorder- und Rückenteil durch Umschlag zunehme, wie entsteht dann das Loch. Ich brauche Hilfe . Dankeschön
09.01.2019 - 21:44DROPS Design answered:
Liebe Sylvia, wenn Sie in jede 4. Runde zunehmen, nehmen Sie bei der 1. Runde 1 M zu (= Umschlag vor/nach A.1), und bei der 3. Runde stricken Sie 1 Abnahme + 1 Umschlag = keine Zunahme, die Maschenanzahl bleibt gleich und das Loch entsteht durch den Umschlag. Viel Spaß beim stricken!
10.01.2019 - 09:40Cheryl wrote:
Hi team. So I am doing this pattern, but it seems that I am only increasing stitches on the sleeves every other round, as on the 4th round the amount of stitches stay the same, is this correct? As I read the pattern under "INCREASE 1 STITCH BEFORE A.1 every 4th round:" & "INCREASE 1 STITCH AFTER A.1 every 4th round:" on ROUND 3 you are knitting 2 together or slip 1 then psso. So therefore I'm not increasing, I'm a little confused, can you please help?
08.01.2019 - 15:50DROPS Design answered:
Dear Cheryl, you will increase 2 sts on each sleeve (1 st after A.1 at the beg of the sleeve + 1 st before A.1 at the end of the sleeve) every other round 10-11-12 times (see size) and then every 4th round 5-6-7 times. The number of sts should increase by 2 on every other round (do not count A.1 where you have 4 or 5 sts depending on the row worked). Happy knitting!
09.01.2019 - 07:51
![]() Flori wrote:
Flori wrote:
Hey Ihr, ich habe eine Fage zum Diagramm. Lese ich das richtig, dass ich hier, da in Runden gestrickt wird, immer von rechts nach links lese? 1. und 2. Reihe mit dem Muster, 3. und 4. Reihe dann glatt rechts außer die linken Randmaschen? Dann wieder 5. und 6. Reihe Muster und die zwei nächsten dann wieder glatt rechts? Egal ob ich in den der 8er oder späteren 4er Zunahmenreihen bin? Danke
07.12.2018 - 09:03DROPS Design answered:
Liebe Flori, ja genau so liest man ein Diagram in der Runde - dieses Video zeigt wie man diese kleine Zöpfe strickt (mit nur 1 li M auf beiden Seiten, nicht 3 wie im Video) - diese 4 bzw 8 Reihen wiederholen Sie immer in der Höhe - und gleichzeitig die Zunahmen wie beschrieben arbeiten (vor diesen 5 Maschen und/oder nach diesen 5 Maschen). Viel Spaß beim stricken!
07.12.2018 - 10:16
![]() Linda wrote:
Linda wrote:
Hallo Team, das Bündchen habe ich gestrickt, aber wie geht es nun weiter? Stricke ich jetzt die Zunahme mit Umschlag VOR jedem A1 dann die 2. Runde glatt rechts? Dann Wiederholung. Dann eine Runde mit der Zunahme NACH jedem A1 und die 2. glatt rechts? Dann Wiederholung. DAnn das gleiche mit vier Runden? Was ist aber mit der Zunahme, die weiter unten beschrieben ist: jeweils 1 Masche am Rumpf- und Ärmelteil? ISt das zusätzlich zu der o.s. Zunahme mit Umschlag? Wie nimmt man dann am besten zu?
05.12.2018 - 09:50DROPS Design answered:
Liebe Linda, die Zunahmen sind unterschiedlich bei Rumpfteil und bei den Ärmeln, es werden 8 oder nur 4 Maschen pro Zunahmerunde zugenommen. Sie müssen 1 Masche am Anfang Vorder- und Rückenteil (= nach A.1) zunehmen + 1 Masche am Ende Vorder- und Rückenteil (= vor A.1) zunehmen. Bei den Ärmeln nehmen Sie auch 1 M am Anfang (nach A.1) und am Ende (vor A.1) zunehmen. Wenn Sie in jede 2. Runde zunehmen, wird der Umschlag glatt gestrickt - wenn Sie in jede 4. Reihe zunehmen, stricken Sie wie unter 1 MASCHE NACH A.1 IN JEDER 4. RUNDE WIE FOLGT ZUNEHMEN beschrieben. Viel Spaß beim stricken!
05.12.2018 - 10:25
![]() Siv Gullaksen wrote:
Siv Gullaksen wrote:
Hei. Jeg har problemer med raglandfellingen. Jeg forstår at man skal etter et visst antall bare ha på hver 4 omgang på ermet. Er det da oppskrift øverst omgang 1-4 man skal følge? Og skal den i så fall kun følges på ermet eller hele omgangen? Hvis man følger den vil man vel få hver 2 omgang uansett?
27.11.2018 - 10:36DROPS Design answered:
Hei Siv. Når du skal øke hver 4 omgang følger du anvisningene for både "ØK 1 MASKE FØR A.1 på hver 4.omgang" og "ØK 1 MASKE ETTER A.1 på hver 4.omgang". Den ene er for den ene siden av ermet, og den andre er for den andre siden av samme ermet. Du øker slik kun på ermene, og øker samtidig til bol som forklart - det vil si at du øker ulikt på bol og ermer. Når du øker hver 4 omgang skjer dette på "1 OMGANG". På "3 OMGANG" lages det også kast, men det felles samtidig masker som gjør at det ikke blir noen øking. Dette gjøres for at hullmønsteret skal fortsette selvom økingen ikke skjer hver annen omgang. God fornøyelse.
29.11.2018 - 14:56
![]() Jule wrote:
Jule wrote:
Hallo ihr Lieben! Ich stricke zum ersten Mal einen Raglan-Pulli und stehe ein bisschen auf dem Schlauch... Sind in A1 nur die Hinreihen beschrieben? Und auch nur jede 2. Hinreihe? Es wäre toll, wenn ihr A1 etwas genauer beschreiben könntet. Ich habe das jetzt so verstanden, dass in jeder 2. Runde alles nur rechts gestrickt wird??? Das kommt mir aber komisch vor Vielen Dank für eure Antwort, Jule
07.10.2018 - 09:02DROPS Design answered:
Lieber Jule, dieses Video zeigt wie man A.1 strickt = alle Reihen im Muster sind im Diagram gezeigt (= A.1 ist 5 M x 8 Reihen) - lesen Sie alle Runde rechts nach links (von der unteren Ecke an der rechten Seiten anfangen). Viel Spaß beim stricken!
08.10.2018 - 08:47
![]() Gina wrote:
Gina wrote:
Alla fine del lavoro dice di aumentare 28 maglie e poi lavorare a coste credo che debbano essere diminuite 28 maglie così anche anche nelle maniche non 6 aumenti ma 6 diminuzioni prima del bordo a coste grazie
27.08.2018 - 01:18
![]() Irène wrote:
Irène wrote:
Bonjour et merci beaucoup pour vos réponses ! La torsade est facile et rend très bien.J'ai un petit doute sur "Quand toutes les augmentations sont faites, on a 212-224-236-248-252-264 mailles. Continuer comme avant...", on continue les torsades ? et quand on ajoute les mailles qui iront sous les aisselles, on tricote ces 6 ou 8 mailles en jersey et on continue les torsades jusqu'au bas du pull ? Merci par avance et bravo pour tous ces modèles !
29.04.2018 - 17:39DROPS Design answered:
Bonjour Irène, après les augmentations du raglan, continuez comme avant en jersey avec les petites torsades mais n'augmentez plus pour le raglan jusqu'à la hauteur indiquée pour la taille. Quand on a séparé les manches du dos et du devant, on tricote en jersey sur toutes les mailles autrement dit, les 6-8 m montées sous les aisselles se tricotent également en jersey (= il n'y a pas de torsade sur les côtés du pull). Bon tricot!
30.04.2018 - 10:59
|
||||||||||||||||
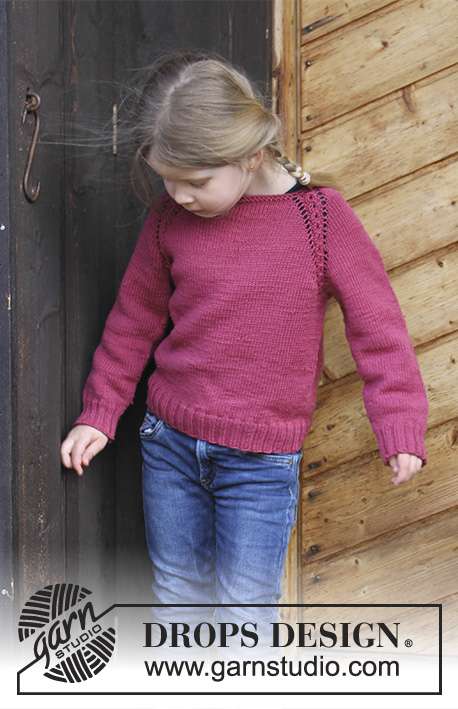
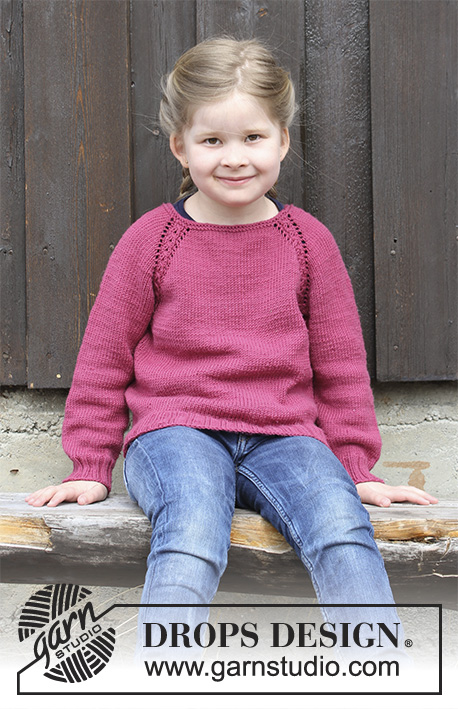
Cherry Cuddler#cherrycuddlersweater |
||||||||||||||||
 |
 |
|||||||||||||||
Jumper with raglan and cables, worked top down for kids. Size 2 - 12 years Piece is knitted in DROPS Merino Extra Fine.
DROPS Children 30-14 |
||||||||||||||||
|
INFORMATION FOR PATTERN: GARTER STITCH (worked in the round): 1 ridge = 2 rounds. Knit 1 round and purl 1 round. PATTERN: See diagram A.1. RAGLAN: Increase for raglan on each side of A.1 in every transition between sleeves and body. INCREASE 1 STITCH BEFORE A.1 every other round: Work until A.1: Make 1 yarn over, work A.1. Knit yarn over on next round to make a hole. Work the increased stitches in stocking stitch. Repeat these 2 rounds. INCREASE 1 STITCH AFTER A.1 every other round: Work A.1, make 1 yarn over. Knit yarn over on next round to make a hole. Work the increased stitches in stocking stitch. Repeat these 2 rounds. INCREASE 1 STITCH BEFORE A.1 every 4th round: ROUND 1: Work until A.1. Make 1 yarn over, work A.1. ROUND 2: Knit yarn over to make a hole. ROUND 3: Work until 2 stitches remain before A.1: Knit 2 together, make 1 yarn over, work A.1. ROUND 4: Knit yarn over to make a hole. Repeat these 4 rounds. INCREASE 1 STITCH AFTER A.1 every 4th round: ROUND 1: Work A.1, make 1 yarn over. ROUND 2: Knit yarn over to make a hole. ROUND 3: Work A.1, make 1 yarn over, slip 1 stitch knitwise, knit 1 and pass slipped stitch over stitch worked ROUND 4: Knit yarn over to make a hole. Repeat these 4 rounds. DECREASE TIP (applies to sleeves): Decrease 1 stitch on each side of marker thread as follows: Work until 2 stitches remain before marker thread, knit 2 together (marker thread), slip 1 stitch knitwise, knit 1, pass slipped stitch over stitch worked (= 2 stitches decreased). ---------------------------------------------------------- JUMPER: Worked in the round on circular needle from mid back. Work top down. Work sleeves in the round on double pointed needles/a short circular needle, top down. YOKE: Cast on 72-76-80-80-84-84 stitches on a short circular needle size 4 mm with Merino Extra Fine. Work 2 ridges in GARTER STITCH - see explanation above. Then work as follows from mid back: Work 9-10-11-11-12-12 stitches in stocking stitch (= half back piece), A.1 (= 5 stitches), 8 stitches in stocking stitch (= sleeve), A.1, 18-20-22-22-24-24 stitches in stocking stitch (= front piece), A.1, 8 stitches in stocking stitch (= sleeve), A.1, 9-10-11-11-12-12 stitches in stocking stitch (= half back piece). REMEMBER THE KNITTING TENSION! Continue this pattern, AT THE SAME TIME begin increases for RAGLAN – see explanation above. NOTE! Increase differently on body and sleeves. INCREASE AS FOLLOWS ON FRONT/BACK PIECE: Increase 2 stitches on back piece and 2 stitches on front piece (= 1 stitch before/after A.1): Increase every other round 20-21-22-24-24-26 times in total. INCREASE AS FOLLOWS ON SLEEVES: Increase 2 stitches on each sleeve (= 1 stitch after/before A.1): Increase every other round 10-11-12-12-12-12 times, then increase every 4th round 5-5-5-6-6-7 times (15-16-17-18-18-19 times in total). After all increases are done there are 212-224-236-248-252-264 stitches on round. Work pattern as before until piece measures 15-16-16-18-18-19 cm from mid back. Work next round as follows: Work the first 31-33-35-37-38-40 stitches (= half back piece), slip the next 44-46-48-50-50-52 stitches on a stitch holder for sleeve, cast on 6-6-6-6-8-8 new stitches (= in the side under sleeve), work the next 62-66-70-74-76-80 stitches (= front piece), slip the next 44-46-48-50-50-52 stitches on a stitch holder for sleeve, cast on 6-6-6-6-8-8 new stitches (= in the side under sleeve), work the last 31-33-35-37-38-40 stitches (= half back piece). Finish body and sleeves separately. NOW MEASURE THE PIECE FROM HERE! BODY: = 136-144-152-160-168-176 stitches. Continue working in stocking stitch in the round over all stitches. When piece measures 14-17-21-23-27-30 cm from division, knit 1 round while increasing 28-28-32-32-36-36 stitches evenly = 164-172-184-192-204-212 stitches. Switch to circular needle size 3.5 mm. Work rib = knit 2/purl 2 for 4 cm. Cast off stitches with knit over knit and purl over purl. Jumper measures approx. 36-40-44-48-52-56 cm from shoulder and down. SLEEVE: Slip the stitches from stitch holder in one side of piece on double pointed needles/a short circular needle size 4 mm and pick in addition up 1 stitch in each of the 6-6-6-6-8-8 new stitches cast on under sleeve = 50-52-54-56-58-60 stitches. Insert 1 marker thread mid under sleeve. Work in stocking stitch in the round. When piece measures 3 cm, decrease 1 stitch on each side of marker thread - read DECREASE TIP. Decrease like this every 2-3-3-3½-3½-4 cm 7-7-8-8-9-9 times in total = 36-38-38-40-40-42 stitches. Continue in stocking stitch until sleeve measures 19-24-28-31-36-40 cm. Knit 1 round while increasing 8-6-6-8-8-10 stitches evenly = 44-44-44-48-48-52 stitches. Switch to circular needle size 3.5 mm. Work rib = knit 2/purl 2 for 4 cm. Cast off stitches with knit over knit and purl over purl. Sleeve measures approx. 23-28-32-35-40-44 cm from division. Work the other sleeve the same way. |
||||||||||||||||
Diagram explanations |
||||||||||||||||
|
||||||||||||||||
 |
||||||||||||||||
Have you finished this pattern?Tag your pictures with #dropspattern #cherrycuddlersweater or submit them to the #dropsfan gallery. Do you need help with this pattern?You'll find 24 tutorial videos, a Comments/Questions area and more by visiting the pattern on garnstudio.com. © 1982-2026 DROPS Design A/S. We reserve all rights. This document, including all its sub-sections, has copyrights. Read more about what you can do with our patterns at the bottom of each pattern on our site. |
||||||||||||||||


With over 40 years in knitting and crochet design, DROPS Design offers one of the most extensive collections of free patterns on the internet - translated to 17 languages. As of today we count 324 catalogues and 12239 patterns translated into English (UK/cm). 12239
We work hard to bring you the best knitting and crochet have to offer, inspiration and advice as well as great quality yarns at incredible prices! Would you like to use our patterns for other than personal use? You can read what you are allowed to do in the Copyright text at the bottom of all our patterns. Happy crafting!
Post a comment to pattern DROPS Children 30-14
We would love to hear what you have to say about this pattern!
If you want to leave a question, please make sure you select the correct category in the form below, to speed up the answering process. Required fields are marked *.