
Popular categories
Looking for a yarn?


Comments / Questions (99)
![]() Elly wrote:
Elly wrote:
Ik wil graag aan deze prachtige trui beginnen. Graag zou ik de kraag langer maken. Meer een col dus. Kan ik dat eenvoudig doen door meer toeren voor de kraag te breien of moet ik het patroon aanpassen?
19.11.2017 - 21:04DROPS Design answered:
Hallo Elly, Ja, zou inderdaad meer toeren kunnen breien. Als je een dubbele col wilt, zou ik meer steken opzetten en dan na een paar toeren minderen in de averechte delen. Op die manier valt hij mooier. Als je met een lange rondbreinaald breit kun je steeds even de col passen en kijken hoe hij valt.
20.11.2017 - 14:40Sonja Kjeldgaard wrote:
Hej. Jeg strikker i str L. 232 masker på omgang og jeg skal tage 3 masker ind over snoning, så er der 220 masker på omgang. Hvordan kommer jeg så ned på de 208 masker? Jeg kan slet ikke lige se, hvor de resterende bliver taget ind. Mvh Sonja.
19.11.2017 - 09:59DROPS Design answered:
Hej, du ska minska 3 maskor över varje fläta med 6 maskor, då blir det 208 maskor kvar.
20.11.2017 - 14:19
![]() Catherine wrote:
Catherine wrote:
J'en suis au dos et devants. J'augmente d'une maille sur l'endroit de chaque côté des quatre A1, donc j'augmente de huit mailles tous les deux rangs et je diminue de deux mailles de chaque côté des marqueurs sur les côtés, sur l'endroit, donc je diminue de quatre mailles tous les deux rangs. Le nombre de maille augmente donc de 4 tous les deux rangs alors qu'il devait rester le même : qu'est ce qui ne va pas ! Merci de votre aide !
15.11.2017 - 12:20DROPS Design answered:
Bonjour Catherine, on augmente les mailles du devant et du dos donc on va augmenter de part et d'autres des A.1 sous chaque manche = 4 augmentations et diminuer 2 m au milieu sous la manche = 4 diminutions. Bon tricot!
15.11.2017 - 13:22
![]() Sylvana wrote:
Sylvana wrote:
Bonjour Je viens de commencer le pull, j'en suis au tout début des torsades. J'ai essayé de lire l'ensemble des explications, mais je ne comprends pas à quel moment on va faire en sorte que le dos soit plus long que le devant ? Merci de votre aide. Sylvana
07.11.2017 - 21:05DROPS Design answered:
Bonjour Sylvana, dans ce modèle, le dos et le devant sont identiques, aussi bien niveau encolure que pour la longueur totale. Bon tricot!
08.11.2017 - 08:50
![]() Reveillaud wrote:
Reveillaud wrote:
Bonjour j'en suis au dos et devant pour les augmentations de part et d'autre autre de a1et des diminutions sous la Manche. Pour les augmentations c'est tous les deux tours mais pour les diminutions c'est tous les deux tours ou tous les tours ? Et lorsque je diminue sur le motif je ne fais plus le jete sur le cote de la diminution mais l autre cote oui ? Car je ne comprends pas comment arriver à 252m pour la taille xxl merci davance
05.11.2017 - 01:21DROPS Design answered:
Bonjour Madame Reveillaud, tant que vous décalez A.1, le nombre de mailles ne va changer (augmentations de part et d'autre de A.1 et diminutions sous les manches), puis vous diminuez 3 m dans chacune des 8 torsades= 24 m, ainsi il vous reste 276-24=252 m. Bon tricot!
06.11.2017 - 09:42
![]() Stockdale wrote:
Stockdale wrote:
Hi, In the first "JUMPER" section, after you have reached 132 stitches, when it says to 'Knit 1 round, the yarn overs are knitted twisted to prevent holes'. Does this mean to 'work' one round in purl? If I knit it, will I not end up with a ridged bump on the right side of my work? Do we want this bump on the right side of the work? Or have I somehow mixed up with my rows, so that I have my right and wrong sides reversed?
28.10.2017 - 15:02DROPS Design answered:
Hi Stockdale, You are working stocking stitch in the round, so each round is knit and the yarn overs are then knittied twisted. Happy knitting!
29.10.2017 - 06:05
![]() Margrit Klingsiek wrote:
Margrit Klingsiek wrote:
Vielen, vielen Dank für Ihre Hilfe! Und ganz herzliche Grüße... übrigens .. wie immer tolle Anleitung, ich liebe diese Seiten!!! Margrit Klingsiek
13.10.2017 - 22:33
![]() Margrit Klingsiek wrote:
Margrit Klingsiek wrote:
Vielen Dank für Ihre schnelle Antwort! Ich hatte nicht die Vorstellung, dass Sie das Muster für mich anpassen sollen. Ich wollte eigentlich gern wissen, ob in der Original-Anleitung die Maschen von A1 komplett im Rumpf bleiben oder eine Anzahl mit in den Ärmel übernommen wird. Und vor allem: Wie ist die Verteilung der Maschen dann? Ich komme mit rechnen nicht weiter, weil ich nicht weiß, ob es so richtig ist. Herzliche Grüße Margrit Klingsiek
12.10.2017 - 17:09DROPS Design answered:
Liebe Frau Klingsiek, die übrigen Maschen für das Vorder- und Rückenteil sind noch mit A.1 gestrickt, aber A.1 wird nach und nach abgenommen (Umschlag vor und nach A.1 und Abnahmen mitte an der Seite, wie unter RUMPFTEIL erklärt. Viel Spaß beim stricken!
13.10.2017 - 09:12
![]() Margrit Klingsiek wrote:
Margrit Klingsiek wrote:
Mein Garn ist dünner als das angegebene. An der Stelle, wo man Maschen für die Ärmel still legen soll, komme ich nicht ganz zurecht. Wird das Muster A1 in den Rumpf mitgenommen oder geht ein Teil in den Ärmel über? Bis wohin muss ich dann meine Maschen dieses Musterteils in Ärmel und Rumpf aufteilen? Vielen Dank schon mal! Margrit
12.10.2017 - 13:56DROPS Design answered:
Liebe Frau Klingsiek, leider können wir nicht jede Anleitung nach jeder Geschmack/Garn anpassen. Bitte nehmen Sie mit dem Laden Kontakt auf, wo Sie Ihre Wolle gekauft haben. Viel Spaß beim stricken!
12.10.2017 - 15:54
![]() Verena Vogt wrote:
Verena Vogt wrote:
Dies ist wiederum eine grossartige Anleitung, vielen Dank dafür. Da ich die neuen Maschen, die für unter dem Arm angeschlagen werden müssen, mit einem Hilfsgarn angeschlagen habe, konnte ich dieses für die Ärmel einfach öffnen und die so frei gewordenen Maschen in die Ärmelmaschen einbeziehen. So entstand ein Pullover ohne eine einzige Naht. Das heisst, sobald die letzte Masche gestrickt war, brauchten nur noch die Fäden vernäht zu werden und fertig war das tolle Teil!
04.10.2017 - 15:34
|
|||||||||||||||||||
Arendal#arendalsweater |
|||||||||||||||||||
 |
 |
||||||||||||||||||
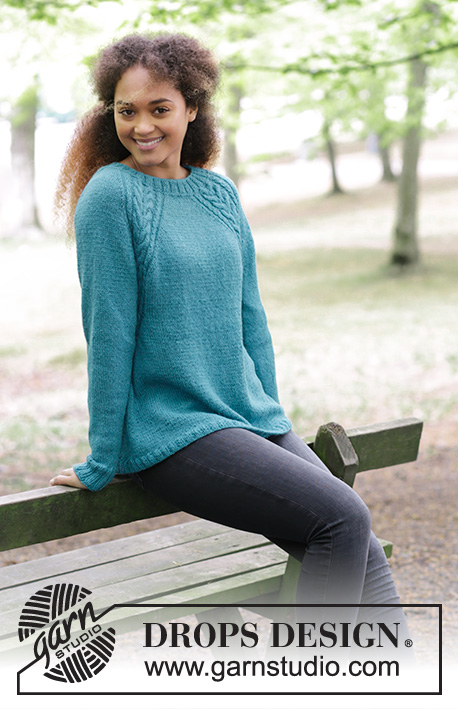
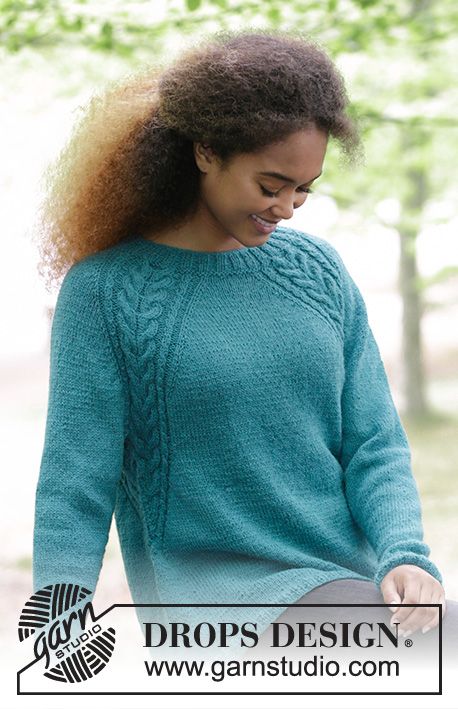
Knitted jumper with cables and raglan, worked top down. Sizes S - XXXL. The piece is worked in DROPS Puna.
DROPS 181-7 |
|||||||||||||||||||
|
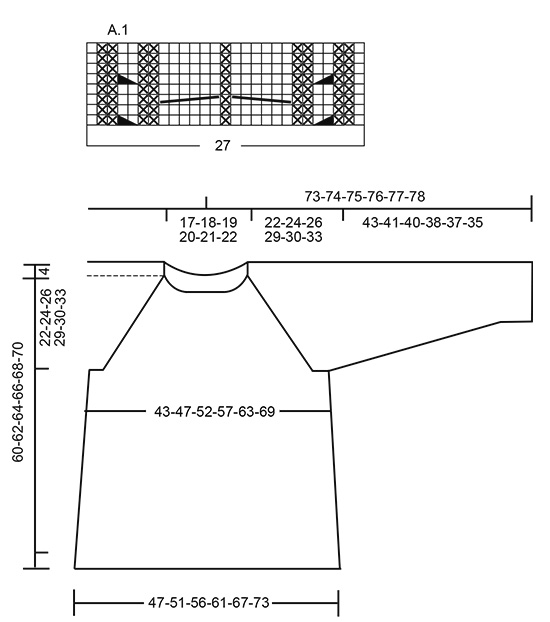
INFORMATION FOR THE PATTERN: RIDGE/GARTER STITCH (worked in the round): 1 ridge = 2 rounds. Knit 1 round and purl 1 round. PATTERN: See diagram A.1. The diagram shows all the rows in the pattern seen from the right side. RAGLAN: Increase to raglan on each side of A.1. Increase 1 stitch on each side of A.1 as follows (= 8 new stitches each time you increase). Work to A.1, 1 yarn over, work A.1, 1 yarn over. On the next round knit the yarn overs twisted to prevent holes. INCREASE TIP (for the sides): Work until there are 2 stitches left before the marker thread in the side. Make 1 yarn over, knit 2 stitches (the marker thread sits between these) and make 1 yarn over. On the next round, knit the yarn overs twisted to prevent holes. DECREASE TIP (for the sleeves): Decrease 1 stitch on each side of the marker thread as follows: Work until there are 3 stitches left before the marker thread, slip 1 stitch as if to knit, knit 1, pass the slipped stitch over, knit 2 stitches (the marker thread sits between these stitches), knit the next 2 stitches together. ---------------------------------------------------------- The jumper is worked in the round with circular needle, from mid back and top down. JUMPER: Cast on 112-120-124-128-136-136 stitches with circular needle size 4 mm and Puna. Knit 1 round, then work rib, knit 2/ purl 2. Continue with rib in this way for 4 cm. Change to circular needle size 4.5 mm. Work 1 RIDGE – see description above, on the first round, decrease 4 stitches evenly on round = 108-116-120-124-132-132 stitches. Continue working as follows: Knit 11-12-13-15-16-18, *1 yarn over, knit 1 *, repeat from *-* a total of 3 times, knit 1, * 1 yarn over, knit 1 *, repeat from *-* a total of 3 times (= these 7 stitches become 13 stitches), knit 18-20-20-18-20-16, *1 yarn over, knit 1 *, repeat from *-* a total of 3 times, knit 1, * 1 yarn over, knit 1 *, repeat from *-* a total of 3 times, knit 22-24-26-30-32-36, * 1 yarn over, knit 1 *, repeat from *-* a total of 3 times, knit 1, * 1 yarn over, knit 1 *, repeat from *-* a total of 3 times, knit 18-20-20-18-20-16, *1 yarn over, knit 1 *, repeat from *-* a total of 3 times, knit 1, * 1 yarn over, knit 1 *, repeat from *-* a total of 3 times and knit 11-12-13-15-16-18 = 132-140-144-148-156-156 stitches. Knit 1 round, the yarn overs are knitted twisted to prevent holes. Continue working as follows: Knit 4-5-6-8-9-11 (= half back piece), A.1 (= 27 stitches), knit 4-6-6-4-6-2 (=sleeve), A.1, knit 8-10-12-16-18-22 (= front piece), A1, knit 4-6-6-4-6-2 (= sleeve), A.1, knit 4-5-6-8-9-11 (= half back piece). READ THE WHOLE OF THE NEXT SECTION BEFORE CONTINUING! Continue this pattern, at the same time increase on each side of A.1 to RAGLAN – see description above. Increase every 2nd round 21-24-27-30-32-35 times. REMEMBER THE KNITTING TENSION! After all the increases, there are 300-332-360-388-412-436 stitches on the needle. Continue the pattern as before (without increases) until the piece measures 22-24-26-29-30-33 cm from the cast-on edge mid front. The next round is worked as follows: Work 45-49-53-58-63-68 stitches (= half back piece), place the next 60-68-74-78-80-82 stitches on 1 thread (= sleeve), cast on 8-8-10-10-12-14 new stitches on the needle (= under the sleeve), work 90-98-106-116-126-136 stitches (= front piece), place the next 60-68-74-78-80-82 stitches on 1 thread (= sleeve), cast on 8-8-10-10-12-14 new stitches on the needle (= under the sleeve) and work the remaining 45-49-53-58-63-68 stitches (= half back piece). BODY: = 196-212-232-252-276-300 stitches. THE PIECE IS NOW MEASURED FROM HERE! Insert a marker thread in each side, in the middle of the new stitches that where cast on. Continue A.1 over the 20-20-20-20-22-22 stitches in the pattern which remain on the front and back piece, but on every 2nd round, make 1 yarn over on the outside of each A.1 (= towards mid front and mid back) and knit 2 stitches together on each side of marker thread in the side. The yarn overs are knitted twisted on the next round. The number of stitches is the same, but the stitches in A.1 will gradually be decreased towards the sides of the jumper and there will be more and more stitches in stocking stitch. When there are not enough stitches in A.1 to work 6-stitch cables, work these stitches in stocking stitch, AT THE SAME TIME as you decrease 3 stitches evenly over the cable, do not decrease over the cables with 2 stitches (remember to increase on the outsides of A.1 and decrease on each side of the marker threads). When all of A.1 has been decreased there are 172-188-208-228-252-276 stitches on the round. Continue with stocking stitch. When the piece measures 15-15-15-15-15-15 cm increase 1 stitch on each side of the marker threads (= 4 stitches increased) – READ INCREASE TIP! Increase every 5 cm a total of 4 times = 188-204-224-244-268-292 stitches. When the piece measures 34-34-34-34-34-34 cm increase 40-44-48-52-56-60 stitches evenly on round = 228-248-272-296-324-352 stitches. Change to circular needle size 4 mm. Work rib, knit 2/ purl 2. Work rib for 2 cm, cast off with knit over knit and purl over purl. The jumper measures approx. 60-62-64-66-68-70 cm from the shoulder. SLEEVE: The piece is worked in the round with circular needle/double pointed needles. Place the 60-68-74-78-80-82 stitches from the thread in the one side of the piece on a short circular needle size 4.5 mm. In addition, cast on 8-8-10-10-12-14 new stitches mid under the sleeve = 68-76-84-88-92-96 stitches on the needle. Insert a marker thread in the middle of these new stitches – The piece is now measured from here! Work stocking stitch in the round. When the piece measures 2-2-2-2-2-4 cm decrease 2 stitches mid under the sleeve – READ DECREASE TIP. Decrease every 3-2-1½-1½-1½-1 cm a total of 12-15-18-19-20-21 times = 44-46-48-50-52-54 stitches. When the sleeve measures 38-36-35-33-32-30 cm increase 4-6-8-6-8-10 stitches evenly on round = 48-52-56-56-60-64 stitches. Change to double pointed needles size 4 mm and work rib, knit 2/ purl 2 over all stitches. Cast off when the sleeve measures 43-41-40-38-37-35 cm. Work the other sleeve in the same way. ASSEMBLY: Sew the openings under the sleeves. |
|||||||||||||||||||
Diagram explanations |
|||||||||||||||||||
|
|||||||||||||||||||
 |
|||||||||||||||||||
Have you finished this pattern?Tag your pictures with #dropspattern #arendalsweater or submit them to the #dropsfan gallery. Do you need help with this pattern?You'll find 31 tutorial videos, a Comments/Questions area and more by visiting the pattern on garnstudio.com. © 1982-2026 DROPS Design A/S. We reserve all rights. This document, including all its sub-sections, has copyrights. Read more about what you can do with our patterns at the bottom of each pattern on our site. |
|||||||||||||||||||


With over 40 years in knitting and crochet design, DROPS Design offers one of the most extensive collections of free patterns on the internet - translated to 17 languages. As of today we count 324 catalogues and 12290 patterns translated into English (UK/cm). 12290
We work hard to bring you the best knitting and crochet have to offer, inspiration and advice as well as great quality yarns at incredible prices! Would you like to use our patterns for other than personal use? You can read what you are allowed to do in the Copyright text at the bottom of all our patterns. Happy crafting!
Post a comment to pattern DROPS 181-7
We would love to hear what you have to say about this pattern!
If you want to leave a question, please make sure you select the correct category in the form below, to speed up the answering process. Required fields are marked *.