
Popular categories
Looking for a yarn?


Comments / Questions (99)
![]() Maria wrote:
Maria wrote:
Non capisco bene la spiegazione che riguarda gli aumenti e le diminuzioni per arrivare ad avere in totale 172 m. Vuol dire che a quel punto tutto il lavoro (dietro, sottomanica, davanti, sottomanica) è a maglia rasata senza più alcun motivo di treccia? Avrei voluto vedere una foto con il fianco in evidenza per capire. Grazie mille per il vostro aiuto.
17.01.2018 - 19:42DROPS Design answered:
Buonasera Maria. Sì esatto. Separate le maniche dal davanti/dietro, il numero delle maglie lavorate con il diagramma A1 si riduce con le diminuzioni fino a sparire. Non c'è quindi il motivo a treccia sul lato, ma le maglie sono tutte lavorate a maglia rasata. Buon lavoro!
17.01.2018 - 20:37
![]() Chalifour wrote:
Chalifour wrote:
C'est quand dans dos & devant "ligne 8 : "Quand il n'y a pas suffisamment de mailles dans A1...Suffisamment c'est combien de mailles restant de A1? Merci pour votre réponse. Cdlt
07.01.2018 - 14:52DROPS Design answered:
Bonjour Mme Chalifour, le nombre de mailles de A.1 va être diminuée au milieu sous la manche, c'est quand vous n'aurez plus assez de mailles pour les torsades de 6 mailles que vous diminuez 3 m dans chaque torsade (pour conserver la bonne largeur, les torsades resserrant l'ouvrage). Bon tricot!
08.01.2018 - 09:36
![]() Chalifour wrote:
Chalifour wrote:
Bonjour, J'en suis sous les manches, combien reste-t-il de maille du schéma A1 quand on doit procéder à la diminution des 3 m au dessus des torsades de 6 m : 19 mailles ? Ce n'est pas clair du tout. Merci pour votre réponse.
07.01.2018 - 13:42DROPS Design answered:
Bonjour Mme Chalifour, au milieu sous chaque manche, on diminue de chaque côté des fils marqueurs, quand on n'a plus suffisamment de mailles pour les torsades de 6 m, on diminue 3 m au-dessus de ces torsades. Bon tricot!
08.01.2018 - 09:24
![]() Mc wrote:
Mc wrote:
Désolée de vous demander une nouvelle fois de l'aide ! J'en suis à diminuer au dessus des torsades, quelque chose me chiffonne : si je diminue 3 mailles au-dessus de chaque torsade, et que j'augmente seulement 2 mailles avant les A1 je vais me retrouver avec un gros rétrécissement ! Je ne comprends plus là ! MERCI
07.12.2017 - 17:30DROPS Design answered:
Bonjour Mc, une torsade resserre toujours l'ouvrage, quand on diminue au-dessus des torsades pour continuer en jersey,on va diminuer le nombre de mailles mais conserver la même largeur. Bon tricot!
08.12.2017 - 08:24
![]() Mc wrote:
Mc wrote:
Bonsoir, Sous la manche, au niveau du fil marqueur, on diminue 1 fois 2 mailles ensemble ou 2 fois 2 mailles ensemble ? donc une ou 2 diminutions sous la manche tous les 2 rangs. Merci
06.12.2017 - 20:29DROPS Design answered:
Bonjour Mc, au milieu sous la manche, on diminue 2 m: 1 m avant le marqueur du début du tour et 1 m après le marqueur du début du tour, cf DIMINUTIONS (manches). Bon tricot!
07.12.2017 - 09:03
![]() Mc wrote:
Mc wrote:
Merci pour vos explications et pour votre célérité
06.12.2017 - 14:43
![]() Mc wrote:
Mc wrote:
Lorsqu'on tricote 2 mailles ensemble à l'endroit de chaque côté du fil marqueur sur les côtés, faut il les tricoter tous les 2 tours, ou à chaque tour ? Merci
05.12.2017 - 18:34DROPS Design answered:
Bonsoir, il faut tricoter 2 mailles ensemble à l'endroit de chaque côté du fil marqueur sur les côtés tous les 2 tours. Bon tricot!
05.12.2017 - 21:27
![]() Jean Beer wrote:
Jean Beer wrote:
Where are the measurements for the various sizes? Thank you!
28.11.2017 - 01:03DROPS Design answered:
Dear Mrs Beer, you will find at the bottom of the page a measurement chart with all measurements for each size (in cm), taken flat from side to side. Compare these to a similar garment you have and like the shape to find out the matching size. Read more about sizing and convert into inches here. Happy knitting!
28.11.2017 - 09:07
![]() Katrina wrote:
Katrina wrote:
Min fråga gäller samma ställe som många andras. När man tar in jämt fördelat 3m över varje fläta är det ju varannan m. och flätan försvinner direkt och kan inte vridas längre. Om man gör dessa minskningar på samma varv samtididigt som man börjar att ta bort A1 alltså. Men det kanske inte är meningen att man ska göra minskningarna under samma varv? Väldigt konstigt formulerat....
27.11.2017 - 15:22DROPS Design answered:
Hej, du ska minska över flätornas maskor först då det inte längre går att göra nya flätvridningar över dessa.
27.11.2017 - 17:28Oksana Merklas wrote:
Please explain additionaly about: AT THE SAME TIME as you decrease 3 stitches evenly over the cable, do not decrease over the cables with 2 stitches. - From what I ve understood - there will be by 2 decreases of A.1 in round. So where exactly 3 stiches over the cable are to be decreased? Thanks!
26.11.2017 - 19:23DROPS Design answered:
Dear Mrs Merklas, you decrease 3 sts in the middle cable (worked over 6 sts) not over the cables worked over only 2 sts at the beg and at the end of A.1. Happy knitting!
27.11.2017 - 10:36
|
|||||||||||||||||||
Arendal#arendalsweater |
|||||||||||||||||||
 |
 |
||||||||||||||||||
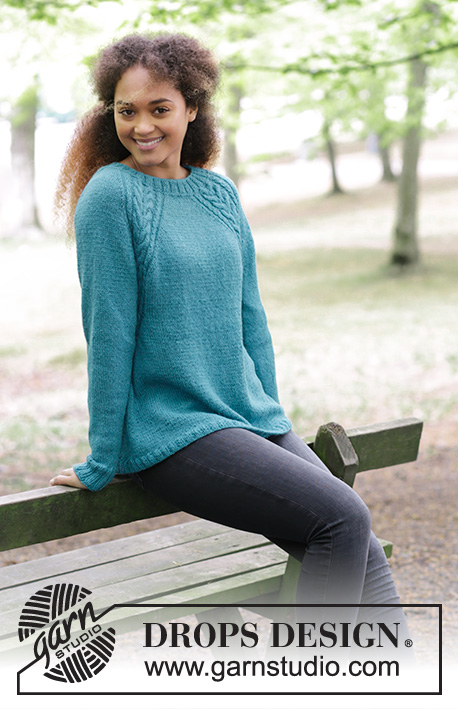
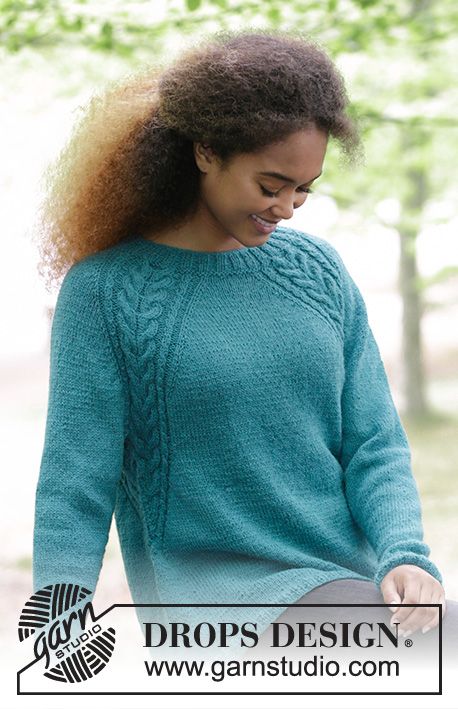
Knitted jumper with cables and raglan, worked top down. Sizes S - XXXL. The piece is worked in DROPS Puna.
DROPS 181-7 |
|||||||||||||||||||
|
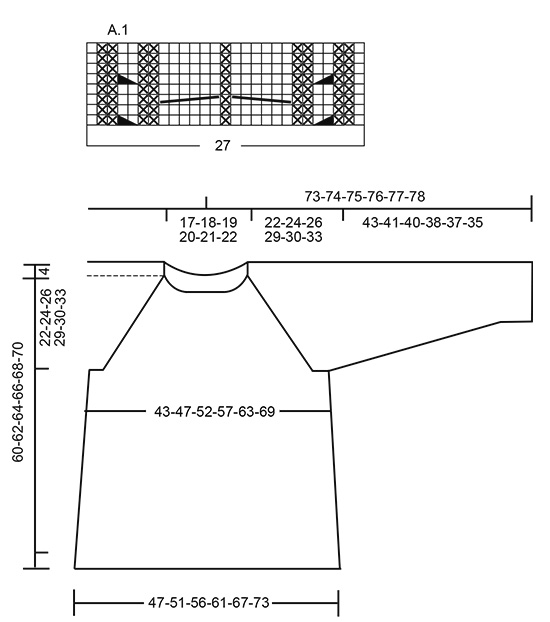
INFORMATION FOR THE PATTERN: RIDGE/GARTER STITCH (worked in the round): 1 ridge = 2 rounds. Knit 1 round and purl 1 round. PATTERN: See diagram A.1. The diagram shows all the rows in the pattern seen from the right side. RAGLAN: Increase to raglan on each side of A.1. Increase 1 stitch on each side of A.1 as follows (= 8 new stitches each time you increase). Work to A.1, 1 yarn over, work A.1, 1 yarn over. On the next round knit the yarn overs twisted to prevent holes. INCREASE TIP (for the sides): Work until there are 2 stitches left before the marker thread in the side. Make 1 yarn over, knit 2 stitches (the marker thread sits between these) and make 1 yarn over. On the next round, knit the yarn overs twisted to prevent holes. DECREASE TIP (for the sleeves): Decrease 1 stitch on each side of the marker thread as follows: Work until there are 3 stitches left before the marker thread, slip 1 stitch as if to knit, knit 1, pass the slipped stitch over, knit 2 stitches (the marker thread sits between these stitches), knit the next 2 stitches together. ---------------------------------------------------------- The jumper is worked in the round with circular needle, from mid back and top down. JUMPER: Cast on 112-120-124-128-136-136 stitches with circular needle size 4 mm and Puna. Knit 1 round, then work rib, knit 2/ purl 2. Continue with rib in this way for 4 cm. Change to circular needle size 4.5 mm. Work 1 RIDGE – see description above, on the first round, decrease 4 stitches evenly on round = 108-116-120-124-132-132 stitches. Continue working as follows: Knit 11-12-13-15-16-18, *1 yarn over, knit 1 *, repeat from *-* a total of 3 times, knit 1, * 1 yarn over, knit 1 *, repeat from *-* a total of 3 times (= these 7 stitches become 13 stitches), knit 18-20-20-18-20-16, *1 yarn over, knit 1 *, repeat from *-* a total of 3 times, knit 1, * 1 yarn over, knit 1 *, repeat from *-* a total of 3 times, knit 22-24-26-30-32-36, * 1 yarn over, knit 1 *, repeat from *-* a total of 3 times, knit 1, * 1 yarn over, knit 1 *, repeat from *-* a total of 3 times, knit 18-20-20-18-20-16, *1 yarn over, knit 1 *, repeat from *-* a total of 3 times, knit 1, * 1 yarn over, knit 1 *, repeat from *-* a total of 3 times and knit 11-12-13-15-16-18 = 132-140-144-148-156-156 stitches. Knit 1 round, the yarn overs are knitted twisted to prevent holes. Continue working as follows: Knit 4-5-6-8-9-11 (= half back piece), A.1 (= 27 stitches), knit 4-6-6-4-6-2 (=sleeve), A.1, knit 8-10-12-16-18-22 (= front piece), A1, knit 4-6-6-4-6-2 (= sleeve), A.1, knit 4-5-6-8-9-11 (= half back piece). READ THE WHOLE OF THE NEXT SECTION BEFORE CONTINUING! Continue this pattern, at the same time increase on each side of A.1 to RAGLAN – see description above. Increase every 2nd round 21-24-27-30-32-35 times. REMEMBER THE KNITTING TENSION! After all the increases, there are 300-332-360-388-412-436 stitches on the needle. Continue the pattern as before (without increases) until the piece measures 22-24-26-29-30-33 cm from the cast-on edge mid front. The next round is worked as follows: Work 45-49-53-58-63-68 stitches (= half back piece), place the next 60-68-74-78-80-82 stitches on 1 thread (= sleeve), cast on 8-8-10-10-12-14 new stitches on the needle (= under the sleeve), work 90-98-106-116-126-136 stitches (= front piece), place the next 60-68-74-78-80-82 stitches on 1 thread (= sleeve), cast on 8-8-10-10-12-14 new stitches on the needle (= under the sleeve) and work the remaining 45-49-53-58-63-68 stitches (= half back piece). BODY: = 196-212-232-252-276-300 stitches. THE PIECE IS NOW MEASURED FROM HERE! Insert a marker thread in each side, in the middle of the new stitches that where cast on. Continue A.1 over the 20-20-20-20-22-22 stitches in the pattern which remain on the front and back piece, but on every 2nd round, make 1 yarn over on the outside of each A.1 (= towards mid front and mid back) and knit 2 stitches together on each side of marker thread in the side. The yarn overs are knitted twisted on the next round. The number of stitches is the same, but the stitches in A.1 will gradually be decreased towards the sides of the jumper and there will be more and more stitches in stocking stitch. When there are not enough stitches in A.1 to work 6-stitch cables, work these stitches in stocking stitch, AT THE SAME TIME as you decrease 3 stitches evenly over the cable, do not decrease over the cables with 2 stitches (remember to increase on the outsides of A.1 and decrease on each side of the marker threads). When all of A.1 has been decreased there are 172-188-208-228-252-276 stitches on the round. Continue with stocking stitch. When the piece measures 15-15-15-15-15-15 cm increase 1 stitch on each side of the marker threads (= 4 stitches increased) – READ INCREASE TIP! Increase every 5 cm a total of 4 times = 188-204-224-244-268-292 stitches. When the piece measures 34-34-34-34-34-34 cm increase 40-44-48-52-56-60 stitches evenly on round = 228-248-272-296-324-352 stitches. Change to circular needle size 4 mm. Work rib, knit 2/ purl 2. Work rib for 2 cm, cast off with knit over knit and purl over purl. The jumper measures approx. 60-62-64-66-68-70 cm from the shoulder. SLEEVE: The piece is worked in the round with circular needle/double pointed needles. Place the 60-68-74-78-80-82 stitches from the thread in the one side of the piece on a short circular needle size 4.5 mm. In addition, cast on 8-8-10-10-12-14 new stitches mid under the sleeve = 68-76-84-88-92-96 stitches on the needle. Insert a marker thread in the middle of these new stitches – The piece is now measured from here! Work stocking stitch in the round. When the piece measures 2-2-2-2-2-4 cm decrease 2 stitches mid under the sleeve – READ DECREASE TIP. Decrease every 3-2-1½-1½-1½-1 cm a total of 12-15-18-19-20-21 times = 44-46-48-50-52-54 stitches. When the sleeve measures 38-36-35-33-32-30 cm increase 4-6-8-6-8-10 stitches evenly on round = 48-52-56-56-60-64 stitches. Change to double pointed needles size 4 mm and work rib, knit 2/ purl 2 over all stitches. Cast off when the sleeve measures 43-41-40-38-37-35 cm. Work the other sleeve in the same way. ASSEMBLY: Sew the openings under the sleeves. |
|||||||||||||||||||
Diagram explanations |
|||||||||||||||||||
|
|||||||||||||||||||
 |
|||||||||||||||||||
Have you finished this pattern?Tag your pictures with #dropspattern #arendalsweater or submit them to the #dropsfan gallery. Do you need help with this pattern?You'll find 31 tutorial videos, a Comments/Questions area and more by visiting the pattern on garnstudio.com. © 1982-2026 DROPS Design A/S. We reserve all rights. This document, including all its sub-sections, has copyrights. Read more about what you can do with our patterns at the bottom of each pattern on our site. |
|||||||||||||||||||


With over 40 years in knitting and crochet design, DROPS Design offers one of the most extensive collections of free patterns on the internet - translated to 17 languages. As of today we count 324 catalogues and 12290 patterns translated into English (UK/cm). 12290
We work hard to bring you the best knitting and crochet have to offer, inspiration and advice as well as great quality yarns at incredible prices! Would you like to use our patterns for other than personal use? You can read what you are allowed to do in the Copyright text at the bottom of all our patterns. Happy crafting!
Post a comment to pattern DROPS 181-7
We would love to hear what you have to say about this pattern!
If you want to leave a question, please make sure you select the correct category in the form below, to speed up the answering process. Required fields are marked *.