
Popular categories
Looking for a yarn?


Comments / Questions (99)
![]() CASTELLI wrote:
CASTELLI wrote:
Bonjour, au début , après avoir avoir obtenu les 140 m au début , on continue, pour une taille M, 5 m endroit +A1, .......hors si l\'on ajoute les mailles on obtient 138 m 5+27+6+27+8+27+6+27+5=138m que fait on des 2 m qu\'il reste. Ensuite au diagramme , au 2ème rang ,sur l\'envers de l\'ouvrage, les mailles sont endroit sur endroit et envers sur envers? D\'avance merci
28.01.2019 - 16:06DROPS Design answered:
Bonjour Mme Castelli, j'obtiens bien 140 m ainsi: 5 m end, A.1 (= 27 m), 6 m end, A.1 (= 27 m), 10 m end, A.1 (= 27 m), 6 m end, A.1 (= 27 m), 5 m end = 5 + 27 + 6 + 27 + 10 + 27 + 6+ 27+ 5= 140 m. On a 4 x 27 m pour le raglan + 2 x 6 m pour les manches + 2 x 5 m pour le dos + 1 x 10 m pour le devant. Bon tricot!
28.01.2019 - 16:34
![]() Elsemarie wrote:
Elsemarie wrote:
Jeg er i tvivl om de 24 masker, der skal tages ind over de store snoninger under armen. Skal alle 24 masker tages ind på 'en omgang, eller skal det gøres over flere omgange, og skal indtagningerne fordeles helt ud i vrangmaskerne ved de små snoninger, så disse bliver til glatstrikning? Mvh Else Marie
07.01.2019 - 15:06DROPS Design answered:
Hei Elsemarie. Når du feller bort A.1 under ermene feller du langs merket i siden (under ermet) hver annen omgang. Du feller ved å strikke 2 masker sammen slik at du feller 1 maske per A.1 hver gang du feller (4 masker på omgangen). Du fortsetter å strikke maskene i mønster etter A.1 helt til de felles. Men når de store flettene ikke lenger kan flettes strikkes disse i glattstrikk (og det felles 3 masker over hver flette). Du fortsetter med vrangmasker som vist i diagrammet helt til disse felles. Samtidig øker du 1 maske på siden av A.1 (ut mot forstykke/bakstykke) på annenhver omgang slik at maskeantallet forblir det samme. God fornøyelse
11.01.2019 - 12:16
![]() Judith wrote:
Judith wrote:
Hallo, wird für den Wechsel von Schulterpasse zu Rumpf und Ärmeln wirklich ab Anschlagrand, also mit Bündchen gemessen? So steht es im Text (26cm für L). Im Schnittdiagramm wird das Bündchen aber extra ausgewiesen, dann würde erst am unterem Bündchenrand gemessen. Was wäre richtig?
27.12.2018 - 18:07DROPS Design answered:
Liebe Judith, so stimmt es, die Passen misst 26 cm von der Anschlagskante + Schulter (ca 4 cm) = 30 cm vom Schulter. Viel Spaß beim stricken!
02.01.2019 - 10:12
![]() Beverly Garblik wrote:
Beverly Garblik wrote:
I have gotten to the decreases under the arm, size medium. Do I decrease 3 across all cables onone round, or decrease 3 on the inner cables one round and then work until I reach the outer cables to d crease them? I have done the latter, but somehow have endedup with 8 extra stitches. Please help. Thank you
18.12.2018 - 12:48DROPS Design answered:
Dear Mrs Garblik, you decrease 3 sts in each of the 8 6-stitches-cables, ie you will decrease a total of 24 sts - and at the same time continue decreasing and increasing as before, when all decreases are done you have 24 sts less than at hte beg of body. Happy knitting!
18.12.2018 - 13:18
![]() Sheila Lebleu wrote:
Sheila Lebleu wrote:
Hallo. Hoe verdeel ik de mindering van 3 steken over A1onder de mouw aub? Doe ik dat rij per rij of minder ik per kabel 3 steken naast elkaar? Het is me niet duidelijk. Uitkijkend naar uw antwoord Sheila
11.12.2018 - 09:37DROPS Design answered:
Dag Sheila,
In A.1 zitten 2 kabels van elk 6 steken breed. Deze minder je beide naar 3 steken, zodat je 21 steken over A.1 hebt.
12.12.2018 - 16:16
![]() Janne Birgitte Ueland wrote:
Janne Birgitte Ueland wrote:
Det eg ikkje skjønner er korleis det blir felt tilsaman 12 masker per flette. Fire av desse maskene aukar ein med kasta etter A1. Då blir den reele fellinga berre åtte masker per runde, og ein vil då stå med åtte maskar for mykje når ein er ferdig med å felle A1
10.09.2018 - 15:17DROPS Design answered:
Hei Janne. Du øker på yettersiden av A.1, men samtidig feller du ved merketrådenen slik at det blir en forskyvning av mønster uten endring i masketallet. De 6 maskene som felles i hver A.1 (3 masker over hver flette) kommer i tillegg til denne forskyvningen. God fornøyelse
11.09.2018 - 09:02
![]() Janne Birgitte wrote:
Janne Birgitte wrote:
Det skal felles 24 masker tilsaman i sida på bolen med mønster. Eg er ferdig med å felle fletten og har då bare felt 16 masker. Masketalet vil jo ikkje minke på resten av fellinga, då det blir laga kast for same tall masker som er felt. Korleis skal eg felle dei siste åtte maskene?
10.09.2018 - 12:11DROPS Design answered:
Hei Janne. Det stemmer at mønsteret forskyves utover til siden, og at masketallet i forbindelse med dette forblir det samme. Men det står videre at du feller 3 masker over hver 6-maskers flette = 6 masker felt per A.1 = 24 masker felt totalt på omgangen. God fornøyelse
10.09.2018 - 15:14
![]() Sharon Ford wrote:
Sharon Ford wrote:
Thank you for the wonderful videos on doing top down sweaters. I could never figure out how to do the underarm holes. Great slow motion too.
01.09.2018 - 15:57
![]() Loly Aguilar wrote:
Loly Aguilar wrote:
Hola perdonar que os haga otra pregunta sobre este modelo ,pero me surge la duda cuando se termina de hacer la Sisa y empiesas a disminuir y aumentar ,vosotros decis hacer dos puntos juntos a cada lado del hilo marcador y tengo la duda si así quedará bien o habrá que hacer dos puntos juntos y pasar un punto tejer otro y pasar el punto no tejido por encima. Muchas gracias
14.04.2018 - 16:45DROPS Design answered:
Hola Loly, el método que sugieres tú es el que se utiliza cuando queremos que las disminuciones formen una línea continua, como, por ejemplo, en este patrón, en las disminuciones para la manga. Estas disminuciones para la sisa no tienen que ser visibles, por lo que es preferible usar el método que ponemos nosotros, con 2 puntos juntos de derecho.
15.04.2018 - 20:16
![]() Loly Aguilar wrote:
Loly Aguilar wrote:
Hola me gustaría saber si tiene alguna importancia como se acabe A1 en la Sisa a la hora de acabarlo en el cuerpo
08.04.2018 - 19:25DROPS Design answered:
Hola Loly, no, no tiene ninguna importancia.
14.04.2018 - 12:39
|
|||||||||||||||||||
Arendal#arendalsweater |
|||||||||||||||||||
 |
 |
||||||||||||||||||
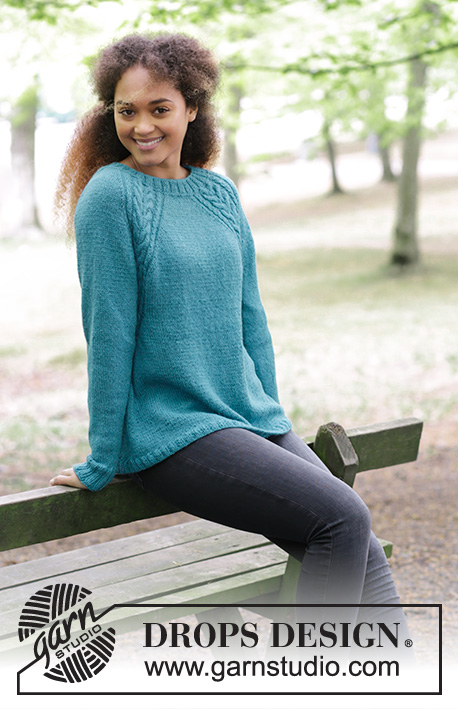
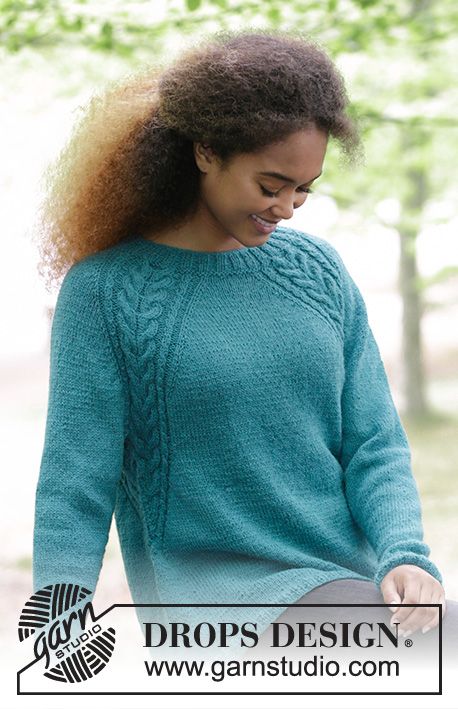
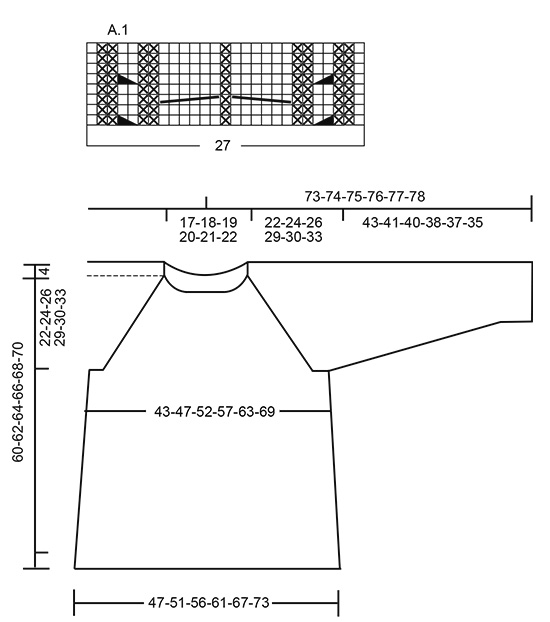
Knitted jumper with cables and raglan, worked top down. Sizes S - XXXL. The piece is worked in DROPS Puna.
DROPS 181-7 |
|||||||||||||||||||
|
INFORMATION FOR THE PATTERN: RIDGE/GARTER STITCH (worked in the round): 1 ridge = 2 rounds. Knit 1 round and purl 1 round. PATTERN: See diagram A.1. The diagram shows all the rows in the pattern seen from the right side. RAGLAN: Increase to raglan on each side of A.1. Increase 1 stitch on each side of A.1 as follows (= 8 new stitches each time you increase). Work to A.1, 1 yarn over, work A.1, 1 yarn over. On the next round knit the yarn overs twisted to prevent holes. INCREASE TIP (for the sides): Work until there are 2 stitches left before the marker thread in the side. Make 1 yarn over, knit 2 stitches (the marker thread sits between these) and make 1 yarn over. On the next round, knit the yarn overs twisted to prevent holes. DECREASE TIP (for the sleeves): Decrease 1 stitch on each side of the marker thread as follows: Work until there are 3 stitches left before the marker thread, slip 1 stitch as if to knit, knit 1, pass the slipped stitch over, knit 2 stitches (the marker thread sits between these stitches), knit the next 2 stitches together. ---------------------------------------------------------- The jumper is worked in the round with circular needle, from mid back and top down. JUMPER: Cast on 112-120-124-128-136-136 stitches with circular needle size 4 mm and Puna. Knit 1 round, then work rib, knit 2/ purl 2. Continue with rib in this way for 4 cm. Change to circular needle size 4.5 mm. Work 1 RIDGE – see description above, on the first round, decrease 4 stitches evenly on round = 108-116-120-124-132-132 stitches. Continue working as follows: Knit 11-12-13-15-16-18, *1 yarn over, knit 1 *, repeat from *-* a total of 3 times, knit 1, * 1 yarn over, knit 1 *, repeat from *-* a total of 3 times (= these 7 stitches become 13 stitches), knit 18-20-20-18-20-16, *1 yarn over, knit 1 *, repeat from *-* a total of 3 times, knit 1, * 1 yarn over, knit 1 *, repeat from *-* a total of 3 times, knit 22-24-26-30-32-36, * 1 yarn over, knit 1 *, repeat from *-* a total of 3 times, knit 1, * 1 yarn over, knit 1 *, repeat from *-* a total of 3 times, knit 18-20-20-18-20-16, *1 yarn over, knit 1 *, repeat from *-* a total of 3 times, knit 1, * 1 yarn over, knit 1 *, repeat from *-* a total of 3 times and knit 11-12-13-15-16-18 = 132-140-144-148-156-156 stitches. Knit 1 round, the yarn overs are knitted twisted to prevent holes. Continue working as follows: Knit 4-5-6-8-9-11 (= half back piece), A.1 (= 27 stitches), knit 4-6-6-4-6-2 (=sleeve), A.1, knit 8-10-12-16-18-22 (= front piece), A1, knit 4-6-6-4-6-2 (= sleeve), A.1, knit 4-5-6-8-9-11 (= half back piece). READ THE WHOLE OF THE NEXT SECTION BEFORE CONTINUING! Continue this pattern, at the same time increase on each side of A.1 to RAGLAN – see description above. Increase every 2nd round 21-24-27-30-32-35 times. REMEMBER THE KNITTING TENSION! After all the increases, there are 300-332-360-388-412-436 stitches on the needle. Continue the pattern as before (without increases) until the piece measures 22-24-26-29-30-33 cm from the cast-on edge mid front. The next round is worked as follows: Work 45-49-53-58-63-68 stitches (= half back piece), place the next 60-68-74-78-80-82 stitches on 1 thread (= sleeve), cast on 8-8-10-10-12-14 new stitches on the needle (= under the sleeve), work 90-98-106-116-126-136 stitches (= front piece), place the next 60-68-74-78-80-82 stitches on 1 thread (= sleeve), cast on 8-8-10-10-12-14 new stitches on the needle (= under the sleeve) and work the remaining 45-49-53-58-63-68 stitches (= half back piece). BODY: = 196-212-232-252-276-300 stitches. THE PIECE IS NOW MEASURED FROM HERE! Insert a marker thread in each side, in the middle of the new stitches that where cast on. Continue A.1 over the 20-20-20-20-22-22 stitches in the pattern which remain on the front and back piece, but on every 2nd round, make 1 yarn over on the outside of each A.1 (= towards mid front and mid back) and knit 2 stitches together on each side of marker thread in the side. The yarn overs are knitted twisted on the next round. The number of stitches is the same, but the stitches in A.1 will gradually be decreased towards the sides of the jumper and there will be more and more stitches in stocking stitch. When there are not enough stitches in A.1 to work 6-stitch cables, work these stitches in stocking stitch, AT THE SAME TIME as you decrease 3 stitches evenly over the cable, do not decrease over the cables with 2 stitches (remember to increase on the outsides of A.1 and decrease on each side of the marker threads). When all of A.1 has been decreased there are 172-188-208-228-252-276 stitches on the round. Continue with stocking stitch. When the piece measures 15-15-15-15-15-15 cm increase 1 stitch on each side of the marker threads (= 4 stitches increased) – READ INCREASE TIP! Increase every 5 cm a total of 4 times = 188-204-224-244-268-292 stitches. When the piece measures 34-34-34-34-34-34 cm increase 40-44-48-52-56-60 stitches evenly on round = 228-248-272-296-324-352 stitches. Change to circular needle size 4 mm. Work rib, knit 2/ purl 2. Work rib for 2 cm, cast off with knit over knit and purl over purl. The jumper measures approx. 60-62-64-66-68-70 cm from the shoulder. SLEEVE: The piece is worked in the round with circular needle/double pointed needles. Place the 60-68-74-78-80-82 stitches from the thread in the one side of the piece on a short circular needle size 4.5 mm. In addition, cast on 8-8-10-10-12-14 new stitches mid under the sleeve = 68-76-84-88-92-96 stitches on the needle. Insert a marker thread in the middle of these new stitches – The piece is now measured from here! Work stocking stitch in the round. When the piece measures 2-2-2-2-2-4 cm decrease 2 stitches mid under the sleeve – READ DECREASE TIP. Decrease every 3-2-1½-1½-1½-1 cm a total of 12-15-18-19-20-21 times = 44-46-48-50-52-54 stitches. When the sleeve measures 38-36-35-33-32-30 cm increase 4-6-8-6-8-10 stitches evenly on round = 48-52-56-56-60-64 stitches. Change to double pointed needles size 4 mm and work rib, knit 2/ purl 2 over all stitches. Cast off when the sleeve measures 43-41-40-38-37-35 cm. Work the other sleeve in the same way. ASSEMBLY: Sew the openings under the sleeves. |
|||||||||||||||||||
Diagram explanations |
|||||||||||||||||||
|
|||||||||||||||||||
 |
|||||||||||||||||||
Have you finished this pattern?Tag your pictures with #dropspattern #arendalsweater or submit them to the #dropsfan gallery. Do you need help with this pattern?You'll find 31 tutorial videos, a Comments/Questions area and more by visiting the pattern on garnstudio.com. © 1982-2026 DROPS Design A/S. We reserve all rights. This document, including all its sub-sections, has copyrights. Read more about what you can do with our patterns at the bottom of each pattern on our site. |
|||||||||||||||||||


With over 40 years in knitting and crochet design, DROPS Design offers one of the most extensive collections of free patterns on the internet - translated to 17 languages. As of today we count 324 catalogues and 12290 patterns translated into English (UK/cm). 12290
We work hard to bring you the best knitting and crochet have to offer, inspiration and advice as well as great quality yarns at incredible prices! Would you like to use our patterns for other than personal use? You can read what you are allowed to do in the Copyright text at the bottom of all our patterns. Happy crafting!
Post a comment to pattern DROPS 181-7
We would love to hear what you have to say about this pattern!
If you want to leave a question, please make sure you select the correct category in the form below, to speed up the answering process. Required fields are marked *.