
Popular categories
Looking for a yarn?


Comments / Questions (99)
![]() Anna wrote:
Anna wrote:
Hej Jag får det inte att stämma. När jag har 208m är jag ej klar med A1. Kan någon förklara!
29.09.2017 - 11:17
![]() Connie wrote:
Connie wrote:
Ik ben aan de slag met deze mooie trui. Maar al vooruitlezend snap ik iets niet. Bij het lijf, vanaf de mouwen, moet je elke keer 4 steken minderen en 4 steken meerderen, het aantal blijft gelijk. Dat snap ik. Maar hoe kan het dan dat er aan het einde van dit deel uitkomt op 188 steken (medium) terwijl je begint met 212 steken? Ergens raak ik hier het spoor kwijt.
11.09.2017 - 22:59DROPS Design answered:
Hallo Connie, Dat komt omdat je op een later moment 3 steken verdeeld over iedere kabel mindert. Omdat je 8 kabels in totaal hebt is dat 24 steken. 212 - 24 = 188 steken over.
13.09.2017 - 13:08
![]() Nathalie wrote:
Nathalie wrote:
Bonjour, Vu que le pull se fait de haut en bas, est-ce que le diagramme se débute par le dessus ou par le bas? Merci
08.09.2017 - 20:16DROPS Design answered:
Bonjour Nathalie, les diagrammes se lisent toujours de la même façon, sauf indication contraire explicite dans les explications, c'est-à-dire qu'on le lit ici de bas en haut. Bon tricot!
11.09.2017 - 09:22
![]() Karolien wrote:
Karolien wrote:
Hallo! Kan ik dit patroon ook met drops Belle breien? Of wordt het dan te 'zwaar'? Alvast bedankt voor het antwoord. Groetjes van Karolien.
07.09.2017 - 11:45DROPS Design answered:
Hallo Karolien, Je kan hem inderdaad ook van Belle breien. Hij zal misschien iets zwaarder worden, maar ik denk dat dat erg meevalt. Maak wel altijd even een proeflapje, en evt. met een stukje kabel erin, zodat je kunt zien wat voor effect dit garen heeft. (Zelf brei ik hem momenteel van Cotton Merino :)
08.09.2017 - 11:30
![]() Lena wrote:
Lena wrote:
Hej! När jag titta på masktätheten så står det först hur många maskor det ska vara för slätstickning. Men under det står det "Nr 4 till resår....." och på nästa rad står det "21 maskor och 28 varv slätstickning...." Har det blivit ngt fel i beskrivningen? Mvh Lena
14.08.2017 - 20:32DROPS Design answered:
Hei Lena. Nei, ingen feil i oppskriften. Det står beskrevet hvilken pinne str du skal bruke til vrangbord, men strikkefastheten må først sjekkes i glattstrikk. God Fornøyelse!
15.08.2017 - 08:03
![]() A. Bieber wrote:
A. Bieber wrote:
Danke fuer die Anleitung. Ich freue mich aufs Stricken!
04.08.2017 - 18:47
![]() Maisie wrote:
Maisie wrote:
Love this pattern - exactly what I have been looking for! The neck band is close to the neck instead of begin too low like a scoop neck. The width of the neck pattern is substantial without being too much, and the pattern along the armholes where the body and sleeve meet is exquisite! The sweater is very stylish and highlights the face with the close patterns. The plain knit stitch body just adds to the beauty of the sweater. It is a simple yet elegant pattern. I can't wait to buy it!!!
03.08.2017 - 02:03
![]() Hermatm wrote:
Hermatm wrote:
Wat een prachtige trui!!
12.07.2017 - 22:23
![]() Anna wrote:
Anna wrote:
Bellissimo colore e modello
08.06.2017 - 16:02
|
|||||||||||||||||||
Arendal#arendalsweater |
|||||||||||||||||||
 |
 |
||||||||||||||||||
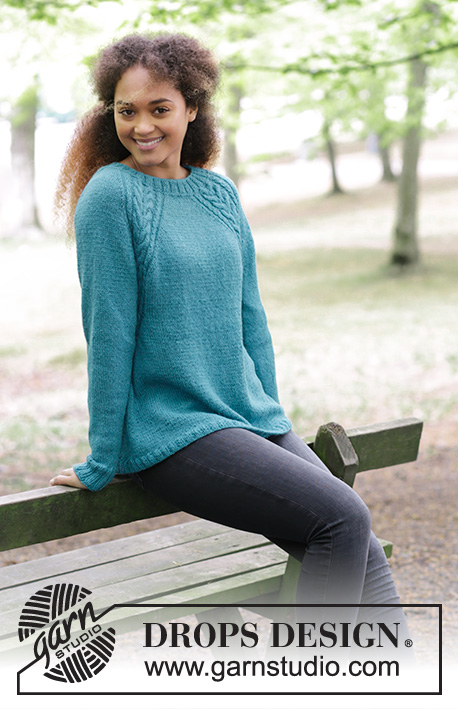
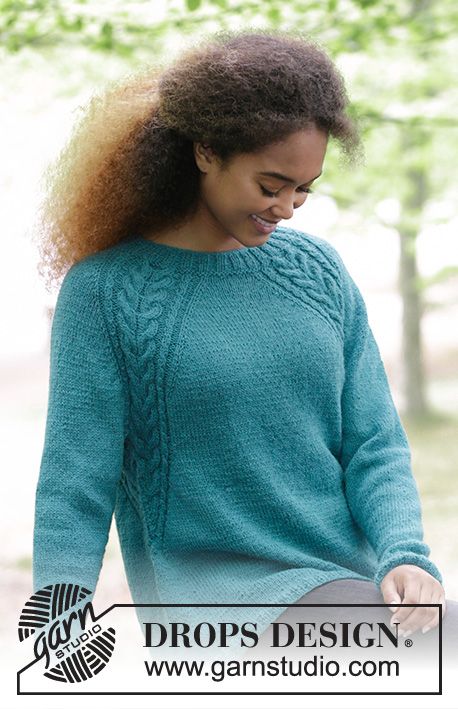
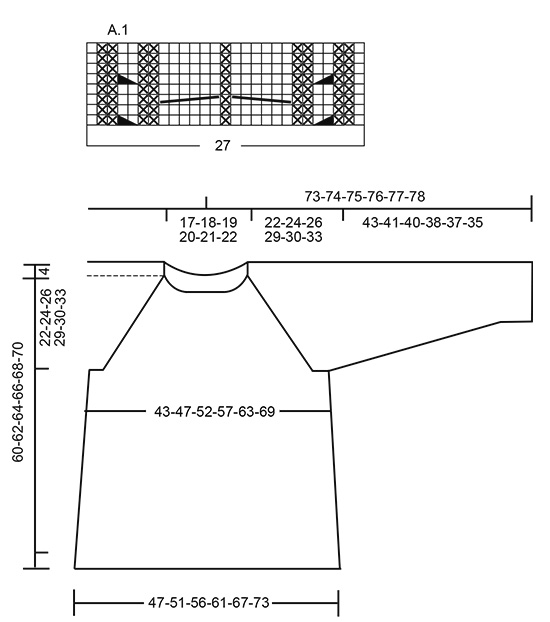
Knitted jumper with cables and raglan, worked top down. Sizes S - XXXL. The piece is worked in DROPS Puna.
DROPS 181-7 |
|||||||||||||||||||
|
INFORMATION FOR THE PATTERN: RIDGE/GARTER STITCH (worked in the round): 1 ridge = 2 rounds. Knit 1 round and purl 1 round. PATTERN: See diagram A.1. The diagram shows all the rows in the pattern seen from the right side. RAGLAN: Increase to raglan on each side of A.1. Increase 1 stitch on each side of A.1 as follows (= 8 new stitches each time you increase). Work to A.1, 1 yarn over, work A.1, 1 yarn over. On the next round knit the yarn overs twisted to prevent holes. INCREASE TIP (for the sides): Work until there are 2 stitches left before the marker thread in the side. Make 1 yarn over, knit 2 stitches (the marker thread sits between these) and make 1 yarn over. On the next round, knit the yarn overs twisted to prevent holes. DECREASE TIP (for the sleeves): Decrease 1 stitch on each side of the marker thread as follows: Work until there are 3 stitches left before the marker thread, slip 1 stitch as if to knit, knit 1, pass the slipped stitch over, knit 2 stitches (the marker thread sits between these stitches), knit the next 2 stitches together. ---------------------------------------------------------- The jumper is worked in the round with circular needle, from mid back and top down. JUMPER: Cast on 112-120-124-128-136-136 stitches with circular needle size 4 mm and Puna. Knit 1 round, then work rib, knit 2/ purl 2. Continue with rib in this way for 4 cm. Change to circular needle size 4.5 mm. Work 1 RIDGE – see description above, on the first round, decrease 4 stitches evenly on round = 108-116-120-124-132-132 stitches. Continue working as follows: Knit 11-12-13-15-16-18, *1 yarn over, knit 1 *, repeat from *-* a total of 3 times, knit 1, * 1 yarn over, knit 1 *, repeat from *-* a total of 3 times (= these 7 stitches become 13 stitches), knit 18-20-20-18-20-16, *1 yarn over, knit 1 *, repeat from *-* a total of 3 times, knit 1, * 1 yarn over, knit 1 *, repeat from *-* a total of 3 times, knit 22-24-26-30-32-36, * 1 yarn over, knit 1 *, repeat from *-* a total of 3 times, knit 1, * 1 yarn over, knit 1 *, repeat from *-* a total of 3 times, knit 18-20-20-18-20-16, *1 yarn over, knit 1 *, repeat from *-* a total of 3 times, knit 1, * 1 yarn over, knit 1 *, repeat from *-* a total of 3 times and knit 11-12-13-15-16-18 = 132-140-144-148-156-156 stitches. Knit 1 round, the yarn overs are knitted twisted to prevent holes. Continue working as follows: Knit 4-5-6-8-9-11 (= half back piece), A.1 (= 27 stitches), knit 4-6-6-4-6-2 (=sleeve), A.1, knit 8-10-12-16-18-22 (= front piece), A1, knit 4-6-6-4-6-2 (= sleeve), A.1, knit 4-5-6-8-9-11 (= half back piece). READ THE WHOLE OF THE NEXT SECTION BEFORE CONTINUING! Continue this pattern, at the same time increase on each side of A.1 to RAGLAN – see description above. Increase every 2nd round 21-24-27-30-32-35 times. REMEMBER THE KNITTING TENSION! After all the increases, there are 300-332-360-388-412-436 stitches on the needle. Continue the pattern as before (without increases) until the piece measures 22-24-26-29-30-33 cm from the cast-on edge mid front. The next round is worked as follows: Work 45-49-53-58-63-68 stitches (= half back piece), place the next 60-68-74-78-80-82 stitches on 1 thread (= sleeve), cast on 8-8-10-10-12-14 new stitches on the needle (= under the sleeve), work 90-98-106-116-126-136 stitches (= front piece), place the next 60-68-74-78-80-82 stitches on 1 thread (= sleeve), cast on 8-8-10-10-12-14 new stitches on the needle (= under the sleeve) and work the remaining 45-49-53-58-63-68 stitches (= half back piece). BODY: = 196-212-232-252-276-300 stitches. THE PIECE IS NOW MEASURED FROM HERE! Insert a marker thread in each side, in the middle of the new stitches that where cast on. Continue A.1 over the 20-20-20-20-22-22 stitches in the pattern which remain on the front and back piece, but on every 2nd round, make 1 yarn over on the outside of each A.1 (= towards mid front and mid back) and knit 2 stitches together on each side of marker thread in the side. The yarn overs are knitted twisted on the next round. The number of stitches is the same, but the stitches in A.1 will gradually be decreased towards the sides of the jumper and there will be more and more stitches in stocking stitch. When there are not enough stitches in A.1 to work 6-stitch cables, work these stitches in stocking stitch, AT THE SAME TIME as you decrease 3 stitches evenly over the cable, do not decrease over the cables with 2 stitches (remember to increase on the outsides of A.1 and decrease on each side of the marker threads). When all of A.1 has been decreased there are 172-188-208-228-252-276 stitches on the round. Continue with stocking stitch. When the piece measures 15-15-15-15-15-15 cm increase 1 stitch on each side of the marker threads (= 4 stitches increased) – READ INCREASE TIP! Increase every 5 cm a total of 4 times = 188-204-224-244-268-292 stitches. When the piece measures 34-34-34-34-34-34 cm increase 40-44-48-52-56-60 stitches evenly on round = 228-248-272-296-324-352 stitches. Change to circular needle size 4 mm. Work rib, knit 2/ purl 2. Work rib for 2 cm, cast off with knit over knit and purl over purl. The jumper measures approx. 60-62-64-66-68-70 cm from the shoulder. SLEEVE: The piece is worked in the round with circular needle/double pointed needles. Place the 60-68-74-78-80-82 stitches from the thread in the one side of the piece on a short circular needle size 4.5 mm. In addition, cast on 8-8-10-10-12-14 new stitches mid under the sleeve = 68-76-84-88-92-96 stitches on the needle. Insert a marker thread in the middle of these new stitches – The piece is now measured from here! Work stocking stitch in the round. When the piece measures 2-2-2-2-2-4 cm decrease 2 stitches mid under the sleeve – READ DECREASE TIP. Decrease every 3-2-1½-1½-1½-1 cm a total of 12-15-18-19-20-21 times = 44-46-48-50-52-54 stitches. When the sleeve measures 38-36-35-33-32-30 cm increase 4-6-8-6-8-10 stitches evenly on round = 48-52-56-56-60-64 stitches. Change to double pointed needles size 4 mm and work rib, knit 2/ purl 2 over all stitches. Cast off when the sleeve measures 43-41-40-38-37-35 cm. Work the other sleeve in the same way. ASSEMBLY: Sew the openings under the sleeves. |
|||||||||||||||||||
Diagram explanations |
|||||||||||||||||||
|
|||||||||||||||||||
 |
|||||||||||||||||||
Have you finished this pattern?Tag your pictures with #dropspattern #arendalsweater or submit them to the #dropsfan gallery. Do you need help with this pattern?You'll find 31 tutorial videos, a Comments/Questions area and more by visiting the pattern on garnstudio.com. © 1982-2026 DROPS Design A/S. We reserve all rights. This document, including all its sub-sections, has copyrights. Read more about what you can do with our patterns at the bottom of each pattern on our site. |
|||||||||||||||||||


With over 40 years in knitting and crochet design, DROPS Design offers one of the most extensive collections of free patterns on the internet - translated to 17 languages. As of today we count 324 catalogues and 12290 patterns translated into English (UK/cm). 12290
We work hard to bring you the best knitting and crochet have to offer, inspiration and advice as well as great quality yarns at incredible prices! Would you like to use our patterns for other than personal use? You can read what you are allowed to do in the Copyright text at the bottom of all our patterns. Happy crafting!
Post a comment to pattern DROPS 181-7
We would love to hear what you have to say about this pattern!
If you want to leave a question, please make sure you select the correct category in the form below, to speed up the answering process. Required fields are marked *.