
Popular categories
Looking for a yarn?


Comments / Questions (47)
![]() Liz wrote:
Liz wrote:
I am making size XL and am trying to do the increases that come before the garter stitch ridges on the yoke. I have read your tips for increasing evenly but it does not seem to be working correctly for me. I have 278 st. I subtract 14sts from the front bands and then divide by 24, which is the number of increases I need? I get a result of 11 so I increase every after every 11th row. The number of sts I end up with I much more than the 302 I am supposed to have. Please help
17.11.2020 - 22:21DROPS Design answered:
Dear Liz, you will read more about this increase technique here - in that case, you work 7 front band sts, 5 sts, (increase 1 st with a yarn over, work 10 sts), repeat from (to) a total of 23 times, make 1 yarn over, work 5 and finish with 7 front band sts. Happy knitting!
18.11.2020 - 08:03
![]() Liz wrote:
Liz wrote:
What kind of cast on would you recommend for this cardigan? This is my first time using a Drops design and I am impressed with all the help available. Which I need, as your method of writing a pattern is quite different from what I am used to :-)
15.10.2020 - 18:34DROPS Design answered:
Dear Liz, we are here using the continental method but I guess you can use any cast on method - making sure (as always) it's not too tight. Happy knitting!
16.10.2020 - 08:57
![]() Jane wrote:
Jane wrote:
After knitting the rib and setting up the yoke pattern, I have 3extra stitches left. Charts A2a A2b and A2c add up to 9 stitches. After deducting 14 stitches from 134 for the front bands, I am left with 120 divided by 9 give 117 and 3 left over. What should I be doing with those extra 3?
15.07.2020 - 15:43DROPS Design answered:
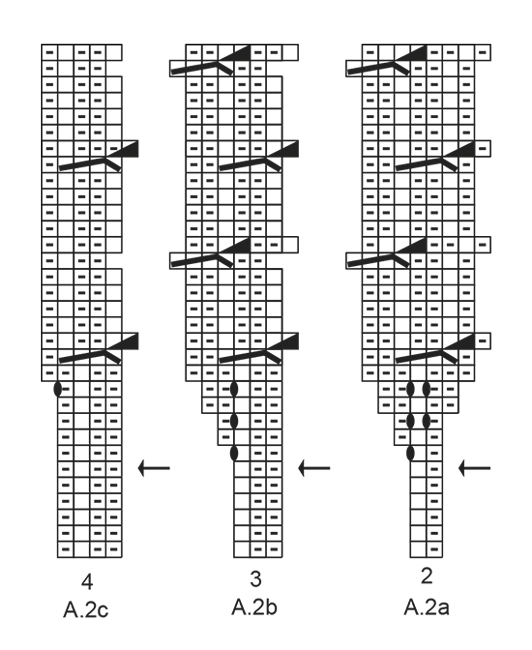
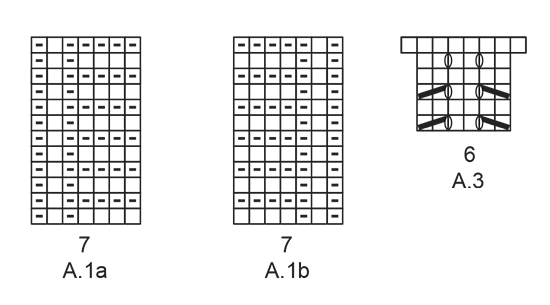
Dear Jane, you are working size M? You will work as follows: 7 sts (A.1a), 2 sts (on first row in A.2a), 114 sts (=38 repeats for the 3 sts in A.2b) , 4 sts (A.2c) and 7 sts (A.1b) = 7+2+114+4+7= 134 sts. Happy knitting!
15.07.2020 - 15:54
![]() Marcela Vera wrote:
Marcela Vera wrote:
Quiero hacer este chaleco y aprender hacer uno así entero
20.05.2020 - 04:26
![]() Marcela Vera wrote:
Marcela Vera wrote:
Son muy preocupados por aquellas que queremos aprender se agradece la consideración
20.05.2020 - 04:25
![]() Marcela Vera wrote:
Marcela Vera wrote:
Primera vez que leo un diagrama y no entiendo necesito saber con cuántos puntos comienzo y la verdad no sé leer los diagramas
20.05.2020 - 04:23DROPS Design answered:
Hola Marcela. Aquí tienes un tutorial de cómo leer los diagramas: https://www.garnstudio.com/lesson.php?id=68&cid=23
25.05.2020 - 00:06
![]() Frances Golynia wrote:
Frances Golynia wrote:
The video of the smock pattern is so easy to understand and is very helpful. However, in the written instructions for the cardigan for row 14, should it not read purl the new stitch together with the stitch before it, rather then the next stitch.
11.03.2020 - 15:07
![]() Petra Schmalenberger wrote:
Petra Schmalenberger wrote:
Hallo, ich würde gern wissen wieviel Wolle ich für dieses Modell benötige in Gr. M
16.09.2019 - 09:29DROPS Design answered:
Liebe Frau Schmalenberger, Garnmenge finden Sie unter Kopfteil - enteweder mit DROPS Puna oder mit DROPS Sky - mehr lesen Sie hier. Viel Spaß beim stricken!
16.09.2019 - 12:11
![]() Sunniva wrote:
Sunniva wrote:
Diagram A3. Skal kastene strikkes vridd vrang eller vanlig vrang på vrangsiden?
18.06.2019 - 09:53DROPS Design answered:
Hei Sunniva. I A.3 strikkes kastene vanlig vrang slik at det blir hull. Se symbolforklaringen for dette symbolet. I A.2 strikkes kastene vridd slik at det ikke blir hull. God fornøyelse
18.06.2019 - 11:21
![]() IvyLeaguer wrote:
IvyLeaguer wrote:
Under Increase Tip, it states: "Increase 1 stitch by making a yarn over. On next row knit yarn overs twisted to avoid holes." This work is working back and forth (not in the round). So, "knit yarn over twisted" means knit through the back loop? This is different from purl twisted, right (as done in working in the round)?
07.06.2019 - 23:26DROPS Design answered:
Dear IvyLeaguer, yes - "twisted" means "knit through the back loop". Happy knitting!
08.06.2019 - 20:15
|
||||||||||||||||||||||||||||
Namdalen Jacket#namdalenjacket |
||||||||||||||||||||||||||||
 |
 |
|||||||||||||||||||||||||||
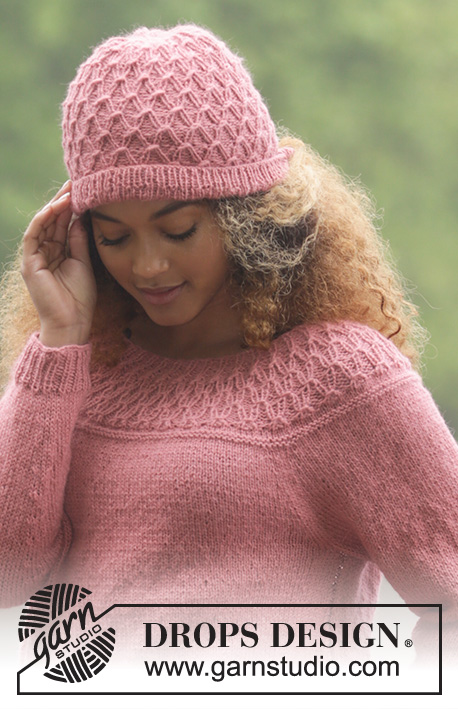
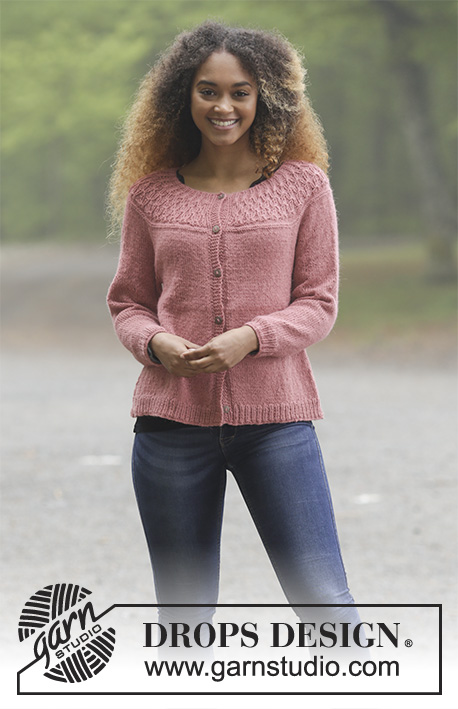
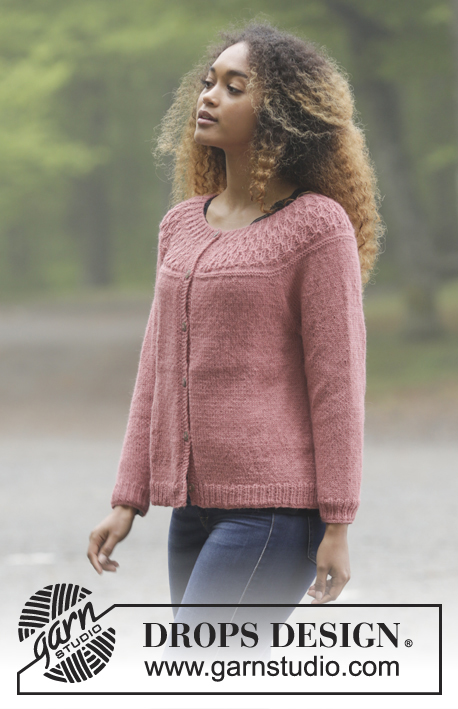
Knitted jacket with round yoke, raglan and texture, worked top down. Size: S - XXXL Piece is knitted in DROPS Puna or Sky.
DROPS 179-2 |
||||||||||||||||||||||||||||
|
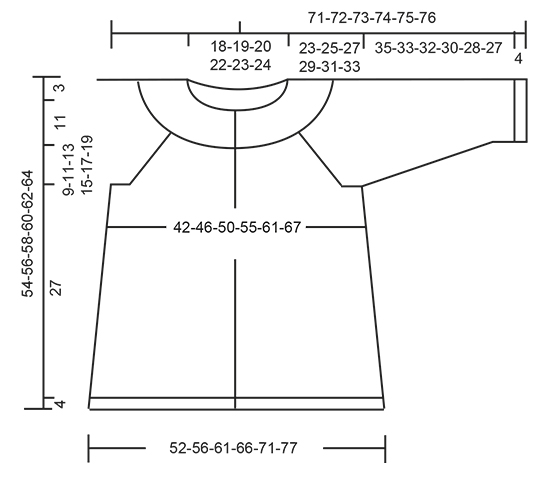
INFORMATION FOR PATTERN: GARTER STITCH (back and forth): 1 ridge = knit 2 rows. PATTERN: See diagrams A.1 to A.3. Diagrams show all rows in pattern seen from the right side. INCREASE TIP (evenly): To calculate how to increase evenly, use the total number of stitches on row (e.g. 254 stitches), minus stitch in band (= 14 stitches) and divide the remaining stitches by number of increases to be done (e.g. 8) = 30. I.e. in this example increase after approx. every 30th stitch and do not increase over bands. Increase 1 stitch by making a yarn over. On next row knit yarn overs twisted to avoid holes. RAGLAN: All increases are done from right side. Increase 1 stitch on each side of marker thread as follows: Work until 2 stitches remain before marker thread, 1 yarn over, knit 4 (marker thread is in the middle of these 4 stitches), 1 yarn over. Repeat at the remaining marker threads on row (= 8 stitches increased on needle). On next row purl yarn overs twisted to avoid holes. DECREASE TIP (applies to mid under sleeve): Begin 3 stitches before marker and knit 2 together, knit 2 (marker is between these 2 stitches), slip 1 stitch knitwise, knit 1, pass slipped stitch over stitch worked (= 2 stitches decreased). BUTTONHOLES: Decrease for buttonholes on right band. I.e. decrease for buttonhole at the end of row from right side. 1 BUTTONHOLE = knit third and fourth band stitch from edge together and make 1 yarn over. On next row knit yarn over = hole. Decrease for buttonholes when piece measures: S: 2, 11, 20, 29, 38 and 47 cm. M: 2, 11, 20, 29, 39 and 49 cm. L: 2, 11, 21, 31, 41 and 51 cm. XL: 2, 11, 21, 31, 41 and 51 cm. XXL: 2, 11, 20, 29, 38, 47 and 56 cm XXXL: 2, 11, 20, 29, 38, 47 and 56 cm ---------------------------------------------------------- JACKET: Worked back and forth on circular needle, top down. Work sleeves in the round on double pointed needles. YOKE: Cast on 128-134-140-146-152-158 stitches on circular needle size 3.5 mm with Puna or Sky. Purl 1 row from wrong side. Then work PATTERN – see explanation above, as follows: Work A.1a (= 7 band stiches), work A.2a (= 2 stitches on first row), work A.2b (= 36-38-40-42-44-46 repetitions of 3 stitches on first row), work A.2c (= 4 stitches on first row), work A.1b (= 7 band stiches). When 6 rows have been worked of diagrams (to and with row marked with arrow in diagrams) switch to circular needle size 4 mm. Remember BUTTONHOLES - see explanation above. Work band stitches as shown in diagrams A.1a and A.1b until finished measurements. REMEMBER THE KNITTING TENSION! When entire A.2a, A.2b and A.2c have been worked vertically, there are 242-254-266-278-290-302 stitches on needle and piece measures 10 cm from cast-on edge. Work 2 rows in stocking stitch while increasing 2-8-16-24-20-34 stitches evenly on first row – read INCREASE TIP = 244-262-282-302-310-336 stitches, Work 2 ridges in GARTER STITCH - see explanation above. Insert 4 marker threads in piece without working as follows: Insert 1st marker thread after 41-43-46-50-53-58 stitches, 2nd marker thread after another 47-52-56-58-56-59 stitches, 3rd marker thread after another 68-72-78-86-92-102 stitches, and 4th marker thread after another 47-52-56-58-56-59 stitches. There are now 41-43-46-50-53-58 stitches left on needle. Continue in stocking stitch and band stitches in each side as before and on next row from right side begin increase for RAGLAN – see explanation above. Increase like this on every 4th row (= every other row from right side) 6-8-9-10-12-13 times in total = 292-326-354-382-406-440 stitches. Continue with stocking stitch without increasing stitches until piece measures 23-25-27-29-31-33 cm from cast-on edge. Work next row from wrong side as follows: Work first 47-51-55-60-65-71 stitches (= half right front piece), slip the next 59-68-74-78-80-85 stitches on a stitch holder (= sleeve), cast on 8-8-10-10-12-12 new stitches under sleeve, work the next 80-88-96-106-116-128 stitches (= back piece), slip the next 59-68-74-78-80-85 stitches on a stitch holder (= sleeve), cast on 8-8-10-10-12-12 new stitches under sleeve, work the remaining 47-51-55-60-65-71 stitches on round (= half left front piece). BODY: = 190-206-226-246-270-294 stitches. Insert a marker thread in the middle of the new stitches cast-on under sleeves in each side (= 4-4-5-5-6-6 stitches on each side of marker thread). NOW MEASURE THE PIECE FROM HERE! Work in stocking stitch with 7 edge stitches in garter stitch in each side of piece. When piece measures 3 cm, work A.3 (= 6 stitches) mid under each sleeve so that there are 3 stitches of diagram on each side of marker thread. For every time A.3 has been worked vertically, 4 stitches have been increased on needle. Work the new stiches in stocking stitch. Continue like this until A.3 have been worked 11 times vertically = 234-250-270-290-314-338 stitches. Piece measures approx. 27 cm. Knit 1 row from right side while increasing 20-22-23-24-27-30 stitches evenly = 254-272-293-314-341-368 stitches. Purl 1 row from wrong side. Switch to circular needle size 3.5 mm. Now work rib as follows: Work 7 band stitches as before, purl 1, * knit 1, purl 2 *, work from *-* until 9 stitches remain on needle, knit 1, purl 1 and 7 band stitches as before. When rib measures 4 cm - adjust so that last row worked is from right side, switch to circular needle size 4 mm. Purl 1 row from wrong side and cast off by knitting from right side. To avoid a tight cast-off edge use a larger needle or make a yarn over that is casted off after approx. every 4th stitch. Jumper measures approx. 54-56-58-60-62-64 cm from shoulder and down. SLEEVES: Work sleeves in the round on double pointed needles. Slip the 59-68-74-78-80-85 stitches from stitch holder on double pointed needles size 4 mm. Pick in addition up 1 stitch in each of the 8-8-10-10-12-12 stitches cast on under sleeve = 67-76-84-88-92-97 stitches. Insert 1 marker thread in the middle of the new stitches (= mid under sleeve). NOW MEASURE THE PIECE FROM HERE! Work in stocking stitch in the round. When piece measures 3 cm, decrease 2 stitches mid under sleeve - read DECREASE TIP. Decrease like this every 8th-6th-5th-4th-4th-3rd round 11-14-16-18-19-20 times in total = 45-48-52-52-54-57 stitches. Work 1 round while decreasing 0-0-1-1-0-0 stitches = 45-48-51-51-54-57 stitches. Continue in stocking stitch until piece measures 35-33-32-30-28-27 cm (NOTE: shorter measurements in the larger sizes because of longer yoke). Switch to double pointed needles size 3.5 mm. Now work rib = knit 1/purl 2 until rib measures 4 cm. Switch back to circular needle size 4 mm. Knit 1 round. Then cast off by knitting. To avoid a tight cast-off edge use a larger needle or make a yarn over that is casted off after approx. every 4th stitch. Sleeve measures approx. 39-37-36-34-32-31 cm. Work the other sleeve the same way. |
||||||||||||||||||||||||||||
Diagram explanations |
||||||||||||||||||||||||||||
|
||||||||||||||||||||||||||||
 |
||||||||||||||||||||||||||||
 |
||||||||||||||||||||||||||||
 |
||||||||||||||||||||||||||||
Have you finished this pattern?Tag your pictures with #dropspattern #namdalenjacket or submit them to the #dropsfan gallery. Do you need help with this pattern?You'll find 25 tutorial videos, a Comments/Questions area and more by visiting the pattern on garnstudio.com. © 1982-2026 DROPS Design A/S. We reserve all rights. This document, including all its sub-sections, has copyrights. Read more about what you can do with our patterns at the bottom of each pattern on our site. |
||||||||||||||||||||||||||||


With over 40 years in knitting and crochet design, DROPS Design offers one of the most extensive collections of free patterns on the internet - translated to 17 languages. As of today we count 324 catalogues and 12290 patterns translated into English (UK/cm). 12290
We work hard to bring you the best knitting and crochet have to offer, inspiration and advice as well as great quality yarns at incredible prices! Would you like to use our patterns for other than personal use? You can read what you are allowed to do in the Copyright text at the bottom of all our patterns. Happy crafting!
Post a comment to pattern DROPS 179-2
We would love to hear what you have to say about this pattern!
If you want to leave a question, please make sure you select the correct category in the form below, to speed up the answering process. Required fields are marked *.