
Popular categories
Looking for a yarn?


Comments / Questions (8)
![]() Carole wrote:
Carole wrote:
Bonjour Pourquoi au début il faut monter 3 fils alors que le 1er rang doit se faire avec 2 fils ? Merci
16.10.2025 - 20:17DROPS Design answered:
Bonjour Carole, on monte les mailles avec 3 fils (2 kidS-Silk) pour un meilleur maintien du montage, ensuite, on continue avec juste 1 fil de chaque qualité. Bon tricot!
17.10.2025 - 07:51
![]() Claudia wrote:
Claudia wrote:
Bin nun mit dem Kissen fertig und es ist superschön geworden :) Was mich allerdings ärgert, ist die Menge an Wolle, die ich nach Anleitung gekauft habe. 2 mal Alpaka und 2 mal Mohair Silk hätte vollkommen ausgereicht! Nun habe ich fast das doppelte bezahlt und habe total viel Wolle übrig, mit der ich eigentlich nichts mehr anfangen kann..
12.04.2019 - 21:06
![]() Claudia wrote:
Claudia wrote:
Nun habe ich doch noch eine zusätzliche Frage. Muss ich in der Runde 28 dann mit einer oder zwei linken Maschen anfangen? Verschiebt sich auch hier der Rundenanfang entsprechend? Vielen Dank schonmal :)
14.03.2019 - 23:38DROPS Design answered:
Liebe Claudia, am besten immer die Runden ab 27. Runde nach der 1. Umschlag (die 1. Masche im 1. A.1 einfach abheben und dann die 2 nächsten M re zs stricken), am Ender der Runde enden Sie mit 1 M re (= 1. M im 1. A.1) und 1 Umschlag. Von jetzt an wird der Runde hier beginnen, dh immer nach dem Umschlag - am Anfang R 28 stricken Sie die M rechts wie im Diagram gezeigt und enden mit 2 M li (= die 2 ersten M im ersten A.1). Viel Spaß beim stricken!
15.03.2019 - 09:39
![]() Claudia wrote:
Claudia wrote:
Vielen Dank :)
14.03.2019 - 10:03
![]() Claudia wrote:
Claudia wrote:
Hallo, auch ich habe ein Problem ab der Verschuebung der Maschen und leider verstehe ich die französische Antwort nur zur Hälfte. Was ich allerdings verstanden habe, ist, dass man erst nach der Runde 27 (statt 21) damit anfangen muss. Mir ist nun auch nicht ganz klar, wie oft ich das in jeder zweiten, und wie oft in jeder vierten Runde tun soll? Und was mache ich mit der einen Masche davor? ich hoffe, Sie können mir helfen!
13.03.2019 - 22:39DROPS Design answered:
Liebe Claudia, ab der 27. Runde beginnen Sie die Runden mit dem Umschlag, damiti die kraus rechts maschen immer schön aussehen (so ist der Übergang zwischen Runden schöner). Viel Spaß beim stricken!
14.03.2019 - 09:59
![]() Chris wrote:
Chris wrote:
Bonjour, merci pour votre réponse. Il n'est donc pas besoin de décaler tous les quatre tours ? (sinon le début du tour ne sera pas calé avec le premier jeté si j'ai bien compris ?) Cdt, Chris
09.04.2018 - 17:09DROPS Design answered:
Bonjour Chris, effectivement, décalez simplement le début des tours juste avant le 1er jeté de A.1 jusqu'à la fin pour que le début des tours soit le plus invisible possible. Bon tricot!
10.04.2018 - 08:12
![]() Chris wrote:
Chris wrote:
Bonjour, pour le passage : "décaler le début du tour d'1 maille à gauche, d'abord ts les 2 tours, , [...] milieu du 1er motif de A.1" Pour décaler le début, on fait passer la première maille sans tricoter (pr qu'elle soit tricotée en dernier) ? A partir de quel tour faut-il décaler ts les 4 tours au lieu de ts les 2 tours ?Je ne comprends pas quand il est dit que le début du tour se fait avant le premier jeté (par ex au tour 22 le jeté est au milieu de la ligne de A1)
09.04.2018 - 15:58DROPS Design answered:
Bonjour Chris, je pense qu'il faut décaler ici à partir du rang 27 et non du rang 21 (une vérification va être faite), c'est-à-dire lorsque vous tricotez le haut de la feuille, au début du 27ème rang, glissez la 1ère md e A.1 sans la tricoter, puis commencez le tour ici au niveau du jeté: 1 jeté, 1 diminution, etc... ainsi, les tours commencent juste au niveau du jeté de A.1. Bon tricot!
09.04.2018 - 16:13
![]() Claire wrote:
Claire wrote:
Bonjour, il est spécifié qu\'il faut 75g de kid silk et 200g d\'alpaca. Or, d\'après l\'explication, il semble que tout le long du travail il faudra utiliser au moins un fil kid et et un fil alpaca ensemble. Comment se fait-il alors que les quantités de laine ne soient pas les mêmes ? Cordialement, C
05.04.2018 - 16:17DROPS Design answered:
Bonjour Claire, ces 2 laines ont un poids/métrage différent, soit 25 g/env. 200 m pour Kid-Silk et 50 g/167 m pour Alpaca, soit 75 g kid-silk= 600 m et 200 g Alpaca = 668 m. Il faudra donc plus de pelotes Alpaca pour avoir une quantité suffisante pour le métrage nécessaire. Bon tricot!
06.04.2018 - 08:17
|
|||||||||||||||||||
White Flower Pillow#whiteflowerpillow |
|||||||||||||||||||
 |
 |
||||||||||||||||||
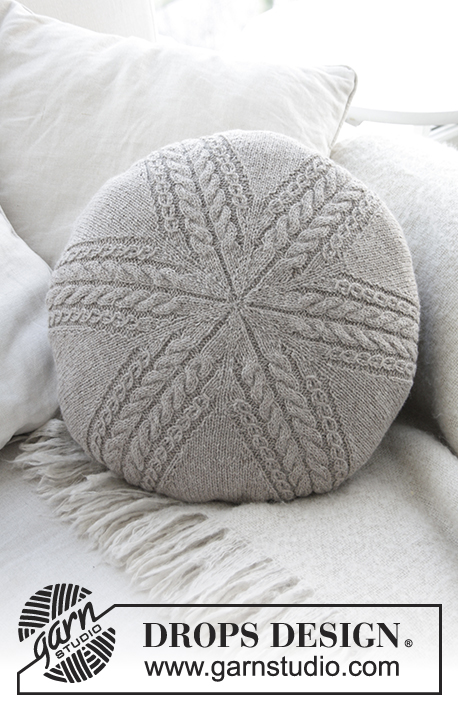
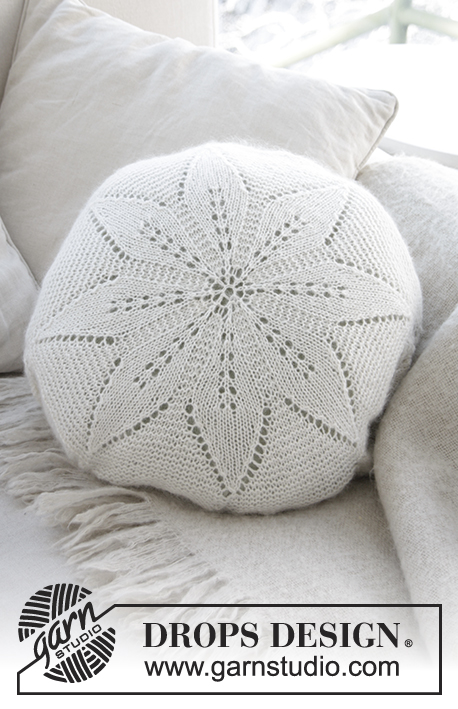
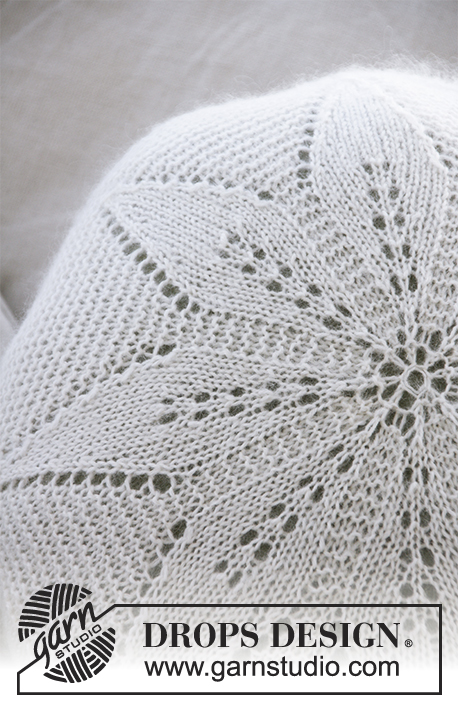
Round cushion with lace pattern, worked in the round in DROPS Alpaca and DROPS Kid-Silk.
DROPS 178-39 |
|||||||||||||||||||
|
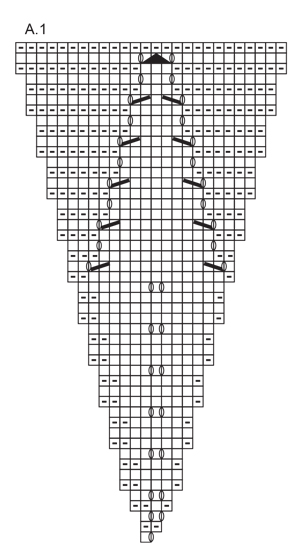
RIDGE/GARTER STITCH (worked in the round): 1 ridge = 2 rounds. Knit 1 round and purl 1 round. PATTERN: See diagram A.1. ---------------------------------------------------------- CUSHION: Is worked in 2 similar parts which are sewn together at the end. The piece is worked in the round in a circle on double pointed needles. Change to circular needle when the number of stitches is sufficient. Cast on 8 stitches with 2 strands Alpaca and 1 strand Kid-Silk (= 3 strands) and divide them on 4 double pointed needles size 6 mm (= 2 stitches on each needle). Continue with 1 strand of each quality (= 2 strands). Work pattern according to diagram A.1 (= 8 repeats of A.1 on the round). When the first 21 rounds of A.1 have been completed, move the start of the round 1 stitch to the left, first on every 2nd round, then on every 4th round – in other words, the start of the round is always just before the first yarn over in the diagram so that it is as invisible as possible. The start of the round will eventually be in the middle of the first repeat of A.1. REMEMBER THE KNITTING TENSION! When A.1 has been completed once in height, there are 208 stitches on the round. The piece measures approx. 34 cm in diameter. Insert 8 marker threads in the piece, insert the 1st marker thread in the 1st stitch on the round, then insert 7 marker threads with 25 stitches between them, the marker threads are directly over the points of each leaf. Work GARTER STITCH – see description above, AT THE SAME TIME on the first round, increase 1 stitch on each side of the marker threads. Increase with 1 yarn over on each side of the stitch with the marker thread – on the next round purl the yarn overs to leave holes = 16 stitches increased per round. Repeat the increases every 2nd round until the piece measures 40 cm – or to desired measurement. Cast off, use a needle and baste the hole in the middle of the cushion. Work another part in the same way – making sure that you have increased the same number of stitches before casting off. ASSEMBLY: Lay the 2 parts together with wrong side to wrong side and sew through both layers in the outermost stitch. When you have sewn half the cushion cover place the cushion in the cushion cover before sewing the rest of the opening together. Cut and fasten the strand. |
|||||||||||||||||||
Diagram explanations |
|||||||||||||||||||
|
|||||||||||||||||||
 |
|||||||||||||||||||
Have you finished this pattern?Tag your pictures with #dropspattern #whiteflowerpillow or submit them to the #dropsfan gallery. Do you need help with this pattern?You'll find 16 tutorial videos, a Comments/Questions area and more by visiting the pattern on garnstudio.com. © 1982-2026 DROPS Design A/S. We reserve all rights. This document, including all its sub-sections, has copyrights. Read more about what you can do with our patterns at the bottom of each pattern on our site. |
|||||||||||||||||||


With over 40 years in knitting and crochet design, DROPS Design offers one of the most extensive collections of free patterns on the internet - translated to 17 languages. As of today we count 324 catalogues and 12290 patterns translated into English (UK/cm). 12290
We work hard to bring you the best knitting and crochet have to offer, inspiration and advice as well as great quality yarns at incredible prices! Would you like to use our patterns for other than personal use? You can read what you are allowed to do in the Copyright text at the bottom of all our patterns. Happy crafting!
Post a comment to pattern DROPS 178-39
We would love to hear what you have to say about this pattern!
If you want to leave a question, please make sure you select the correct category in the form below, to speed up the answering process. Required fields are marked *.