
Popular categories
Looking for a yarn?


Comments / Questions (38)
![]() Christelle wrote:
Christelle wrote:
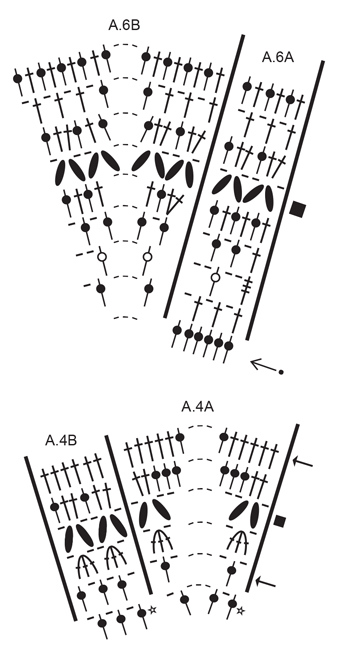
Bonjour, j'ai un petit soucis avec le diagramme A6. Au niveau de la ligne colorée, je dois crocheter dans l'arceau toutes les 3 brides du rang d'avant? Ou je dois crocheter dans la maille? Ou encore, une fois dans l'arceau, puis dans la 3ème maille, puis puis dans l'arceau après la 5ème maille? J'ai un peu du mal à le lire.
04.12.2025 - 16:30DROPS Design answered:
Bonjour Christelle, vous en êtes au "coin" de A.6B, est-ce bien exact? Si oui alors, commencez A.6B ainsi 2 brides écoulez ensemble (dans la même maille que les 2 dernières brides écoulées ensemble de A.6A), puis sautez 1 m, dans la m suivante, crochetez: 2 brides écoulées ensemble + 2 ml + 2 brides écoulées ensemble, puis crochetez dans l'arceau de 3 ml: 2 brides écoulée ensemble, 3 ml, 2 brides écoulées ensemble, puis sautez 1 m, dans la m suivante, crochetez 2 brides écoulés ensemble + 2 ml +. 2 brides écoulées ensemble, sautez 2 m et crochetez 2 brides écoulées ensemble dans la m suivante, 1 ml. Reprenez A.6A. Bon crochet!
05.12.2025 - 08:18
![]() Paloma wrote:
Paloma wrote:
Hola, es necesario bloquear cuando esté ya terminado? Gracias.
11.04.2022 - 13:30DROPS Design answered:
Hola Paloma, si, siepre. Saludos!
11.04.2022 - 13:41
![]() Emilia wrote:
Emilia wrote:
Also gehe ich davon aus, dass woanders angefangen wurde. Ich darf auch nicht bei der ersten R. von A.3A nach A.3B wieder mit einem Stb. anfangen, sondern mit einer LM, sonst habe ich ein Stb. zu viel. Wenn ich jetzt pro R. ein Stb dazugewinne ,bin ich am Ende von A.3C bei 87 Stb, soll aber laut Anleitung erst 85 haben. Oder häkel ich einfach bis 87 und muss laut A.4 dafür keine 2 Stb zunehmen? Und warum wurden bei dem Poncho (Foto) nur 11 R. Stb-LM gehäkelt, während es laut A.15 sind?
24.01.2022 - 19:23DROPS Design answered:
Liebe Emilia, wie zuvor vorgeschlagen, am besten häkeln Sie mit Markierungen zwischen allen Diagrammen, so können Sie am besten die richtige Maschenanzahl haben und behalten. Damit die Maschenanzahl die Diagramme und Anleitung passt, häkeln Sie am besten wie beschrieben, aber gerne können Sie auch Ihre eigene Änderungen machen. Viel Spaß beim häkeln!
25.01.2022 - 09:28
![]() Emilia wrote:
Emilia wrote:
Hallo, ich habe A.3A /B gehäkelt und festgestellt, dass ich auf der Anfangsseite mehr Stb. hatte als auf der anderen. Laut Diagramm beginnt man jede 2. Reihe mit einer LM , gleichzeitig steht in der Häkelinfo-2 , dass mann jede Runde mit 3 M. beginnen soll. Dann habe ich nochmal angefangen und immer beim Rundenende ein Stb weniger gehäkelt. Der Übergang sah trotzdem nicht schön aus , da in diesem Muster jede Abweichung auffällt. Auf dem Foto sieht man keinen sichtbaren Übergang,
24.01.2022 - 19:00DROPS Design answered:
Liebe Emilia, schauen Sie wieviele A.3A Sie auf beiden Seiten haben, und jeweils wieviele Stäbchen, setzen Sie Markierungen zwischen jedes Diagram und so können Sie am besten immer die genaue Maschenanzahl häklen (auch in A.3B). Hoffentlich kann es Ihnen helfen.
25.01.2022 - 09:23
![]() Kitty Roeffen wrote:
Kitty Roeffen wrote:
Vraag Is er een filmpje omeen poncho te haken
19.11.2021 - 14:09
![]() Jessica wrote:
Jessica wrote:
Al final de la primera vuelta de 120 puntos altos me sobran 24 puntos de la cadena de inicio. No me gustan las cuentas... 120 pa más 28 puntos que se saltan dan 148 y entonces me sobran los 24 puntos de la cadena. Por favor me explicas cómo hacerlo?
13.03.2021 - 00:09DROPS Design answered:
Hola Jessica, había un fallo en el inicio del patrón, había 146 puntos de cadeneta iniciales y se saltan 26.
21.03.2021 - 20:17
![]() Françoise Laplace wrote:
Françoise Laplace wrote:
J' ai commencé le premier rang de mon pencho 176-17 et pour le deuxième rang je suis perdue car je ne comprends pas : CrocheterA.1 ainsi: Crocheter les tours 1-3 ainsi: 5-6-7- fois A.1A au total,1B au de dessus de l arceau du milieu Je ne comprend pas le anagramme D avance merci pour me donner des conseils
18.09.2020 - 14:55DROPS Design answered:
Bonjour Mme Laplace, vous devez crocheter les tours 1 à 3 de A.1 comme indiqué, autrement dit répéter A.1A en largeur sur les côtés avec A.1B au-dessus de l'arceau du milieu (pointe du milieu devant et du milieu dos) = le tour commence au milieu d'un des côtés, vous devrez ainsi répéter 5, 6 ou 7 fois A.1A avant la pointe du milieu où vous crochetez A.1B, puis répéter 10, 12 ou 14 fois A.1B avant la pointe du miieu = A.1B et terminer par A.1A jusqu'au début du tour (= 5, 6 ou 7 fois en largeur). Bon crochet!
18.09.2020 - 15:59
![]() Betty wrote:
Betty wrote:
Kann es sein dass im ersten Teil etwas mit der Luftmaschenanzahl nicht stimmt? Wenn ich für die Größe L XL 178 Luftmaschen anschlage komme ich mit den Stäbchen in der Anleitung nicht hin. Also es fehlen Luftmaschen
26.07.2020 - 12:17DROPS Design answered:
Liebe Betty, es müsste passen, die Maschenzahl geht auf. Vielleicht schreiben Sie sich die Zahlen für Ihre Größe gesondert auf oder markieren sie farblich, dann haben Sie einen besseren Überblick. Beachten Sie, dass Sie bei den Luftmaschenbögen (= 1 Luftmasche häkeln), die Sie an der vorderen und hinteren Mitte häkeln, keine Luftmasche überspringen. Gutes Gelingen!
27.07.2020 - 10:45
![]() Elena wrote:
Elena wrote:
I dont't understand how to reach 100 dc after increasing in pattern A1 (smaller size). In the last round I have to work 6*10 +8+8 dc, in total 68 dc each side, increasing 2*10 dc in A1.A e 2dc twice in A.1B, 24 dc in total (not 23 as written in the pattern). What am I doing wrong? Thank you.
07.07.2020 - 18:36DROPS Design answered:
Dear Elena, on last round in A.1 there are: 6 sts x 5 (A.1A) + 8+9 sts (A.1B) + 6 sts x 10 (A.1A) + 8+9 (A.1B) + 6 sts x 5 (A.1A) = 154 sts in total - you then increase 23 sts on each side of each corner: 154+ 2x23=200 sts. Happy crocheting!
08.07.2020 - 07:57
![]() Svenja wrote:
Svenja wrote:
Hallo, wenn ich für Größe S, wie in der Anleitung angegeben, in A.4A die erste Runde häkle und die eine Masche zunehme komme ich wieder auf 77 Maschen. Für die zweite Runde bräuchte ich aber doch 78 Maschen, oder zumindest etwas was durch drei teilbar ist, oder nicht? Für Hilfe wäre ich sehr dankbar.
24.02.2019 - 19:12DROPS Design answered:
Liebe Svenja, bei der 1. Runde häkeln Sie 2 Stb in A.4A und 3 Stb x 25 in A.4B = 75 Stb + 1 Zunahme = 76 Stb + die 2 Stb in A.4A = 78 Stb. Viel Spaß beim häkeln!
25.02.2019 - 11:04
|
||||||||||||||||||||||||||||||||||||||||||||||||||||
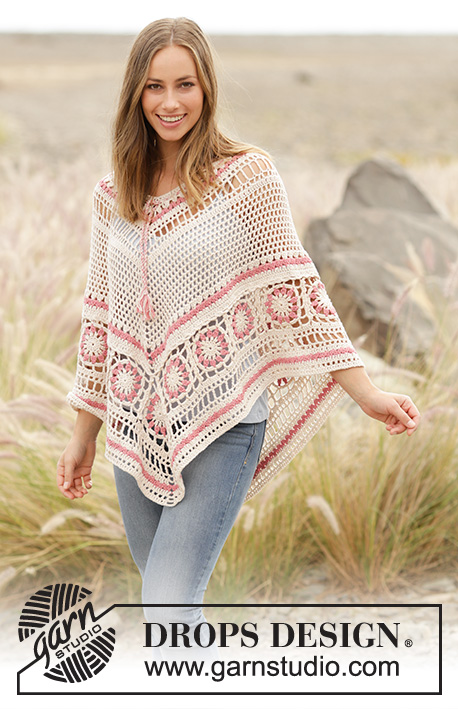
A Wistful Dream#awistfuldreamponcho |
||||||||||||||||||||||||||||||||||||||||||||||||||||
 |
 |
|||||||||||||||||||||||||||||||||||||||||||||||||||
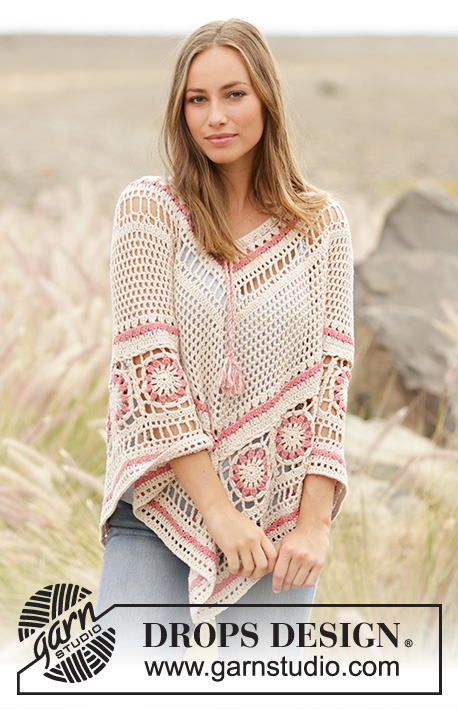
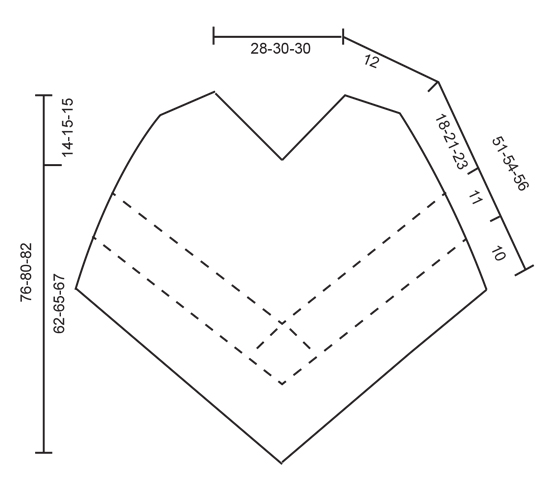
Poncho with lace pattern and crochet squares, worked top down in DROPS Belle. Sizes S - XXXL.
DROPS 176-16 |
||||||||||||||||||||||||||||||||||||||||||||||||||||
|
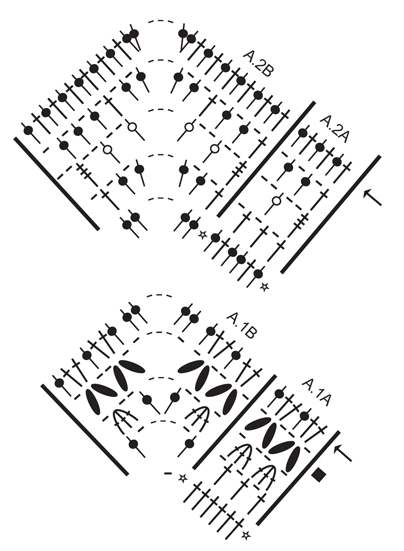
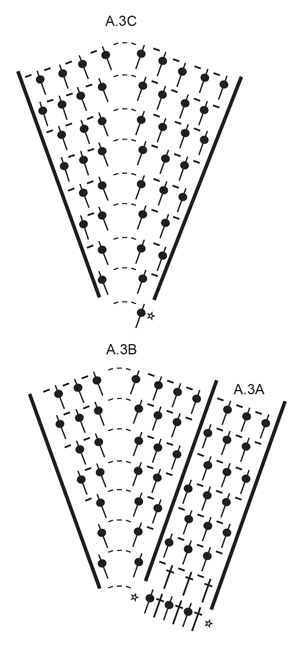
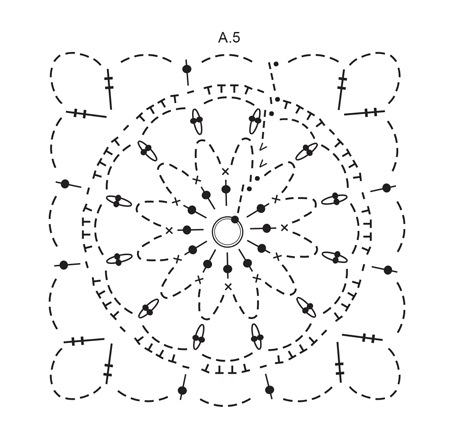
PATTERN: See diagrams A.1 to A.6. CROCHET INFO-1: The first treble crochet from the beginning of the round is replaced by 3 chain stitches and the round finishes with 1 slip stitch in the 3rd chain stitch at the start of the round. CROCHET INFO-2 (diagram): Each round starts with 3 chain stitches and finishes with 1 slip stitch in the 3rd chain stitch at the start of the round. COLOURS: The whole poncho is worked with light beige apart from the 3 rounds marked with a black square in the diagrams, these rounds are worked with old pink. The square is worked with light beige apart from the 4th round (= the round with together-worked treble crochets), this round is worked with old pink. INCREASE TIP-1: Increase 1 treble crochet by working 2 treble crochets in/around the same stitch. INCREASE TIP-2: Increase 1 treble crochet + 1 chain stitch by working 1 treble crochet, 1 chain stitch, 1 treble crochet and 1 chain stitch around the same chain stitch. ---------------------------------------------------------- PONCHO: The poncho is worked in the round and top down in 3 sections which are worked together as you go. Start with the first section, then work the squares separately as section 2. Increase mid front and mid back as shown in the diagram and otherwise increase evenly along the sides. FIRST SECTION: The round starts on the left shoulder. Work 146-178-206 chain stitches with hook size 4 mm and light beige and form them to a ring with 1 slip stitch in the first chain stitch. Work 3 chain stitches – READ CROCHET INFO-1, then work 1 treble crochet in each of the next 5-3-5 chain stitches, * skip 1 chain stitch, work 1 treble crochet in each of the next 4 chain stitches *, repeat from *-* 5-7-8 more times (= 30-36-42 treble crochets), 1 chain stitch (= chain space in front), work 1 treble crochet in each of the next 4-4-4 chain stitches, * skip 1 chain stitch, work 1 treble crochet in each of the next 4 chain stitches *, repeat from *-* 13-16-19 more times (= 60-72-84 treble crochets along the side), 1 chain stitch (= chain space in the middle in the back), work 1 treble crochet in each of the next 6-4-6 chain stitches, * skip 1 chain stitch, work 1 treble crochet in each of the next 4 chain stitches *, repeat from *-* 5-7-8 more times (= 30-36-42 treble crochets along half the side) = in total 120-144-168 treble crochets and 2 chain stitches on the round. REMEMBER THE CROCHET TENSION! Then work according to the diagram – READ COLOURS and CROCHET INFO-2. Increase every treble crochet round marked with an arrow – READ INCREASE TIP-1! A.1 is worked as follows: Work rounds 1-3 as follows: Work A.1A in total 5-6-7 times, A.1B over the chain space, A.1A in total 10-12-14 times, A.1B over the chain space in the middle, finish with A.1A in total 5-6-7 times. Then work the last round and increase 23-23-23 treble crochets evenly in each of the sides between the chain space in the middle mid front and the chain space in the middle mid back. When A.1 is finished in height there are 100-112-124 treble crochets between the chain-space mid front and mid back (= in total 200-224-248 treble crochets and 2 chain-spaces on the round). A.2 is worked as follows: Work rounds 1-3 as follows: Work A.2A in total 8-9-10 times, A.2B, A.2A in total 16-18-20 times, A.2B, finish with A.2A in total 8-9-10 times. Then work the last round and increase 9-9-9 treble crochets evenly in each of the sides between the chain space in the middle in front and the chain space in the middle mid back. When A.2 is finished in height there are 132-144-156 treble crochets between the chain-space mid front and mid back (= in total 264-288-312 treble crochets and 2 chain-spaces on the round). A.3A and A.3B are worked as follows: Work A.3A in total 11-12-13 times, A.3B over chain space in the middle, A.3A in total 22-24-26 times, A.3B over chain space in the middle, finish with A.3A in total 11-12-13 times. When A.3B is finished in height there are 73-79-85 treble crochets with 1 chain stitch, between the chain-space mid front and mid back (= in total 146-158-170 treble crochets with 1 chain stitch and 2 chain-spaces on the round). A.3A and A.3C are worked as follows: When A.3A is worked, repeat only the last 2 rounds upwards. Work A.3A in total 12-13-14 times, A.3C, A.3A in total 24-26-28 times, A.3C, finish with A.3A in total 12-13-14 times. Continue up to and including rounds 4-6-8 in A.3C. There are now 77-85-93 treble crochets with 1 chain stitch, between the chain-space mid front and mid back (= in total 154-170-186 treble crochets with 1 chain stitch and 2 chain-spaces on the round). Cut the strand, start next round as shown in A.4A, i.e. not in the middle chain space, but before this one. A.4 is worked as follows: On the 1st round you will increase 1-2-0 treble crochet/s (with 1 chain stitch) evenly on each of the sides between the middle chain space mid front and the middle chain space mid back - READ INCREASE TIP-2 and work as follows: Work * A4.A, A.4B in total 25-28-30 times *, repeat from *-* 1 more time. Then work rounds 2-4. Then work round 5 and decrease 2-0-0/increase 0-0-8 treble crochets evenly in each of the sides between the chain space in the mid front and the chain space in the mid back. When A.4 is finished in height there are 160-180-200 treble crochets between the chain-space mid front and mid back (= in total 320-360-400 treble crochets and 2 chain-spaces on the round). Cut and fasten the strand. Lay the piece to one side and work the second section. SECOND SECTION: Work in total 18-20-22 similar squares. One square measures 11 cm in width x 11 cm in height. NOTE! It is important that you keep to these measurements so that the squares fit the measurements on the last round of the first section. SQUARE: Work 4 chain stitches with hook size 4 mm and light beige and form them to a ring with one slip stitch in the first chain stitch - Remember COLOURS. Continue in the round according to A.5 until the square is finished. Cut and fasten the strand. Work 17-19-21 more squares in the same way. ASSEMBLY OF SQUARES: Lay 10-11-12 squares together in a line (the square at each end = mid front and mid back of the poncho). Lay 2 and 2 squares on top of each other, wrong side to wrong side and work them together through both layers as follows: 1 double crochet in the middle chain stitch in the corner, 2 chain stitches, 1 double crochet around the same chain-space, 1 chain stitch, * 1 double crochet around the next chain-space, 2 chain stitches, 1 double crochet around the same chain-space, 1 chain stitch *, repeat from *-* in total 3 times, work 1 double crochet around the next space (= the corner), 2 chain stitches, finish with 1 double crochet in the middle chain stitch in the corner. Lay the other 8-9-10 squares together in a line and work together in the same way. Lay the 2 lines together to make a tip in each side (i.e. mid front and mid back – see the sketch) and work together in the same way as before. ASSEMBLY OF FIRST AND SECOND SECTIONS: Lay the first section = 160-180-200 treble crochets, together wityh second section (i.e. the side with the shortest circumference of squares). Work them together through both layers (adjust so that there is 20 treble crochets over each side of each square of 5 chain-spaces) as follows: Work * 1 double crochet in the next treble crochet and around the chain-space on the square, skip 3 treble crochets *, repeat from *-* the complete round, around the 2 chain spaces in the middle work in addition 3 chain stitches over the middle chain spaces (= mid front and mid back). Cut and fasten the strand. THIRD SECTION: Continue working in the round on the second section, i.e. the side with the longest circumference of squares, there are 10-11-12 square sides on each side of mid front and mid back (= in total 20-22-24 sides). Start in one corner. Remember CROCHET INFO-2. Work 4 treble crochets around each of the 5 chain-spaces on each square until the next corner, work 3 chain stitches (= chain space in the middle), work 4 treble crochets around each of the 5 chain-spaces on each square until the next corner, finish with 3 chain stitches (= chain space in the middle). There are now 200-220-240 treble crochets between the chain-space mid front and mid back (= in total 400-440-480 treble crochets and 2 chain-spaces on the round). A.6 is worked as follows: Work * A.6A in total 33-37-40 times, A.3B over the chain space in the middle *, repeat from *-* 1 more time. When A.6 is finished in height there are 215-239-257 treble crochets between the chain-space mid front and mid back (= in total 430-478-514 treble crochets and 2 chain-spaces on the round). Cut and fasten the strand. TIE STRING: Cut 2 strands light beige and 2 strands old pink of 4 meters in length. Twist them together until they resist, fold the string double and it will continue to twist. Tie a knot in each end, approx. 5 cm from the end. Thread the string up and down, starting mid front, through the holes in round 3 from the neck. |
||||||||||||||||||||||||||||||||||||||||||||||||||||
Diagram explanations |
||||||||||||||||||||||||||||||||||||||||||||||||||||
|
||||||||||||||||||||||||||||||||||||||||||||||||||||
 |
||||||||||||||||||||||||||||||||||||||||||||||||||||
 |
||||||||||||||||||||||||||||||||||||||||||||||||||||
 |
||||||||||||||||||||||||||||||||||||||||||||||||||||
 |
||||||||||||||||||||||||||||||||||||||||||||||||||||
 |
||||||||||||||||||||||||||||||||||||||||||||||||||||
Have you finished this pattern?Tag your pictures with #dropspattern #awistfuldreamponcho or submit them to the #dropsfan gallery. Do you need help with this pattern?You'll find 11 tutorial videos, a Comments/Questions area and more by visiting the pattern on garnstudio.com. © 1982-2026 DROPS Design A/S. We reserve all rights. This document, including all its sub-sections, has copyrights. Read more about what you can do with our patterns at the bottom of each pattern on our site. |
||||||||||||||||||||||||||||||||||||||||||||||||||||


With over 40 years in knitting and crochet design, DROPS Design offers one of the most extensive collections of free patterns on the internet - translated to 17 languages. As of today we count 324 catalogues and 12290 patterns translated into English (UK/cm). 12290
We work hard to bring you the best knitting and crochet have to offer, inspiration and advice as well as great quality yarns at incredible prices! Would you like to use our patterns for other than personal use? You can read what you are allowed to do in the Copyright text at the bottom of all our patterns. Happy crafting!
Post a comment to pattern DROPS 176-16
We would love to hear what you have to say about this pattern!
If you want to leave a question, please make sure you select the correct category in the form below, to speed up the answering process. Required fields are marked *.