
Popular categories
Looking for a yarn?


Comments / Questions (169)
![]() GoldenEagle1620 wrote:
GoldenEagle1620 wrote:
Thanks for the reply. It makes more sense to me now. So you are referring to the 'continental' method of casting on with two strands! This is not to be confused with two strand cast on that produces double the number! As in 66 x2 = 132. Thanks again. GoldenEagle1620
19.03.2018 - 14:17
![]() GoldenEagle1620 wrote:
GoldenEagle1620 wrote:
Thanks for replying. But I am still confused. To knit in the round from the yoke (collar) down, if there are only 90 sts, then the circumference will be approx 22.8cm (tension 17sts/10cm. This is by far, much too small for the collar! When I cast on 66sts, with 2 strands - should I have 132sts? Please, this is a lovely garment that I want to complete (I have knitted quite a few, using 'Drops' wool). GoldenEagle1620 (Richard).
19.03.2018 - 11:38DROPS Design answered:
Dear Richard, you cast on the 66 sts with 2 strands Air (= 66 sts on needle) but then continue with only 1 strand Air working all 66 sts(and not each st of the 66 sts cast on with double strand). If your tension is 17 sts = 10 cm the 66 sts will give you approx. 38.8 cm for the ridges (circumference around neck) then you will increase to knit cable and get the correct tension (cables require more sts in width than garter st/stocking st). Happy knittng!
19.03.2018 - 13:16
![]() GoldenEagle1620 wrote:
GoldenEagle1620 wrote:
Thank you for answering. But, I am confused - because I have cast on 66 sts, with 2 strands as you say, but this results in 2 x 66 sts! Equals 132 total. This seems correct for the yoke. The pattern does not say what has happened to the remaining stitches. Also, you mention 'A2' - yet i CANNOT FIND any REFERENCE TO A2!
19.03.2018 - 10:40DROPS Design answered:
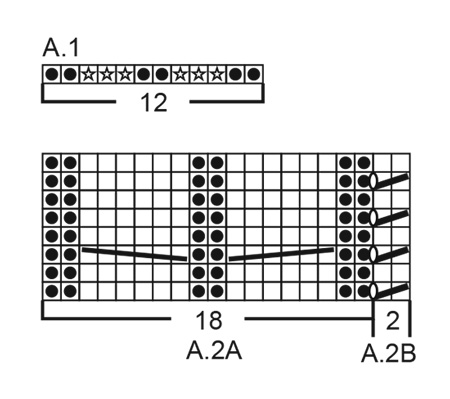
Dear GoldenEagle1620, work the 66 sts as follows: Work A.1 (= 12 sts inc to 18 sts), 2 sts in stocking st (= sleeve), A.1 (= 12 sts inc to 18 sts), 7 sts in stocking st (marker in the middle of these sts = mid front), A.1 (= 12 sts inc to 18 sts), 2 sts in stocking st (= sleeve), A.1 (= 12 sts inc to 18 sts) and 7 sts in stocking st (insert 1 marker in the middle of these sts = mid back) = (12+6) + 2+ (12+6) + 7 + (12+6) + 2 + (12+6) + 7 = 90 sts on needle. You will find diagrams A.2A and A.2B below on theh page, just under diagram text. Happy knitting!
19.03.2018 - 11:25
![]() GoldenEagle1620 wrote:
GoldenEagle1620 wrote:
Yesterday I asked a question concerning the 'Emerald Queen' pattern! I live in the UK and I am English, yet I notice that there is an 'Italian' flag over my question! This should be the Union Jack' for the UK. Thanks. GoldenEagle1620
19.03.2018 - 10:07
![]() GoldenEagle1620 wrote:
GoldenEagle1620 wrote:
Work A.1 (= 12 sts inc to 18 sts), 2 sts in stocking st (= sleeve), A.1 (= 12 sts inc to 18 sts), 7-7-9-9-11-11 sts in stocking st (insert 1 marker in the middle of these sts = mid front), A.1 (= 12 sts inc to 18 sts), 2 sts in stocking st (= sleeve), A.1 (= 12 sts inc to 18 sts) and 7-7-9-9-11-11 sts in stocking st (insert 1 marker in the middle of these sts = mid back) = 90-90-94-94-98-98 sts on needle. Is this correct?
18.03.2018 - 10:53DROPS Design answered:
Dear GoldenEagle1620, that's correct you will increase a total of 24 sts (6 sts inc in each A.1 x 4) = 90-94-98 sts (see size). Happy knitting!
19.03.2018 - 10:32
![]() Mar wrote:
Mar wrote:
Buonasera, devo allungare maniche del mio maglione e vorrei fare i polsi come il modello è possibile? mi potete spiegare come fare ad ogni giro, quando devo aumentare? grazie
15.03.2018 - 21:38DROPS Design answered:
Buongiorno Mar. Purtroppo in questa sede non ci è possibile fornire un aiuto così personalizzato. Può rivolgersi al suo rivenditore Drops di fiducia, indicando la taglia che sta seguendo, di quanto deve allungare la manica e come vuole realizzarla. Buon lavoro!
16.03.2018 - 09:28
![]() Jeanette Danielsen wrote:
Jeanette Danielsen wrote:
Ser det er flere som klager på at denne ikke stemmer i lengden, selv når strikkefastheten stemmer, og oppskriften er fulgt til punkt og prikke. Hvorfor retter dere ikke på den? Skikkelig dumt å sitte med en genser, som en har brukt masse tid på energi på å lage selv, så passer den ikke i det hele. jeg er en helt normal S, men ferdig strikket rekker den meg så vidt til hoftene på siden.
20.02.2018 - 11:20DROPS Design answered:
Hej Jeanette, opskriften blev rettet på nettet maj 2017. Hvis du har skrevet opskriften ud efter det, så stemmer målene med måleskitsen hvis man overholder strikkefastheden. God fornøjelse!
21.02.2018 - 14:34
![]() Alessandra wrote:
Alessandra wrote:
Scusate,avete ragione,tempo fa, nei commenti per il cambio filato, avevo scritto del problema di chiusura,il bordo si arrotola una volta terminato, mi avete risposto che dovevo fare il bloccaggio e,nn ho ben capito a cosa vi riferite. Grazie
17.02.2018 - 09:41DROPS Design answered:
Buongiorno Alessandra. Per evitare che il bordo si arrotoli, può provare a far passare un po' di vapore sul rovescio del lavoro, senza appoggiare il ferro sul capo. Oppure può aggiungere un bordo picot lavorato all'uncinetto. Buon lavoro!
17.02.2018 - 10:44
![]() Alessandra wrote:
Alessandra wrote:
Buonasera, scusate,cosa intendete per bloccaggio quando parliamo della chiusura a punto legaccio?
16.02.2018 - 17:53DROPS Design answered:
Buonasera Alessandra. Chiediamo scusa ma nelle spiegazioni non troviamo il punto a cui fa riferimento. Può indicarci meglio il problema per cortesia? Grazie. Buon lavoro!
16.02.2018 - 18:38
![]() Alessandra wrote:
Alessandra wrote:
Buonasera, ho un problema, nnbriesco a capire la diminuzione sul centro avanti e dietro, quella per avere meno volume, se devo arrivare a 2 maglie prima del segnapunti, come faccio a "lavorare 2maglie insieme un gettato ed un accavallano?" dove le prendo 4 maglie? E,anche volendo usare quella centrale,come faccio a continuare con i fori laterali?
14.02.2018 - 01:22DROPS Design answered:
Buongiorno Alessandra. Abbiamo corretto il testo del paragrafo: suggerimento per il lavoro 2. Adesso può proseguire correttamente. Buon lavoro!
14.02.2018 - 07:03
|
|||||||||||||||||||||||||
Emerald Queen#emeraldqueensweater |
|||||||||||||||||||||||||
 |
 |
||||||||||||||||||||||||
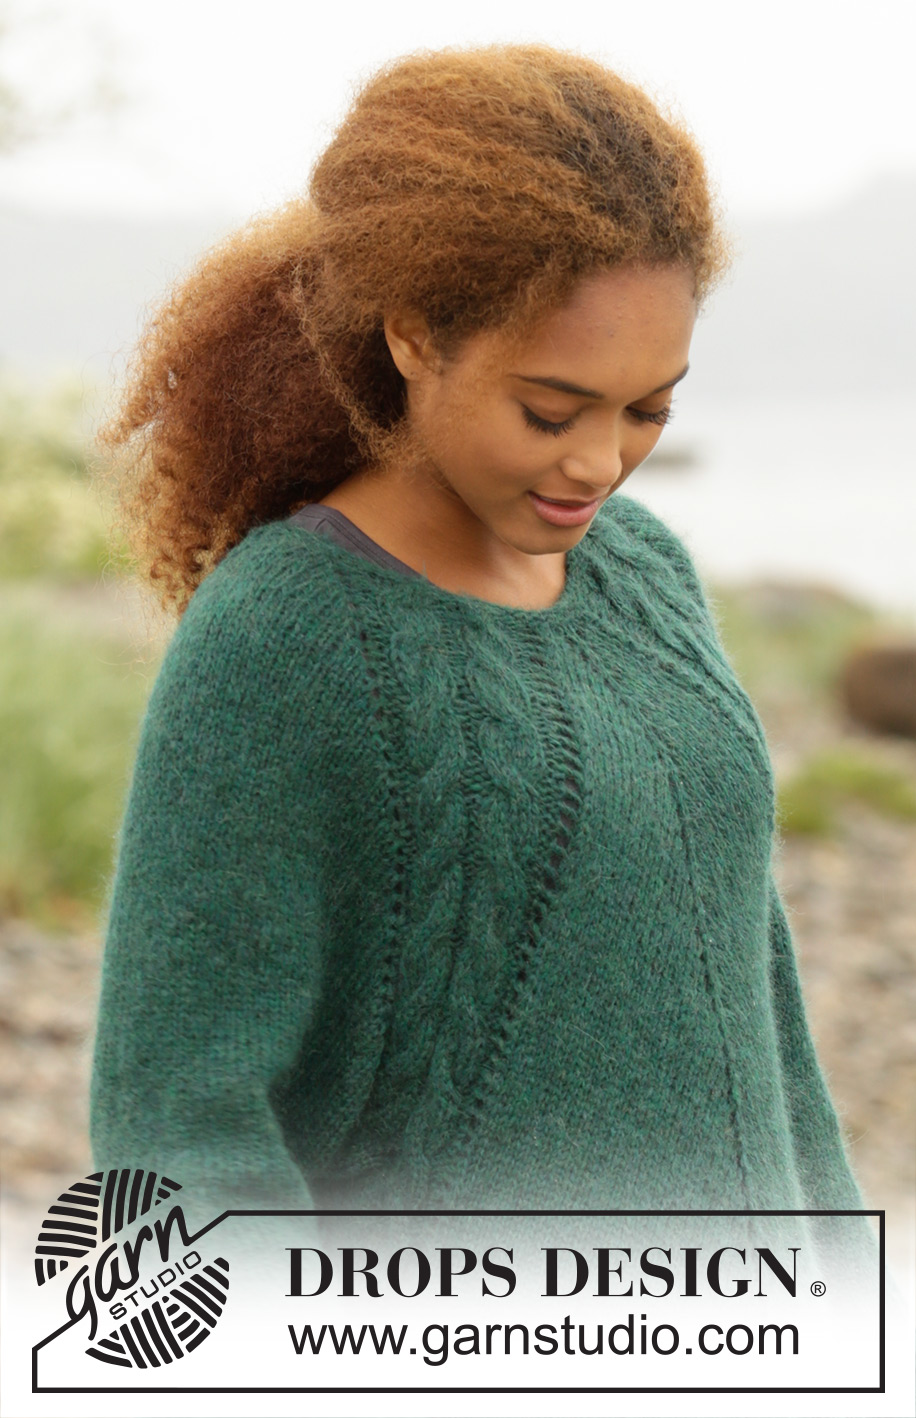
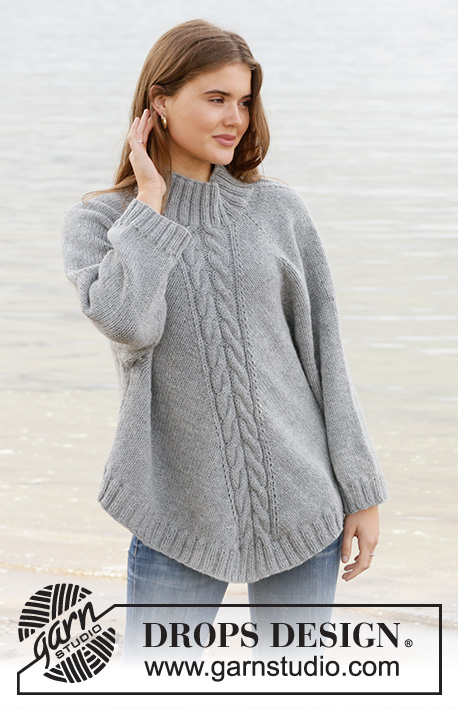
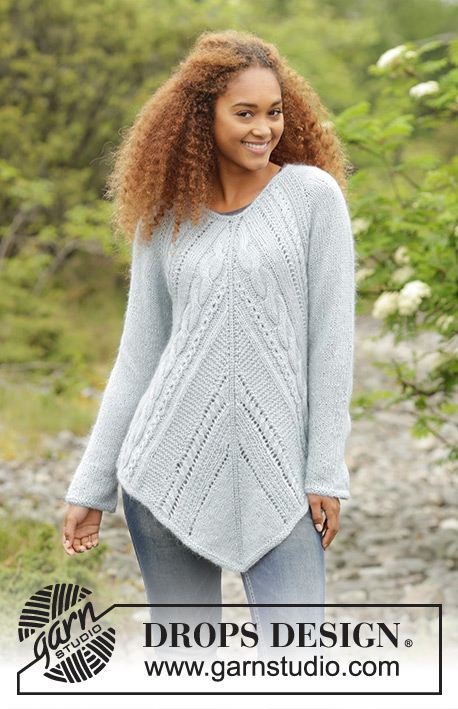
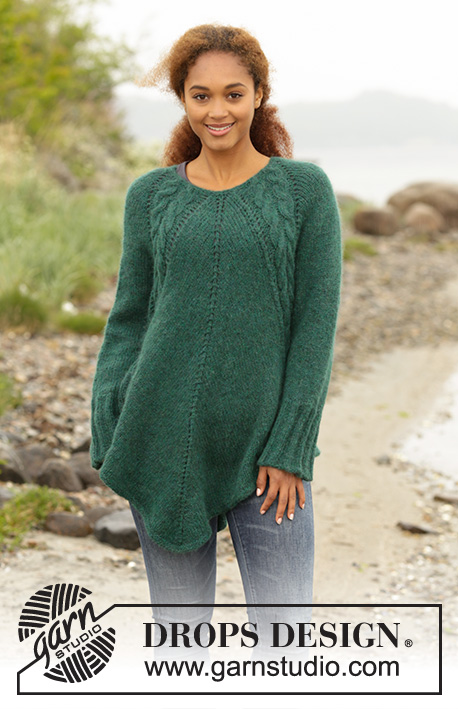
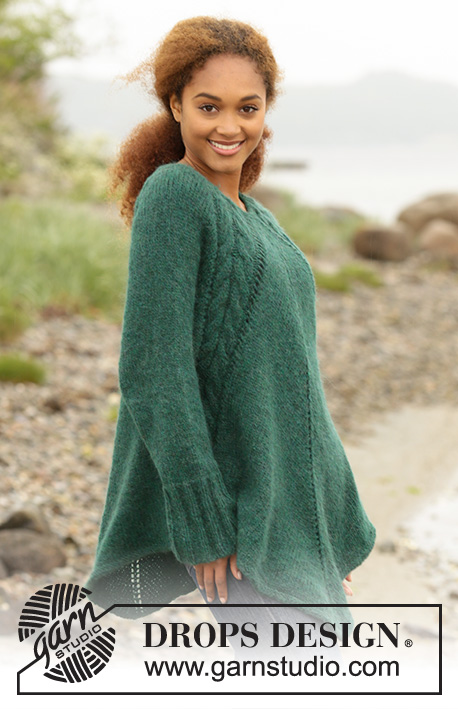
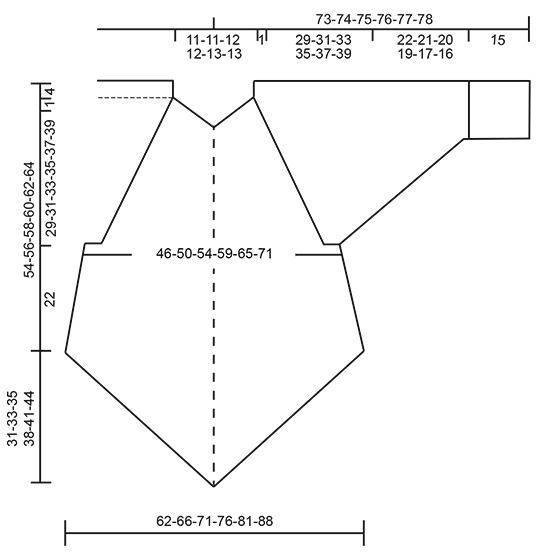
Knitted DROPS tunic with deep raglan and cables, worked top down in ”Air”. Size: S - XXXL.
DROPS 171-1 |
|||||||||||||||||||||||||
|
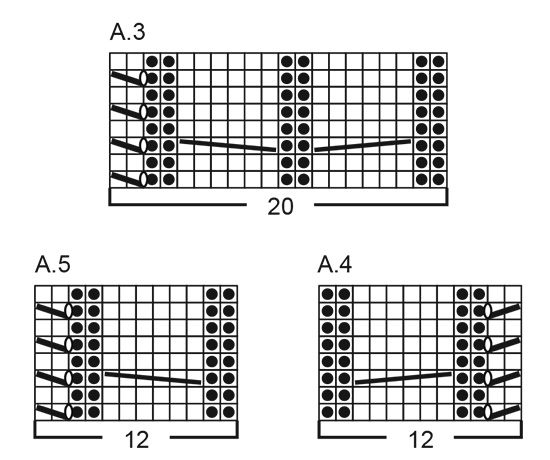
GARTER ST (worked in the round): 1 ridge = 2 rounds. * K 1 round and P 1 round *, repeat from *-*. PATTERN: See diagrams A.1 to A.5. INCREASE FOR SLEEVES: Increase 1 st in each side on each sleeve by increasing after A.2 and before A.3 (= 2 st inc on each sleeve and 4 sts in total on round). Inc 1 st by making 1 yarn over, on next round knit yarn over to make holes. INCREASE MID FRONT AND MID BACK: Increase 2 sts on each side of st with marker thread on mid front and mid back as follows: Knit until 1 st before st with marker thread, make 1 yarn over, knit 1, make 1 yarn over, knit st with marker thread, make 1 yarn over, knit 1, make 1 yarn over (= 4 sts inc mid front/mid back and 8 sts in total on round). On next round knit the 2 yarn overs closest to the st with mid-st to make holes, the outermoste 2 sts should be knit twisted to avoid holes. Increase 1 st on each side of st with marker thread on mid front and mid back as follows: Work until st with maker thread, make 1 yarn over, knit st with maker thread (mid-st), make 1 yarn over (= 2 sts inc mid front/mid back and 4 sts in total on round).On next round knit yarn overs to make holes. KNITTING TIP-1: To avoid the eye let row being interrupted while increasing for sleeves on every 4th row and not on every 2nd row as before, work as follows on the rows that previously had increases: After A.2: Make 1 yarn over, slip 1 st knitvise, knit 1 and pass slipped st over the knit st. Before A.3: Knit until 2 sts before A.3, knit 2 st tog and make 1 yarn over. KNITTING TIP-2: If you want a little less volume on body, it is possible to make some adjustments after dividing for sleeves. Decrease 2 sts mid front and mid back on i.e every 8th round as follows (decrease on a round with increases): Knit until 2 sts before st with marker (= mid-st), knit 2 tog, make 1 yarn over, knit 1 (= mid-st), make 1 yarn over, slip 1 st knitvise, knit 1 and pass slipped st over the knit st (this decrease vil give approx 8 cm less width in total at the end of body). DECREASE TIP (applies to sleeves): Beg 3 sts before marker and dec as follows: K 2 tog, K 2 (marker is in the middle of these 2 sts), slip 1 st as if to K, K 1, psso. ---------------------------------------------------------- TUNIC: Worked in the round on circular needle, top down. YOKE: Cast on 66-66-70-70-74-74 sts on a short circular needle size 4 mm with 2 strands Air. Remove 1 strand and continue with 1 strand Air as follows: Work 2 ridges in GARTER ST - see explanation above. Switch to a short circular needle size 5 mm, work next round as follows: Work A.1 (= 12 sts inc to 18 sts), 2 sts in stocking st (= sleeve), A.1 (= 12 sts inc to 18 sts), 7-7-9-9-11-11 sts in stocking st (insert 1 marker in the middle of these sts = mid front), A.1 (= 12 sts inc to 18 sts), 2 sts in stocking st (= sleeve), A.1 (= 12 sts inc to 18 sts) and 7-7-9-9-11-11 sts in stocking st (insert 1 marker in the middle of these sts = mid back) = 90-90-94-94-98-98 sts on needle. Next round work as follows: Work A.2A (= 18 sts), inc 1 st – READ INCREASE FOR SLEEVES, knit 2, inc 1 st for sleeve, work A.3 (= 20 sts), knit 0-0-1-1-2-2 s, inc 2 sts on each side of st with marker thread – READ INCREASE MID FRONT AND MID BACK, knit 0-0-1-1-2-2 sts, work A.2B (= 2 sts), work A.2A (=18 sts), inc 1 st for sleeve, knit 2 sts, inc 1 st for sleeve, work A.3 (= 20 sts), knit 0-0-1-1-2-2 sts, inc 2 sts on each side of st with marker thread (= mid back) and knit 0-0-1-1-2-2 sts and work A.2B (= 2 sts) = 102-102-106-106-110-110 sts on needle. Then work stocking st in the round with A.2 and A.3 in every transition between body and sleeves. AT THE SAME TIME continue increase for sleeves and increase mid front and mid back as follows: SLEEVES: Increase on every 2nd round 10-13-15-21-23-27 times in total (including the increase explained on firste round), then increase on every 4th round 11-11-11-9-9-8 times in total - READ KNITTING TIP-1. MID FRONT AND MID BACK : Inc 2 sts on every side of st with marker in it on every 2nd round 11-14-15-18-21-25 times in total (including the increases explained on first round). Then increase 1 st on each side of st with marker in it on every 2nd round 21-20-21-21-20-18 times in total. REMEMBER THE KNITTING TENSION! After last increase on body and sleeves there are 346-378-402-442-474-510 sts on needle. Work next round as follows: Work as before over the first 11 sts (= until middle of 2 P sts in A.2), slip the next 62-68-72-80-84-90 sts on a stitch holder (= sleeve), cast on 6-6-8-8-10-12 new sts under sleeve, work as before over the next 111-121-129-141-153-165 sts on front piece(i.e 11 st in A.3, 89-99-107-119-131-143 knit sts, 11 sts in A.2)slip the next 62-68-72-80-84-90 sts on a stitch holder (= sleeve), cast on 6-6-8-8-10-12 new sts under sleeve and work the remaining 100-110-118-130-142-154 sts on back piece as before (i.e 11 sts in A.3 and 89-99-107-119-131-143 knit sts). Finish body and sleeves separately. BODY: = 234-254-274-298-326-354 sts. Insert 1 marker in the piece. Work next round as follows: Work A.4 (12 sts), knit 4-4-6-6-8-10 sts, A.5 (=11 sts), knit until mid-st, make 1 yarn over, knit 1 (= mid-st), make 1 yarn over, knit until A.2, work A.4 (= 12 sts), knit 4-4-6-6-8-10 sts, A.5 (= 12 sts), knit until mid-st, make 1 yarn over, knit 1 (= mid-st), make 1 yarn over and knit the rest of round (= 4 sts increased). Continue pattern like this while AT THE SAME TIME continuing to increase mid front and mid back on every 2nd round until inc has been done 20 times on each side of mid front/mid back from marker - READ KNITTING TIP-2 = 314-334-354-378-406-434 sts on needle (or work until desired length). On next round work sts in each cable K tog 2 by 2 (= 12 sts dec) = 302-322-342-366-394-422 sts. Switch to circular needle size 4 mm and work 2 ridges in garter st in the round over all sts. Switch back to circular needle size 5 mm and cast off (this is done to avoid a tight cast-off edge). SLEEVE: Worked in the round on a short circular needle, switch to double pointed needles when needed. Slip the sts from stitch holder in one side of piece on a short circular needle size 5 mm and pick up 1 st in each of the 6-6-8-8-10-12 sts cast on under sleeve on body = 68-74-80-88-94-102 sts on needle. Insert 1 marker at beg of round (= mid under sleeve) - NOW MEASURE PIECE FROM HERE. Work in stocking st in the round over all sts AT THE SAME TIME on first round dec over the two cables by working sts in each cable K tog 2 by 2 (= 6 sts dec) = 62-68-74-82-88-96 sts. When piece measures 2 cm, dec 2 sts mid under sleeve - READ DECREASE TIP. Dec a total of 12-14-17-20-22-25 times in Size S: On every 4th round, in size M: On every 3rd round, in size L: Alternately on every 2nd and 3rd round, in size XL: On every other round, in size XXL: Alternately on every and every other round and size XXXL. On every round = 38-40-40-42-44-46 sts on needle. Continue to work until piece measures 22-21-20-19-17-16 cm (NOTE: Shorter measurements in the larger sizes because of wider shoulders). K 1 round while AT THE SAME TIME inc 7-10-10-8-11-9 sts evenly = 45-50-50-50-55-55 sts. Switch to double pointed needles size 4 mm and work rib in the round = K 2/P 3. When rib measures 15 cm, switch back to double pointed needles size 5 mm before casting off with K over K and P over P (this is done to avoid a tight cast-off edge). Work the other sleeve the same way. |
|||||||||||||||||||||||||
Diagram explanations |
|||||||||||||||||||||||||
|
|||||||||||||||||||||||||
 |
|||||||||||||||||||||||||
 |
|||||||||||||||||||||||||
 |
|||||||||||||||||||||||||
Have you finished this pattern?Tag your pictures with #dropspattern #emeraldqueensweater or submit them to the #dropsfan gallery. Do you need help with this pattern?You'll find 26 tutorial videos, a Comments/Questions area and more by visiting the pattern on garnstudio.com. © 1982-2026 DROPS Design A/S. We reserve all rights. This document, including all its sub-sections, has copyrights. Read more about what you can do with our patterns at the bottom of each pattern on our site. |
|||||||||||||||||||||||||


With over 40 years in knitting and crochet design, DROPS Design offers one of the most extensive collections of free patterns on the internet - translated to 17 languages. As of today we count 324 catalogues and 12290 patterns translated into English (UK/cm). 12290
We work hard to bring you the best knitting and crochet have to offer, inspiration and advice as well as great quality yarns at incredible prices! Would you like to use our patterns for other than personal use? You can read what you are allowed to do in the Copyright text at the bottom of all our patterns. Happy crafting!
Post a comment to pattern DROPS 171-1
We would love to hear what you have to say about this pattern!
If you want to leave a question, please make sure you select the correct category in the form below, to speed up the answering process. Required fields are marked *.