
Popular categories
Looking for a yarn?


Comments / Questions (169)
![]() Vlaďka wrote:
Vlaďka wrote:
Chtěla bych se zeptat, k čemu jsou schémata A.2B, A3, A4 a A5....a jak je to s tím přidáváním...je psáno v 1.kruhové řadě přidávat na předním a zadním díle a pak v každé druhé řadě a u rukávů začínáme v druhé řadě a pak zase v každé druhé řadě - vyplývá mi z toho, že v jedné řadě přidám na předním a zadním díle a v další řadě přidávám u rukávů - chápu to tak správně? Moc děkuji.
13.01.2019 - 20:26
![]() Sabine Rosemann wrote:
Sabine Rosemann wrote:
Hallo, das ist mir klar, aber was ist mit den Abnahmen von A3 und A2B? Wenn ich die mitstricke, komme ich nicht auf die 442 Maschen.
17.12.2018 - 09:57DROPS Design answered:
Liebe Frau Rosenmann, die Abnahmen in A.3 und A.2B (sowie in A.4 und A.5) werden die Zunahemn (Umschläge) ausgleichen : in A.2B stricken Sie 2 M re zs, 1 Umschlag = es sind immer noch 2 Maschen. Viel Spaß beim stricken!
17.12.2018 - 10:27
![]() Sabine Rosemann wrote:
Sabine Rosemann wrote:
Ich stricke die Größe XL, das kommt aber nicht auf die Größe an. Die Maschen stimmen in jeder Größe nur, wenn man die Abnahmen nicht macht.
12.12.2018 - 17:23DROPS Design answered:
Liebe Frau Rosemann, Sie haben 94 M dann nehmen Sie für die Ärmel (4 M x 21 + 4 M x 9) und für Vorder und Rückenteil (8 M x 18 + 4 M x 21 ) = 94 + 120 + 228 = 442 M. Viel Spaß beim stricken!
17.12.2018 - 09:02
![]() Sabine Rosemann wrote:
Sabine Rosemann wrote:
Guten Tag, ich rechne jetzt schon seit Tagen und komme immer zu dem Ergebnis, dass ich die Maschenzahl nur erreichen kann, wenn ich an den Reglanärmeln (A3 und A2A und A2B) nicht abnehme. Ich hatte schon die Hälfte gestrickt und dann bemerkt, dass mit der Maschenzahl etwas nicht stimmt. Was habe ich falsch gemacht?
12.12.2018 - 14:10DROPS Design answered:
Liebe Frau Rosemann, können Sie uns bitte sagen, welche Größe Sie stricken? Viel Spaß beim stricken!
12.12.2018 - 14:13
![]() Sylvie wrote:
Sylvie wrote:
On ne peut obtenir les 378 mailles (taille M) de la séparation que si on ne diminue pas du tout entre les augmentations... De plus, cela ne donne le joli motif des oeillets/trous que d'un côté des torsades des manches, et non des deux comme c'est le cas sur la photo. Que suis-je censée faire? Ce modèle est superbe, mais le patron n'est vraiment pas des plus compréhensibles...
01.10.2018 - 20:26DROPS Design answered:
Bonjour Sylvie, - edit 24/05 - avec toutes nos excuses pour la réponse tardive vous avez 90 m au début, et augmentez pour les manches et le dos/devant: 13x2 mailles + 11 x 2 m et 14 x 4 m et 20 x 2 m = vous avez augmenté 48 m sur chaque manche et 96 m sur le devant/le dos soit 90 + 48x2 + 96x2= 378 m. Bon tricot!
02.10.2018 - 09:59
![]() Sylvie wrote:
Sylvie wrote:
Bonjour, je ne comprend pas les augmentations manches et milieu avec A2 et A3. Selon le patron, on augmente de 12 mailles un tour sur deux (4 pour les manches, 8 pour les milieux) mais on diminue aussi de 4 sur lautre tour (2x2mailles ensembles pour A2B, 2xmailles glissée/passée au début de A3 selon les diagrammes). Mais cela déséquilibre le motif du milieu (un côté a moins de mailles ) et ne correspond pas au nombre de mailles que je devrais avoir à la séparation manches/torse.
01.10.2018 - 20:25DROPS Design answered:
Bonjour Sylvie, on ne diminue pas le nombre de mailles dans A.3 et A.2B (ni dans A.4 et A.5), chaque diminution est compensée par 1 jeté fait juste après = le nombre de mailles du diagramme reste le même.
02.10.2018 - 09:58
![]() Sixtine wrote:
Sixtine wrote:
So do I need to add a yo before AND after each diagram? Because the pattern only says 'Increase 1 st in each side on each sleeve by increasing after A.2 and before A.3' but you seem to say before and after each of them... And so the yo from before A3 becomes the slipped stitch that passes over the first knit stitch of A3, right? Sorry for the many questions, this is a gorgeous sweater and I don't want to mess it up
25.09.2018 - 14:17DROPS Design answered:
Dear Sixtine, you increase for sleeve between diagrams: after the diagram at the transition on raglan at the beginning of sleeve and before the diagram at the transition on raglan at the end of sleeve = 2 sts increased for sleeve (= diagram/raglan, increase, stitches for sleeve, increase, diagram/raglan). Happy knitting!
25.09.2018 - 14:34Sixtine wrote:
Thank you but that's not what I meant. I am not that far into the pattern yet. I am at the 'work stockinette st in the round with A.2 and A.3 in every transition between body and sleeves.AT THE SAME TIME continue increase for sleeves and increase mid front' part, still within the first few rows of that, and am confused about how to deal with the slip stitch passed over at the beginning of A3 every other round (on the same rounds where A2 is k2tog) and the Dec that makes for A3's 20sts
25.09.2018 - 10:40DROPS Design answered:
Dear Sixtine, you can add some markers to mark diagrams to be sure to place your sts and the increase as you should. The dec with slip 1, K1, psso in A.3 is worked at the end of A.3 and compensated with a YO just before = the number of sts in A.3 will be always the same. To increase at the beg of sleeve, start just after A.2/A.3 and make a YO, continue to next A.2/A.3 and make 1 YO before diagram (= 2 sts inc). Increase on mid front and mid back on each side of the st with marker as explained under INCREASE MID FRONT/MID BACK. Happy knitting!
25.09.2018 - 13:39Sixtine wrote:
When alternating between Inc and Dec rows, for A3, is the psso the first ks of A3 Or is the psso st the yo from the previous row? On the next Inc row, when starting A3 again, for the 2 KS: do I take that first knit stitch before my A3 place marker or do I start A3 again from after the place marker (knitting the remaining knit stitch, then knitting the first purl, purling the second purl, purling the knit that follows) and thus 'moving' A3 one stitch over each time?
24.09.2018 - 17:13DROPS Design answered:
Dear Sixtine, KNITTING TIP-2 explains how to alternate the decrease and increase row on mid front/back: you have to decrease 2 sts on mid front and mid back on every 8th round with K2 tog before st with marker, YO, K st with marker, YO, K2 tog. Happy knitting!
25.09.2018 - 09:40
![]() Lucy wrote:
Lucy wrote:
When you do A.2B do you YO first so you don't decrease a st?
20.09.2018 - 23:00DROPS Design answered:
Dear Lucy, in A.2B you work K2 tog, YO (as at the beg of A.4) - the last 2 sts in A.3 and A.5 are worked (YO, slip 1 as if to K, K1, psso). Happy knitting!
21.09.2018 - 08:01
|
|||||||||||||||||||||||||
Emerald Queen#emeraldqueensweater |
|||||||||||||||||||||||||
 |
 |
||||||||||||||||||||||||
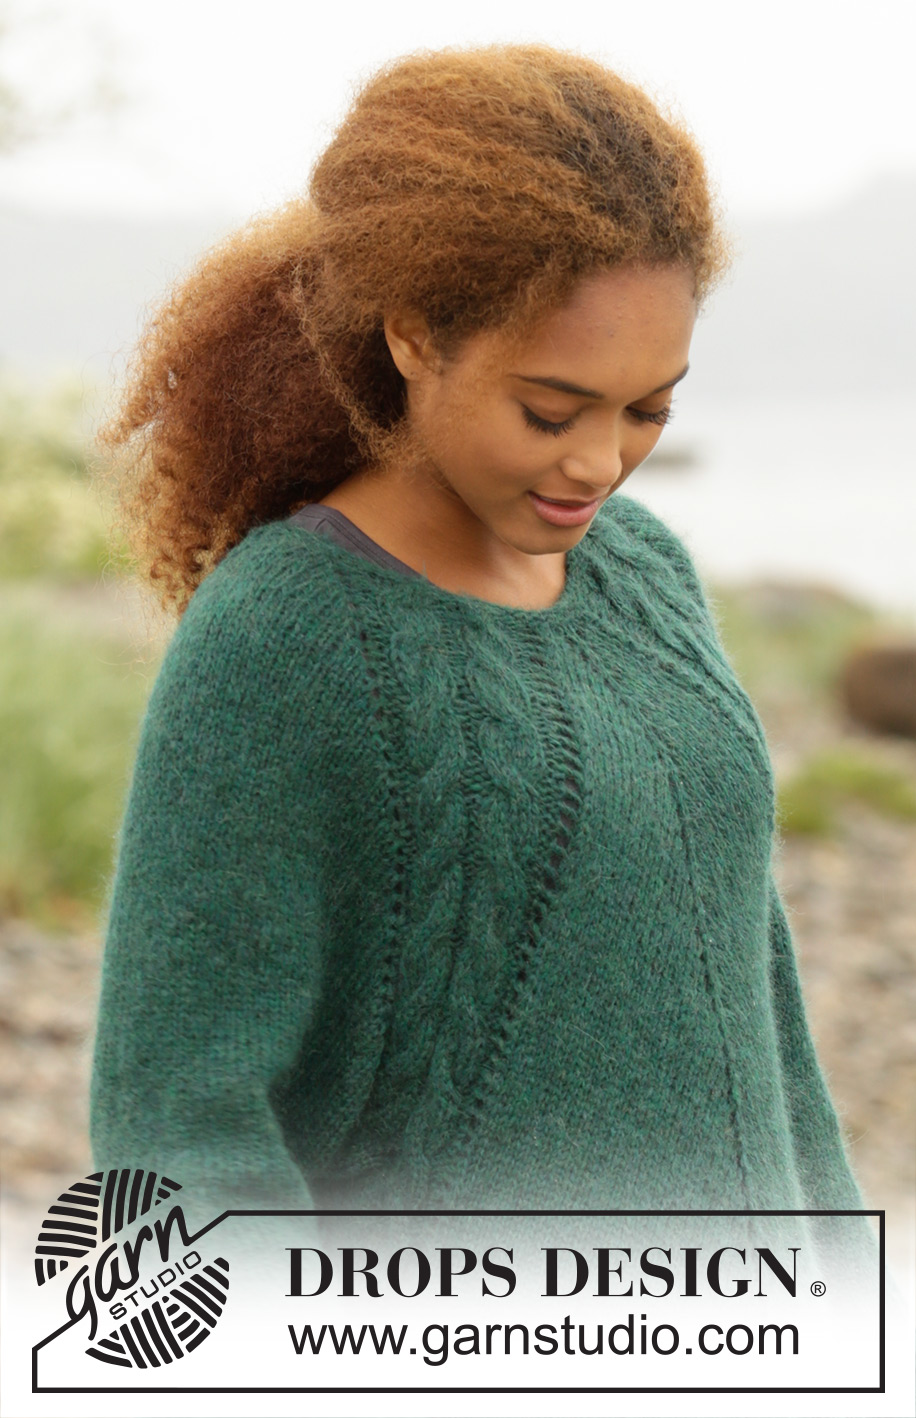
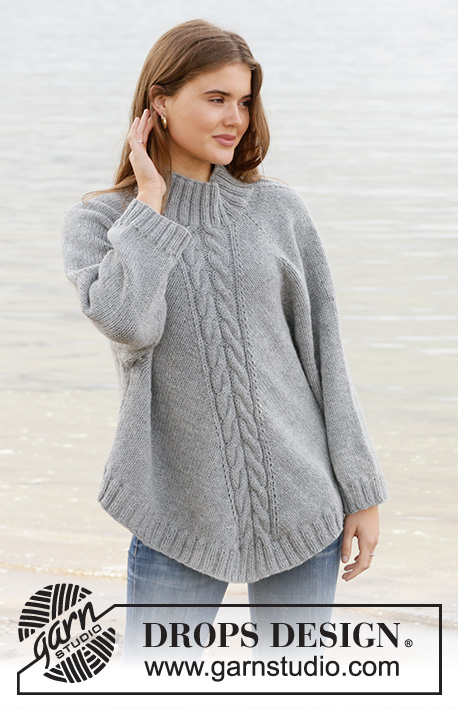
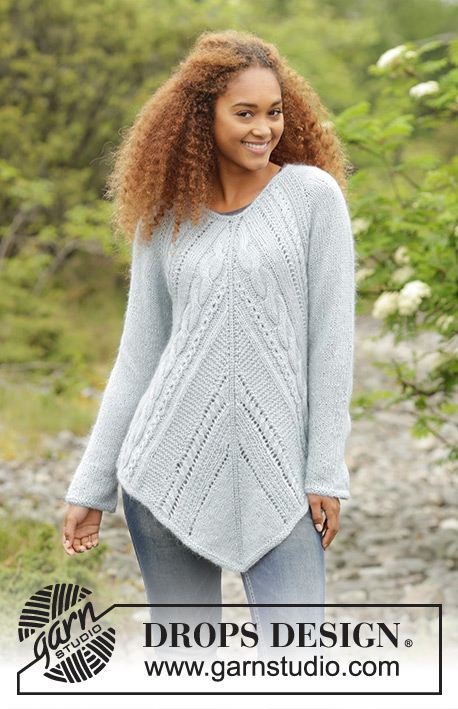
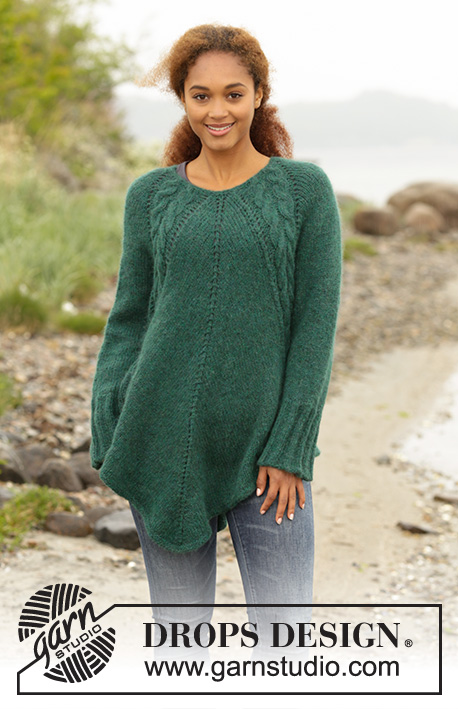
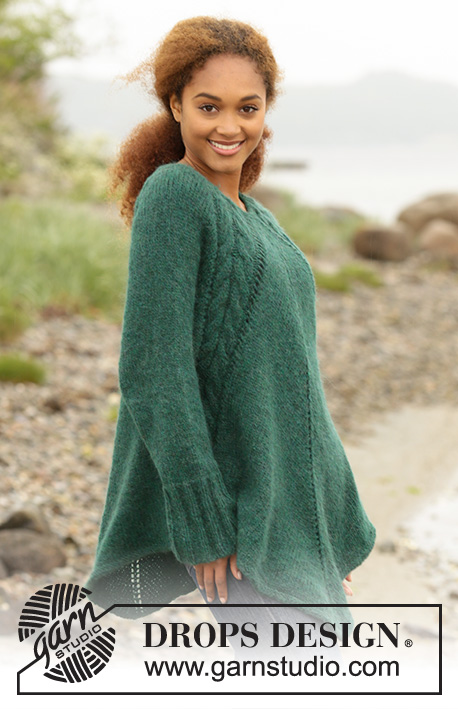
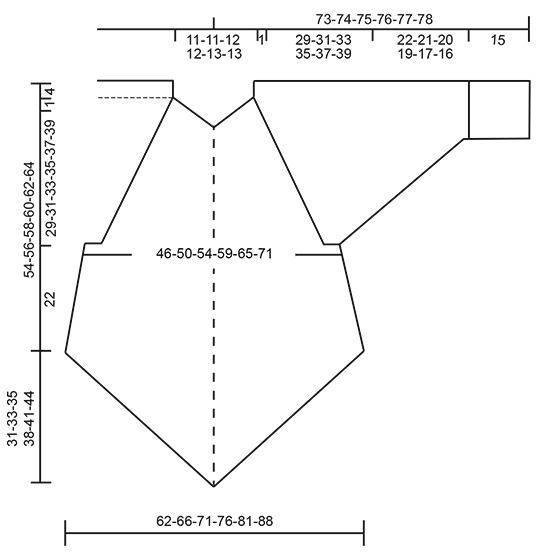
Knitted DROPS tunic with deep raglan and cables, worked top down in ”Air”. Size: S - XXXL.
DROPS 171-1 |
|||||||||||||||||||||||||
|
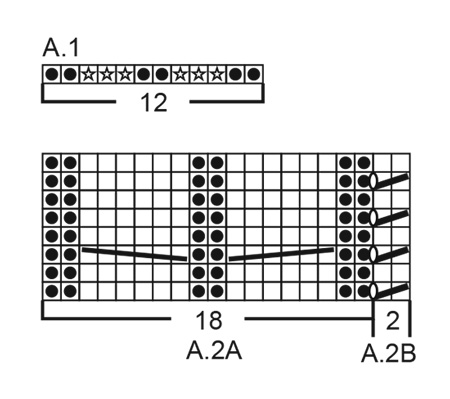
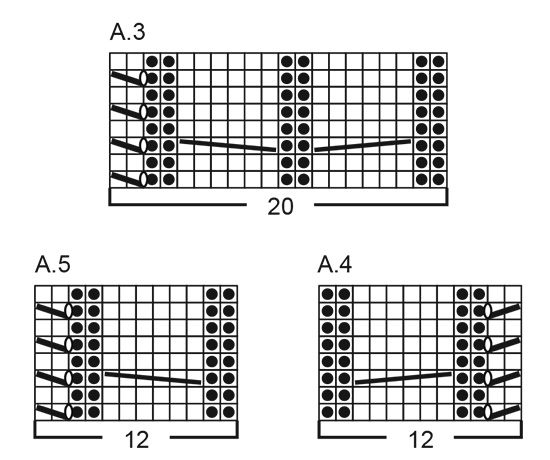
GARTER ST (worked in the round): 1 ridge = 2 rounds. * K 1 round and P 1 round *, repeat from *-*. PATTERN: See diagrams A.1 to A.5. INCREASE FOR SLEEVES: Increase 1 st in each side on each sleeve by increasing after A.2 and before A.3 (= 2 st inc on each sleeve and 4 sts in total on round). Inc 1 st by making 1 yarn over, on next round knit yarn over to make holes. INCREASE MID FRONT AND MID BACK: Increase 2 sts on each side of st with marker thread on mid front and mid back as follows: Knit until 1 st before st with marker thread, make 1 yarn over, knit 1, make 1 yarn over, knit st with marker thread, make 1 yarn over, knit 1, make 1 yarn over (= 4 sts inc mid front/mid back and 8 sts in total on round). On next round knit the 2 yarn overs closest to the st with mid-st to make holes, the outermoste 2 sts should be knit twisted to avoid holes. Increase 1 st on each side of st with marker thread on mid front and mid back as follows: Work until st with maker thread, make 1 yarn over, knit st with maker thread (mid-st), make 1 yarn over (= 2 sts inc mid front/mid back and 4 sts in total on round).On next round knit yarn overs to make holes. KNITTING TIP-1: To avoid the eye let row being interrupted while increasing for sleeves on every 4th row and not on every 2nd row as before, work as follows on the rows that previously had increases: After A.2: Make 1 yarn over, slip 1 st knitvise, knit 1 and pass slipped st over the knit st. Before A.3: Knit until 2 sts before A.3, knit 2 st tog and make 1 yarn over. KNITTING TIP-2: If you want a little less volume on body, it is possible to make some adjustments after dividing for sleeves. Decrease 2 sts mid front and mid back on i.e every 8th round as follows (decrease on a round with increases): Knit until 2 sts before st with marker (= mid-st), knit 2 tog, make 1 yarn over, knit 1 (= mid-st), make 1 yarn over, slip 1 st knitvise, knit 1 and pass slipped st over the knit st (this decrease vil give approx 8 cm less width in total at the end of body). DECREASE TIP (applies to sleeves): Beg 3 sts before marker and dec as follows: K 2 tog, K 2 (marker is in the middle of these 2 sts), slip 1 st as if to K, K 1, psso. ---------------------------------------------------------- TUNIC: Worked in the round on circular needle, top down. YOKE: Cast on 66-66-70-70-74-74 sts on a short circular needle size 4 mm with 2 strands Air. Remove 1 strand and continue with 1 strand Air as follows: Work 2 ridges in GARTER ST - see explanation above. Switch to a short circular needle size 5 mm, work next round as follows: Work A.1 (= 12 sts inc to 18 sts), 2 sts in stocking st (= sleeve), A.1 (= 12 sts inc to 18 sts), 7-7-9-9-11-11 sts in stocking st (insert 1 marker in the middle of these sts = mid front), A.1 (= 12 sts inc to 18 sts), 2 sts in stocking st (= sleeve), A.1 (= 12 sts inc to 18 sts) and 7-7-9-9-11-11 sts in stocking st (insert 1 marker in the middle of these sts = mid back) = 90-90-94-94-98-98 sts on needle. Next round work as follows: Work A.2A (= 18 sts), inc 1 st – READ INCREASE FOR SLEEVES, knit 2, inc 1 st for sleeve, work A.3 (= 20 sts), knit 0-0-1-1-2-2 s, inc 2 sts on each side of st with marker thread – READ INCREASE MID FRONT AND MID BACK, knit 0-0-1-1-2-2 sts, work A.2B (= 2 sts), work A.2A (=18 sts), inc 1 st for sleeve, knit 2 sts, inc 1 st for sleeve, work A.3 (= 20 sts), knit 0-0-1-1-2-2 sts, inc 2 sts on each side of st with marker thread (= mid back) and knit 0-0-1-1-2-2 sts and work A.2B (= 2 sts) = 102-102-106-106-110-110 sts on needle. Then work stocking st in the round with A.2 and A.3 in every transition between body and sleeves. AT THE SAME TIME continue increase for sleeves and increase mid front and mid back as follows: SLEEVES: Increase on every 2nd round 10-13-15-21-23-27 times in total (including the increase explained on firste round), then increase on every 4th round 11-11-11-9-9-8 times in total - READ KNITTING TIP-1. MID FRONT AND MID BACK : Inc 2 sts on every side of st with marker in it on every 2nd round 11-14-15-18-21-25 times in total (including the increases explained on first round). Then increase 1 st on each side of st with marker in it on every 2nd round 21-20-21-21-20-18 times in total. REMEMBER THE KNITTING TENSION! After last increase on body and sleeves there are 346-378-402-442-474-510 sts on needle. Work next round as follows: Work as before over the first 11 sts (= until middle of 2 P sts in A.2), slip the next 62-68-72-80-84-90 sts on a stitch holder (= sleeve), cast on 6-6-8-8-10-12 new sts under sleeve, work as before over the next 111-121-129-141-153-165 sts on front piece(i.e 11 st in A.3, 89-99-107-119-131-143 knit sts, 11 sts in A.2)slip the next 62-68-72-80-84-90 sts on a stitch holder (= sleeve), cast on 6-6-8-8-10-12 new sts under sleeve and work the remaining 100-110-118-130-142-154 sts on back piece as before (i.e 11 sts in A.3 and 89-99-107-119-131-143 knit sts). Finish body and sleeves separately. BODY: = 234-254-274-298-326-354 sts. Insert 1 marker in the piece. Work next round as follows: Work A.4 (12 sts), knit 4-4-6-6-8-10 sts, A.5 (=11 sts), knit until mid-st, make 1 yarn over, knit 1 (= mid-st), make 1 yarn over, knit until A.2, work A.4 (= 12 sts), knit 4-4-6-6-8-10 sts, A.5 (= 12 sts), knit until mid-st, make 1 yarn over, knit 1 (= mid-st), make 1 yarn over and knit the rest of round (= 4 sts increased). Continue pattern like this while AT THE SAME TIME continuing to increase mid front and mid back on every 2nd round until inc has been done 20 times on each side of mid front/mid back from marker - READ KNITTING TIP-2 = 314-334-354-378-406-434 sts on needle (or work until desired length). On next round work sts in each cable K tog 2 by 2 (= 12 sts dec) = 302-322-342-366-394-422 sts. Switch to circular needle size 4 mm and work 2 ridges in garter st in the round over all sts. Switch back to circular needle size 5 mm and cast off (this is done to avoid a tight cast-off edge). SLEEVE: Worked in the round on a short circular needle, switch to double pointed needles when needed. Slip the sts from stitch holder in one side of piece on a short circular needle size 5 mm and pick up 1 st in each of the 6-6-8-8-10-12 sts cast on under sleeve on body = 68-74-80-88-94-102 sts on needle. Insert 1 marker at beg of round (= mid under sleeve) - NOW MEASURE PIECE FROM HERE. Work in stocking st in the round over all sts AT THE SAME TIME on first round dec over the two cables by working sts in each cable K tog 2 by 2 (= 6 sts dec) = 62-68-74-82-88-96 sts. When piece measures 2 cm, dec 2 sts mid under sleeve - READ DECREASE TIP. Dec a total of 12-14-17-20-22-25 times in Size S: On every 4th round, in size M: On every 3rd round, in size L: Alternately on every 2nd and 3rd round, in size XL: On every other round, in size XXL: Alternately on every and every other round and size XXXL. On every round = 38-40-40-42-44-46 sts on needle. Continue to work until piece measures 22-21-20-19-17-16 cm (NOTE: Shorter measurements in the larger sizes because of wider shoulders). K 1 round while AT THE SAME TIME inc 7-10-10-8-11-9 sts evenly = 45-50-50-50-55-55 sts. Switch to double pointed needles size 4 mm and work rib in the round = K 2/P 3. When rib measures 15 cm, switch back to double pointed needles size 5 mm before casting off with K over K and P over P (this is done to avoid a tight cast-off edge). Work the other sleeve the same way. |
|||||||||||||||||||||||||
Diagram explanations |
|||||||||||||||||||||||||
|
|||||||||||||||||||||||||
 |
|||||||||||||||||||||||||
 |
|||||||||||||||||||||||||
 |
|||||||||||||||||||||||||
Have you finished this pattern?Tag your pictures with #dropspattern #emeraldqueensweater or submit them to the #dropsfan gallery. Do you need help with this pattern?You'll find 26 tutorial videos, a Comments/Questions area and more by visiting the pattern on garnstudio.com. © 1982-2026 DROPS Design A/S. We reserve all rights. This document, including all its sub-sections, has copyrights. Read more about what you can do with our patterns at the bottom of each pattern on our site. |
|||||||||||||||||||||||||


With over 40 years in knitting and crochet design, DROPS Design offers one of the most extensive collections of free patterns on the internet - translated to 17 languages. As of today we count 324 catalogues and 12290 patterns translated into English (UK/cm). 12290
We work hard to bring you the best knitting and crochet have to offer, inspiration and advice as well as great quality yarns at incredible prices! Would you like to use our patterns for other than personal use? You can read what you are allowed to do in the Copyright text at the bottom of all our patterns. Happy crafting!
Post a comment to pattern DROPS 171-1
We would love to hear what you have to say about this pattern!
If you want to leave a question, please make sure you select the correct category in the form below, to speed up the answering process. Required fields are marked *.