DROPS Children 49 · Lots of new kid designs!
Product image DROPS Polaris yarn
DROPS Polaris
100% Wool
from 9.00 BGN /100g
Get the yarn to make this pattern from 90.00BGN.

The yarn cost is calculated from the pattern’s smallest size and the yarn’s cheapest product type. Looking for an even better price? You might find it on the DROPS Deals!

DROPS AW2425

Earthling

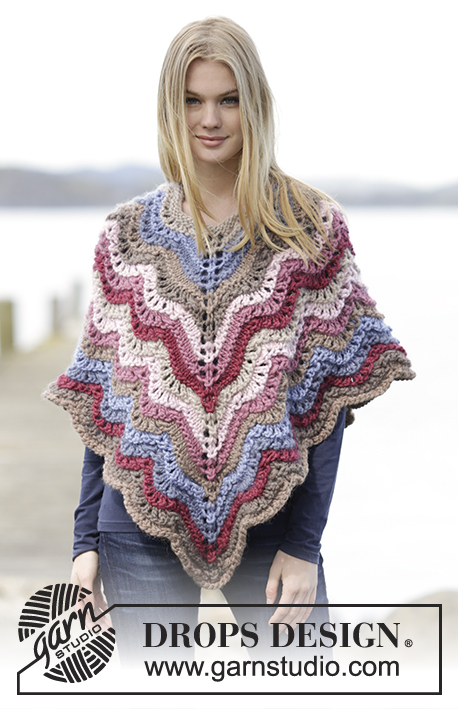
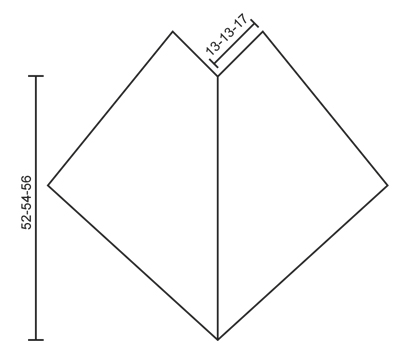
Knitted DROPS poncho with hood and fringes, worked top down in ”Polaris”. Size: S - XXXL.

DROPS Extra 0-1221
DROPS design: Pattern no po-078
Yarn group F or E + E
----------------------------------------------------------
Size: S/M - L/XL - XXL/ XXXL
Length mid front: approx. 52 - 54 - 56 cm (without fringes)
Materials:
DROPS POLARIS from Garnstudio
1000-1100-1300 g colour no 06, light beige

DROPS CIRCULAR NEEDLE (80 cm) SIZE 15 mm - or size needed to get 7 sts x 8 rounds in stocking st = 10 x 10 cm.

-------------------------------------------------------

Alternative Yarn – See how to change yarns here
Yarn Groups A to F – Use the same pattern and change the yarn here
Yarn usage using an alternative yarn – Use our yarn converter here

-------------------------------------------------------

You might also like...

Product image DROPS Polaris
DROPS Polaris
100% Wool
from 9.00 BGN /100g
Get the yarn to make this pattern from 90.00BGN.

The yarn cost is calculated from the pattern’s smallest size and the yarn’s cheapest product type. Looking for an even better price? You might find it on the DROPS Deals!

Pattern instructions

INCREASE TIP:
Inc 1 st on each side of st with marker
Inc by making 1 YO - work YOs into rib.

RIB TIP:
To avoid the rib contracting the piece K 1 round over all sts after every 5th round with rib (adjust so that this is a round without inc).

GARTER ST (back and forth):
K all rows. 1 ridge = 2 rows K.

FRINGE TIP:
To make the fringes hang nicely on garment they should be moistened, shaken and dried before they are tied on.

TIP FOR CHANGING YARN:
When switching ball with Polaris, split the old strand in two on the last 15 cm – cut off one part, do the same on the new strand. Place the first and last 15 cm on top of each other so that the yarn is the normal thickness and continue to work – this is done to make the strand switch invisible in the yarn.
----------------------------------------------------------

PONCHO:
Worked in the round on circular needle from top down.
Cast on 36-36-48 sts on circular needle size 15 mm with Polaris. P 1 round, K 1 round, P 1 round and K 2 round. Insert 1 marker in 10th-10th-13th and in 28th-28th-37th st on needle (= mid front and mid back).
Work rib (= K 1/P 2) on round and inc 1 st on each side of K st with marker mid front and mid back – READ INCREASE TIP (= 4 sts inc). Continue rib - READ RIB TIP and repeat inc every other round - NOTE: Work the inc sts into rib, i.e. work the first K, work the next 2 P, work the next K and work the next 2 P etc. REMEMBER THE KNITTING TENSION AND READ TIP FOR CHANGING YARN. When poncho measures approx. 50-52-54 cm from neck (measures along mid front), K 1 round over all sts (inc mid front and mid back as before). P 1 round and then LOOSELY cast off with K while AT THE SAME TIME inc mid front and mid back as before (cast off the inc sts as regular sts).

HOOD:
Beg from RS mid front after st with marker and pick up 1 st in every st around the neck on circular needle size 15 mm with Polaris (do not work in st with marker mid front) = 35-35-47 sts on needle. K 3 rows back and forth and inc 5 sts evenly on 2nd row (= from RS) = 40-40-52 sts. Then work in stocking st with 2 sts in GARTER ST - see explanation above, in each side towards mid front until hood measures approx. 36-37-38 cm. Loosely cast off and sew hood tog at the top with grafting/kitchener sts.

FRINGES:
Fasten fringes in every other st along cast-off edge on poncho as follows - READ FRINGE TIP. Cut 1 strand Polaris of 40 cm, fold it double and pull the loop through a st and then pull yarn ends through the loop.

Diagram

Diagram measurements for DROPS Extra 0-1221
Do you have a question? See a list of frequently asked questions (FAQ)

Knitting tension is what determines the final measurements of your work, and is usually measured per 10 x 10 cm. It is provided like so: number of stitches in width x number of rows in height - eg: 19 stitches x 26 rows = 10 x 10 cm.

The knitting tension is very individual; some people knit/crochet loosely while others work tightly. You adjust the knitting tension with the needle size, which is why the suggested needle size is only meant as a guide! You need to adjust this (up or down) to ensure that YOUR knitting tension matches the knitting tension provided in the pattern. If you work with a different knitting tension than provided you will have a different yarn consumption, and your work will have different measurements than what the pattern suggests.

The knitting tension also determines which yarns can replace each other. As long as you achieve the same knitting tension you can replace one yarn with another.

See DROPS lesson: How to measure your tension/gauge

See DROPS video: How to make a gauge tension swatch

The required amount of yarn is provided in grams, eg: 450 g. To calculate how many balls you’ll need you first need to know how many grams are in 1 ball (25g, 50g or 100g). This information is available if you click on the individual yarn quality on our pages. Divide the amount required with the amount of each ball. For example, if each ball is 50g (the most common amount), the calculation will be as follows: 450 / 50 = 9 balls.

The important thing when changing from one yarn to another is that the knitting/crochet tension remains the same. This is so that the measurements of the finished piece will be the same as on the sketch provided. It is easier to achieve the same knitting tension using yarns from the same yarn group. It is also possible to work with multiple strands of a thinner yarn to achieve the knitting tension of a thicker one. Please try our yarn converter. We recommend you to always work a test swatch.

Please NOTE: when changing yarn the garment might have a different look and feel to the garment in the photo, due to individual properties and qualities of each yarn.

See DROPS lesson: Can I use a different yarn than the one mentioned in the pattern?

All our yarns are categorised into yarn groups (from A to F) according to thickness and knitting tension – group A contains the thinnest yarns and group F the thickest. This makes it easier for you to find alternative yarns to our patterns, should you wish to switch yarn. All yarns within the same group have a similar knitting tension and can easily replace each other. However, different yarn qualities have different structures and properties which will give the finished work a unique look and feel.

Click here for an overview of the yarns in each yarn group

At the top of all our patterns you’ll find a link to our yarn calculator, which is a helpful tool should you wish to use a different yarn than suggested. By filling in the yarn quality you wish to replace, the amount (in your size) and number of strands, the calculator will present good alternative yarns with the same knitting tension. Additionally it will tell you how much you’ll require in the new qualities and whether you’ll need to work with multiple strands. Most skeins are 50g (some are 25g or 100g).

If the pattern is worked with multiple colours, every colour will have to be calculated separately. Similarly, if the pattern is worked with several strands of different yarns (for example 1 strand Alpaca and 1 strand Kid-Silk) you will have to find alternatives for each, individually.

Click here to see our yarn calculator

Since different yarns have different qualities and textures we have chosen to keep the original yarn in our patterns. However, you can easily find options among our available qualities by using our yarn calculator, or simply pick a yarn from the same yarn group.

It is possible that some retailers still have discontinued yarns in stock, or that someone has a few skeins at home that they would like to find patterns for.

The yarn calculator will provide both alternative yarn as well as required amount in the new quality.

If you think it's hard to decide what size to make, it can be a good idea to measure a garment you own already and like the size of. Then you can pick the size by comparing those measures with the ones available in the pattern's size chart.

You'll find the size chart at the bottom of the pattern.

See DROPS lesson: How to read size chart

The needle size provided in the pattern serves only as a guide, the important thing is to follow the knitting tension. And since knitting tension is very individual, you will have to adjust the needle size to ensure that YOUR tension is the same as in the pattern – maybe you’ll have to adjust 1, or even 2 needle sizes, up or down to achieve the correct tension. For this, we recommend that you work test swatches.

Should you work with a different knitting tension than the one provided, the measurements of the finished garment might deviate from the measurement sketch.

See DROPS lesson: How to measure your tension/gauge

See DROPS video: How to make a tension/gauge swatch

Working a garment top-down provides more flexibility and room for personal adjustment. For example it is easier to try the garment on while working, as well as making adjustments to length of yoke and shoulder caps.

The instructions are carefully explaining every step, in the correct order. Diagrams are adjusted to the knitting direction and are worked as usual.

The diagram depicts all rows/rounds, and every stitch seen from the right side. It is read from bottom to top, from right to left. 1 square = 1 stitch.

When working back and forth, every other row is worked from the right side and every other row is worked from the wrong side. When working from the wrong side, the diagram will have to be worked reversed: from left to right, knit stitches are purled, purl stitches are knit etc.

When working in the round every round is worked from the right side and the diagram are worked from right to left on all rounds.

See DROPS lesson: How to read knitting diagrams

The diagram depicts all rows/rounds, and every stitch seen from the right side. It is worked from bottom to top, from right to left.

When working back and forth every other row is worked from the right side: from right to left and every other row is worked from the wrong side: from left to right.

When working in the round, every row in the diagram are worked from the right side, from right to left.

When working a circular diagram you start in the middle and work your way outwards, counter clockwise, row by row.

The rows usually start with a given number of chain stitches (equivalent to the height of the following stitch), this will either be depicted in the diagram or explained in the pattern.

See DROPS lesson: How to read crochet diagrams

Instructions for working several diagrams after each other on the same row/round, will often be written like so: “work A.1, A.2, A.3 a total of 0-0-2-3-4 times". This means you work A.1 once, then A.2 is worked once, and A.3 is repeated (in width) the number of times provided for your size – in this case like so: S = 0 times, M = 0 times, L=2 times, XL= 3 times and XXL = 4 times.

The diagrams are worked as usual: begin with the first row in A.1, then work the first row in A.2 etc.

See DROPS lesson: How to read knitting diagrams

See DROPS lesson: How to read crochet diagrams

The total width of the garment (from wrist-to-wrist) will be larger in the larger sizes, despite the actual sleeves being shorter. The larger sizes have longer sleeve caps and wider shoulders, so there will be a good fit in all sizes.

The measurement sketch/schematic drawing provides information regarding the full length of the garment. If it’s a jumper or a jacket the length is measured from the highest point on the shoulder closest to the neckline, and straight down to the bottom of the garment. It is NOT measured from the tip of shoulder. Similarly, the length of yoke is measured from the highest point on the shoulder and down to where yoke is split into body and sleeves.

On a jacket measures are never taken along bands, unless specifically stated. Always measure inside band stitches when measuring the length.

See DROPS lesson: How to read a schematic drawing

Diagrams are often repeated on the round or in height. 1 repeat is the diagram the way it appears in the pattern. If it says to work 5 repeats of A.1 in the round, then you work A.1 a total of 5 times after/next to each other in the round. If it says to work 2 repeats of A.1 vertically/in height you work the entire diagram once, then begin again at the start and work the entire diagram one more time.

Chain stitches are slightly narrower than other stitches and to avoid working the cast-on edge too tight, we simply chain more stitches to begin with. The stitch count will be adjusted on the following row to fit the pattern and measurement sketch.

The rib edge is more elastic and will contract slightly compared to, for example, stocking stitch. By increasing before the rib edge, you avoid a visible difference in width between the rib edge and the rest of the body.

It’s very easy to cast off too tightly, and by making yarn overs while casting off (and simultaneously casting these off) you avoid a too tight cast off edge.

See DROPS video: How to bind off with yarn overs (yo)

To achieve an even increase (or decrease) you can increase on, for example: every 3rd and 4th row alternately, like so: work 2 rows and increase on the 3rd row, work 3 rows and increase on the 4th. Repeat this until the increase is complete.

See DROPS lesson: Increase or decrease 1 st on every 3rd and 4th row alternately

Should you prefer to work in the round instead of back and forth, you may of course adjust the pattern. You’ll need to add steeks mid-front (usually 5 stitches), and follow the instructions. When you would normally turn and work from the wrong side, simply work across the steek and continue in the round. At the end you’ll cut the piece open, pick up stitches to work bands, and cover the cut edges.

See DROPS video: How to knit steeks and cut open

Should you prefer to work back and forth instead of in the round, you may of course adjust the pattern so you work the pieces separately and then assemble them at the end. Divide the stitches for the body in 2, add 1 edge stitch in each side (for sewing) and work the front and back pieces separately.

See DROPS lesson: Can I adapt a pattern for circular needles into straight needles?

Pattern repeats can vary slightly in the different sizes, in order to get the correct proportions. If you’re not working the exact same size as the garment in the photo, yours might deviate slightly. This has been carefully developed and adjusted so that the complete impression of the garment is the same in all sizes.

Make sure to follow instructions and diagrams for your size!

If you have found a pattern you like which is available in women’s size it’s not very difficult to convert it to men’s size. The biggest difference will be the length of sleeves and body. Start working on the women size that you think would fit across the chest. The additional length will be worked right before you cast off for the armhole/sleeve cap. If the pattern is worked top-down you can add the length right after the armhole or before the first decrease on sleeve.

Regarding additional yarn amount, this will depend on how much length you add, but it is better with a skein too many than too few.

All yarns will have excess fibres (from production) that might come off as lint or shedding. Brushed yarns (ie hairier yarns) have more of these loose, excess fibres, causing more shedding.

Shedding also depends on what is worn under or over the garment, and whether this pulls at the yarn fibres. It’s therefore not possible to guarantee that there will be no shedding

Below are some tips on how to get the best result when working with hairier yarns:

1. When the garment is finished (before you wash it) shake it vigorously so the looser hairs come off. NOTE: do NOT use a lint roller, brush or any method that pulls at the yarn.

2. Place the garment in a plastic bag and put it in your freezer - the temperature will cause the fibres to become less attached to each other, and excess fibres will come off easier.

3. Leave in the freezer for a few hours before taking it out and shaking it again.

4. Wash the garment according to the instructions on the yarn label.

Pilling is a natural process that happens to even the most exclusive of fibers. It's a natural sign of wear and tear that is hard to avoid, and that is most visible in high friction areas of your garment like a sweater's arms and cuffs.

You can make your garment look as new by removing the pilling, using a fabric comb or a pill/lint remover.

Still can't find the answer you need? Then scroll down and leave your question so one of our experts can try to help you. This will be done normally within 5 to 10 working days.
In the meantime, you can read the questions and answers that others have left to this pattern or join the DROPS Workshop on Facebook to get help from fellow knitters/crocheters!
Have you finished this pattern?
Tag your pictures with #dropspattern or submit them to the #dropsfan gallery.

Post a comment to pattern DROPS Extra 0-1221

We would love to hear what you have to say about this pattern!

If you want to leave a question, please make sure you select the correct category in the form below, to speed up the answering process. Required fields are marked *.

Comments / Questions (16)

country flag Lene Bang wrote:

Det ville være fint om opskriften angav hvor meget garn der går til hætten. Ellers en fed opskrift

22.08.2019 - 12:17

country flag Sarah wrote:

Ich bin jetzt soweit fertig mit dem "Körper". Ich bin ziemlich groß, deswegen hab ich noch einige Runden mehr gestrickt, passt ganz gut:) Jetzt habe ich noch 1,5 Knäuel Wolle übrig. Reicht das für die Kapuze? Wie viel Wolle brauche ich noch dafür? Imsgesamt ein sehr schöner Poncho, ich freue mich schon den im Herbst/Winter tragen zu können:)

29.06.2019 - 19:02

DROPS Design answered:

Liebe Sarah, leider haben wir nur die gesamte Garnmenge für die gegebene Maßen, gerne können Sie Kontakt mit Ihrem Laden auf - auch telefonisch oder per E-mail, sie werden Ihnen gerne wal weiterhelfen. Viel Spaß beim stricken!

01.07.2019 - 07:00

Cinzia wrote:

I have the same problem Anna has. I cannot keep the rib pattern by increasing 4 stitches. Anna, did you resolve it? Sorry I am not an expert. What am I missing ?

18.03.2017 - 22:52

DROPS Design answered:

Dear Cinzia, you have to work the inc sts in rib as before so that the rib will continue as before and you should always keep K1/P2. Mid st is a K st, on 1st inc, you will have to work the YOs K, then on next 2 inc work the YOs P (= you will have P2, K1, P2, mid st K, P2, K1, P2) and continue this way. Happy knitting!

20.03.2017 - 09:36

country flag Anna wrote:

Hello, I'm having a bit of trouble keeping the rib aligned, because the rib pattern is 3 stitches, while we increase by 4 every inc row. So the stitches with the markers don't stay K. Also, am I supposed to K/P the inc stitches the same every time? (K,PP,K). Thank you!

14.11.2016 - 17:30

DROPS Design answered:

Dear Anna, correct, inc sts on each side of the middle st on mid front and mid back should be worked in rib so that rib patterns continues. Happy knitting!

15.11.2016 - 09:04

country flag Regina Reifferscheid wrote:

Frage: Wie stricke ich GENAU das Rippenmuster bei den Zugaben? Komme nicht klar! Die markierte vordere und hintere Masche wird doch IMMER rechts gestrickt, oder und wie bringe ich da die Reihenfolge 1M re/ 2M li ein? Ich verstehe auch nicht, das nach jeder 5 Rippenmuster Rd, 1Rd. rechts gestrickt wird, da ich es auf dem Bild absolut nicht erkennen kann! Diese Anleitung ist leider sehr unübersichtlich. Würde mich sehr über eine genaue Erläuterung freuen ! Viele Grüße

03.10.2016 - 16:03

DROPS Design answered:

Liebe Frau Reifferscheid, Sie müssen die Bündchen so stricken: 1 M re/2 M li über die 9-9-12 ersten M, dann 1 M re (= Markierer), 2 M li/1 M re über die nächsten 17-17-23 M, 1 M re (= Markierer), 2 M li/1 M re über die letzten 8-8-11 M. Dann jede 5. Rd muss man 1 Rd re stricken so dass die Bündchen nicht so "eng" sind (so sichtlich ist es auch nicht).

03.10.2016 - 16:54

country flag Celia wrote:

¿Para tallas grandes xxl, como puedo sacar el patrón?es la primera vez que voy ha hacer uno y no se calcularlo. Si me resolvieran esta duda, estaría muy agradecida. Gracias y un saludo.

13.08.2016 - 19:26

DROPS Design answered:

Hola Celia, para la talla XXL tienes que mirar el último de los números cuando te indican los puntos que debes hacer. Por ejemplo, 36-36-38, tendrías que hacer el 38. Sin embargo si hay solo un número, ese es para todas las tallas.

14.08.2016 - 11:59