DROPS Polaris
DROPS Polaris
100% vlna
od 121.00 Kč /100g
Přízi na tento model můžete mít už za 1210.00Kč.

Cenu za klubka počítáme podle spotřeby při výrobě modelu v nejmenší velikosti a nejlevnější variantě příze. Rádi byste ještě lepší cenu? Třeba ji najdete mezi DROPS Deals!

Earthling

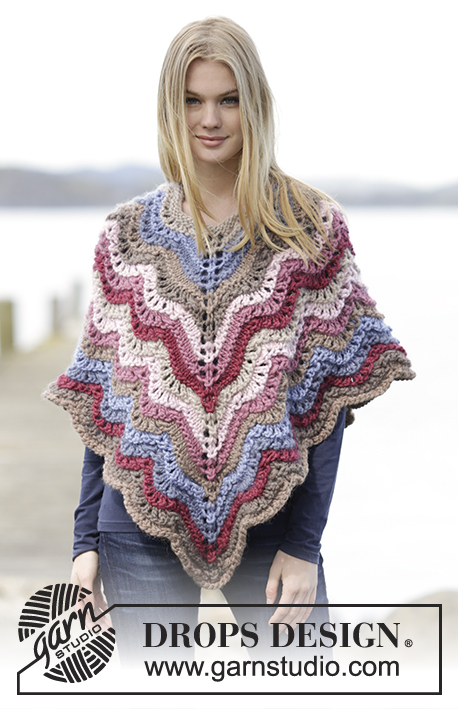
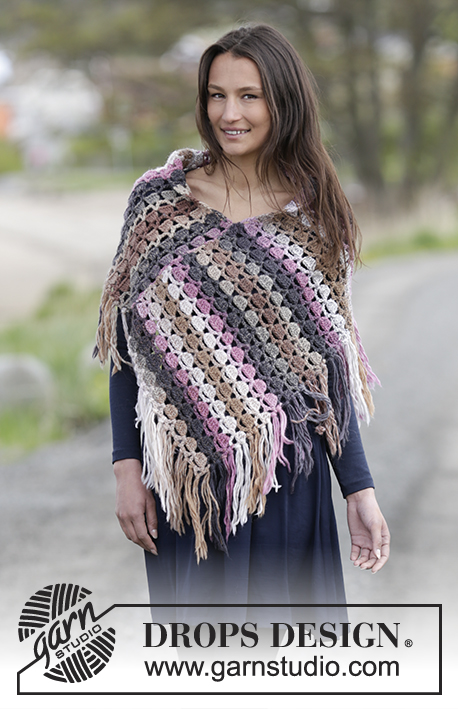
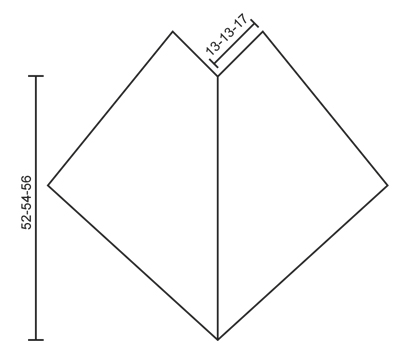
DROPS pončo s kapucí a třásněmi pletené shora dolů z příze "Polaris". Velikost: S-XXXL.

DROPS Extra 0-1221
DROPS design: model č. po-078
Skupina přízí: F nebo E + E
-----------------------------------------------------------

Velikost: S/M – L/XL – XXL/XXXL
Délka přední strany (v cípu): asi 52-54-56 cm (bez třásní)

Materiál: DROPS POLARIS firmy Garnstudio
1000-1100-1300 g, barva č.06, béžová

DROPS KRUHOVÁ JEHLICE (80 cm) č. 15 – nebo velikosti potřebné k upletení zkušebního vzorku o rozměrech 7 ok x 8 kruhových řad lícovým žerzejem = 10 x 10 cm.

-------------------------------------------------------

Náhradní příze – Podívejte se, jak změnit přízi
Skupina přízí A až F – Neměňte návod, změňte přízi
Spotřeba příze při použití náhradní příze – Využijte náš převodník

-------------------------------------------------------

DROPS Polaris
DROPS Polaris
100% vlna
od 121.00 Kč /100g
Přízi na tento model můžete mít už za 1210.00Kč.

Cenu za klubka počítáme podle spotřeby při výrobě modelu v nejmenší velikosti a nejlevnější variantě příze. Rádi byste ještě lepší cenu? Třeba ji najdete mezi DROPS Deals!

DROPS Super Sale

SAVE 30% on 6 cotton favourites!
Platí do 12.04.2024

Návod

TIP - PŘIDÁVÁNÍ:
Přidáme 1 oko na každé straně označeného oka. Přidáváme nahozením – nahození zapracujeme do pružného vzoru.

TIP – PRUŽNÝ VZOR:
Aby pružný vzor pleteninu nestahoval, upleteme nad všemi oky po každé 5. řadě pružným vzorem (měla by to být kruhová řada bez přidávání) 1 kruhovou řadu hladce.

VROUBKOVÝ VZOR:
Pleteme stále hladce, lícové i rubové řady. 1 vroubek = 2 řady hladce.

TIP - TŘÁSNĚ:
Aby byly třásně úhledné a srovnané, vlákna příze před navázáním navlhčíme, protřepeme a necháme proschnout.
----------------------------------------------------------

PONČO:
Pleteme v kruhových řadách shora dolů.
Na kruhovou jehlici č.15 nahodíme přízí Polaris 36-36-48 ok a upleteme 1 kruhovou řadu obrace, 1 hladce, 1 obrace a 2 hladce. Označíme si 10.-10.-13. a 28.-28.-37. oko na jehlici (= středové oko na přední a na zadní straně).
Pleteme pružným vzorem 1/2 (tj. střídáme 1 oko hladce, 2 obrace) v kruhových řadách a SOUČASNĚ přidáme 1 oko na každé straně označeného oka uprostřed přední i zadní strany ponča – viz TIP - PŘIDÁVÁNÍ (= přidáme 4 oka). Takto pokračujeme - viz TIP – PRUŽNÝ VZOR, přidávání opakujeme v každé 2. kruhové řadě; POZN.: přidaná oka zapracujeme do pružného vzoru, tj. první přidané oko pleteme hladce, další 2 obrace, následující hladce, další 2 obrace, atd. Ve výšce asi 50-52-54 cm (měřeno od průkrčníku podél středového oka na předním dílu), upleteme 1 kruhovou řadu hladce nad všemi oky (uprostřed přední i zadní strany přidáváme jako dosud). Pak upleteme 1 kruhovou řadu obrace a poté všechna oka VOLNĚ hladce uzavřeme; SOUČASNĚ přidáme uprostřed přední i zadní strany jako dosud (přidané oko hned i uzavřeme).

KAPUCE:
Kruhovou jehlicí č.15 nabereme přízí Polaris z lícové strany po 1 oku z každého oka okraje průkrčníku – začínáme uprostřed přední strany ponča, za označeným okem (z označeného oka na přední straně nové oko NEnabíráme) = na jehlici máme 35-35-47 ok. Upleteme v řadách 3 řady hladce a SOUČASNĚ ve 2. řadě (= lícové) přidáme rovnoměrně 5 ok = 40-40-52 ok. Pokračujeme lícovým žerzejem se 2 oky vroubkovým vzorem – viz výše - na každé straně (tj. podél výstřihu na přední straně ponča), a to až do výše asi 36-37-38 cm. Pak všechna oka volně uzavřeme a horní okraj kapuce sešijeme, nejlépe pletacím stehem.


TŘÁSNĚ:
Třásně navazujeme do každého druhého oka podél celého dolního okraje, takto: ustřihneme si 1 vlákno příze dlouhé 40 cm, přeložíme je napolovic a vzniklou smyčku protáhneme okem; smyčkou pak provlečeme konce příze a stáhneme - viz TIP – TŘÁSNĚ.

Schéma

diagram measurements
Chcete se na něco zeptat? Projděte si seznam nejčastějších otázek (FAQ).

Knitting tension is what determines the final measurements of your work, and is usually measured per 10 x 10 cm. It is provided like so: number of stitches in width x number of rows in height - eg: 19 stitches x 26 rows = 10 x 10 cm.

The knitting tension is very individual; some people knit/crochet loosely while others work tightly. You adjust the knitting tension with the needle size, which is why the suggested needle size is only meant as a guide! You need to adjust this (up or down) to ensure that YOUR knitting tension matches the knitting tension provided in the pattern. If you work with a different knitting tension than provided you will have a different yarn consumption, and your work will have different measurements than what the pattern suggests.

The knitting tension also determines which yarns can replace each other. As long as you achieve the same knitting tension you can replace one yarn with another.

See DROPS lesson: How to measure your tension/gauge

See DROPS video: How to make a gauge tension swatch

The required amount of yarn is provided in grams, eg: 450 g. To calculate how many balls you’ll need you first need to know how many grams are in 1 ball (25g, 50g or 100g). This information is available if you click on the individual yarn quality on our pages. Divide the amount required with the amount of each ball. For example, if each ball is 50g (the most common amount), the calculation will be as follows: 450 / 50 = 9 balls.

The important thing when changing from one yarn to another is that the knitting/crochet tension remains the same. This is so that the measurements of the finished piece will be the same as on the sketch provided. It is easier to achieve the same knitting tension using yarns from the same yarn group. It is also possible to work with multiple strands of a thinner yarn to achieve the knitting tension of a thicker one. Please try our yarn converter. We recommend you to always work a test swatch.

Please NOTE: when changing yarn the garment might have a different look and feel to the garment in the photo, due to individual properties and qualities of each yarn.

See DROPS lesson: Can I use a different yarn than the one mentioned in the pattern?

All our yarns are categorised into yarn groups (from A to F) according to thickness and knitting tension – group A contains the thinnest yarns and group F the thickest. This makes it easier for you to find alternative yarns to our patterns, should you wish to switch yarn. All yarns within the same group have a similar knitting tension and can easily replace each other. However, different yarn qualities have different structures and properties which will give the finished work a unique look and feel.

Click here for an overview of the yarns in each yarn group

At the top of all our patterns you’ll find a link to our yarn calculator, which is a helpful tool should you wish to use a different yarn than suggested. By filling in the yarn quality you wish to replace, the amount (in your size) and number of strands, the calculator will present good alternative yarns with the same knitting tension. Additionally it will tell you how much you’ll require in the new qualities and whether you’ll need to work with multiple strands. Most skeins are 50g (some are 25g or 100g).

If the pattern is worked with multiple colours, every colour will have to be calculated separately. Similarly, if the pattern is worked with several strands of different yarns (for example 1 strand Alpaca and 1 strand Kid-Silk) you will have to find alternatives for each, individually.

Click here to see our yarn calculator

Since different yarns have different qualities and textures we have chosen to keep the original yarn in our patterns. However, you can easily find options among our available qualities by using our yarn calculator, or simply pick a yarn from the same yarn group.

It is possible that some retailers still have discontinued yarns in stock, or that someone has a few skeins at home that they would like to find patterns for.

The yarn calculator will provide both alternative yarn as well as required amount in the new quality.

If you think it's hard to decide what size to make, it can be a good idea to measure a garment you own already and like the size of. Then you can pick the size by comparing those measures with the ones available in the pattern's size chart.

You'll find the size chart at the bottom of the pattern.

See DROPS lesson: How to read size chart

The needle size provided in the pattern serves only as a guide, the important thing is to follow the knitting tension. And since knitting tension is very individual, you will have to adjust the needle size to ensure that YOUR tension is the same as in the pattern – maybe you’ll have to adjust 1, or even 2 needle sizes, up or down to achieve the correct tension. For this, we recommend that you work test swatches.

Should you work with a different knitting tension than the one provided, the measurements of the finished garment might deviate from the measurement sketch.

See DROPS lesson: How to measure your tension/gauge

See DROPS video: How to make a tension/gauge swatch

Working a garment top-down provides more flexibility and room for personal adjustment. For example it is easier to try the garment on while working, as well as making adjustments to length of yoke and shoulder caps.

The instructions are carefully explaining every step, in the correct order. Diagrams are adjusted to the knitting direction and are worked as usual.

The diagram depicts all rows/rounds, and every stitch seen from the right side. It is read from bottom to top, from right to left. 1 square = 1 stitch.

When working back and forth, every other row is worked from the right side and every other row is worked from the wrong side. When working from the wrong side, the diagram will have to be worked reversed: from left to right, knit stitches are purled, purl stitches are knit etc.

When working in the round every round is worked from the right side and the diagram are worked from right to left on all rounds.

See DROPS lesson: How to read knitting diagrams

The diagram depicts all rows/rounds, and every stitch seen from the right side. It is worked from bottom to top, from right to left.

When working back and forth every other row is worked from the right side: from right to left and every other row is worked from the wrong side: from left to right.

When working in the round, every row in the diagram are worked from the right side, from right to left.

When working a circular diagram you start in the middle and work your way outwards, counter clockwise, row by row.

The rows usually start with a given number of chain stitches (equivalent to the height of the following stitch), this will either be depicted in the diagram or explained in the pattern.

See DROPS lesson: How to read crochet diagrams

Instructions for working several diagrams after each other on the same row/round, will often be written like so: “work A.1, A.2, A.3 a total of 0-0-2-3-4 times". This means you work A.1 once, then A.2 is worked once, and A.3 is repeated (in width) the number of times provided for your size – in this case like so: S = 0 times, M = 0 times, L=2 times, XL= 3 times and XXL = 4 times.

The diagrams are worked as usual: begin with the first row in A.1, then work the first row in A.2 etc.

See DROPS lesson: How to read knitting diagrams

See DROPS lesson: How to read crochet diagrams

The total width of the garment (from wrist-to-wrist) will be larger in the larger sizes, despite the actual sleeves being shorter. The larger sizes have longer sleeve caps and wider shoulders, so there will be a good fit in all sizes.

The measurement sketch/schematic drawing provides information regarding the full length of the garment. If it’s a jumper or a jacket the length is measured from the highest point on the shoulder closest to the neckline, and straight down to the bottom of the garment. It is NOT measured from the tip of shoulder. Similarly, the length of yoke is measured from the highest point on the shoulder and down to where yoke is split into body and sleeves.

On a jacket measures are never taken along bands, unless specifically stated. Always measure inside band stitches when measuring the length.

See DROPS lesson: How to read a schematic drawing

Diagrams are often repeated on the round or in height. 1 repeat is the diagram the way it appears in the pattern. If it says to work 5 repeats of A.1 in the round, then you work A.1 a total of 5 times after/next to each other in the round. If it says to work 2 repeats of A.1 vertically/in height you work the entire diagram once, then begin again at the start and work the entire diagram one more time.

Chain stitches are slightly narrower than other stitches and to avoid working the cast-on edge too tight, we simply chain more stitches to begin with. The stitch count will be adjusted on the following row to fit the pattern and measurement sketch.

The rib edge is more elastic and will contract slightly compared to, for example, stocking stitch. By increasing before the rib edge, you avoid a visible difference in width between the rib edge and the rest of the body.

It’s very easy to cast off too tightly, and by making yarn overs while casting off (and simultaneously casting these off) you avoid a too tight cast off edge.

See DROPS video: How to bind off with yarn overs (yo)

To achieve an even increase (or decrease) you can increase on, for example: every 3rd and 4th row alternately, like so: work 2 rows and increase on the 3rd row, work 3 rows and increase on the 4th. Repeat this until the increase is complete.

See DROPS lesson: Increase or decrease 1 st on every 3rd and 4th row alternately

Should you prefer to work in the round instead of back and forth, you may of course adjust the pattern. You’ll need to add steeks mid-front (usually 5 stitches), and follow the instructions. When you would normally turn and work from the wrong side, simply work across the steek and continue in the round. At the end you’ll cut the piece open, pick up stitches to work bands, and cover the cut edges.

See DROPS video: How to knit steeks and cut open

Should you prefer to work back and forth instead of in the round, you may of course adjust the pattern so you work the pieces separately and then assemble them at the end. Divide the stitches for the body in 2, add 1 edge stitch in each side (for sewing) and work the front and back pieces separately.

See DROPS lesson: Can I adapt a pattern for circular needles into straight needles?

Pattern repeats can vary slightly in the different sizes, in order to get the correct proportions. If you’re not working the exact same size as the garment in the photo, yours might deviate slightly. This has been carefully developed and adjusted so that the complete impression of the garment is the same in all sizes.

Make sure to follow instructions and diagrams for your size!

If you have found a pattern you like which is available in women’s size it’s not very difficult to convert it to men’s size. The biggest difference will be the length of sleeves and body. Start working on the women size that you think would fit across the chest. The additional length will be worked right before you cast off for the armhole/sleeve cap. If the pattern is worked top-down you can add the length right after the armhole or before the first decrease on sleeve.

Regarding additional yarn amount, this will depend on how much length you add, but it is better with a skein too many than too few.

All yarns will have excess fibres (from production) that might come off as lint or shedding. Brushed yarns (ie hairier yarns) have more of these loose, excess fibres, causing more shedding.

Shedding also depends on what is worn under or over the garment, and whether this pulls at the yarn fibres. It’s therefore not possible to guarantee that there will be no shedding

Below are some tips on how to get the best result when working with hairier yarns:

1. When the garment is finished (before you wash it) shake it vigorously so the looser hairs come off. NOTE: do NOT use a lint roller, brush or any method that pulls at the yarn.

2. Place the garment in a plastic bag and put it in your freezer - the temperature will cause the fibres to become less attached to each other, and excess fibres will come off easier.

3. Leave in the freezer for a few hours before taking it out and shaking it again.

4. Wash the garment according to the instructions on the yarn label.

Pilling is a natural process that happens to even the most exclusive of fibers. It's a natural sign of wear and tear that is hard to avoid, and that is most visible in high friction areas of your garment like a sweater's arms and cuffs.

You can make your garment look as new by removing the pilling, using a fabric comb or a pill/lint remover.

Pořád se nemůžete dobrat odpovědi, kterou hledáte? Pak posuňte stránku dolů a napište nám svůj dotaz, naši specialisté se vám pokusí poradit. Obvykle to zvládneme během 5 až 10 pracovních dnů..
Mezitím si můžete pročíst otázky a odpovědi, které k tomuto modelu položili ostatní, nebo navštívit skupinu DROPS Workshop na Facebooku, kde vám může poradit některá spřízněná duše!

Mohly by se vám líbit...

Přidejte komentář k návodu DROPS Extra 0-1221

Rádi bychom věděli, co si o tomto modelu myslíte!

Pokud se chcete na něco zeptat, dbejte prosím na to, abyste ve formuláři níže vybrali správnou kategorii - díky tomu se dříve dozvíte, co potřebujete vědět. Povinná pole jsou označena *.

Komentáře / Otázky (16)

country flag Serenella wrote:

Seguendo le spiegazioni indicate nel pattern non riesco a capire come fare per far un senza aumenti. Questa spiegazione mi sembra sbagliata “SUGGERIMENTO PER LE COSTE: Per evitare che le coste facciano contrarre il lavoro, lavorare 1 giro dir su tutte le m ogni 5 giri a coste (aggiustarlo in modo che questo sia un giro senza aumenti).” Facendo gli aumenti ad ogni giro il poncho viene molto lungo al centro rispetto alla lunghezza dei lati. Grazie,

17.10.2022 - 20:30

DROPS Design answered:

Buonasera Serenella, gli aumenti sono a giri alterni. Buon lavoro!

17.10.2022 - 23:39

country flag Ulrike wrote:

Die Frage wurde nun schon öfter gestellt, aber nach wie vor verstehe ich nicht, wie das Rippenmuster mit 3 M bei 4 M Zunahme aufgehen kann. Wie stricke ich nach „Umschlag, Mittlere M, Umschlag“ weiter? Fange ich danach immer mit einer re M wieder an?

21.09.2022 - 13:09

country flag Annabelle wrote:

Bonjour, Je viens de finir ce poncho avec la laine polaris💎 Cette laine, étant assez épaisse, je me demande s il faut que je le bloque? Il gondole sur le bas. Les côtes en haut serrent et les augmentations et le rabat souple détend beaucoup Le bloquer, l uniformirait il? Et si oui, comment? Merci Au plaisir de vous lire

20.12.2020 - 21:47

DROPS Design answered:

Bonjour Annabelle, vous pouvez le bloquer si vous voulez (lavez-le en suivant bien les indications de l'étiquette + ces généralités) et faites le sécher bien à plat aux mesures du schéma correspondant à votre taille. Bon tricot!

21.12.2020 - 08:23

country flag Thérèse Fillion wrote:

Moi je serais intéressée a acheter ce patron et désirerais avoir le prix.. je le trouve tres jolie merci beaucoup

28.11.2020 - 18:33

DROPS Design answered:

Bonjour Mme Fillion, ce modèle est gratuit, vous pouvez ainsi imprimer gratuitement les explications en cliquant sur le bouton "imprimer" - Bon tricot!

30.11.2020 - 08:43

country flag Thérèse Fillion wrote:

Est-ce que c'est possible de commander le patron combien ca coute?

21.11.2020 - 16:37

DROPS Design answered:

Bonjour Mme Fillion, les explications de ce modèle sont gratuites, cliquez sur le bouton "imprimer" si besoin. Bon tricot!

23.11.2020 - 08:37

country flag Bryndis Thorarinsdottir wrote:

Hi I love knitting this poncho, so easy but I was wondering if it will get bigger after wash? I’m not using Polaris, I’m using Andes. Hope you can help, Bryndis

09.03.2020 - 17:33

DROPS Design answered:

Dear Mrs Thorarinsdottir, you can work this poncho with Andes using 2 strands (= 2 yarn group E = 1 yarn group F), you should have same tension (= 7 sts x 8 rounds stocking st = 10 x 10 cm). measurements should be the same. You can always swatch before to make sure you will get correct measurements. Happy knitting!

10.03.2020 - 10:13

country flag Jezirah wrote:

Hallo, es hat ein bisschen gedauert, bis ich das mit dem Rippenmuster trotz Zunahmen verstanden habe. Aber was ist mit "Bündchen" gemeint (in den Antworten auf Kommentare) und ich verstehe auch nicht, warum ich in jeder 5. Runde nur rechts stricken soll. Bei der dicken Wolle müsste man das im Bild oben sehen, aber da sind keine Runden nur rechts gestrickt. Ich habe schon viele Drops-Anleitungen gestrickt, aber diese ist irgendwie sehr verwirrend. Gruß Jezirah

15.11.2019 - 18:39

DROPS Design answered:

Liebe Jezirah, mit "Bündchen" war sicher früher "Rippenmuster" gemeint - es wird empfohlen, in jeder 5. Runde eine Runde rechts zu stricken, damit das Rippenmuster die Arbeit nicht zusammentzieht. Viel Spaß beim stricken!

18.11.2019 - 08:20

country flag Maya wrote:

Thank you for your reply. Can you translate that to yards?

16.10.2019 - 00:36

DROPS Design answered:

Dear Maya, the pattern is designed for DROPS POLARIS yarn, which is a rather thick yarn, 38 meters for a 100 gramms. From this yarn you will need 10-11-13 balls to knit up this pattern. If you want to use another of our yarns, please use the yarn converter linked in the pattern page. Happy Knitting!

16.10.2019 - 05:29

country flag Maya wrote:

I may just be missing it, but I don't see anywhere where it says how many skeins of yarn to us of the Polaris. Pls help. Thank you

15.10.2019 - 21:59

DROPS Design answered:

Dear Maya, you can find yarn amount next to the picture, on the right. For this pattern, you'll need 1000-1100-1300 g , colour 06, light beige of aPolaris, according to the different sizes. Happy crafting!

15.10.2019 - 22:10

country flag Helena wrote:

En ymmärrä mitä tarkoitetaan, kun ohjeessa lukee, että lisätyillä silmukoilla neulotaan joustinneuletta, kun lisättyjä silmukoita on 4. Ja eikö keskimmäisen silmukan tulisi olla oikea s? Ohjeessa on joustinneule-vinkki, joka käskee neuloa joka 5. kerroksen oikein. Toimiiko tämä myös vasenkätisille?

06.10.2019 - 09:21

DROPS Design answered:

Hei, keskimmäinen silmukka on aina oikea silmukka, tämän silmukan molemmin puolin neulotaan joustinneuletta, eli ensimmäisellä lisätyllä silmukalla neulotaan oikeaa, 2 seuraavalla lisätyllä silmukalla neulotaan nurjaa jne.

18.12.2019 - 17:04