
Popular categories
Looking for a yarn?


Comments / Questions (60)
![]() Sabine wrote:
Sabine wrote:
Ich versuche den Pulli als Jacke stricken und das Blattmuster nur auf dem Rückenteil stricken. Ich nehme an, das sollte gehen? Und kann ich anstatt Krausrippen auch alles rechts stricken? Würde sich da an den Massen etwas ändern?
15.04.2026 - 13:06DROPS Design answered:
Liebe Sabine, beachten Sie, daß die Reihenanzahl glattrechts ist nicht die gleich wie bei Krausrechts, aber sicher können Sie sich von einer Jacke in der gewüsnchten Maschenprobe bzw Größe inspirieren. Viel Spaß beim Stricken!
15.04.2026 - 16:13
![]() Elyse-Brianne wrote:
Elyse-Brianne wrote:
Kunnen jullie even uitleggen wat een omslag is tussen 2 steken ? Is dit 1 steek breien, 1 omslag en terug 1 steek breien ?
02.06.2025 - 09:37DROPS Design answered:
Dag Elyse-Brianne,
Klopt precies zoals je zegt: 1 steek breien, 1 omslag, weer 1 steek breien.
03.06.2025 - 21:27
![]() Patrizia Pennati wrote:
Patrizia Pennati wrote:
Buongiorno sto eseguendo il modello tg M ed ho fatto 10 aumenti di A3 ma ora nn capisco come procedere nel giro succ. x fare lo scollo ? 12 m iniziali e finali in attesa?quanti altri aumenti di A3 e come si gira il lavoro? Potete aiutarmi per favore? Ormai sono arrivata fin qui e mi spiacerebbe disfare tt . Il modello è bellissimo grazie
16.04.2025 - 16:43DROPS Design answered:
Buongiorno Patrizia, deve mettere in attesa 12 maglie all'inizio e alla fine e continuare a procedere con gli aumenti di A.3 come indicato. Buon lavoro!
19.04.2025 - 15:05
![]() Laurence wrote:
Laurence wrote:
Bonjour, je ne comprends pas comment ne pas avoir de trou au milieu (début du tricot). Merci
06.04.2024 - 01:09DROPS Design answered:
Bonjour Laurence, vous pourrez passer à la fin un fil dans les mailles du montage pour les resserrer et ainsi fermer le trou, ou bien montez les mailles en rond comme dans cette vidéo. Bon tricot!
08.04.2024 - 07:46
![]() Tanja wrote:
Tanja wrote:
For all those wondering why their knitting has holes in A1: I knitted the yarn overs crossed. The instruction doesn´t say so, but my result looks like in the third picture. It´s only in A2 and afterward in A3 that you have to knit them like a regular stitch.
14.02.2024 - 08:08
![]() Hanne Thune wrote:
Hanne Thune wrote:
Kan ikke finde brystmål ? Der står kun diverse størrelser. Men når brystmålet ikke kan findes er det jo svært at finde den rigtige størrelse.
07.12.2023 - 11:05DROPS Design answered:
Hej Hanne, Brystmålet i samtlige størrelser er 2 x 50-54-58-62-70-76 cm (100 cm i den mindste). Du finder måleskitsen nederst i opskriften. Her finder du også en lektion som beskriver hvordan man læser måleskitsen :)
07.12.2023 - 15:30
![]() Emily wrote:
Emily wrote:
Based off the pattern and videos, the very beginning looks to have quite a few holes around the middle due to the yarn overs. Photos of those who have done the pattern fully, show this as well. However, the third photo of the leaf flower shows no holes in the very middle from rows 1-9. Why is that? I have tried and cannot seem to get the outcome shown in the third photo. Am I missing an essential element in order to not get holes from the yarn overs in the beginning of the flower middle?
07.11.2023 - 02:17DROPS Design answered:
Dear Emily, when A.1 (the flower) is done, you work A.2 over the 1st, 3rd, 5th and 7th marker, the yarn overs will be worked twisted on next round to avoid holes; and you then work A.4 over 2nd, 4th, 6th and 8th repeat of A.2 working yarn overs so that they create holes (- corners of piece). Happy knitting!
07.11.2023 - 08:46
![]() Terese wrote:
Terese wrote:
Håller på med Morning Star. På ett ställe står det: SAMTIDIGT minskas det i varje sida mot halsen på vartannat v så här: 2 m 1 gång och 1 m 2 ggr. Vad menas med det? Ska jag sticka 2 maskor tillsammans 1 gång sedan följt av 2 räta maskor? Jag förstår inte. Mvh Terese
20.10.2023 - 12:45
![]() Ulla Nielsen wrote:
Ulla Nielsen wrote:
Når jeg har avet strikkeprøven passer det ikke. Der står at du skal bruge for at få 17 m x 34 p retstrik på 10 x 10 cm. Jeg får 17m 10cm og 34 p 22,5 cm. Er det en fejl?
13.08.2023 - 13:58DROPS Design answered:
Hej Ulla, du kan prøve at gå ½ nummer ned på pinden, men det vigtigste er de 17 masker du har i bredden på 10 cm :)
16.08.2023 - 11:48
![]() Vivian wrote:
Vivian wrote:
Jeg har nu strikket hele mønsteret, MEN har 184 masker - kan det mon have noget med de opslåede 8 masker at gøre?
22.01.2023 - 15:09DROPS Design answered:
Hei Vivian. Du skal legge opp 8 masker og så skal du strikke A.1 8 ganger. Når du ser på diagrammet starter det med 1 maske x 8 rapporter og når du har strikket A.1 1 gang i høyden er det 22 masker pr A.1 = 8 x 22 masker = 176 masker. Mulig du har økt 8 masker for mye. Om du setter en maskemarkør mellom hvert rapport har du en bedre oversikt over hvor mange masker du har på hver rapport etter hver omgang. mvh DROPS Design
23.01.2023 - 14:19
|
|||||||||||||||||||
Morning Star#morningstarsweater |
|||||||||||||||||||
 |
 |
||||||||||||||||||
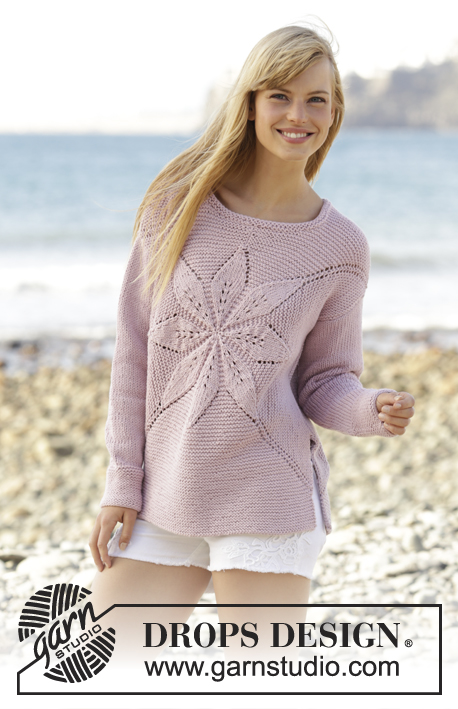
Knitted DROPS jumper worked in a square with leaf pattern in ”Paris”. Size: S - XXXL.
DROPS 167-4 |
|||||||||||||||||||
|
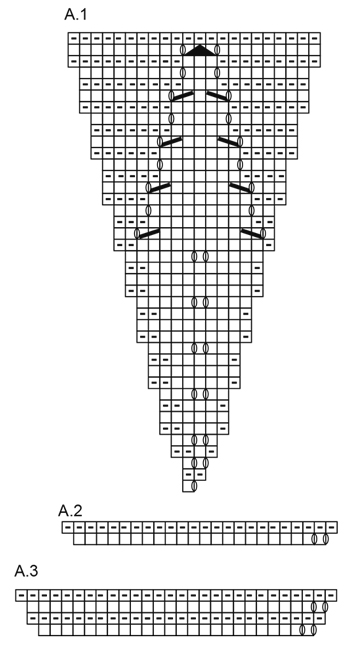
GARTER ST (worked in the round): 1 ridge = 2 rounds. * K 1 round and P 1 round *, repeat from *-*. GARTER ST (back and forth): K all rows. 1 ridge = 2 rows K. PATTERN: See diagrams A.1 to A.3. ---------------------------------------------------------- JUMPER: Body worked in 2 parts from mid front / mid back. Piece is first worked in the round, then worked back and forth. Cast on and work in the round on double pointed needles, switch to circular needle when needed. Finish by working the sleeves. FRONT PIECE: Cast on 8 sts with Paris and divide them on 4 double pointed needles size 5 mm (= 2 sts on every needle). Work according to A.1 (= 8 repetitions of A.1 in width). When the first 21 rounds in A.1 have been worked, displace the start of round 1 st towards the left, first on every other round, then every 4th round – i.e. beg of round is always right before the first YO in the diagram to make it less visible. Beg of round at the end will be in the midle of 1st repetition of A.1. REMEMBER THE KNITTING TENSION When A.1 has been worked one time vertically, there are 176 sts on round, piece measures approx. 15 cm from the middle, approx. 30 cm in diameter. Work first round in A.2 over all sts – make sure that YOs are directly above YOs from A.1, on next round K YO twisted in the first, third, fifth and seventh repetition (to avoid holes), K the YOs in the other repetitions (to make holes) = 192 sts. Then continue to work according to A.3 over the second, fourth, sixth and eighth repetition of A.2, over the 4 other repetitions work in GARTER st – see explanation above – now inc 8 sts every other round as shown in A.3. Continue in garter st and with inc as before until inc have been done 7-10-12-15-20-25 times in A.3, there are now 248-272-288-312-352-392 sts on round, finish after 1 P round. Work next round as follows: Slip the first 11-11-12-12-13-13 sts on a stitch holder for neck (work them first), continue with inc in A.3 and in garter st as before until 11-11-12-12-13-13 sts remain on round, slip the last 11-11-12-12-13-13 sts on a stitch holder for neck (work them first). Cut the yarn. Turn, now work piece back and forth. Continue with inc in A.3 on every row from RS, AT THE SAME TIME cast off in each side towards the neck on every other row as follows: 2 sts 1 time and 1 st 2 times. Continue like this until inc have been done 17-20-24-27-34-39 times in total in A.3 – there are now 298-322-352-376-430-470 sts on needle and piece measures approx. 25-27-29-31-35-38 cm from the middle and 50-54-58-62-70-76 cm in diameter. Size S-M-L-XL: Cast off the first 108-117-128-137 sts, slip the next 82-88-96-102 sts on a stitch holder, and cast off the last 108-117-128-137 sts. Cut the yarn. Work in garter st back and forth over the 82-88-96 sts in bottom edge for 8-6-4-2 cm. Cast off. Size XXL-XXXL: Cast off when all inc are done. Insert a marker in each side, 18-19-20-21-22-23 cm down from shoulder. This shows where sleeve is sewn in. BACK PIECE: Cast on and work as front piece until inc have been done 14-17-21-24-31-36 times in A.3, there are now 304-328-360-384-440-480 sts on round, finish with P 1 round. Piece measures approx. 23-25-27-30-33-36 cm from the middle and 46-50-54-60-66-72 cm in diameter. Then work next round as follows: Cast off the first 15-15-16-16-17-17 sts on round, continue with A.3 with inc as before until 15-15-16-16-17-17 sts remain on round, cast off these sts. Cut the yarn. Then work piece back and forth until inc have been done 17-20-24-27-34-39 times in total in A.3 – there are now 298-322-352-376-430-470 sts on needle and piece measures approx. 25-27-29-32-35-38 cm from the middle and 50-54-58-64-70-76 cm in diameter. Size S-M-L-XL: Cast off the first 108-117-128-137 sts, slip the next 82-88-96-102 sts on a stitch holder, and cast off the last 108-117-128-137 sts. Cut the yarn. Work in garter st back and forth over the 82-88-96 sts in bottom edge for 8-6-4-2 cm. Cast off. Size XXL-XXXL: Cast off when all inc are done. Insert a marker in each side, 18-19-20-21-22-23 cm down from shoulder. This shows where sleeve is sewn in. SLEEVE: Worked back and forth on circular needle. Cast on 32-34-36-38-40-42 sts (incl 1 edge st in each side) on circular needle size 5 mm with Paris. Work 16 ridges, then work in stocking st with 1 edge st in garter st in each side. When piece measures 10 cm, inc 1 st in each side. Repeat inc every 2½-2½-2-2-1½-1½ cm 14-14-15-16-16-17 more times = 62-64-68-72-74-78 sts. Cast off when piece measures 48-47-46-44-42-40 cm (shorter measurements in the larger sizes because of wider shoulders). Work another sleeve the same way. ASSEMBLY: Sew the shoulder seams. Sew in sleeves, down to markers on front/back piece. Sew underarm seams and side seams in one inside 1 edge st, stop when 20 cm remain at the bottom of body = vents. NECK EDGE: Pick up approx. 70 to 86 sts (incl sts on stitch holder) around the neck on double pointed needles size 5 mm. Work 2 ridges. Cast off. |
|||||||||||||||||||
Diagram explanations |
|||||||||||||||||||
|
|||||||||||||||||||
 |
|||||||||||||||||||
 |
|||||||||||||||||||
Have you finished this pattern?Tag your pictures with #dropspattern #morningstarsweater or submit them to the #dropsfan gallery. Do you need help with this pattern?You'll find 29 tutorial videos, a Comments/Questions area and more by visiting the pattern on garnstudio.com. © 1982-2026 DROPS Design A/S. We reserve all rights. This document, including all its sub-sections, has copyrights. Read more about what you can do with our patterns at the bottom of each pattern on our site. |
|||||||||||||||||||


With over 40 years in knitting and crochet design, DROPS Design offers one of the most extensive collections of free patterns on the internet - translated to 17 languages. As of today we count 324 catalogues and 12290 patterns translated into English (UK/cm). 12290
We work hard to bring you the best knitting and crochet have to offer, inspiration and advice as well as great quality yarns at incredible prices! Would you like to use our patterns for other than personal use? You can read what you are allowed to do in the Copyright text at the bottom of all our patterns. Happy crafting!
Post a comment to pattern DROPS 167-4
We would love to hear what you have to say about this pattern!
If you want to leave a question, please make sure you select the correct category in the form below, to speed up the answering process. Required fields are marked *.