
Popular categories
Looking for a yarn?


Comments / Questions (80)
![]() Bodil wrote:
Bodil wrote:
Spørsmål til RAGLAN ØKNINGENE på bærestykket : når det står HVER omgang (og også ANNENHVER omgang litt seinere ) tror jeg jeg har tolket dette som gjeldene 2. og 4. omgang, altså kun der det strikkes kast og felling i mønsteret 🫢 Jeg har kommet et stykke ned og tror jeg har misforstått {?} økningene SKAL være kanskje på HVER pinne i begynnelsen 🤔 Jeg syns kantene ble så brå /skrå hvis dere forstår min forklaring. Mvh
10.02.2026 - 10:59DROPS Design answered:
Hei Bodil, Ja, du skal begynne med å øke til raglan hver omgang riktig antall ganger og, deretter øke hver annen omgang. Hilsen Drops Team.
11.02.2026 - 07:08
![]() Iris Van Dijk wrote:
Iris Van Dijk wrote:
Hallo, Ik wil graag patroon 165-8 breien, ,maar kom niet uit de pas er staat ook na het begin van breiwerk wat je moet breien A3 of A1 maar na de gemeerderde 88 steken wordt er gezegd brei verder in patroon . Dit snap ik niet welk patroon, hopelijk kunt u me helpen. Vast vriendelijk bedankt groet Iris van Dijk
06.02.2026 - 16:07DROPS Design answered:
Dag Iris,
Na de meerderingen zet je het patroon voort zoals je bezig was.
15.02.2026 - 14:43
![]() Charlotte wrote:
Charlotte wrote:
Som fortsættelse af min kommentar kl. 14.53, så tror jeg der er byttet om på hvorvidt man strikke diagram A.3a før A.3b. Jeg tror man skal strikke A.3b først. Vil i se på om jeg har ret….Tak🙏🏼
24.11.2025 - 18:33DROPS Design answered:
Hej igen Charlotte, du strikker A.3a først og så A.3b :)
25.11.2025 - 13:49
![]() Charlotte wrote:
Charlotte wrote:
Regal splendour kjole. Skal diagrammet læses/strikkes oppefra og ned? Skal strikke str s og har svært ved at få det midterste mønster på 8 m pænt, da jeg starter med 80 m og heri er de midterste 8 m ikke med, så det diagram kommer først med efterhånden som jeg tager ud ved ærmerne/raglan. Er det korrekt?
24.11.2025 - 14:53DROPS Design answered:
Hej Charlotte, diagrammet læses nedefra og op, du starter i højre side, så du læser diagrammet i samme rækkefølge som du strikker maskerne fra højre til venstre :)
25.11.2025 - 13:47
![]() Carmen wrote:
Carmen wrote:
Hallo. Ich habe dieses Kleid in einem flieder-grau gestrickt. Es sieht wunderschön aus und ist mir gut gelungen. Die Anleitung ist sehr ausführlich und deshalb gut umzusetzen. Allerdings nicht für Anfänger geeignet.
27.01.2025 - 12:41
![]() Dominika wrote:
Dominika wrote:
There is the error in A5 chart(there is 26 stitches not 28), so I don't have idea how to make the rib on the sleeves(size M). Could it be explained?
02.12.2024 - 03:30DROPS Design answered:
Hi Dominika, The A.5 chart does have 28 stitches, so it will fit around the sleeve. Happy knitting!
02.12.2024 - 07:09
![]() Mona Jensen wrote:
Mona Jensen wrote:
Jeg strikker 165-8. Læsers diagrammerne nedefra og op og fra højre mod venstre?
29.10.2024 - 07:27DROPS Design answered:
Hej Mona, ja det stemmer, kjolen strikkes oppefra og ned! Diagrammerne strikkes fra nederste højre hjørne mod venstre og så opad :)
29.10.2024 - 14:23
![]() Mona Jensen wrote:
Mona Jensen wrote:
Jeg strikker kjole 165-8 . De 88 masker jeg starter med dækker begyndelsen af maskerne i diagrammet og der skal 12 pindes udtagninger til for at der er nok til snoninger men det ser ud som om snoningerne starter ved 6 pind? Jeg strikker xxl. Ved ærmerne står der at det er a2a og 10 masker glatstrik på hver side. Men er maskerne op til ikke vrang?
29.10.2024 - 07:15DROPS Design answered:
Hej Mona, du starter med de 14 masker som er markeret i A.3A (og venter med snoningen til du kommer til den og har taget nok masker ud) :)
29.10.2024 - 14:22
![]() Anne wrote:
Anne wrote:
Hei. Miten hihan kuvio A.2A ja B toistuu kerroksen 28 jälkeen. Tarkoitan sivuosia?
10.10.2024 - 18:30DROPS Design answered:
Hei, toista piirroksen mallikerta 1.kerrokselta alkaen.
11.10.2024 - 18:19
![]() DELATTRE Marie-Pierre wrote:
DELATTRE Marie-Pierre wrote:
Message précédent : excusez moi. J'ai fini par comprendre. Il fallait prendre les nombres en haut. Merci
18.09.2024 - 14:20
|
|||||||||||||||||||||||||
Regal Splendour#regalsplendourdress |
|||||||||||||||||||||||||
|
|
|||||||||||||||||||||||||
Knitted DROPS dress with raglan, cables and textured pattern, worked top down in "Nepal". Size: S - XXXL.
DROPS 165-8 |
|||||||||||||||||||||||||
|
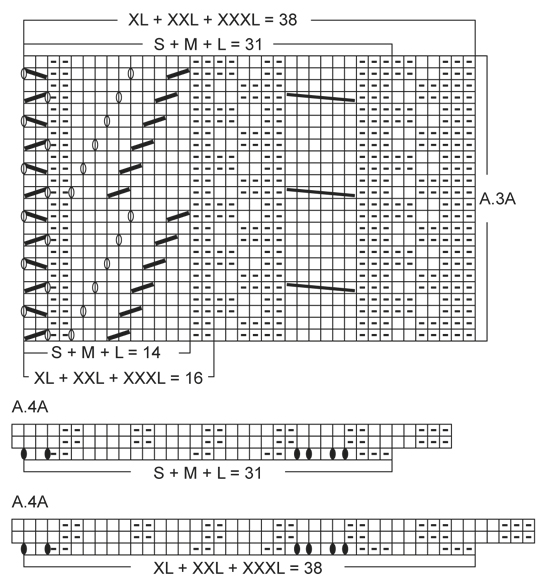
GARTER ST (worked in the round): * K 1 round and P 1 round *, repeat from *-*. 1 ridge = 2 rounds. PATTERN: See diagrams A.1 to A.5. Choose diagram for correct size (applies to A.3 + A.4). RAGLAN: Inc for raglan before/after A.1 in every transition between sleeves and body. Increase towards the right BEFORE A.1: Use left needle to pick up thread between 2 stitches from round below, pick up thread from behind and knit stitch in front loop. Increase towards the left AFTER A.1: Use left needle to pick up thread between 2 stitches from round below, pick up thread from the front and knit stitch in back loop. DECREASE TIP-1 (applies to body): Dec at the 4 markers. Dec as follows before A.3A: Beg 2 sts before marker, K 2 tog. Dec as follows after A.3B: Slip 1 st as if to K, K 1, psso. DECREASE TIP-2 (applies to mid under sleeve): Beg 3 sts before marker and K 2 tog, K 2 (marker is in the middle of these two sts), slip 1 st as if to K, K 1, psso. INCREASE TIP (applies to body): Inc at the 4 markers. Inc as follows: Make 1 YO before A.3A and after A.3B. On next round K YOs twisted to avoid holes. ---------------------------------------------------------- YOKE: Worked in the round on circular needle from top down. Cast on 62-62-62-70-70-70 sts on circular needle size 4.5 mm with Nepal. Work 2 ridges in GARTER ST - see explanation above. K 1 round while inc 18 sts evenly in all sizes = 80-80-80-88-88-88 sts. READ ALL OF THE FOLLOWING SECTION BEFORE CONTINUING: Switch to circular needle size 5.5 mm, work next round as follows: Inc 1 st for RAGLAN – see explanation above, work A.1 (= 4 sts in raglan line), inc 1 st for raglan, work the 6 sts marked in diagram A.2A (= right sleeve), inc 1 st, A.1 (= 4 sts), inc 1 st, work the 14-14-14-16-16-16 sts marked in diagram A.3A and work the 12-12-12-14-14-14 sts marked in diagram A.3B (= front piece), inc 1 st, A.1 (= 4 sts), inc 1 st, work the 6 sts marked in diagram A.2B (= left sleeve), inc 1 st, A.1 (= 4 sts), inc 1 st, work the 14-14-14-16-16-16 sts marked in diagram A.3A and work the 12-12-12-14-14-14 sts marked in diagram A.3B (= back piece) = 88-88-88-96-96-96 sts on needle. Continue pattern like this while AT THE SAME TIME continuing inc for raglan on each side of A.1 in every transition between sleeves and body - NOTE: Inc differently on body and sleeves and work the inc sts in pattern (i.e. when there are enough sts for entire repetition in width, then work inc sts in stocking st): BODY: Inc every round 1-5-7-9-15-25 more times, and then every other round 15-14-14-14-12-8 times in total. SLEEVE: Inc every round 3-5-3-3-1-3 more times, and then every other round 14-14-16-17-19-19 times in total. REMEMBER THE KNITTING TENSION After all inc are done there are 220-240-248-268-284-316 sts on needle. Now slip the 46-50-50-52-52-56 sts over each sleeve on stitch holders (i.e. sts over A.2A/A.2B, 7-9-9-10-10-12 sts in stocking st on each side of these and 2 sts from A.1 in each side – NOTE: This is done without working sts) = 128-140-148-164-180-204 sts remain on needle. BODY: NOW MEASURE PIECE FROM HERE! Cast on 6-6-8-8-10-10 new sts on needle (= in the side), work 2-5-7-4-8-14 sts in stocking st, continue A.3A and A.3B over the next 60-60-60-74-74-74 sts as before, 2-5-7-4-8-14 sts in stocking st, cast on 6-6-8-8-10-10 new sts on needle (= in the side), work 2-5-7-4-8-14 sts in stocking st, A.3A and A.3B over the next 60-60-60-74-74-74 sts as before and 2-5-7-4-8-14 sts in stocking st = 140-152-164-180-200-224 sts on needle. Insert 1 marker on each side of the middle 60-60-60-74-74-74 sts front and back (i.e. outside A.3A/A.3B front and back = 4 markers) and move them upwards when working. Continue in the round with stocking st and A.3A/A.3B mid front and mid back. When piece measures 4-4-4-5-5-5 cm, dec outside A.3A/A.3B (i.e. in towards section in stocking st) - READ DECREASE TIP-1 (= 4 sts dec). Repeat dec every 5-5-6-6-7-7 cm a total of 3 times in all sizes = 128-140-152-168-188-212 sts. When piece measures 19-20-21-24-25-26 cm from division for sleeves (piece measures approx. 38-40-42-46-48-50 cm from shoulder), inc outside A.3A/A.3B (i.e. in towards section in stocking st) - READ INCREASE TIP (= 4 sts inc). Repeat inc every 4-4-4-4-3-3 cm a total of 8-8-8-8-10-10 times = 160-172-184-200-228-252 sts. When piece measures approx. 51-52-53-52-53-54 cm from division at sleeves – adjust after a whole lace motif in A.3A/A.3B, work next round as follows: Inc 4-7-4-7-6-6 sts over the next 10-13-16-13-20-26 sts (make 1 YO after approx. every 2nd-2nd-4th-2nd-3rd-4th st), work A.4A over the next 31-31-31-38-38-38 sts (choose diagram for correct size), work A.4B over the next 29-29-29-36-36-36 sts (choose diagram for correct size), inc 8-14-8-14-12-12 sts evenly over the next 20-26-32-26-40-52 sts (i.e. make 1 YO after approx. every 2nd-2nd-4th-2nd-3rd-4th st), work A.4A over the next 31-31-31-38-38-38 sts, A.4B over the next 29-29-29-36-36-36 sts and inc 4-7-4-7-6-6 sts evenly over the last 10-13-16-13-20-26 sts = 196-220-220-248-272-296 sts on needle. Switch to circular needle size 4.5 mm and work next round as follows (work YOs twisted in rib to avoid holes): K 2, * P 2, K 4 *, repeat from *-* 2-3-3-3-4-5 times in total, work rib over the next 70-70-70-84-84-84 sts as shown in diagram A.4A/A.4B, * K 4, P 2 *, repeat from *-* 4-6-6-6-8-10 times in total, K 4, work rib over the next 70-70-70-84-84-84 sts as shown in diagram A.4A/A.4B, * K 4, P 2 *, repeat from *-* 2-3-3-3-4-5 times in total and finish with K 2. Continue rib like this but to avoid the rib contracting too much K 1 round over all sts after every 3rd round with rib. When rib measures 28-28-28-30-30-30 cm (entire dress measures approx. 98-100-102-104-106-108 cm from shoulder), K 1 round over all sts before LOOSELY casting off with K. RIGHT SLEEVE: Worked in the round on a short circular needle/double pointed needles. Slip sts from stitch holder in right side (seen from RS) on a short circular needle size 5.5 mm. Work 9-11-11-12-12-14 sts in stocking st, work pattern according to diagram A.2A (= 28 sts), work 9-11-11-12-12-14 sts in stocking st and cast on 6-6-8-8-10-10 new sts at the end of round = 52-56-58-60-62-66 sts on needle. Insert 1 marker in the middle of the 6-6-8-8-10-10 new sts (= mid under sleeve) – NOW MEASURE PIECE FROM HERE. Continue in the round with stocking st and pattern. When sleeve measures 4-4-4-3-2-3 cm, dec 2 sts mid under sleeve - READ DECREASE TIP-2. Repeat dec every 8-5-8-6-5-6 cm a total of 4-6-4-5-6-5 times = 44-44-50-50-50-56 sts. When sleeve measures 31-31-31-28-28-28 cm, switch to double pointed needles size 4.5 mm and work next round as follows: SIZE S + M + XXXL: K 2, * P 2, K 4 *, repeat from *-* 1-1-2 times in total, work A.5 over the next 28 sts, * K 4, P 2 *, repeat from *-* 1-1-2 times in total and finish with K 2. SIZE L + XL + XXL: P 1, K 4, P 2, K 4, work A.5 over the next 28 sts, K 4, P 2, K 4 and P 1. Continue rib like this for 18-18-18-20-20-20 cm (entire sleeve measures approx. 49-49-49-48-48-48 cm - NOTE: Shorter measurements in the larger sizes because of longer sleeve cap and wider shoulders), K 1 round over all sts before LOOSELY casting off with K. LEFT SLEEVE: Work as right but work pattern according to A.2B (instead of A.2A). ASSEMBLY: Sew the openings under the sleeves. |
|||||||||||||||||||||||||
Diagram explanations |
|||||||||||||||||||||||||
|
|||||||||||||||||||||||||
 |
|||||||||||||||||||||||||
 |
|||||||||||||||||||||||||
 |
|||||||||||||||||||||||||
 |
|||||||||||||||||||||||||
Have you finished this pattern?Tag your pictures with #dropspattern #regalsplendourdress or submit them to the #dropsfan gallery. Do you need help with this pattern?You'll find 27 tutorial videos, a Comments/Questions area and more by visiting the pattern on garnstudio.com. © 1982-2026 DROPS Design A/S. We reserve all rights. This document, including all its sub-sections, has copyrights. Read more about what you can do with our patterns at the bottom of each pattern on our site. |
|||||||||||||||||||||||||


With over 40 years in knitting and crochet design, DROPS Design offers one of the most extensive collections of free patterns on the internet - translated to 17 languages. As of today we count 324 catalogues and 12290 patterns translated into English (UK/cm). 12290
We work hard to bring you the best knitting and crochet have to offer, inspiration and advice as well as great quality yarns at incredible prices! Would you like to use our patterns for other than personal use? You can read what you are allowed to do in the Copyright text at the bottom of all our patterns. Happy crafting!
Post a comment to pattern DROPS 165-8
We would love to hear what you have to say about this pattern!
If you want to leave a question, please make sure you select the correct category in the form below, to speed up the answering process. Required fields are marked *.