
Popular categories
Looking for a yarn?


Comments / Questions (50)
![]() Katy wrote:
Katy wrote:
It says 5 mm to get a 10.5 mm square but mine are coming out hugs. Tried various sizes but even 3.5 mm too big. My tension is usually spot on. Am I doing something wrong?
09.12.2015 - 12:18DROPS Design answered:
Dear Katy, check you are following the instructions in UK-English, terminology is different from US-English and could explain this difference of tension. Happy crocheting!
10.12.2015 - 09:50
![]() Hanneke wrote:
Hanneke wrote:
Thank you Drops Design for replying to my query. I actually ended up buying one ball and making a few squares with different sizes of crochet hooks and the Drops Design yarn and indeed the no. 5 works out to the right size and does the job well. The yarn is superb, it gives stunning colours.
03.10.2015 - 14:32
![]() Hanneke wrote:
Hanneke wrote:
Did anyone make this blanket using crochet hook no. 5? It seems very large for the Drops Design yarn and gives a very loose result. I have tried a few squares on crochet hook no. 3, which is much nicer, but works out a lot smaller than the pattern. It just seems a little odd that the wrap on the yarn suggests size 2.5?
03.10.2015 - 00:09DROPS Design answered:
Dear Hanneke, this blanket is worked with a larger hook to get the desired result, ie loose enough. You can adjust the size of the crochet hook as you rather, but remember this may change size of blanket (squares, etc..) and required amount of yarn. Happy crocheting!
03.10.2015 - 09:01
![]() Anna wrote:
Anna wrote:
Onko totta, että mallin lanka on ohuempi Delight -lanka, eikä Big Delight? Ohjeessa käytetään koukkua nro 5 ja se tuntuu kyllä hieman suurelta koukulta Delight-langalle, siis sille ohuemmalle. Onko joku kokeillut? Aivan upea on malli ja värit.
13.08.2015 - 10:43DROPS Design answered:
Malli on suunniteltu ohuemmalle Delight-langalle.
24.08.2015 - 14:07
![]() Tina wrote:
Tina wrote:
Zeer mooi, ga ik zeker maken
21.07.2015 - 11:18
![]() Terry wrote:
Terry wrote:
Love this afghan! The colors and the style!! Please let me know when the pattern is available!!
16.07.2015 - 16:46
![]() Sabine Bürg wrote:
Sabine Bürg wrote:
Wo gib es die Anleitung?
13.07.2015 - 13:22
![]() Annukka wrote:
Annukka wrote:
Tämä on aivan pakko tehdä - upeat värit 😃
20.06.2015 - 14:42Johanna wrote:
Fin färg och design!
20.06.2015 - 09:20
![]() MARIE-ESTELLE SCHULLER wrote:
MARIE-ESTELLE SCHULLER wrote:
MAGNIFIQUE. J'AI HATE DE LE CROCHETER. JE VERRAI BIEN "ETINCELLE".
19.06.2015 - 15:14
|
||||||||||||||||||||||||||||||||||||||||||||||||||||||||||||||||
Memories#memoriesblanket |
||||||||||||||||||||||||||||||||||||||||||||||||||||||||||||||||
|
|
||||||||||||||||||||||||||||||||||||||||||||||||||||||||||||||||
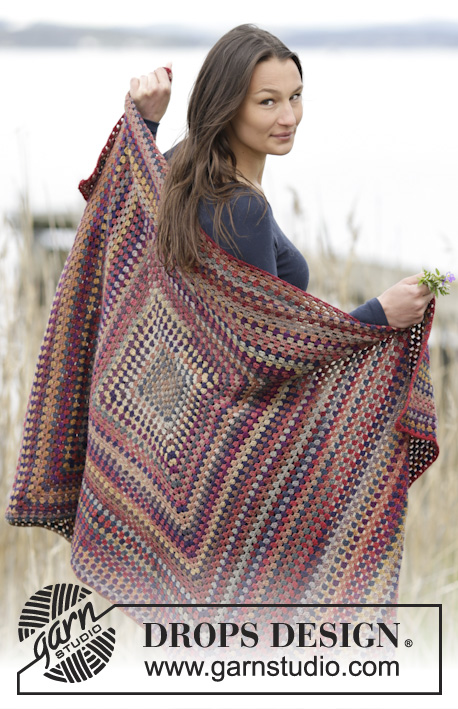
Crochet DROPS blanket with granny squares, circle squares and borders with bobbles in ”Delight”.
DROPS 163-1 |
||||||||||||||||||||||||||||||||||||||||||||||||||||||||||||||||
|
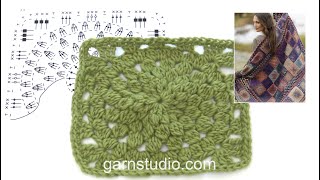
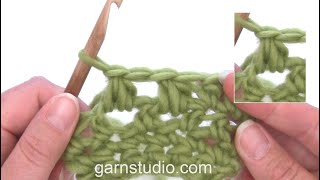
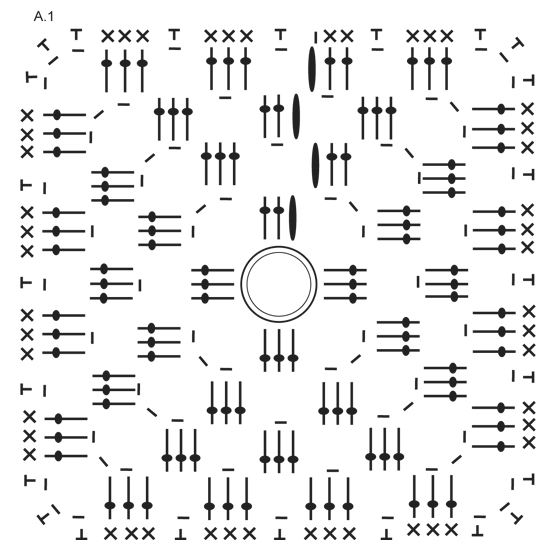
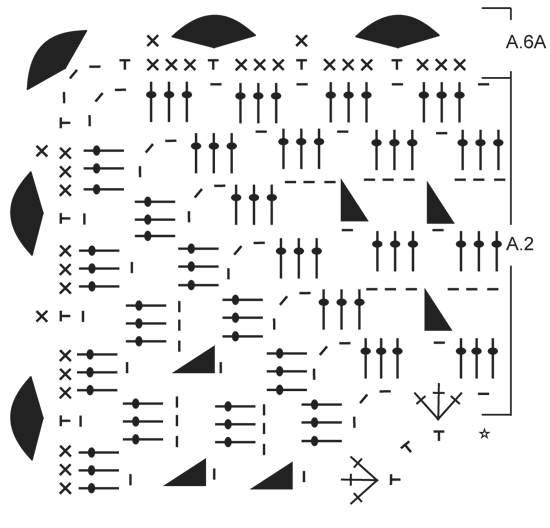
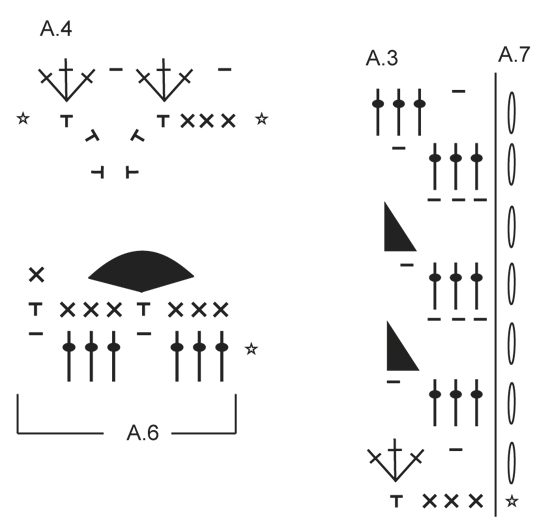
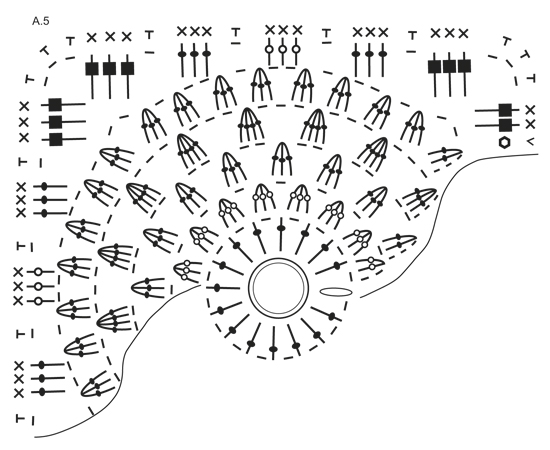
PATTERN: See diagrams A.1 to A.7. CROCHET INFO: A.7 shows beg of round in A.3 and is in addition to repetition (i.e. 3 ch do not replace a tr). BOBBLE: Work 6 tr around same ch, then work 1 sl st in the first of the 6 tr. 2 HTR TOG: Make 1 YO, insert hook under ch-space and get yarn, make 1 YO, insert hook below same ch-space and get yarn, make 1 YO and pull yarn through all 5 sts on hook. 3 HTR TOG: Make 1 YO, insert hook under ch-space and get yarn, * make 1 YO, insert hook below same ch-space and get yarn *, repeat from *-* 2 times in total, make 1 YO and pull yarn through all 7 sts on hook. 2 TR TOG: Work 1 tr around ch-space but wait with last YO and pull through, work next tr around same ch-space but pull last YO through all 3 sts on hook. 3 TR TOG: Work 1 tr around ch-space but wait with last YO and pull through, work next tr around same ch-space but wait with last YO and pull through, work last tr around same ch-space but now pull last YO through all 4 sts on hook. 4 TR TOG: Work 1 tr around ch-space but wait with last YO and pull through, * work next tr around same ch-space but wait with last YO and pull through *, repeat from *-* 2 times in total, work last tr around same ch-space but now pull last YO through all 5 sts on hook. ---------------------------------------------------------- BLANKET: Blanket consists of granny squares in the middle and sew tog one by one. Then work an edge with bobbles outside these squares. Then work larger circle squares that are sewn tog one by one into a frame that is sewn to edge on blanket, before working a finishing edge around the entire blanket with bobbles and fans. GRANNY SQUARE: Work 4 ch on hook size 5 mm with Delight and form 1 ring with 1 sl st in first ch. Then work in the round but alternately from RS and WS as shown in diagram A.1. I.e. work as follows: ROUND 1: 3 ch (= 1 tr), 2 tr around ch-space, * 3 ch, 3 tr around ch-space *, repeat from *-* 3 times in total and finish with 3 ch and 1 sl st in 3rd ch from beg of round, turn piece. ROUND 2: 3 ch (= 1 tr), 2 tr + 3 ch + 3 tr around same ch-space (= corner), * 1 ch, around next ch-space work 3 tr + 3 ch + 3 tr (= corner) *, repeat from *-* 3 times in total and finish with 1 ch and 1 sl st in 3rd ch at beg of round, turn piece. ROUND 3: 3 ch (= 1 tr), 2 tr around same ch-space, * 1 ch, 3 tr + 3 ch + 3 tr around next ch-space (= corner), 1 ch, 3 tr around next ch-space *, repeat from *-* 3 times in total, 1 ch, 3 tr + 3 ch + 3 tr around next ch-space (= corner), 1 ch and 1 sl st in 3rd ch from beg of round, turn piece. REMEMBER THE CROCHET TENSION! ROUND 4: 3 ch (= 1 tr), 2 tr around same ch-space, * 1 ch, 3 tr + 3 ch + 3 tr around next ch-space (= corner), 1 ch, 3 tr around next ch-space, 1 ch, 3 tr around next ch-space *, repeat from *-* 3 times in total, 1 ch, 3 tr + 3 ch + 3 tr around next ch-space (= corner), 1 ch, 3 tr around next ch, 1 ch and 1 sl st in 3rd ch from beg of round, turn piece. ROUND 5: 1 ch, then work 1 dc around every ch and 1 dc in every tr the entire round (around ch-space in each corner work 3 dc), finish round with 1 sl st in first ch at beg of round. Fasten off. ASSEMBLY: Work 32 granny squares in total. Place the squares with 4 squares in width and 8 squares in height. Sew squares tog edge to edge with neat little stitches - NOTE: Sew a stitch in every dc and make sure to avoid a tight seam (sew with yarn from the ball that fits square's colour to avoid marked lines). EDGE WITH BOBBLES: ROUND 1: Beg with 1 sl st in the last of the 3 dc in a corner on blanket, work 3 ch (= diagram A.7) – READ CROCHET INFO. Then work as shown in diagram A.3, i.e. work as follows: * 1 ch, skip 3 dc, 3 tr in next dc *, repeat from *-* around the entire edge on blanket - NOTE: In every transition between 2 squares work as shown in diagram A.4, i.e. work 3 tr in the first of the 3 dc in corner on first square, 1 ch, 3 tr in 3rd dc of the 3 dc in corner on next square. In every corner on the blanket work as shown in diagram A.2, i.e. work 1 ch, 3 tr in the first of the 3 dc in the corner, 3 ch, 3 tr in third dc of the 3 dc in same corner (i.e. the last time work in same dc as the 3 ch at beg of round). Finish round with 1 sl st in 3rd ch from beg of round. ROUND 2: 3 ch (= A.7), * (3 tr around ch, 1 ch), repeat from (-) until corner, work 3 tr + 3 ch + 3 tr around ch-space in corner, 1 ch *, repeat from *-* around the entire blanket and finish with 1 sl st in 3rd ch at beg of round. ROUND 3: 3 ch, * (3 ch, skip 3 tr, 1 BOBBLE – see explanation above, around next ch), repeat from (-) until corner, work 3 ch, 3 tr + 3 ch + 3 tr around ch-space in corner *, repeat from *-* around the entire blanket and finish round with 1 sl st in 3rd ch at beg of round. ROUND 4: 3 ch, then work 3 tr around every ch-space and 1 ch between every tr-group the entire round (work corners as before with 3 tr + 3 ch + 3 tr) and finish round with 1 sl st in 3rd ch at beg of round. ROUND 5: 3 ch, * (3 ch, skip 3 tr, 1 bobble, around next ch), repeat from (-) until corner, work 3 ch + 3 tr + 3 ch + 3 tr around ch-space in corner *, repeat from *-* around the entire blanket and finish round with 1 sl st in 3rd ch at beg of round. ROUNDS 6-7: Work tr-groups as on 4th round. Fasten off. CIRCLE SQUARE: Work 4 ch on hook size 5 mm with Delight and form a ring with 1 sl st in first ch. Then work as shown in diagram A.5, i.e. work as follows: ROUND 1: 4 ch (= 1 tr + 1 ch), * 1 tr in ch-ring, 1 ch *, repeat from *-* a total of 15 times, finish with 1 sl st in 3rd ch from beg of round (= 16 tr with 1 ch between each). ROUND 2: 1 sl st around first ch, 2 ch (= 1 htr), work 2 HTR TOG around same ch-space – see explanation above, * 1 ch, 3 HTR TOG around next ch-space – see explanation above *, repeat from *-* 15 times in total and finish with 1 ch and 1 sl st in 2nd ch at beg of round (= 16 htr-groups with 1 ch between each). ROUND 3: 1 sl st around first ch-space, 3 ch (= 1 tr), 2 TR TOG around same ch-space - see explanation above, * 2 ch, 3 TR TOG around next ch-space *, repeat from *-* 15 times in total, and finish with 2 ch and 1 sl st in 3rd ch from beg of round (= 16 tr-groups with 2 ch between each). ROUND 4: 1 sl st around first ch-space, 3 ch (= 1 tr), 3 tr tog around same ch-space, * 3 ch, 4 TR TOG around next ch-space *, repeat from *-* 15 times in total, and finish with 3 ch and 1 sl st in 3rd ch from beg of round (= 16 tr-groups with 3 ch between each). ROUND 5: 1 sl st around first ch-space, 3 ch (= 1 tr), 2 tr tog + 2 ch + 3 tr tog around same ch-space, * 1 ch + 3 tr tog + 2 ch + 3 tr tog around next ch-space *, repeat from *-* 15 times in total and finish with 1 ch and 1 sl st in 3rd ch at beg of round (32 tr-groups on round). ROUND 6: 1 sl st around first ch-space, 4 ch (= 1 dtr), 2 dtr + 3 ch + 3 dtr around same ch-space (= first corner), * 1 ch, 3 tr around next 2-ch-space, 1 ch, 3 htr around next 2-ch-space, 1 ch, 3 tr around next 2-ch-space, 1 ch, 3 dtr + 3 ch + 3 dtr around next 2-ch-space (= corner) *, repeat from *-* 4 times in total but finish last repetition with 1 sl st in 4th ch at beg of round (instead of 3 dtr + 3 ch + 3 dtr around next 2-ch-space). ROUND 7: 1 ch (= 1 dc), then work 1 dc in every st and 1 dc around every ch the entire round (around ch-space in each corner work 3 dc), finish round with 1 sl st in first ch at beg of round. Fasten off. MORE ASSEMBLY: Work 26 circle squares in total. Place the squares to form a frame. There should be 4 circle squares along each short side on blanket, 7 circle squares along each long side on blanket and 1 circle square in each corner. Sew squares tog two by two with neat little stitches – sew edge to edge with one stitch in every dc and make sure to avoid a tight seam. Work 1 round with dc inside the frame (work 1 dc in every st). Place frame around the blanket and fasten dc-round on frame to edge with bobbles - sew edge to edge with neat little stitches and make sure to avoid a tight seam. FINISHING EDGE AROUND BLANKET: Beg from RS with 1 sl st in the last of the 3 dc in a corner on blanket. Then work 4th-7th round on EDGE WITH BOBBLES (i.e. work 1 round with tr-groups, 1 round with bobbles and 2 rounds with tr-groups). FAN EDGE: Work sl sts until ch before first tr-group, work 1 ch, then work as shown in diagram A.6, i.e. work as follows: ROUND 1: Work 1 dc in every tr and 1 dc around every ch from previous round, finish round with 1 sl st in ch at beg of round. ROUND 2: * Skip 3 dc, 10 tr in next dc (= 1 fan), skip 3 dc, 1 dc in next dc *, repeat from *-* the entire round but adjust so that there is a fan in each corner on blanket (as shown in A.6A). Fasten off. |
||||||||||||||||||||||||||||||||||||||||||||||||||||||||||||||||
Diagram explanations |
||||||||||||||||||||||||||||||||||||||||||||||||||||||||||||||||
|
||||||||||||||||||||||||||||||||||||||||||||||||||||||||||||||||
 |
||||||||||||||||||||||||||||||||||||||||||||||||||||||||||||||||
 |
||||||||||||||||||||||||||||||||||||||||||||||||||||||||||||||||
 |
||||||||||||||||||||||||||||||||||||||||||||||||||||||||||||||||
 |
||||||||||||||||||||||||||||||||||||||||||||||||||||||||||||||||
Have you finished this pattern?Tag your pictures with #dropspattern #memoriesblanket or submit them to the #dropsfan gallery. Do you need help with this pattern?You'll find 21 tutorial videos, a Comments/Questions area and more by visiting the pattern on garnstudio.com. © 1982-2026 DROPS Design A/S. We reserve all rights. This document, including all its sub-sections, has copyrights. Read more about what you can do with our patterns at the bottom of each pattern on our site. |
||||||||||||||||||||||||||||||||||||||||||||||||||||||||||||||||


With over 40 years in knitting and crochet design, DROPS Design offers one of the most extensive collections of free patterns on the internet - translated to 17 languages. As of today we count 324 catalogues and 12290 patterns translated into English (UK/cm). 12290
We work hard to bring you the best knitting and crochet have to offer, inspiration and advice as well as great quality yarns at incredible prices! Would you like to use our patterns for other than personal use? You can read what you are allowed to do in the Copyright text at the bottom of all our patterns. Happy crafting!
Post a comment to pattern DROPS 163-1
We would love to hear what you have to say about this pattern!
If you want to leave a question, please make sure you select the correct category in the form below, to speed up the answering process. Required fields are marked *.