
Popular categories
Looking for a yarn?


Comments / Questions (94)
![]() Beatrice wrote:
Beatrice wrote:
Buonasera il modello mi piace molto ma ho difficoltà con lo schema A2, ci sono 2 gettati di seguito nel primo ferro. Come si fanno? Grazie mille
02.03.2020 - 18:08DROPS Design answered:
Buongiorno Beatrice. Deve lavorare il diagramma A.2 sulle maglie su cui ha lavorato il diagramma A.1. Tra una ripetizione e l’altra di A.2 continua a lavorare le maglie a rovescio. Buon lavoro!
02.03.2020 - 18:26
![]() Amina wrote:
Amina wrote:
I made one amnd i am wearing it now. it's so beautiful. thank you for the pattern and explanation 😚👍👍👍
10.02.2019 - 18:47
![]() Marita Kjørsvik wrote:
Marita Kjørsvik wrote:
Hei, begynt å stikke denne. Men får ikke oppskriften til å stemme med bildet. På bildet ser det ut som det er glattstrikk, rettmasker mellom rapportene A1 og A2, mens i oppskriften står det vrang. Dette blir da ikke riktig?? Kan noen hjelpe raskt.
18.07.2018 - 11:53DROPS Design answered:
Hei Marita. Det stemmer at det er vrangmasker mellom A.1 og A.2 – det er det også på bildet, men det er litt vanskelig å se siden det er så lite. God fornøyelse.
25.07.2018 - 15:04
![]() Sanna wrote:
Sanna wrote:
Jag räknade inte med maskan som jag ska dra över. Ibland står det helt still. Haha! PS. Det måste va 3 varv räts i början annars börjar man sticka mönstret från avs.
11.03.2018 - 23:15
![]() Sanna wrote:
Sanna wrote:
Hej! Undrar hur A.2 ska stickas. Man gör 2 omslag men bara 1 maska mindre när man stickar ihop 2 maskor. Då har jag 1 m kvar i ökningen som blir med omslagen. Dom ska väl stickas am på avigsidan för att det ska bli hål? Då blir det en masökning kvar varje mönster varv? Får inte ihop det.
09.03.2018 - 21:34DROPS Design answered:
Hej, du minskar 2 maskor åt gången i A.2: Du lyfter 1 maska, stickar ihop 2 maskor och drar den lyfta maskan över. Omslagen ska stickas aviga från avigsidan. Det ökas alltså inga maskor.
13.03.2018 - 14:38
![]() Angela wrote:
Angela wrote:
Salve. Vorrei iniziare questo lavoro. Vedendo le domande, vorrei chiedere: e' troppo difficile? Qualcuna e' riuscita a realizzarlo? Grazie
20.01.2018 - 12:35DROPS Design answered:
Buongiorno Angela, è un modello di sicuro non semplicissimo, ma se segue attentamente le istruzioni riuscirà a realizzarlo. Se dovesse aver bisogno di aiuto, può scriverci. Buon lavoro!
20.01.2018 - 13:19
![]() Simone wrote:
Simone wrote:
Bij de mouw staat 112 opzetten, bij het begin van het patroon staat 5 avdan 8x het patroon volgen, dan zou ik 96 steken hebben. Echter 8x9 + 10 maakt 91, wat doe ik met de overige 11 steken??
15.01.2018 - 22:09DROPS Design answered:
Hoi Simone, je breit eerst 5 steken en dan A.1 (= 9 steken) en dat doe je in totaal 8 keer. Dat is in totaal 112 steken (5+9)x8=112. Omdat er in elke herhaling van A.1 2 steken worden geminderd, minder je 16 steken over de hele toer, daarmee kom je op een totaal van 96 (112-16)
17.01.2018 - 11:26
![]() Gigi wrote:
Gigi wrote:
Bonsoir, peut-on connaitre les dimensions des tailles en centimètres ? En effet je n'arrive pas à me décider entre la taille S et M/L il n'y a aucune référence en cm pour m'aider dans mon choix. Merci bien amicalement :)
16.08.2017 - 21:02DROPS Design answered:
Bonjour Gigi, le schema des mesures se trouve en bas de page, sous les explications. En plus consultez notre lecon: Comment lire le schéma des mesures. Bon tricot!
17.08.2017 - 16:41
![]() Kari Holth wrote:
Kari Holth wrote:
Jeg sartet på denne jakka, 160-2. I str S. Jeg kan ikke forstå at det skal legges opp så mange masker, selv om jeg ser at det skal felles etter hvert. Jeg fikk starten nesten rundt meg selv 2 ganger. På bildet ser den forholdsvis ettersittende ut "rundt ekvator".(hoftene). Fint om jeg får et svar. Strikker i Belle.
03.08.2017 - 16:29DROPS Design answered:
Hei Kari. Mønstret vil gjøre det at plagget trekker seg sammen, men husk å sjekke din strikkefasthet. God Fornøyelse!
09.08.2017 - 13:51Frances wrote:
Please help. I'm making a small so I've cast on 311 and I've done the garter rows, now starting pattern. I must be misunderstanding the pattern because I'm doing: K6, P10 (A.1, P7)x3, inset marker, (P7, A.1)x8, P7, insert marker, (P7, A.1)x3, P10, K6. But this only makes 247. Where am I going wrong?
31.07.2017 - 14:59DROPS Design answered:
Dear Frances, you have to repeat the A.1 pattern 1 more time on each piece, ie: now starting pattern. I must be misunderstanding the pattern because I'm doing: K6, P10 (A.1, P7)x 4 times in total, inset marker, (P7, A.1)x 9 times in total, P7, insert marker, (P7, A.1) x 4 times in total, P10, K6. Happy knitting!
31.07.2017 - 16:19
|
||||||||||
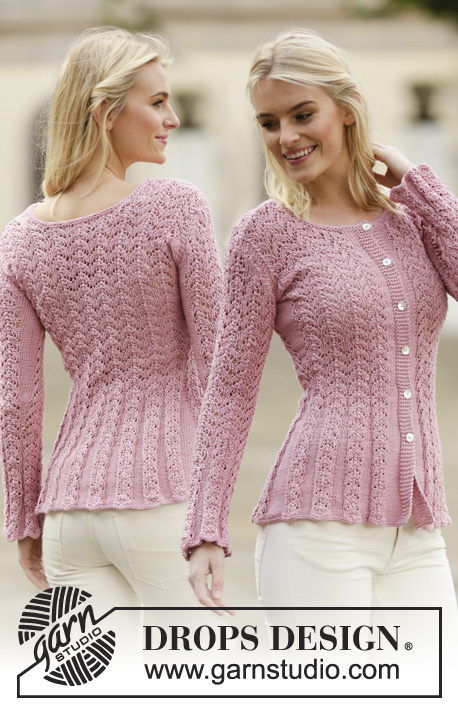
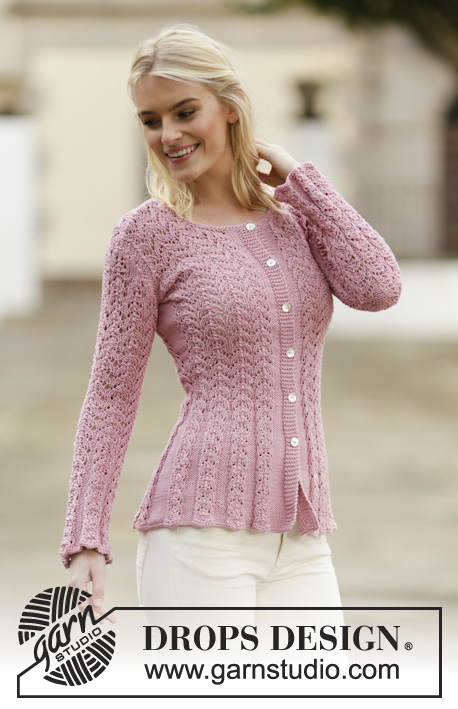
Love Is In The Air Cardigan#loveisintheaircardigan |
||||||||||
 |
 |
|||||||||
Knitted DROPS jacket with lace pattern in ”Muskat” or "Belle". Size: S - XXXL.
DROPS 160-2 |
||||||||||
|
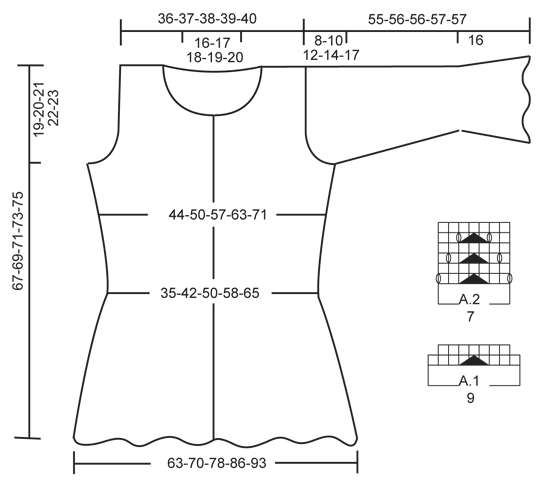
GARTER ST (worked in the round): * K 1 round and P 1 round *, repeat from *-*. 1 ridge = 2 rounds. GARTER ST (back and forth): K all rows. 1 ridge = 2 rows K. PATTERN: See diagrams A.1 and A.2. The diagrams show all rows in pattern seen from RS. INCREASE TIP: Work until 1 st remains before marker, 1 YO, P 2 (marker is in the middle of these sts), 1 YO = 2 sts inc. On next row K YO twisted to avoid holes. BUTTONHOLES: Dec for buttonholes on right band from RS. 1 buttonhole = K tog 3rd and 4th st from mid front, then make 1 YO. Dec for buttonholes when piece measures: SIZE S: 15, 23, 31, 39, 47 and 55 cm. SIZE M/L: 15, 23, 31, 39, 48 and 57 cm. SIZE XL: 16, 24, 32, 41, 50 and 59 cm. SIZE XXL: 16, 25, 34, 43, 52 and 61 cm. SIZE XXXL: 17, 27, 36, 45, 54 and 63 cm. ---------------------------------------------------------- BODY: Worked back and forth on circular needle. Cast on 311-351-411-439-495 sts (incl 6 band sts in each side of piece) on circular needle size 3.5 mm with Muskat or Belle. Work 2 ridges in GARTER ST - see explanation above. Switch to circular needle size 4 mm. Then work as follows from RS: 6 band sts in garter st, P 10-9-9-8-8, * A.1 (= 9 sts), P 7-6-6-5-5 *, repeat from *-* 3-4-5-6-7 more times, insert 1 marker (= right front piece), * P 7-6-6-5-5, A.1 *, repeat from *-* 8-10-12-14-16 more times, P 7-6-6-5-5, insert 1 marker (= back piece), * P 7-6-6-5-5, A.1 *, repeat from *-* 3-4-5-6-7 more times, P 10-9-9-8-8, 6 band sts in garter st. Work band sts in garter st until finished measurements. Work P sts K from WS and P from RS. Move the markers upwards when working. When A.1 has been worked 1 time vertically, there are 277-309-361-381-429 sts on needle. Then work A.2 (= 7 sts) over A.1 until finished measurements. When piece measures 10 cm, dec as follows: Work 6 band sts in garter st, P 2 tog, P 8-7-7-6-6, * A.2, P 2 tog, P 5-4-4-3-3 *, repeat from *-* 3-4-5-6-7 more times, marker, * P 2 tog, P 5-4-4-3-3, A.2 *, repeat from *-* 8-10-12-14-16 more times, P 2 tog, P 5-4-4-3-3, marker, * P 2 tog, P 5-4-4-3-3, A.2 *, repeat from *-* 3-4-5-6-7 more times, P 2 tog, P 8-7-7-6-6, 6 band sts in garter st = 257-285-333-349-393 sts (20-24-28-32-36 sts dec). Continue with P and pattern as before until piece measures 13-14-14-15-15 cm. Then dec as follows: 6 band sts in garter st, P 7-6-6-5-5, P 2 tog, * A.2, P 4-3-3-2-2, P 2 tog *, repeat from *-* 3-4-5-6-7 more times, marker, * P 4-3-3-2-2, P 2 tog, A.2 *, repeat from *-* 8-10-12-14-16 more times, P 4-3-3-2-2, P 2 tog, marker, * P 4-3-3-2-2, P 2 tog, A.2 *, repeat from *-* 3-4-5-6-7 more times, P 7-6-6-5-5, P 2 tog, 6 band sts in garter st = 237-261-305-317-357 sts (20-24-28-32-36 sts dec). Dec for BUTTONHOLES on right band - see explanation above. Continue dec (i.e. dec alternately on each side of every P section) every 3-4-4-5-5 cm 4-3-3-2-2 more times = 157-189-221-253-285 sts. Work next row as follows: 6 band sts in garter st, P 4, * A.2, P 1 *, repeat from *-* 3-4-5-6-7 more times, marker, * P 1, A.2 *, repeat from *-* 8-10-12-14-16 more times, P 1, marker, * P 1, A.2 *, repeat from *-* 3-4-5-6-7 more times, P 4, 6 band sts in garter st. When piece measures 30 cm, inc 1 st on each side of each marker (= 4 sts inc) - READ INCREASE TIP! Work inc sts P from RS and K from WS. Repeat inc every 1½-2-2½-3½-3½ cm 9-7-6-5-5 more times = 197-221-249-277-309 sts. When piece measures 48-49-50-51-52 cm, divide the piece as follows: Slip the first and last 52-58-65-72-80 sts on a stitch holder for front piece, cut the yarn, then work only over the middle 93-105-119-133-149 sts (= back piece). BACK PIECE: = 93-105-119-133-149 sts. Now cast off for armholes at beg of every row in each side of piece as follows: Cast off 4 sts 0-0-1-1-1 time, then 3 sts 1-1-1-1-2 times, 2 sts 2-4-4-6-7 times and 1 st 1-3-5-8-9 times = 77-77-79-79-83 sts. When piece measures 65-67-69-71-73 cm, slip the middle 31-33-35-37-39 sts on a stitch holder for neck and finish each shoulder separately = 23-22-22-21-22 sts. On next row from neck, K the first 2 sts tog = 22-21-21-20-21 sts. Work sts in the side that do not fit A.2 in stocking st. Continue to work A.2, P sts and in stocking st as before. When piece measures 66-68-70-72-74 cm, work 1 ridge in garter st over all sts, then cast off. Work the other shoulder the same way. RIGHT FRONT PIECE: = 52-58-65-72-80 sts. Now cast off for armhole at beg of every row from the side as on back piece = 44-44-45-45-47 sts. Continue to work in garter st, A.2 and P sts as before. When piece measures 57-59-61-63-65 cm, dec for neck as follows: On next row from RS slip the 14-15-16-17-18 sts towards mid front on a stitch holder for neck (work them first), then cast off on every row from neck: 2 sts 3 times and 1 st 2 times = 22-21-21-20-21 sts remain on shoulder. Work sts in the side that do not fit A.2 in stocking st. Continue to work A.2, P sts and in stocking st as before. When piece measures 66-68-70-72-74 cm, work 1 ridge in garter st over all sts, then cast off. LEFT FRONT PIECE: Work as right but reversed. SLEEVE: Worked in the round on double pointed needles. Cast on 96-105-105-112-112 sts on double pointed needles size 3.5 mm with Muskat or Belle. Work 2 ridges. Switch to double pointed needles size 4 mm. Insert 1 marker at the beg of the round. Then work as follows: * P 7-6-6-5-5, A.1 (= 9 sts) *, repeat from *-* the entire round (= 6-7-7-8-8 times in total). When A.1 has been worked 1 time vertically, there are 84-91-91-96-96 sts on needle. Work A.2 over A.1 and P as before. When piece measures 3 cm, dec as follows: * P 2 tog, P 5-4-4-3-3, A.2 *, repeat from *-* the entire round (= 6-7-7-8-8 sts dec) = 78-84-84-88-88 sts. When piece measures 6-6-6-7-7 cm, dec as follows: * P 4-3-3-2-2, P 2 tog, A.2 *, repeat from *-* the entire round (= 6-7-7-8-8 sts dec) = 72-77-77-80-80 sts. Repeat dec (i.e. dec alternately on each side of every P section) every 2½-3-3-4-4 cm 4-3-3-2-2 more times = 48-56-56-64-64 sts. Work next round as follows: * P 1, A.2 *, repeat from *-* the entire round (= 6-7-7-8-8 times in total). Piece now measures approx. 16 cm. When piece measures 18 cm, inc on each side of marker - READ INCREASE TIP - (= 2 sts inc), repeat inc every 2½-3-2-2-1½ cm 11-9-12-11-14 more times = 72-76-82-88-94 sts. P the inc sts. Work A.2 and P until piece measures 47-46-44-43-40 cm (shorter measurements in the larger sizes because of longer sleeve cap and wider shoulders), cast off 6 sts mid under sleeve (= 3 sts on each side of marker) and work sleeve back and forth on circular needle until finished measurements. Cast off for sleeve cap at beg of every row in each side: Cast off 2 sts 4 times and 1 st 1-4-7-10-14 times, then cast off 2 sts in each side until piece measures 54-55-55-56-56 cm, then cast off 3 sts 1 time in each side. NOTE: Work sts in the side that do not fit A.2 in stocking st. Cast off the remaining sts, piece measures approx. 55-56-56-57-57 cm. Knit another sleeve. ASSEMBLY: Sew the shoulder seams. Sew in sleeves. Sew the buttons on to left front piece. NECK EDGE: Pick up 100-120 sts (incl sts on stitch holder for neck) on circular needle size 3.5 mm with Muskat or Belle. Work 2 ridges. Cast off. |
||||||||||
Diagram explanations |
||||||||||
|
||||||||||
 |
||||||||||
Have you finished this pattern?Tag your pictures with #dropspattern #loveisintheaircardigan or submit them to the #dropsfan gallery. Do you need help with this pattern?You'll find 27 tutorial videos, a Comments/Questions area and more by visiting the pattern on garnstudio.com. © 1982-2026 DROPS Design A/S. We reserve all rights. This document, including all its sub-sections, has copyrights. Read more about what you can do with our patterns at the bottom of each pattern on our site. |
||||||||||


With over 40 years in knitting and crochet design, DROPS Design offers one of the most extensive collections of free patterns on the internet - translated to 17 languages. As of today we count 324 catalogues and 12290 patterns translated into English (UK/cm). 12290
We work hard to bring you the best knitting and crochet have to offer, inspiration and advice as well as great quality yarns at incredible prices! Would you like to use our patterns for other than personal use? You can read what you are allowed to do in the Copyright text at the bottom of all our patterns. Happy crafting!
Post a comment to pattern DROPS 160-2
We would love to hear what you have to say about this pattern!
If you want to leave a question, please make sure you select the correct category in the form below, to speed up the answering process. Required fields are marked *.