
Popular categories
Looking for a yarn?


Comments / Questions (68)
![]() Carol Whitman wrote:
Carol Whitman wrote:
How do you keep from having a hole at the center back where the cast-on is?
28.05.2025 - 18:01DROPS Design answered:
Dear Mrs Whitman, you can use the technique shown in this video or cast on as usual and baste the strand into the cast on edge stitches at the end, tighten and fasten. Happy knitting!
30.05.2025 - 08:16
![]() Karola wrote:
Karola wrote:
Habe jetzt Muster 1fertig jetzt meine frage muß ich von makierer 4und von makierer 1jeweils die Hälfte der maschen nehmen fürs muster 2
05.05.2025 - 20:57
![]() Hélène wrote:
Hélène wrote:
Est-ce que entre le 2e et 3e marqueur se tricote ensemble ou séparément. J’ai jamais eu autant de misère à suivre un tricot je m’en excuse. Je sais pas si c’est à cause de tricoter circulaire. Merci
15.04.2025 - 20:58DROPS Design answered:
Bonjour Hélène, lorsque vous avez tricoté A.1, vous terminez chaque côté séparément: vous tricotez d'abord les mailles entre le 4ème marqueur et le 1er marqueur - vous glissez celles entre le 1er et le 2ème marqueur en attente sur un fil (elles seront reprises pour la bordure), celles entre le 2ème et le 3ème marqueur aussi = elles seront tricotées ensuite pour l'autre manche et glissez également les mailles entre le 3ème et le 4ème marqueur en attente (elles seront également reprises pour la bordure). Vous tricotez maintenant les mailles sur l'aiguille (d'abord celles entre le 4ème et le 1er marqueur) en allers et retours. Bon tricot!
22.04.2025 - 10:00
![]() Viveka wrote:
Viveka wrote:
Fattar inte, har gjort diagram A1, hur ska jag fortsätta? Ska jag börja med A2 över de första 67 m och göra det diagrammet klart och sen fortsätta med nästa 67, eller? Tacksam för svar. // Viveka
05.04.2025 - 14:26DROPS Design answered:
Hej Viveka, ja det stemmer, når du har 67 masker på hver side, fortsætter du over kun den ene side med 2 ret, A.2=61m, 2 ret, strik 2 m i de 2 sidste masker = 69 masker :)
09.04.2025 - 12:24
![]() Helene wrote:
Helene wrote:
J’ai vraiment de la difficulté à comprendre ce patron quand je tricote le devant est-ce qu’on tricote les marqueurs ensemble ou séparé i.e 1 et 4 attaché ensemble 128 mailles ou séparé 69 mailles en exécutant le diagramme A2.SVP aidez moi
26.03.2025 - 02:58DROPS Design answered:
Bonjour Hélène, lorsque vous tricotez en allers et retours A.2, vous tricotez les manches et pas les devants; autrement dit, vous tricotez d'abord le carré avec A.1 puis vous tricotez en taille M les 69 premières mailles du tour (les autres mailles ont été mises en attente) pour la 1ère manche entre les mailles entre le 4ème et le 1er marqueur; lorsque cette manche est terminée, vous reprenez les mailles entre le 2ème et le 3ème marqueur pour tricoter la 2ème manche; vous faites les coutures des manches (27 cm, pas la longueur totale des manches) et vous terminez par la bordure tout autour de l'ouverture. Bon tricot!
26.03.2025 - 08:43
![]() Hélène wrote:
Hélène wrote:
Je viens de terminer A1 grandeur L. La suite pour moi est 67 mailles donc les côtés et qu’est-ce que vous voulez dire tricoter 2 fois la 1ere m.0-2-4-6 et la dernière m. Si je comprend ma grandeur ce serait 4 m. le diagramme A2.(61m.)comment puis-je arriver à 69 m. SVP guidez moi.
17.03.2025 - 20:18DROPS Design answered:
Bonjour Hélène, vous allez augmenter 1 maille au début + 1 maille à la fin de ces 67 mailles en tricotant 2 fois la 1ère et la dernière de ces mailles: tricotez 2 fois la 1ère maille, puis 2 m end (la taille L est la 2ème taille, donc on a ici 2 mailles endroit) puis les 61 m de A.2, 2 m end et tricotez 2 fois la dernière maille soit 2+2+61+2+2=69 mailles. Bon tricot!
18.03.2025 - 10:04
![]() Louise wrote:
Louise wrote:
Yarn group A. Is there a chart that a canadian can follow to find the conversion weight?
01.03.2025 - 22:44
![]() Carol Whitman wrote:
Carol Whitman wrote:
What are the measurements (in inches or cm) that correspond to the given sizes? How much ease is allowed?
27.06.2024 - 02:48DROPS Design answered:
Hi Carol, You will find a size chart with all the measurements for each size at the bottom of the pattern. If you choose the size which corresponds to your measurements, you will get the shape and fit as shown in the photograph. Happy crafting!
27.06.2024 - 06:31
![]() FONTAINE wrote:
FONTAINE wrote:
Pouvez vous me dire si les 30 augmentations faites à la fin de la bordure se tricoté sur toutes les mailles . Merci
27.05.2024 - 10:32DROPS Design answered:
Bonjour Mme Fontaine, tout à fait, vous augmentez 30 mailles à intervalles réguliers tout le tour (au 1er tour de A.6) pour passer de 264 à 294 mailles. Bon tricot!
27.05.2024 - 13:00
![]() Irene Dickinson wrote:
Irene Dickinson wrote:
Is it possible to print the pattern for ease of use?
13.03.2024 - 12:25DROPS Design answered:
Sure Mrs Dickinson, just click on the icon "printer" to open the dialog window of your printer and launch printing. Happy knitting!
13.03.2024 - 13:23
|
|||||||||||||||||||
Kamelia#kameliashoulderpiece |
|||||||||||||||||||
 |
 |
||||||||||||||||||
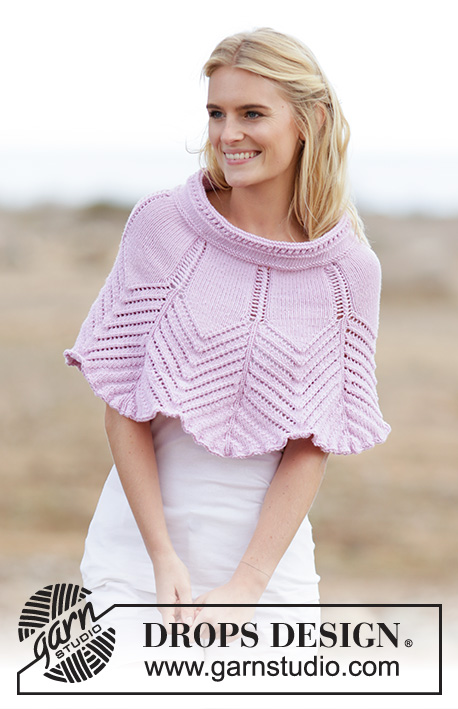
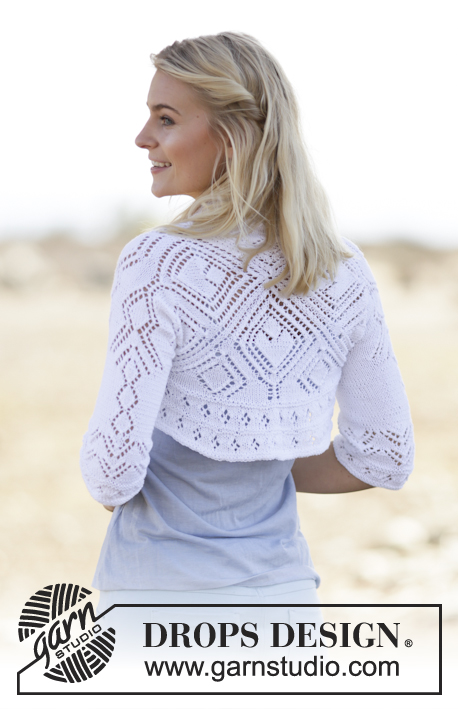
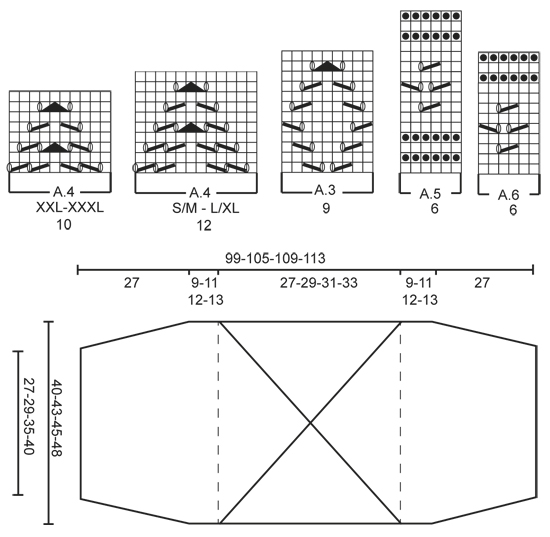
DROPS square knitted bolero with lace pattern in ”Safran”. Size: S - XXXL.
DROPS 160-25 |
|||||||||||||||||||
|
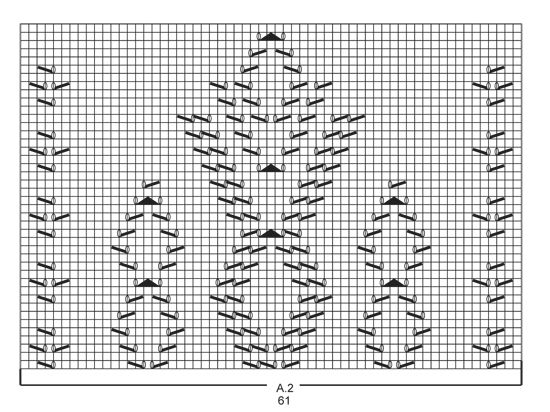
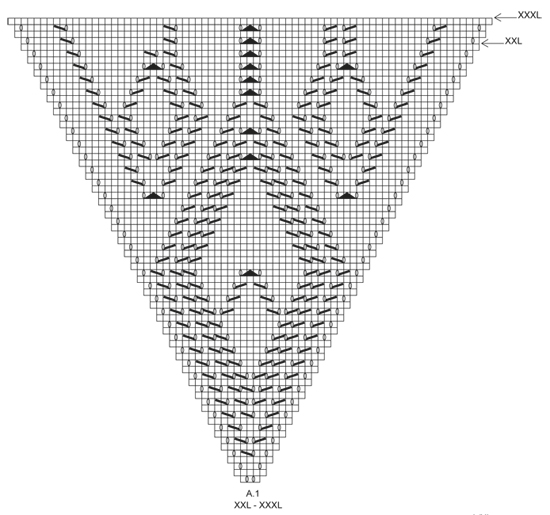
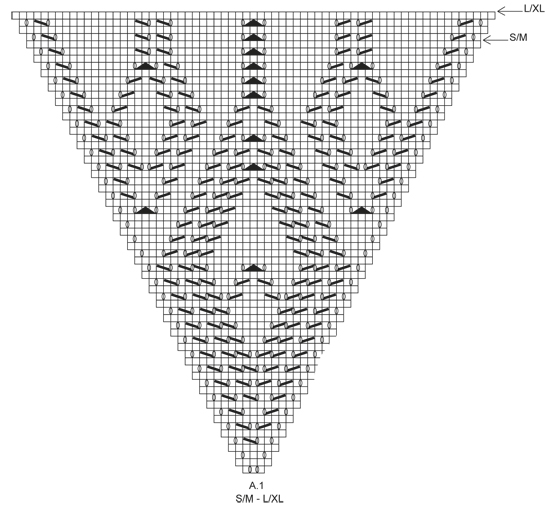
GARTER ST (back and forth): K all rows. 1 ridge = 2 rows K. INCREASE TIP: Inc 1 st by making 1 YO, on next row P YO twisted (i.e. work in back loop of st instead front) to avoid holes. PATTERN: See diagrams A.1 to A.6. The diagrams show all rows in pattern seen from RS. ---------------------------------------------------------- BOLERO: Work first a square in the round, then work out to each sleeve back and forth. BACK PIECE: Work in the round on double pointed needles, switch to circular needle when needed. Cast on 12 sts with Safran and distribute sts on 4 double pointed needles size 3.5 mm (= 3 sts on each needle). Then insert 4 markers in the piece as follows: Insert 1st marker between 3rd and 4th st, 2nd marker between 6th and 7th st, 3rd marker between 9th and 10th st and 4th marker between 12th and 1st st. Then work according to A.1 – choose diagram for correct size (= 4 times). Sts with markers are corner sts, let the markers follow when working outwards. REMEMBER THE KNITTING TENSION When A.1 has been worked 1 time vertically (see arrow for your size) each side will be worked seperatly = 63-67-71-75 sts along each side and 252-268-284-300 sts in total on needle. Then work only over the first 63-67-71-75 sts (= one side, sts between 4th and 1st marker), slip the other sides on stitch holders, work over sts between 2nd and 3rd marker later. Now work piece back and forth. On next row from RS work as follows: Work 2 sts in first st, K 0-2-4-6, A.2 (= 61 sts), K 0-2-4-6, work 2 sts in last st on row = 65-69-73-77 sts. Then work as follows: 1 edge st in GARTER ST - see explanation above, 1-3-5-7 sts in stocking st, A.2, 1-3-5-7 sts in stocking st, 1 edge st in garter st. Work edge sts in garter st until finished measurements. SIZE L/XL-XXL-XXXL: On next row from RS inc 1 st in each side of piece inside 1 edge st – READ INCREASE TIP, repeat inc on every row from RS 2-4-8 more times = 75-83-95 sts. Work inc sts in stocking st. ALL SIZES: = 65-75-83-95 sts. When A.2 has been worked 1 time vertically, work as follows from RS: 1 edge st in garter st, 27-32-36-42 sts in stocking st, A.3 (= 9 sts), 27-32-36-42 sts in stocking st, 1 edge st in garter st. Work A.3 2 times in total vertically. Work 0-6-0-4 rows in stocking st. On next row from RS, dec 3-1-1-3 sts evenly = 62-74-82-92 sts. P 1 row from WS. Work A.4 – see diagram for correct size (= 12-12-10-10 sts) 5-6-8-9 times in width. Work A.4 2-2-3-3 times in total vertically. Then work A.5 (= 6 sts) 10-12-13-15 times, AT THE SAME TIME on first row dec 0-0-2-0 sts evenly = 62-74-80-92 sts. Cast off when A.5 has been worked 1 time vertically. Work sts between 2nd and 3rd marker the same way. ASSEMBLY: Sew tog the side inside 1 edge st, 27 cm up from bottom of sleeve and up. Do same in the other side. EDGE: Worked in the round on circular needle. Beg at one sleeve seam and work with circular needle 3.5 mm with Safran from RS as follows: Pick up 20-25-28-30 sts inside 1 edge st in garter st, K the 63-67-71-75 sts from stitch holder, pick up 40-50-56-60 sts inside 1 edge st, K the 63-67-71-75 sts from stitch holder, pick up 20-25-28-30 sts = 206-234-254-270 sts. P 1 round - AT THE SAME TIME insert 4 markers in the piece as follows: P 40-47-52-56, insert 1st marker, P 23, insert 2nd marker, P 80-94-104-112, insert 3rd marker, P 23, insert 4th marker, work the rest of round (= P 40-47-52-56). When inc sts, do not inc sts between 1st and 2nd marker (marks the neck) and between 3rd and 4th marker (marks mid back on the back). K 1 round while AT THE SAME TIME inc 14-15-18-22 sts evenly = 220-249-272-292 sts. P 1 round. Then work A.6 (= 6 sts) AT THE SAME TIME on first round inc 14-15-16-20 sts evenly = 234-264-288-312 sts. A.6 is now worked 39-44-48-52 times in width. Repeat A.6 1 more time vertically AT THE SAME TIME on first round inc 24-30-36-36 sts evenly = 258-294-324-348 sts. A.6 is now worked 43-49-54-58 times in the round. When A.6 is done, loosely cast off. |
|||||||||||||||||||
Diagram explanations |
|||||||||||||||||||
|
|||||||||||||||||||
 |
|||||||||||||||||||
 |
|||||||||||||||||||
 |
|||||||||||||||||||
 |
|||||||||||||||||||
Have you finished this pattern?Tag your pictures with #dropspattern #kameliashoulderpiece or submit them to the #dropsfan gallery. Do you need help with this pattern?You'll find 27 tutorial videos, a Comments/Questions area and more by visiting the pattern on garnstudio.com. © 1982-2026 DROPS Design A/S. We reserve all rights. This document, including all its sub-sections, has copyrights. Read more about what you can do with our patterns at the bottom of each pattern on our site. |
|||||||||||||||||||


With over 40 years in knitting and crochet design, DROPS Design offers one of the most extensive collections of free patterns on the internet - translated to 17 languages. As of today we count 324 catalogues and 12290 patterns translated into English (UK/cm). 12290
We work hard to bring you the best knitting and crochet have to offer, inspiration and advice as well as great quality yarns at incredible prices! Would you like to use our patterns for other than personal use? You can read what you are allowed to do in the Copyright text at the bottom of all our patterns. Happy crafting!
Post a comment to pattern DROPS 160-25
We would love to hear what you have to say about this pattern!
If you want to leave a question, please make sure you select the correct category in the form below, to speed up the answering process. Required fields are marked *.