
Popular categories
Looking for a yarn?


Comments / Questions (50)
![]() Niva wrote:
Niva wrote:
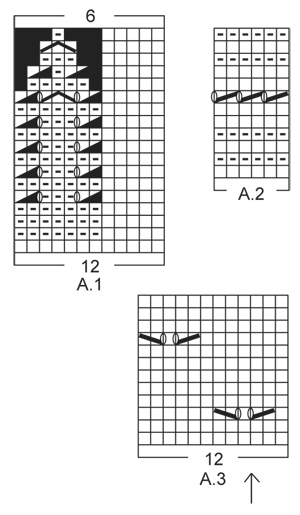
Must admit this is the most confusing pattern I’ve ever tried and I’m an accomplished knitter. I’ve read it so many times to work it out and I’m almost there. Does the A4 pattern stop after the 12 rows in the graph?
08.04.2021 - 04:33DROPS Design answered:
Dear Niva, A.4 will be repeated in height until all decreases for raglan are done. Happy knitting!
08.04.2021 - 07:51
![]() Nova wrote:
Nova wrote:
At the beginning of the A4 graph is the YO between the last stitch on the body and the first stitch on the sleeve?
07.04.2021 - 13:43DROPS Design answered:
Dear Nova, the stitch with the arrow in A.4 should be the one with the marker at the transitions, so that you will have 1 yarn over, the double decrease with marker in the middle stitch, 1 yarn over; this means there will be one hole (yarn over) on body and on sleeve. Happy knitting!
07.04.2021 - 14:26
![]() Nova wrote:
Nova wrote:
After attaching the sleeves for size L and beginning middle back for the first round, it says to start on the same row for the sleeve as for the body. Does this mean if I’m on row 4 on the body (A1) that I start on row 4 for the sleeves (A3)? Also A1 the arrow designates the middle of the sleeve but the graph starts with A4 which is 3 stitches and A3 is another 3 sts total 6 sts wouldn't the middle be half of 68 sts which is 34 sts?
06.04.2021 - 14:03DROPS Design answered:
Dear Nova, you should finish the sleeves 8adjust its length) so you will end up in the same row if the pattern as on the body, so you can continue the pattern without disrupting it. The arrow should match the middle of the sleeves, the upper middle line, put the stitch marked there, and count outwards to find out where you should start. Happy Knitting!
06.04.2021 - 14:26
![]() Nova wrote:
Nova wrote:
This is becoming a real challenge but I’m not going to give up! I am attaching the sleeves to the body but notice you don’t mention double pointed needles in your materials needed for this project. How are you supposed to knit these sleeves together with the body without them? It won’t work.
25.03.2021 - 01:52DROPS Design answered:
Dear Nova, when you have knitted the sleeves, you put all the stitches on one curcular needle, (back, sleeve, fron, sleeve), and knot the circular needle on the round. You don't knit "together" as a three needle bind off, but along with the body, in one big circle, that is getting decreased as you get to the neckline. Happy Knitting!
25.03.2021 - 02:26
![]() Nova wrote:
Nova wrote:
Hi again. I’m up to the yoke and I’m really confused about this section of the pattern. The fact that there are 3 graphs to be worked is a challenge in itself. The confusion is in the A4 graph between the body and the sleeves, does this have to do with the shaping of the raglan?
09.03.2021 - 13:31DROPS Design answered:
Dear Nova, pattern A.4 is between each body and sleeve, right at the raglan line. Shaping happens before and after this pattern. Happy Knitting!
09.03.2021 - 13:57
![]() Nova wrote:
Nova wrote:
When you get to the side where the first increases have been worked you have two extra stitches so to keep the eyelet pattern uniform, the space between the next eyelet is 9 stitches and that throws the whole eyelet pattern out. I don’t know how you can keep the eyelet pattern 7 stitches between with these increases on the side. The new repeat would make more sense at the beginning of the round.
26.02.2021 - 23:15DROPS Design answered:
See answer below - if you can't work a part of decrease (K2 tog, YO), over the new stitches, just work these stitches in stocking stitch without the lace pattern. You shoulud have the correct number of sts between each eyelet in width. Hope this will help. Happy knitting!
01.03.2021 - 08:00
![]() Nova wrote:
Nova wrote:
The beginning of the round the increases can be worked out but it’s the increases halfway on the side marker those stitches throw the whole eyelet pattern out. You can’t do 7 stitches between the pattern it doesn’t work out I’ve tried it
26.02.2021 - 22:52DROPS Design answered:
Dear Nova, if you don't have enough stitches to work the whole lace pattern on the side, this means there are not enough stitches yet, just work these stitches in stocking stitch. Work the lace pattern over the new stitches only if you have enough stitches to work them. This means each lace pattern should be worked with 7 knit stitches in between. Happy knitting!
01.03.2021 - 07:58
![]() Nova wrote:
Nova wrote:
Are you saying to read the graph from left to right and then right to left alternately and the added stitches will work out with the eyelet pattern?
26.02.2021 - 16:33DROPS Design answered:
Hi Nova, when working in the round all rounds are worked from the right side, and the diagram is read solely from right to left. When starting a new round, simply start working the first symbol on the next row in diagram. Happy knitting!
28.02.2021 - 21:14
![]() Nova wrote:
Nova wrote:
For example on the 3rd round after the first increases there are 4 stitches left at the end of the round and I’m not sure whether to knit those stitches as normal or do the pattern.
26.02.2021 - 15:19DROPS Design answered:
Dear Nova, see previous answer, make always sure that the eyelet pattern fit in height, it shouldn't be displaced. Happy knitting!
26.02.2021 - 16:17
![]() Nova wrote:
Nova wrote:
When doing the body and the A3 and making the increases on either side of the markers I notice that those extra stitches will throw the alternate pattern out where the holes should be. Is that how it’s supposed to be?
26.02.2021 - 15:08DROPS Design answered:
Dear Nova, the increased stitches should be worked in A.3, this means at the beg of A.3 work the new stitches as a new repeat reading diagram from the left towards the right (= there should be always 7 sts before the next K2 tog, YO in the lace pattern. And at the end of A.3, work the new stitches as a new repeat of A.3 (reading from the right towards the left). Hope this will help. Happy knitting!
26.02.2021 - 16:16
|
||||||||||||||||||||||||||||
White Romance#whiteromancetop |
||||||||||||||||||||||||||||
 |
 |
|||||||||||||||||||||||||||
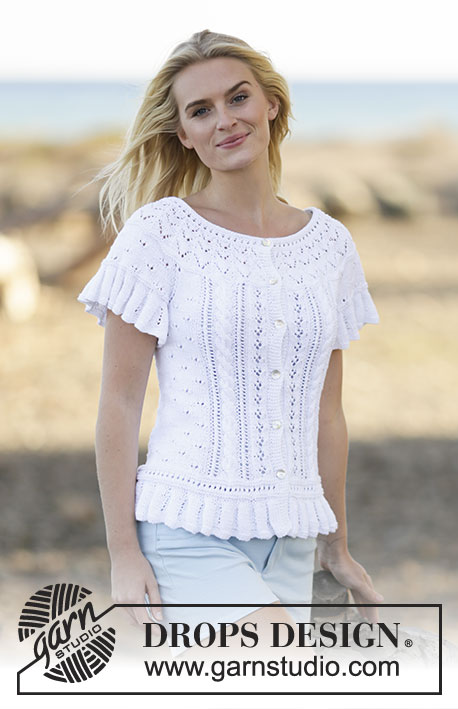
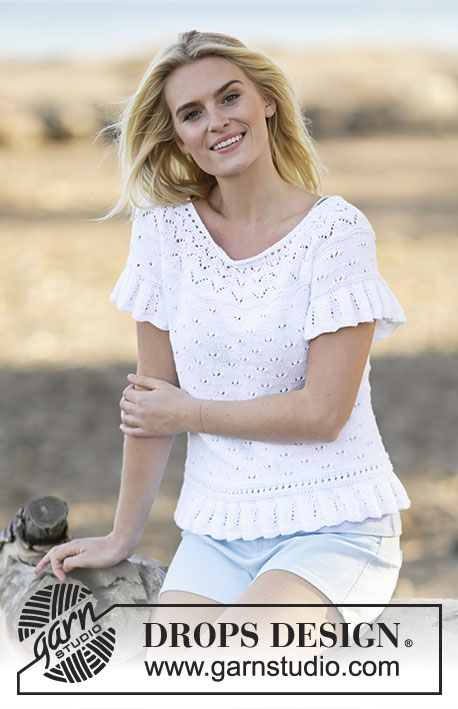
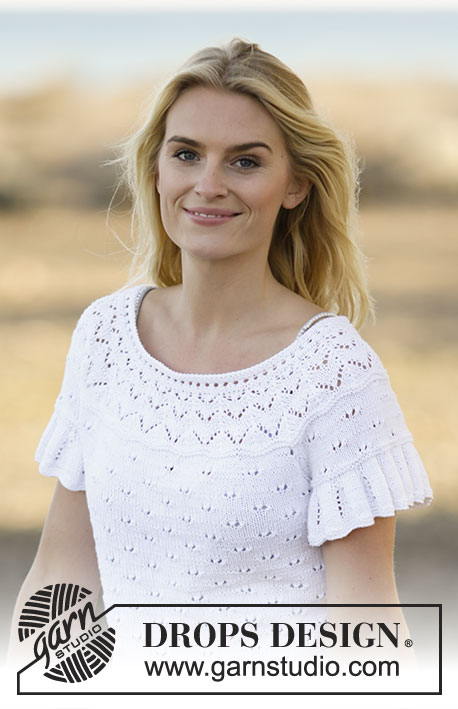
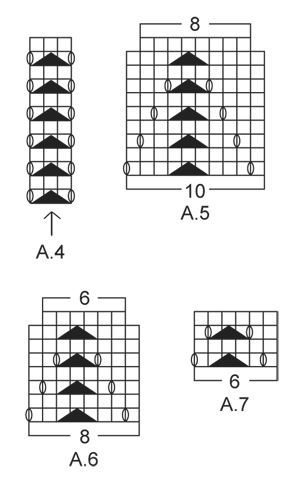
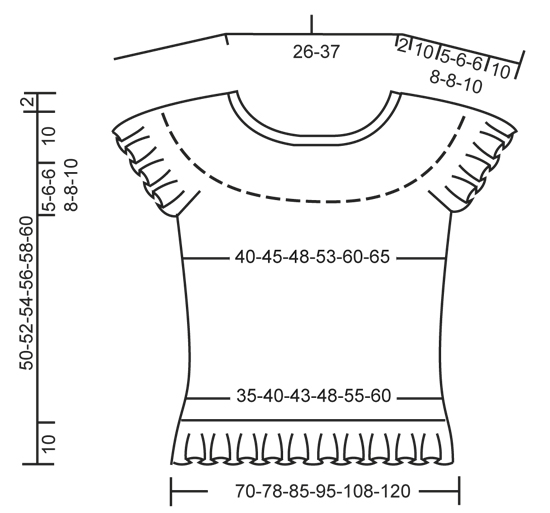
Knitted DROPS top with lace pattern, short sleeves and round yoke in ”Safran”. Size: S - XXXL.
DROPS 159-12 |
||||||||||||||||||||||||||||
|
GARTER ST (in the round on circular needle): * K 1 round and P 1 round *, repeat from *-*. 1 ridge = 2 rounds. PATTERN: See diagrams A.1 to A.7. The diagrams show all rows in pattern seen from RS. INCREASE TIP: Inc 1 st by making 1 YO. On next round work YO twisted to avoid holes - work inc sts in stocking st. RAGLAN: Dec for raglan on each side of A.4 in every transition between sleeves and body. Dec as follows after A.4: Slip 1 st as if to K, K 1, psso. Dec as follows 2 sts before A.4: K 2 tog. ---------------------------------------------------------- BODY: Worked in the round on circular needle. Cast on 336-372-408-456-516-576 sts on circular needle size 2.5 mm with Safran. Work 2 ridges in GARTER ST - see explanation above. Switch to circular needle size 3 mm and work pattern according to diagram A.1. When A.1 has been worked 1 time vertically, there are 168-186-204-228-258-288 sts on needle. Then continue pattern according to diagram A.2. After A.2 K 2 rounds while AT THE SAME TIME inc 0-6-0-0-6-0 sts evenly on last round = 168-192-204-228-264-288 sts. Insert 1 marker at beg of round and 1 marker after 84-96-102-114-132-144 sts (= the sides). Then continue pattern according to diagram A.3. REMEMBER THE KNITTING TENSION AT THE SAME TIME when piece measures 12 cm, inc 1 st on each side of both markers - READ INCREASE TIP (= 4 sts inc). Repeat inc every 4-4-4-5-5-5 cm a total of 6 times in each side = 192-216-228-252-288-312 sts - NOTE: Work inc sts in stocking st. Continue to work until piece measures 35-36-38-38-40-40 cm. Work next round as follows: Cast off 5-5-5-6-6-6 sts for armhole, work 86-98-104-114-132-144 sts (= front piece), cast off 10-10-10-12-12-12 sts for armhole (i.e. 5-5-5-6-6-6 sts on each side of marker), work 86-98-104-114-132-144 sts (= back piece) and cast off the remaining 5-5-5-6-6-6 sts. Put piece aside and knit the sleeves. SLEEVE: Worked in the round on circular needle. Cast on 144-156-156-168-168-180 sts on circular needle size 2.5 mm with Safran. Work 2 ridges in GARTER ST - see explanation above. Switch to circular needle size 3 mm and work pattern according to diagram A.1. When A.1 has been worked, there are 72-78-78-84-84-90 sts on needle. Work 2 ridges. AT THE SAME TIME on last round cast off the middle 10-10-10-12-12-12 sts mid under sleeve = 62-68-68-72-72-78 sts remain on needle. Put piece aside and knit another sleeve. YOKE: Slip sleeves on to same circular needle as body where armholes were cast off (without working them first) = 296-332-344-372-408-444 sts. AT THE SAME TIME insert 1 marker in first and last st on both sleeves (= 4 markers). Beg mid back and continue pattern as before on body AT THE SAME TIME work A.3 on sleeves (arrow in diagram should match middle of sleeve, beg on same row in diagram as on body). Work in addition A.4 in every transition between body and sleeves (arrow in diagram should match against st with marker). When 2 rounds have been worked in the round over all sts, beg dec for RAGLAN - see explanation above (= 8 sts dec). Repeat dec on every 4th round 4-5-5-7-7-8 times in total = 264-292-304-316-352-380 sts. Work 2 ridges over all the sts while AT THE SAME TIME dec 4-12-4-6-12-10 sts evenly on 1st round = 260-280-300-310-340-370 sts. K 2 rounds. Now beg dec for round yoke and work pattern in the round according to diagram A.5 (= 26-28-30-31-34-37 repetitions on round – NOTE: Switch to a shorter circular needle when needed). When A.5 has been worked 1 time vertically, work A.6 instead of A.5. When A.6 has been worked 1 time vertically, there are 156-168-180-186-204-222 sts on needle. Now work A.7 instead of A.6. When A.7 has been worked 1 time vertically, work an elevation in the back of neck. Insert 1 marker mid front. Beg mid back and K until 14-14-16-16-18-20 sts remain before marker. Turn, K back until 14-14-16-16-18-20 sts remain before marker in the other side. Turn, K until 30-30-34-34-38-42 sts remain before marker. Turn, K back until 30-30-34-34-38-42 sts remain before marker in the other side. Turn, K until 46-46-52-52-58-64 sts remain before marker. Turn, K back until 46-46-52-52-58-64 sts remain before marker in the other side. Turn, K until 62-62-70-70-76-86 sts remain before marker. Turn, K back until 62-62-70-70-76-86 sts remain before marker in the other side. Turn and K back to beg of round. NECK EDGE: Switch to circular needle size 2.5 mm and work pattern in the round over all sts according to diagram A.2. AT THE SAME TIME on 1st round dec 22-24-24-26-30-32 sts evenly = 134-144-156-160-174-190 sts. After A.2, loosely cast off with K from RS. Top measures approx. 52-54-56-58-60-62 cm from shoulder and down. ASSEMBLY: Sew the openings under the sleeves. |
||||||||||||||||||||||||||||
Diagram explanations |
||||||||||||||||||||||||||||
|
||||||||||||||||||||||||||||
 |
||||||||||||||||||||||||||||
 |
||||||||||||||||||||||||||||
 |
||||||||||||||||||||||||||||
Have you finished this pattern?Tag your pictures with #dropspattern #whiteromancetop or submit them to the #dropsfan gallery. Do you need help with this pattern?You'll find 30 tutorial videos, a Comments/Questions area and more by visiting the pattern on garnstudio.com. © 1982-2026 DROPS Design A/S. We reserve all rights. This document, including all its sub-sections, has copyrights. Read more about what you can do with our patterns at the bottom of each pattern on our site. |
||||||||||||||||||||||||||||


With over 40 years in knitting and crochet design, DROPS Design offers one of the most extensive collections of free patterns on the internet - translated to 17 languages. As of today we count 324 catalogues and 12290 patterns translated into English (UK/cm). 12290
We work hard to bring you the best knitting and crochet have to offer, inspiration and advice as well as great quality yarns at incredible prices! Would you like to use our patterns for other than personal use? You can read what you are allowed to do in the Copyright text at the bottom of all our patterns. Happy crafting!
Post a comment to pattern DROPS 159-12
We would love to hear what you have to say about this pattern!
If you want to leave a question, please make sure you select the correct category in the form below, to speed up the answering process. Required fields are marked *.