
Popular categories
Looking for a yarn?


Comments / Questions (95)
![]() Tereza wrote:
Tereza wrote:
Zdravím, nějak jsem se zamotala a teď pářu a nevím jak začít znova. Výšku 6 cm kdy začnu v nohavici přidávat oka měřím od začátku vroubku, nebo úplně od kraje? A poté co udělám všechna přidání tak pokračuji v pletení dokud nemám daný počet cm dle velikosti, je to tak? Díky.
17.04.2026 - 16:52
![]() Fanni wrote:
Fanni wrote:
Hei, ihana ilmainen ohje, kiitos siitä! Toivoisin, että kaltaisilleni aloittelijoille lisättäisiin hihojen silmukoiden lisäystä varten tarkempi tieto tai video siitä, millä menetelmällä silmukoita lisätään hihaa varten. Itse valitsin sattumanvaraisesti menetelmän ja hihat jäivät sen vuoksi hieman kapeiksi ja lyhyiksi ja huomasin sen liian myöhään jotta olisin voinut asian korjata. Kiitos jo etukäteen!
19.03.2025 - 18:58
![]() Silja Sofie Fadel wrote:
Silja Sofie Fadel wrote:
Hej, er ved at strikke ben og lukker 3 masker af i begyndelsen af "de næste 2 pinde", og så skal benene samles med indtagninger mod hinanden. Men der er jo indtagninger i begge sider? Vh Silja
16.02.2025 - 17:55DROPS Design answered:
Hej Silja, ja du sætter benene ind på samme rundpind så du har 2 indtagninger foran og 2 indtagninger bagpå :)
18.02.2025 - 11:48
![]() Anna wrote:
Anna wrote:
When I start on the body and have done 3 ridges in garter stitch, am I casting off 3 stitches in the middle of the work, or at the end? Since I’m starting in mid front when I connect the legs :)
28.01.2025 - 20:23DROPS Design answered:
Dear Anna. for the crotch you should "at beg of the next 2 rows cast off 3 sts". In other words, since you start at the middle of the front, cast off 3 stitches, knit until th ened of teh row, turn, cast off 3 stitches and knit until the end of the row. Happy Knitting!
28.01.2025 - 23:00
![]() Isabelle Von Eichborn wrote:
Isabelle Von Eichborn wrote:
Ich will aber nicht mit 2 Fäden stricken, deshalb habe ich ja das andere Garn gewählt. Ich möchte nur mit einem Garn stricken. Welches Garn kann ich da nehmen. Vielen Dank vorab!
21.11.2024 - 16:11DROPS Design answered:
Liebe Frau Von Eichborn, die originelle Anleitung wird aber für 2 Fäden Alpaca gestrickt, so sollen Sie "2 Fäden Alpaca" im Garnumrechner wählen, um die Alternative dazu (= 1 Faden der Garngruppe C) zu finden. Viel Spaß beim Stricken!
22.11.2024 - 10:15
![]() Isabelle Von Eichborn wrote:
Isabelle Von Eichborn wrote:
Hallo, ich stelle die Frage noch einmal, weil ich eine Fehlermeldung angezeigt bekomme. Ich möchte den Einteiler Playdate in gr. 12-18 Monate (80-86) stricken und dabei das Garn gegen DROPS Nepal austauschen. Dabei ist mir die Frage aufgekommen ob ich die gleiche Menge pro Garn bestellen muß? Also 200 gr von der einen und 300 gr von der anderen Farbe. Vielen Danke vorab für Ihre Antwort.
21.11.2024 - 12:31DROPS Design answered:
Liebe Frau Von Eichborn, benutzen Sie den Garnumrechner um die neue Garnmenge für Nepal zu finden, z.B. Alpaca wählen, dann 200 g (Natur), und 2 Fäden sind dann 223 g Nepal = ca 5 Knäuel, genauso für die 2. Farbe wiederholen: 300 g (rosa) = 334 g Nepal = ca 7 Knäuel. Viel Spaß beim Stricken!
21.11.2024 - 16:01
![]() Isabelle Von Eichborn wrote:
Isabelle Von Eichborn wrote:
Ich möchte den Einteiler Playdate in gr. 12-18 Monate (80-86) stricken und dabei das Garn gegen DROPS Nepal austauschen. Dabei ist mir die Frage aufgekommen ob ich die gleiche Menge pro Garn bestellen muß? Also 200 gr von der einen und 300 gr von der anderen Farbe. Vielen Dank vorab für Ihre Antwort.
18.11.2024 - 12:54
![]() Meriyam Kerim wrote:
Meriyam Kerim wrote:
Hallo, ich habe statt der oben angegebenen Alpakawolle Baby Merino super watch von Drops gekauft, nun ist diese ja viel dünner. Besteht die Möglichkeit die Anleitung mit zentimeterangaben zu bekommen? Dann könnte ich selber umrechnen oder soll ich besser mit doppelten Fäden arbeiten? Vielen Dank und viele Grüße Meriyam Kerim
16.11.2024 - 14:56DROPS Design answered:
Liebe Frau Kerim, Baby Merino und Alpaca gehören beide zur selben Garngruppe A, so können Sie auch hier Baby Merino anstatt Alpaca stricken, beachten Sie nur, daß man hier 2 fähig strickt, dh mit 2 Fäden Alpaca oder Baby Merino. Viel Spaß beim Stricken!
18.11.2024 - 07:32
![]() Nina wrote:
Nina wrote:
Hei, minulla on ongelma hihojen kanssa, kun en oikein ymmärrä missä kohdassa niiden ohje on, kun ei erikseen ole "ohje hihalla" kohtaa. Sekä en ole varma takakappaleen ohjeessa silmukoiden lisäämisestä, teen kokoa 68/74, ohjeessa on seuraavasti 2x3s, 1x5s, 1x7s ja 1x7s, lisäänkö 2 silmukkaa 3 kertaa, 1 silmukan 5kertaa jne vai lisääkö 3 silmukkaa 2 kertaa, 5 silmukkaa 1 kerran jne ? Kiitos jo näin etukäteen.
06.11.2024 - 17:11DROPS Design answered:
Hihat tehdään, kun housupuku on jaettu etu- ja takakappaleita varten. Tällöin kumpaankin reunaan luodaan uudet silmukat hihoja varten, eli hihat neulotaan samalla kun neulotaan takakappale ja etukappaleet. Kun ohjeessa lukee esim. lisää 2 x 3 s, tämä tarkoittaa, että työhön lisätään 3 silmukkaa 2 kertaa.
07.11.2024 - 16:45
![]() Mitrovic wrote:
Mitrovic wrote:
Bonjour, J’en suis à la combinaison mais je ne comprend pas les instructions. « Continuer à tricoter en allers et retours à partir du bord »: quel bort? Celui où les mailles sont rabattues ou celui qui est droit? Merci
04.11.2023 - 17:41DROPS Design answered:
Bonjour Mme Mitrovic, les rangs commencent désormais à partir de la 1ère maille de la jambe droite, vu sur l'endroit, vous tricotez ensuite les mailles de la jambe droite et vous terminez par celles de la jambe gauche = le début des tours se trouve au milieu du devant, tournez et tricotez sur l'envers, d'abord les mailles du côté gauche puis celles du côté droit). Bon tricot!
06.11.2023 - 08:17
|
|
Playdate#playdateoverall |
|
 |
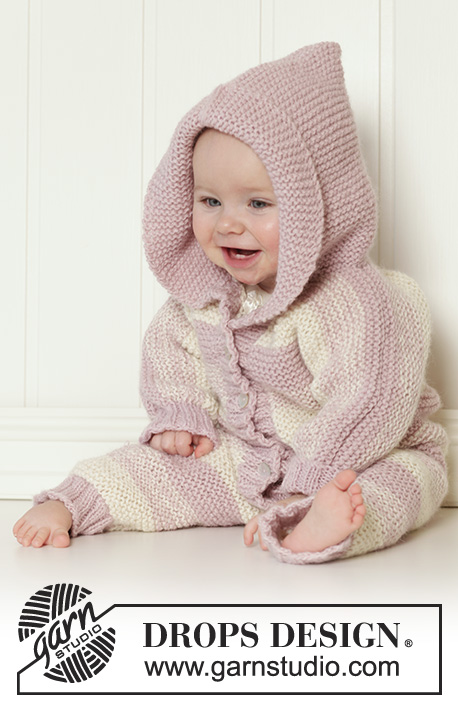 |
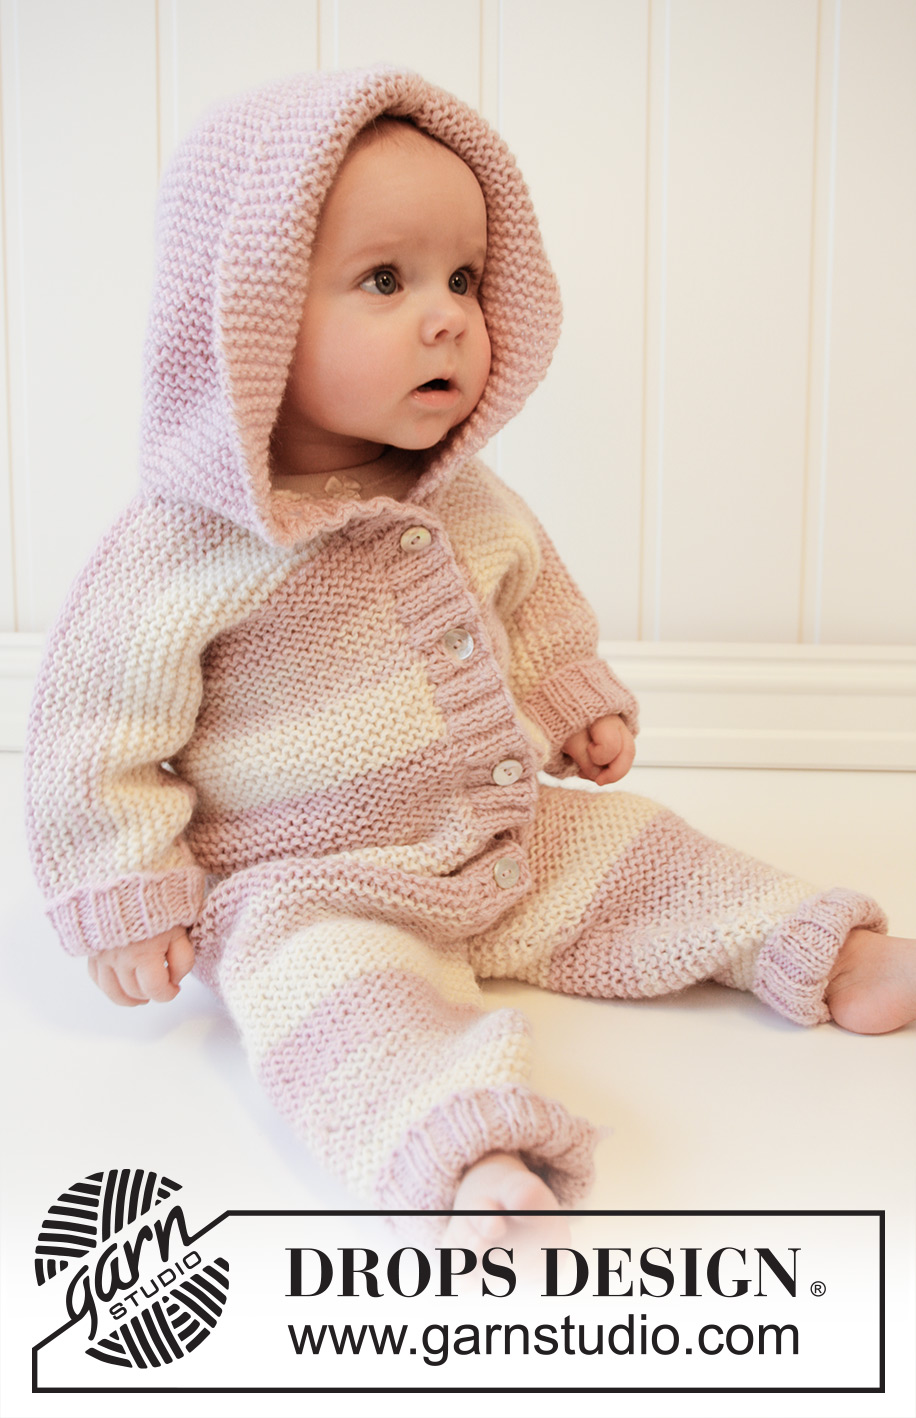
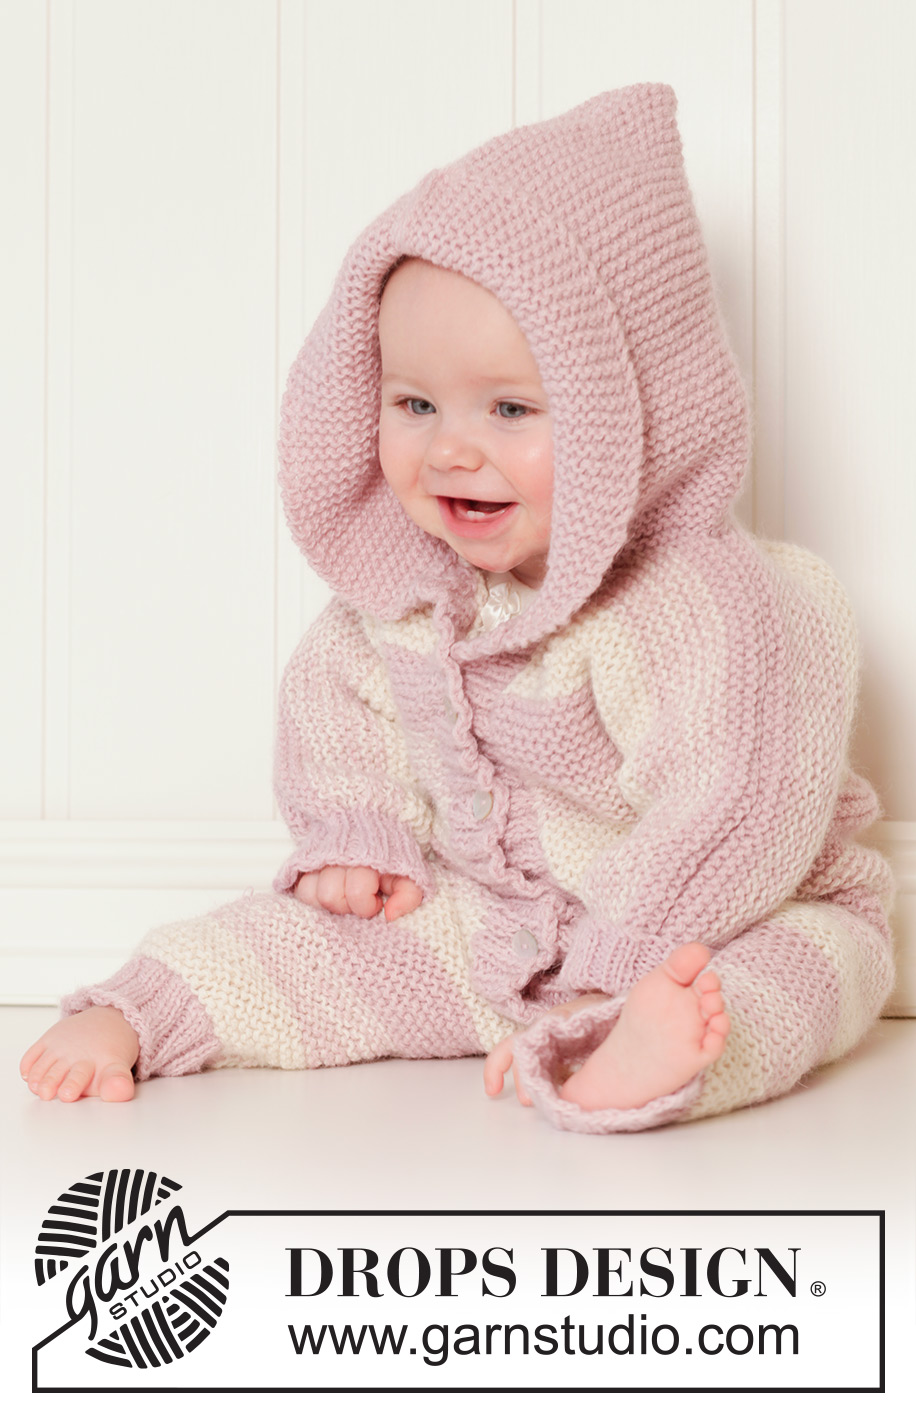
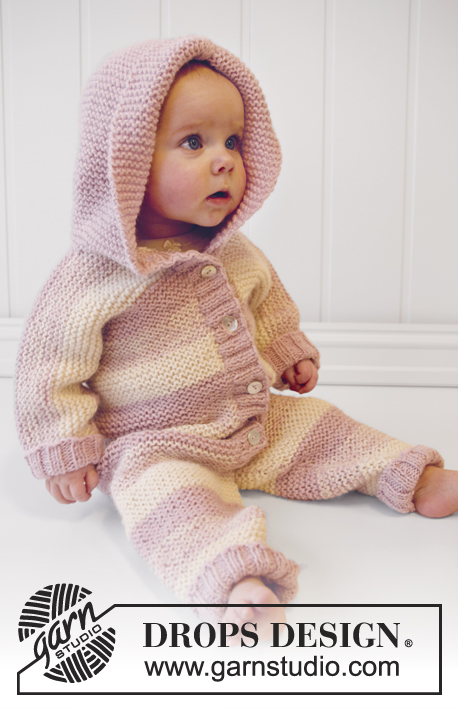
Knitted baby overall with hood in garter st worked in 2 threads DROPS Alpaca. Size 0 – 4 years.
DROPS Baby 25-17 |
|
|
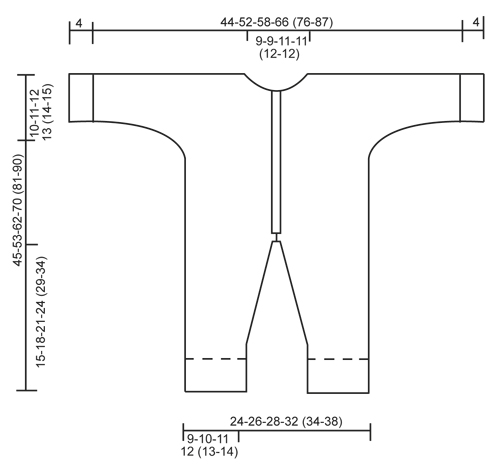
GARTER ST (back and forth on circular needle): K all rows. 1 ridge = 2 rows K. STRIPES: * 4 cm in garter st with 2 strands off white, 4 cm in garter st with 1 strand off white + 1 strand dusty pink, 4 cm in garter st with 2 strands dusty pink *, repeat from *-* until finished measurements. ---------------------------------------------------------- LEG: Worked back and forth on circular needle. LOOSELY cast on 38-42-46-50 (54-58) sts (incl 1 edge st in each side) on circular needle size 4 mm with 2 strands dusty pink. K 1 row from WS, continue with rib K 2/P 2 with 1 edge st in each side. When piece measures 4 cm, K 1 row from RS while AT THE SAME TIME dec 6-6-6-8 (8-8) sts evenly = 32-36-40-42 (46-50) sts. Switch to circular needle size 5 mm. Then work in GARTER ST – see explanation above while AT THE SAME TIME working STRIPES – see explanation above. REMEMBER THE KNITTING TENSION! AT THE SAME TIME when piece measures 6 cm, inc 1 st in each side, repeat inc every 3-5-6-6 (8-9) rows a total of 7-7-7-9 (9-10) times = 46-50-54-60 (64-70) sts. When piece measures 15-18-21-24 (29-34) cm, cast off 3 sts at the beg of the next 2 rows = 40-44-48-54 (58-64) sts. Put piece aside and knit another leg the same way. Make sure that legs have the same no of stripes. SUIT: Slip both legs on to same circular needle size 5 mm with cast off sts towards each other = 80-88-96-108 (116-128) sts. Continue to work back and forth from mid front as follows (1st row = RS and continue stripes where they ended): Work 3 ridges in garter st back and forth. At beg of the next 2 rows cast off 3 sts = 74-82-90-102 (110-122) sts remain on row. Insert 1 marker 17-19-21-24 (26-29) sts in from each side (= 40-44-48-54 (58-64) sts between markers on back piece). Continue in GARTER ST and STRIPES. When piece measures 35-42-50-57 (67-75) cm, divide piece at the 2 markers and finish front and back piece separately. BACK PIECE: = 40-44-48-54 (58-64) sts. Continue in garter st and stripes - AT THE SAME TIME cast on new sts at the end of every row in each side for sleeves: 3 sts 2-1-2-3 (1-2) times, 5 sts 1-1-1-1 (2-2) times, 7 sts 0-1-1-1 (2-2) times and then 6-7-7-8 (9-12) sts 1 time = 74-88-98-112 (130-148) sts on row. When piece measures 44-52-61-69 (80-89) cm, cast off the middle 16-16-18-18 (20-20) sts for neck and finish each shoulder/sleeve separately. Work 2 rows over the 29-36-40-47 (55-64) sts in each side – LOOSELY cast off, piece measures approx. 45-53-62-70 (81-90) cm. LEFT FRONT PIECE: = 17-19-21-24 (26-29) sts. Continue in garter st and stripes - AT THE SAME TIME cast on new sts at the end of row towards the side for sleeve as on back piece = 34-41-46-53 (62-71) sts. When piece measures 41-49-58-65 (76-85) cm, cast off for neck at the beg of every row from neck as follows: 2 sts 2 times in all sizes and then 1 st 1-1-2-2 (3-3) times in total = 29-36-40-47 (55-64) sts remain on row for shoulder/sleeve. Continue to work until piece measures 45-53-62-70 (81-90) cm, LOOSELY cast off. RIGHT FRONT PIECE: Work as left front piece but reversed. ASSEMBLY: Sew overarm seams with grafting/kitchener sts from RS. Sew underarm seams tog edge to edge in front loop of outermost sts. Sew tog legs inside 1 edge st and then sew from opening mid front up to vent. LEFT BAND: Pick up from RS inside 1 edge st approx. 46 to 90 sts along left front piece on circular needle size 4 mm with 2 strands dusty pink. P 1 row from WS while AT THE SAME TIME inc evenly to 64-72-88-96 (108-116) sts. Work next row as follows from RS (i.e. from neck and down): 1 edge st in garter st, * K 2, P 2 *, repeat from *-* until 3 sts remain and finish with K 2 and 1 edge st in garter st. Continue rib like this for 3½-4 cm (adjust according to vent at the bottom) and loosely cast off with K over K and P over P. RIGHT BAND: Work as left but after 1½ cm dec evenly for 5-5-6-6 (6-7) buttonholes. 1 buttonhole = work 2 sts tog and make 1 YO (P 2 tog in a P-section will look more pretty). Upper buttonhole should be max. 1 cm from neck edge, and bottom hole approx. 2-3 cm from vent. Sew the buttons on to the left band. Sew bands right over left at the bottom of vent. HOOD: Pick up from RS approx. 50 to 60 sts around the neck on circular needle size 5 mm with 2 strands dusty pink (also pick up over bands). Work in garter st - AT THE SAME TIME on 2nd row (= from RS) inc evenly to 72-76-80-84 (88-92) sts. (If you do not want a hood, cast off after 2 ridges in garter st.) When piece measures 19-21-23-25 (27-28) cm, cast off all sts. Place hood double and sew tog at the top with grafting/kitchener sts. CUFF: Pick up from RS 32-32-36-36 (40-40) sts on double pointed needles size 4 mm with 2 strands dusty pink at the bottom around one sleeve. Work rib = K 2/P 2 until cuff measures 4 cm, then loosely cast off with K over K and P over P. Work the same way around the edge of the other sleeve. |
|
 |
|
Have you finished this pattern?Tag your pictures with #dropspattern #playdateoverall or submit them to the #dropsfan gallery. Do you need help with this pattern?You'll find 25 tutorial videos, a Comments/Questions area and more by visiting the pattern on garnstudio.com. © 1982-2026 DROPS Design A/S. We reserve all rights. This document, including all its sub-sections, has copyrights. Read more about what you can do with our patterns at the bottom of each pattern on our site. |
|


With over 40 years in knitting and crochet design, DROPS Design offers one of the most extensive collections of free patterns on the internet - translated to 17 languages. As of today we count 324 catalogues and 12290 patterns translated into English (UK/cm). 12290
We work hard to bring you the best knitting and crochet have to offer, inspiration and advice as well as great quality yarns at incredible prices! Would you like to use our patterns for other than personal use? You can read what you are allowed to do in the Copyright text at the bottom of all our patterns. Happy crafting!
Post a comment to pattern DROPS Baby 25-17
We would love to hear what you have to say about this pattern!
If you want to leave a question, please make sure you select the correct category in the form below, to speed up the answering process. Required fields are marked *.