
Popular categories
Looking for a yarn?


Comments / Questions (51)
![]() Britta wrote:
Britta wrote:
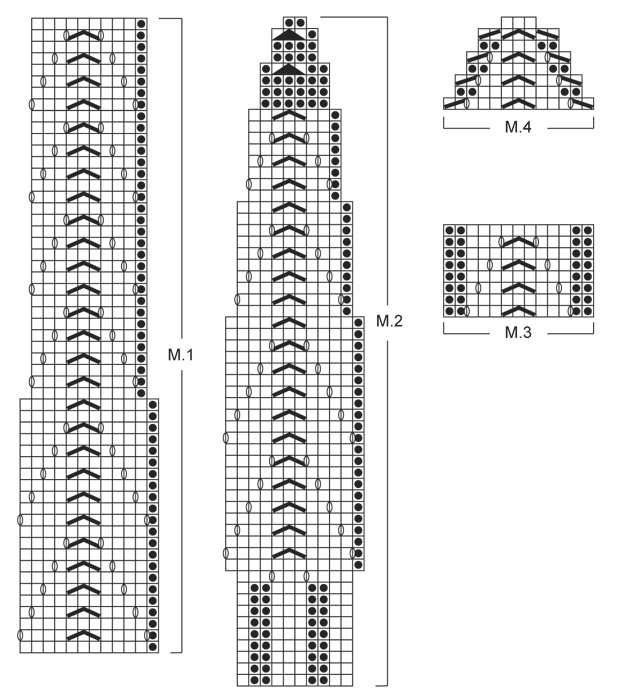
Det syns ju i diagrammet!
26.10.2012 - 10:09
![]() Susanne wrote:
Susanne wrote:
Mangler man ikke og skrive under huen,at der startes med rib 2 ret og 2 vrang 10 omgange .hilsen Susanne
25.10.2012 - 16:02DROPS Design answered:
Hej Susanne. De første omgange i rib er med i diagrammet, så dem strikker du automatisk når du følger diagrammet.
15.11.2012 - 15:41
![]() Mette Eriksen wrote:
Mette Eriksen wrote:
Tusind tak for hurtig hjælp.... Jeg kom nemt videre, og glæder mig til huen er færdig.
13.04.2012 - 21:25
![]() Mette Eriksen wrote:
Mette Eriksen wrote:
Jeg er gået i gang med at strikke huen... Men hvordan skal man tage ud i 11.række i M2 ? Der står Desværre ingenting om det i opskriften.
13.04.2012 - 19:54DROPS Design answered:
Du tager ud i 10.rekke med at slå om 2 gange i hver rapport av M.2.
13.04.2012 - 20:00
![]() Caroline wrote:
Caroline wrote:
Merci pour les explications ... J'ai trouvé mon erreur
28.03.2012 - 21:15
![]() Caroline wrote:
Caroline wrote:
Bonjour, Je suis en train de faire le modèle en taille S dans départ avec 132 mailles. Mais lorsque je termine le 2ème rang du diagramme M1 j'arrive à 142 mailles !! Est ce normal ? Et comment puis je arrivé à faire le diagramme correctement ? Est à cause des jétés ? Merci de pourvoir me répondre .
25.03.2012 - 15:04DROPS Design answered:
Bonjour Caroline, en taille S, vous répétez 11 fois M.1 tout le tour (11x 12 m), vous avez au milieu 1 surjet double (= 2 m en moins) compensés par 2 jetés (1 au début + 1 à la fin du motif), le nombre de mailles au 2ème rang de M1 = le même qu'au 1er rang. Bon tricot !
26.03.2012 - 09:17
![]() Drops Design France wrote:
Drops Design France wrote:
Merci Adrienne, les explications ont été ajustées pour la moufle droite.
25.01.2012 - 18:00
![]() Adrienne wrote:
Adrienne wrote:
Si vous suivez le modèle des gants, vous obtenez malheureusement 2 gants gauches !!!
24.01.2012 - 16:27
![]() DROPS Deutsch wrote:
DROPS Deutsch wrote:
Wenn Sie dem Diagramm folgen machen Sie die Auf-Abnahmen automatisch (Umschlag in der 11. Reihe)
30.12.2011 - 19:10
![]() Henrike wrote:
Henrike wrote:
Wie macht man die Zunahmen bzw. Abnahmen bei der Mütze? Ich habe vorher noch nie mit einem Diagramm gearbeitet und ich weiß nicht, wie ich eine Zunahme in der 11. Reihe erzeugen muss, bzw. später die Abnahmen.
29.12.2011 - 21:24
|
||||||||||||||||||||||
Florence Set#florenceset |
||||||||||||||||||||||
 |
 |
|||||||||||||||||||||
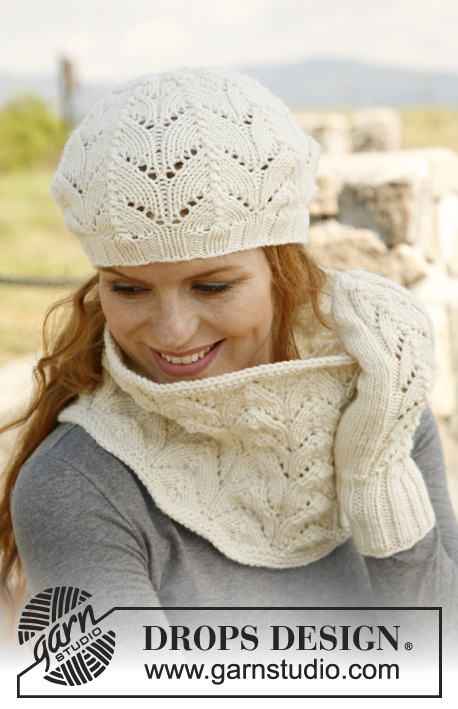
Knitted DROPS neck warmer, mittens and hat with lace pattern in ”Nepal”.
DROPS 131-35 |
||||||||||||||||||||||
|
GARTER ST (in the round on circular needle): 1 ridge = 2 rounds * K 1 round and P 1 round *, repeat from *-*. PATTERN: See diagrams M.1-M.4. Diagrams show pattern from RS and the entire pattern is worked in the round on circular needle or double pointed needles. INCREASE TIP – for mitten: Inc 1 st by making 1 YO, on next row K YO twisted (i.e. work in back loop of st instead front) to avoid holes. DECREASE TIP – for mitten: Dec on same round as dec in diagram M.4. Dec as follows at 1st marker: Work until 1 st remains before marker, slip 1 st as if to K, K 1, psso. Dec as follows at 2nd marker: work until 1 st remains before marker, K 2 tog. -------------------------------------------------------- -------------------------------------------------------- NECK WARMER: Worked in the round on circular needle. Cast on 132-144-156-168 sts with Nepal on circular needle size 5 mm. Work 4 rounds in GARTER ST - see explanation above. Then work diagram M.1. When diagram M.1 has been worked, 110-120-130-140 sts remain on round. Work 4 rounds in GARTER ST and cast off. -------------------------------------------------------- -------------------------------------------------------- HAT: Worked in the round on circular needle. Cast on 90 sts on circular needle size 3.5 mm with Nepal. Then work diagram M.2 - while AT THE SAME TIME after 10 rounds switching to circular needle size 5 mm. REMEMBER THE KNITTING TENSION! – Switch to double pointed needles size 5 mm when needed. When diagram M.2 has been worked, 18 sts remain on round. Cut the thread and pull it through the remaining sts, tighten tog and fasten. The hat measures approx. 24 cm vertically. To make the hat keep its shape - moisten it and place it over a large plate to dry. -------------------------------------------------------- -------------------------------------------------------- MITTEN: Worked in the round on double pointed needles. Cast on 39-39 sts on double pointed needles size 3.5 mm with Nepal and K 1 round. Then work rib as follows = P 2, K 2, P 2, K 2, P 2, K 1, * P 2, K 2 *, repeat from *-* the entire round. Continue with K over K and P over P until rib measures 8-9 cm. Switch to double pointed needles size 4 mm, work next round as follows: K 4, P 2, K 9, P 2, K the remaining sts - while AT THE SAME TIME dec 4-1 sts evenly = 35-38 sts on the round. Work next round as follows: K 4, diagram M.3 over the next 13 sts, K the remaining sts. When piece measures 11-13 cm, inc 1 st on each side of first st on round for thumb – READ INCREASE TIP – (on the other mitten, inc on each side of 4th st after M.3). Repeat inc on each side of the inc sts on every other round a total of 5 times = 45-48 sts. Now slip the 11 thumb sts on a stitch holder. Then work in stocking st and with pattern while AT THE SAME TIME casting on 1 new st behind thumb on next round = 35-38 sts. When mitten measures approx. 25-27 cm - adjust to finish after 1 whole repetition of diagram M.3 (approx. 3 cm remain until finished measurements) insert 2 markers: 1 marker after 21st-23rd st and 1 marker after 31st- 32nd st (= 10-9 sts between markers). Then dec for tip on the underside by dec 1 st at every marker on every other round – Read DECREASE TIP – while AT THE SAME TIME working diagram M.4 over M.3. When diagram M.4 has been worked, 17-20 sts remain on needle. On next round work all sts tog 2 by 2. Cut the thread and pull it through the remaining sts, tighten tog and fasten. THUMB: Slip the 11 thumb sts back on double pointed needles size 4 mm. In addition knit up 4-5 sts behind thumb = 15-16 sts. Work in stocking st until the thumb itself measures approx. 4½-5½ cm (try on the mitten, approx. ½ cm remains until finished measurements). Now dec by working the sts tog 2 by 2. Repeat dec on next round. Cut the thread and pull it through the remaining sts, tighten tog and fasten. |
||||||||||||||||||||||
Diagram explanations |
||||||||||||||||||||||
|
||||||||||||||||||||||
 |
||||||||||||||||||||||
Have you finished this pattern?Tag your pictures with #dropspattern #florenceset or submit them to the #dropsfan gallery. Do you need help with this pattern?You'll find 16 tutorial videos, a Comments/Questions area and more by visiting the pattern on garnstudio.com. © 1982-2026 DROPS Design A/S. We reserve all rights. This document, including all its sub-sections, has copyrights. Read more about what you can do with our patterns at the bottom of each pattern on our site. |
||||||||||||||||||||||


With over 40 years in knitting and crochet design, DROPS Design offers one of the most extensive collections of free patterns on the internet - translated to 17 languages. As of today we count 325 catalogues and 12291 patterns translated into English (UK/cm). 12291
We work hard to bring you the best knitting and crochet have to offer, inspiration and advice as well as great quality yarns at incredible prices! Would you like to use our patterns for other than personal use? You can read what you are allowed to do in the Copyright text at the bottom of all our patterns. Happy crafting!
Post a comment to pattern DROPS 131-35
We would love to hear what you have to say about this pattern!
If you want to leave a question, please make sure you select the correct category in the form below, to speed up the answering process. Required fields are marked *.