
Popular categories
Looking for a yarn?


Comments / Questions (51)
![]() Josiane wrote:
Josiane wrote:
Bonjour Pour un bonnet a combien de centimétre correspond a la taille M ? Merci josiane
09.01.2024 - 13:41DROPS Design answered:
Bonjour Josiane, c'est environ 54/56 cm. Bon tricot!
10.01.2024 - 08:44
![]() Tilou wrote:
Tilou wrote:
Bonjour, En fait, c’est une question. Je suis un peu embêtée concernant les diminutions pour le bonnet. Pourriez-vous m’aider s.v.p.? Merci. .
31.10.2023 - 13:23DROPS Design answered:
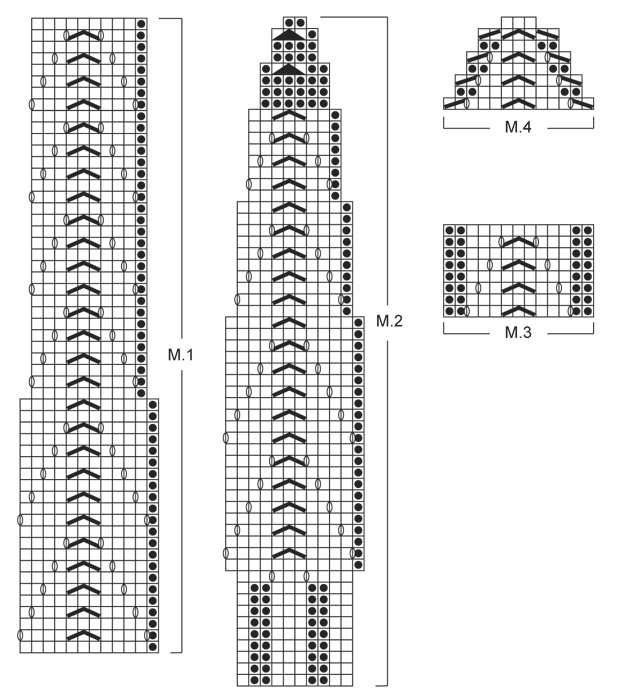
Bonjour Tilou, volontiers, les diminutions figurent dans le diagramme, on va par exemple ne pas faire les jetés pour ne pas compenser les 2 mailes diminuées au milieu de M.2, on diminue ainsi 2 mailles dans chaque motif. Bon tricot!
03.11.2023 - 07:24
![]() Lucia Bandirali wrote:
Lucia Bandirali wrote:
Sto ultimando il berretto Florence, ma non so come fare per il diagramma M2, al punto dove si restringe a dx e sx, come faccio in circolare non lavorare il primo e ultimo punto!
01.12.2022 - 20:56DROPS Design answered:
Buonasera Lucia, quei punti non ci sono perchè sono stati diminuiti nei giri precedenti. Buon lavoro!
01.12.2022 - 22:12
![]() Kaidi wrote:
Kaidi wrote:
Leidsin mustris ühe vea. Käpikutel on peale soonikut esimene ring 4mm varrastega kirjutatud 2pr, 2ph, 9pr jne. Järgmise rea järgi sain aga aru, et peab olema 4pr, 2ph, 9pr jne. Nii on kirjas ka ingliskeelses versioonis.
24.11.2021 - 13:22
![]() Marja wrote:
Marja wrote:
Setti mallista Florence, aivan ihana. Myssy ja kauluri valmiina, lapaset aloituksessa. Minusta on tullut todellinen Drops fani. Neuloosi jatkukoon.
26.09.2021 - 12:53
![]() Marja Steinhoff wrote:
Marja Steinhoff wrote:
Hei. Kysyn lapasista. Aivan alku, jatkuuko siis koko joustinneule niin että aina krs:n alussa neulotaan 2n, 2o, 2n, 2o,2n, 1o ja aina loput kerroksesta 2n,2o.
26.09.2021 - 12:50DROPS Design answered:
Hei, aivan oikein, kun olet neulonut ensimmäiset 11 silmukkaa, loput silmukat neulotaan 2 n/2 o.
05.10.2021 - 17:00
![]() Sara wrote:
Sara wrote:
Buongiorno! Ho appena realizzato il campione richiesto e per la mia misura sarebbero sufficienti meno di 90 m da caricare. Ho arrotondato a 80 m in modo da riuscire a fare i primi 10 giri con 10 ripetizioni in modo simmetrico. Mi chiedo, a livello di disegno ci sarebbero problemi? soprattutto per le ripetizioni ogni 12 m... grazie mille! Sara
19.03.2020 - 16:36DROPS Design answered:
Buongiorno Sara. E' sufficiente che segua correttamente le indicazioni del diagramma. Sul primo ferro, ogni ripetizione è di 10 maglie, al decimo ferro vengono aumentate 2 maglie in ogni ripetizione e questo le consente di proseguire correttamente con il disegno. Buon lavoro!
20.03.2020 - 09:35
![]() Maryvonne Dechamps wrote:
Maryvonne Dechamps wrote:
J'ai assayé de suivre la grille du bonnet , mais impossible à faire , pourriez vous me donner les explications rang par rang , cela me serait plus facile , je vous remercie
08.12.2019 - 08:49DROPS Design answered:
Bonjour Mme Deschamps, tricotez simplement le diagramme M.2 comme indiqué dans les explications (en changeant pour l'aiguille 5 à partir du 11ème tour) - vous pourrez apprendre ici comment tricoter un diagramme en rond. Bon tricot!
09.12.2019 - 10:04
![]() Simona wrote:
Simona wrote:
Verstehe ich das richtig ?die Maschenproben werden Nur mit Nadel 5 und 4 Glatt rechts gemacht? Oder muss man mit Nadel 3,5 im Bündchenmuster auch eine Maschenprobe fertigen?
03.01.2019 - 16:37DROPS Design answered:
Liebe Simona, ja genau, es gibt keine Maschenprobe für die Nadel Nr 3,5 - sollte die Maschenprobe mit Nadel 4 und 5 stimmen, dann stimmt sie auch mit dünneren Nadeln. Viel Spaß beim stricken!
04.01.2019 - 11:56
![]() Laura Menegatti wrote:
Laura Menegatti wrote:
Buongiorno, per favore 2 chiarimenti sulle muffole. Sto facendo la taglia S. 1) si dice di lavorare gli aumenti con gettato a dir. ritorto per non creare buchi, ma nella foto i buchi ci sono; quindi vanno lavorati normalmente come negli altri diagrammi? 2) Le diminuzioni per la punta delle muffole vanno fatte tra i 2 Marcapunto, cioè entro le 10 maglie, o esternamente ai Marcapunto? Grazie
09.01.2018 - 07:53DROPS Design answered:
Buongiorno Laura, il suggerimento per il lavoro a diritto ritorto vale solo per gli aumenti, per il resto della muffola si lavora il diagramma, che crea i buchi. Per quanto riguarda le diminuzioni per la punta è tutto spiegato nel suggerimento per le diminuzioni. Buon lavoro!
09.01.2018 - 09:34
|
||||||||||||||||||||||
Florence Set#florenceset |
||||||||||||||||||||||
 |
 |
|||||||||||||||||||||
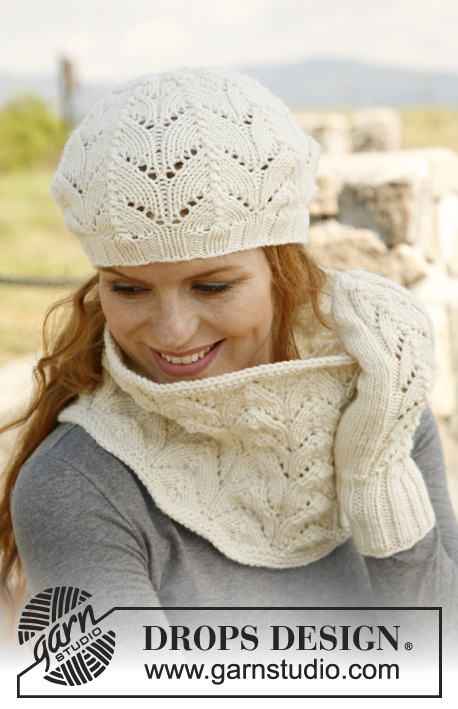
Knitted DROPS neck warmer, mittens and hat with lace pattern in ”Nepal”.
DROPS 131-35 |
||||||||||||||||||||||
|
GARTER ST (in the round on circular needle): 1 ridge = 2 rounds * K 1 round and P 1 round *, repeat from *-*. PATTERN: See diagrams M.1-M.4. Diagrams show pattern from RS and the entire pattern is worked in the round on circular needle or double pointed needles. INCREASE TIP – for mitten: Inc 1 st by making 1 YO, on next row K YO twisted (i.e. work in back loop of st instead front) to avoid holes. DECREASE TIP – for mitten: Dec on same round as dec in diagram M.4. Dec as follows at 1st marker: Work until 1 st remains before marker, slip 1 st as if to K, K 1, psso. Dec as follows at 2nd marker: work until 1 st remains before marker, K 2 tog. -------------------------------------------------------- -------------------------------------------------------- NECK WARMER: Worked in the round on circular needle. Cast on 132-144-156-168 sts with Nepal on circular needle size 5 mm. Work 4 rounds in GARTER ST - see explanation above. Then work diagram M.1. When diagram M.1 has been worked, 110-120-130-140 sts remain on round. Work 4 rounds in GARTER ST and cast off. -------------------------------------------------------- -------------------------------------------------------- HAT: Worked in the round on circular needle. Cast on 90 sts on circular needle size 3.5 mm with Nepal. Then work diagram M.2 - while AT THE SAME TIME after 10 rounds switching to circular needle size 5 mm. REMEMBER THE KNITTING TENSION! – Switch to double pointed needles size 5 mm when needed. When diagram M.2 has been worked, 18 sts remain on round. Cut the thread and pull it through the remaining sts, tighten tog and fasten. The hat measures approx. 24 cm vertically. To make the hat keep its shape - moisten it and place it over a large plate to dry. -------------------------------------------------------- -------------------------------------------------------- MITTEN: Worked in the round on double pointed needles. Cast on 39-39 sts on double pointed needles size 3.5 mm with Nepal and K 1 round. Then work rib as follows = P 2, K 2, P 2, K 2, P 2, K 1, * P 2, K 2 *, repeat from *-* the entire round. Continue with K over K and P over P until rib measures 8-9 cm. Switch to double pointed needles size 4 mm, work next round as follows: K 4, P 2, K 9, P 2, K the remaining sts - while AT THE SAME TIME dec 4-1 sts evenly = 35-38 sts on the round. Work next round as follows: K 4, diagram M.3 over the next 13 sts, K the remaining sts. When piece measures 11-13 cm, inc 1 st on each side of first st on round for thumb – READ INCREASE TIP – (on the other mitten, inc on each side of 4th st after M.3). Repeat inc on each side of the inc sts on every other round a total of 5 times = 45-48 sts. Now slip the 11 thumb sts on a stitch holder. Then work in stocking st and with pattern while AT THE SAME TIME casting on 1 new st behind thumb on next round = 35-38 sts. When mitten measures approx. 25-27 cm - adjust to finish after 1 whole repetition of diagram M.3 (approx. 3 cm remain until finished measurements) insert 2 markers: 1 marker after 21st-23rd st and 1 marker after 31st- 32nd st (= 10-9 sts between markers). Then dec for tip on the underside by dec 1 st at every marker on every other round – Read DECREASE TIP – while AT THE SAME TIME working diagram M.4 over M.3. When diagram M.4 has been worked, 17-20 sts remain on needle. On next round work all sts tog 2 by 2. Cut the thread and pull it through the remaining sts, tighten tog and fasten. THUMB: Slip the 11 thumb sts back on double pointed needles size 4 mm. In addition knit up 4-5 sts behind thumb = 15-16 sts. Work in stocking st until the thumb itself measures approx. 4½-5½ cm (try on the mitten, approx. ½ cm remains until finished measurements). Now dec by working the sts tog 2 by 2. Repeat dec on next round. Cut the thread and pull it through the remaining sts, tighten tog and fasten. |
||||||||||||||||||||||
Diagram explanations |
||||||||||||||||||||||
|
||||||||||||||||||||||
 |
||||||||||||||||||||||
Have you finished this pattern?Tag your pictures with #dropspattern #florenceset or submit them to the #dropsfan gallery. Do you need help with this pattern?You'll find 16 tutorial videos, a Comments/Questions area and more by visiting the pattern on garnstudio.com. © 1982-2026 DROPS Design A/S. We reserve all rights. This document, including all its sub-sections, has copyrights. Read more about what you can do with our patterns at the bottom of each pattern on our site. |
||||||||||||||||||||||


With over 40 years in knitting and crochet design, DROPS Design offers one of the most extensive collections of free patterns on the internet - translated to 17 languages. As of today we count 325 catalogues and 12291 patterns translated into English (UK/cm). 12291
We work hard to bring you the best knitting and crochet have to offer, inspiration and advice as well as great quality yarns at incredible prices! Would you like to use our patterns for other than personal use? You can read what you are allowed to do in the Copyright text at the bottom of all our patterns. Happy crafting!
Post a comment to pattern DROPS 131-35
We would love to hear what you have to say about this pattern!
If you want to leave a question, please make sure you select the correct category in the form below, to speed up the answering process. Required fields are marked *.