
Popular categories
Looking for a yarn?


Comments / Questions (44)
![]() Crissi wrote:
Crissi wrote:
Vielen Dank für die Antwort. Ich hatte was überlesen, daher hatte ich zu wenig Maschen und es ging nicht auf....Hab das Vorderteil schon fertig :-)
21.01.2013 - 10:27
![]() Crissi wrote:
Crissi wrote:
Ich bin jetzt am Ende des ersten Vorderteils (rechts) und werde aus der Anleitung nicht schlau. Es steht jetzt folgendes drin: Jetzt gleichmässig verteilt über die mittleren 13-13-13-13-17-17 M. mit Zöpfen wie folgt: 6 M. in Grösse S + M. + L + XL und 8 M. in Grösse XXL + XXXL – Achten Sie bitte darauf: Abnehmen indem man 2 M. re. zusammen strickt. Aber was? Abnehmen?
18.01.2013 - 12:53DROPS Design answered:
Hallo Crissi, ja genau: abnehmen.
20.01.2013 - 18:43
![]() DROPS Design NL wrote:
DROPS Design NL wrote:
Hoi. De hoogte van het armsgat is niet gelijk aan de breedte van de mouw voor het afkanten voor de mouwkop. Je breit de mouwkop en de hoogte van de mouwkop/ronding wordt aan het armsgat genaaid. Het patroon klopt en als de mouw af is, dan past de mouwkop ook in het armsgat ;o). Gr. Tine
09.11.2010 - 12:57
![]() Antoinet wrote:
Antoinet wrote:
Hallo Tine, heb de hoogte exact zo gebreid als beschreven.Heb de vraag wat onduidelijk gesteld. Met de 58 cm doelde op de breedte van de mouw. Mijn mouwkop is vergeleken met het armsgat te klein. Heb exact 17 steken op 10 cm. Heb 60 steken maar kom niet aan 58 cm breedte van de mouw. Hier kom ik niet uit.
01.11.2010 - 21:04
![]() DROPS Design NL wrote:
DROPS Design NL wrote:
Hoi Antoinet. U meerdert eerst vanaf een hoogte van 9 cm 1 st aan weerskanten op elke 5 cm in totaal 8 keer - dus u bent daarna op een hoogte van ca. 44 cm. Kant vanaf 48 cm af voor de mouwkop zoals vermeldt tot een hoogte van 55 cm en kant af bij 56 cm. Succes. Gr. Tine
01.11.2010 - 12:07
![]() Antoinet wrote:
Antoinet wrote:
Ben vergeten aan te geven dat mijn vraag gaat over de mouw
22.10.2010 - 14:08
![]() Antoinet wrote:
Antoinet wrote:
Mouw: brei dit vest in maat s. Na meerdering zoals beschreven kom ik uit op 60 steken= 35 cm. 1x1 steek beide kanten, daarna 8x 1 steek beide kanten. totaal 18 steken +42 opzetsteken = 60 steken. Patroon geeft 58 cm aan en geen aantal steken. Waar ga ik de fout in?
21.10.2010 - 21:57Marisa wrote:
Could you revise the explanation of the pattern diagram? Because I think there is a mistake. Thank you
01.08.2010 - 17:56
![]() Ulrike wrote:
Ulrike wrote:
Eine sehr schöne, elegante, praktische Jacke, die, glaube ich, auf der Seite ob der fehlenden Kontraste etwas untergeht.
21.07.2010 - 12:02
![]() Carla wrote:
Carla wrote:
Deze past heel mooi bij de trui NE-021
27.06.2010 - 23:41
|
|||||||||||||||||||||||||
Martina's Hug |
|||||||||||||||||||||||||
|
|
|||||||||||||||||||||||||
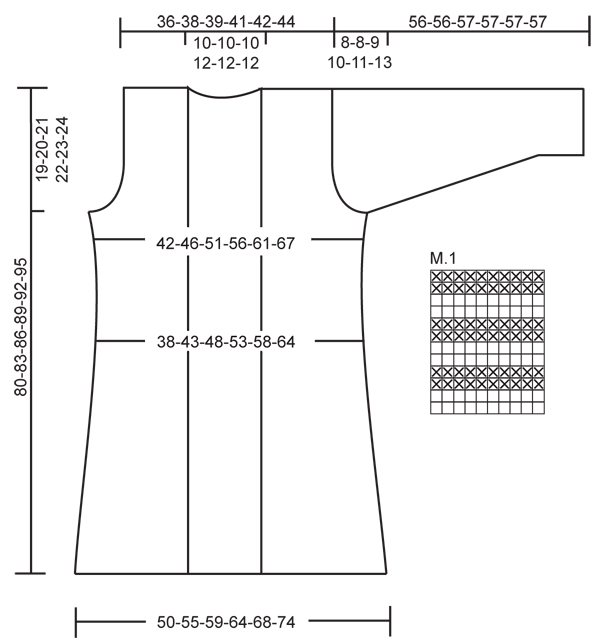
Knitted long DROPS jacket with cables and shawl collar in ”Nepal”. Size S - XXXL.
DROPS 123-39 |
|||||||||||||||||||||||||
|
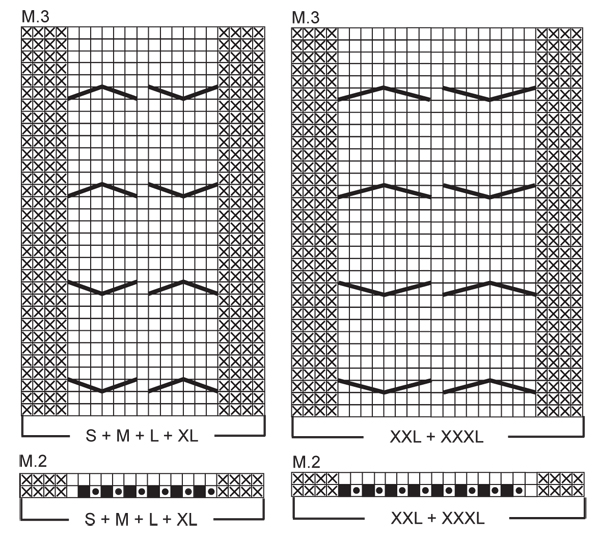
GARTER ST (back and forth on circular needle): K all rows. MEASUREMENT TIP: Because of the weight of the yarn make all measurements while the garment is hanging, otherwise it will be too long when worn. KNITTING TIP-1 (applies to front band): To make the edge neater work the 2 first sts on front band with 2 strands (use a separate small ball of yarn). It is important to either K or P first st according to pattern, i.e. do not slip first st as if to K/P. KNITTING TIP-2 (applies to front band): To make sure front band isn’t too tight, work shortened rows on front band with regular intervals as follows: * Beg mid front and work 2 rows as before on all sts on needle, turn piece, work 1 row on the 18-18-18-20-20-20 front band sts only, turn piece, slip 1 st as if to K/P, tighten thread and work return row *, repeat from *-* after approx every 10 rows. PATTERN: See diagrams M.1 to M.3. Diagrams show the pattern from RS. Row 1 in diagram = RS. INCREASING TIP (applies to shawl collar): Inc 1 st by making 1 YO inside the 2 front band sts towards front edge. On next row K YO into back of loop, to avoid a hole. BUTTONHOLES: Make buttonholes on right front band. 1 BUTTONHOLE = K tog 3rd and 4th st from mid front and make 1 YO. Make buttonholes when piece measures: SIZE S: 27, 34, 41 and 48 cm. SIZE M: 29, 36, 43 and 50 cm. SIZE L: 29, 37, 45 and 53 cm. SIZE XL: 31, 39, 47 and 55 cm. SIZE XXL: 34, 42, 50, 58 cm. SIZE XXXL: 33, 42, 51 and 60 cm. -------------------------------------------------------- JACKET: All parts worked back and forth on circular needle. BACK PIECE: Cast on 87-95-103-110-118-128 sts (includes 1 edge st each side) on circular needle size 4.5 mm with Nepal. Work 4 rows GARTER ST - see above! Change to circular needle size 5 mm and work stocking st back and forth on needle with 1 edge st each side. REMEMBER THE KNITTING TENSION! When piece measures 4-4-5-6-6-6 cm - See MEASUREMENT TIP -dec 1 st each side and repeat the dec each side on every 4-4-4-4.5-4.5-4.5 cm a total of 10-10-10-9-9-9 times = 67-75-83-92-100-110 sts. When piece measures 45-46-47-48-49-50 cm inc 1 st each side. Repeat the inc each side on every 5-5-6-6-6-6 cm a total of 3 times = 73-81-89-98-106-116 sts. When piece measures 61-63-65-67-69-71 cm cast off for armhole at beg of row each side as follows: 3 sts 1-1-1-1-2-3 times, 2 sts 1-1-2-3-3-4 times and 1 st 1-3-4-5-5-4 times = 61-65-67-70-72-74 sts. When piece measures 78-81-84-87-90-93 cm cast off the middle 15-15-15-18-18-18 sts for neck and complete each shoulder separately. Cast off 1 st on neckline on next row = 22-24-25-25-26-27 sts left on shoulder. Cast off when piece measures 80-83-86-89-92-95 cm. RIGHT FRONT PIECE: Cast on 53-57-61-65-69-74 sts (includes 1 edge st at the side and 18-18-18-20-20-20 front band sts towards front edge) on circular needle size 4.5 mm with Nepal. Work 4 rows garter st and change to circular needle size 5 mm. See KNITTING TIP 1 + 2 AND REMEMBER MEASUREMENT TIP! Work next row as follows from RS: M.1 on the first 18-18-18-20-20-20 sts (= front band), M.2 (= 15 sts in SIZE S + M + L + XL and 17 sts in SIZE XXL + XXXL), stocking st on the next 19-23-27-29-31-36 sts and 1 edge st. After 1 vertical repeat of M.2 there are 59-63-67-71-77-82 sts on needle. Now continue in M.3 instead of M.2 (Row 1 = RS, see diagram for your size) – work remaining sts as before. When piece measures 4-4-5-6-6-6 cm dec at the side as described for back piece = 49-53-57-62-68-73 sts. REMEMBER BUTTONHOLES ON FRONT BAND - see above. When piece measures 45-46-47-48-49-50 cm inc at the side as described for back piece. AT THE SAME TIME when piece measures 48-49-50-51-52-53 cm inc 1 st for shawl collar – See INCREASING TIP. Repeat the inc on every 3-3.5-3.5-4-4-4.5 cm a total of 8 times. AT THE SAME TIME when piece measures 61-63-65-67-69-71 cm cast off for armhole at the side as described for back piece (cast off at the beg of every row from the side). After all inc and dec are complete there are 54-56-57-59-62-63 sts on needle. Continue until 1 row remains before piece measures 80-83-86-89-92-95 cm – adjust so that next row is from RS. Now dec evenly on the middle 13-13-13-13-17-17 sts in cable as follows: 6 sts in SIZE S + M + L + XL and 8 sts in SIZE XXL + XXXL – NOTE: Dec by K2 tog. On next row cast off 22-24-25-25-26-27 sts for shoulder = 26-26-26-28-28-28 sts left on needle for shawl collar, work remaining sts on row. Continue in M.1 back and forth on these sts AT THE SAME TIME work shortened rows as follows - adjust so that next row is a K row from RS and either row 2, 6 or 10 in M.1 (adjust to this by working an extra row here if necessary): * K1 row from RS on all sts, turn and K return row from WS on all sts, turn and P the first 14 sts, turn, slip first st as if to K, tighten thread and K return row, turn and P 1 row on all sts, turn and P 1 row from WS on all sts *, repeat from *-* until collar measures approx 7-7-7-8-8-8 cm towards the neck, slip sts on a stitch holder. LEFT FRONT PIECE: Cast on and work like right front piece, but mirrored. NOTE: Do not make buttonholes on left front band. When working shortened rows on collar adjust so the collar is identical on both sides and mid back for sewing tog SLEEVE: Cast on 42-44-44-46-46-48 sts (includes 1 edge st each side) on circular needle size 4.5 mm with Nepal. Work 4 rows garter st. Change to circular needle size 5 mm and work M.1 back and forth on needle. When piece measures 8 cm continue in stocking st. When piece measures 9-9-11-9-12-10 cm inc 1 st each side. Repeat the inc on every 5-4-3-3-2-2 cm a total of 8-10-12-13-16-16 times = 58-64-68-72-78-80 sts. When piece measures 48-48-48-47-46-44 cm - NOTE: Less for the larger sizes because of longer sleeve cap and wider shoulder – cast off for sleeve cap at the beg of every row each side as follows: 3 sts 1 time, 2 sts 3 times and 1 st 1-1-2-3-4-5 times, then 2 sts each side until piece measures 55-55-56-56-56-56 cm. Now cast off 3 sts at the beg of the next 2 rows and cast off remaining sts, piece measures approx 56-56-57-57-57-57 cm. ASSEMBLY: Sew shoulder seams. Graft collar tog mid back and sew collar to neckline on back piece. Set in sleeves. Sew sleeve and side seams inside 1 edge st. Sew buttons on left front piece. |
|||||||||||||||||||||||||
Diagram explanations |
|||||||||||||||||||||||||
|
|||||||||||||||||||||||||
 |
|||||||||||||||||||||||||
 |
|||||||||||||||||||||||||
Have you finished this pattern?Tag your pictures with #dropspattern or submit them to the #dropsfan gallery. Do you need help with this pattern?You'll find 23 tutorial videos, a Comments/Questions area and more by visiting the pattern on garnstudio.com. © 1982-2026 DROPS Design A/S. We reserve all rights. This document, including all its sub-sections, has copyrights. Read more about what you can do with our patterns at the bottom of each pattern on our site. |
|||||||||||||||||||||||||


With over 40 years in knitting and crochet design, DROPS Design offers one of the most extensive collections of free patterns on the internet - translated to 17 languages. As of today we count 324 catalogues and 12290 patterns translated into English (UK/cm). 12290
We work hard to bring you the best knitting and crochet have to offer, inspiration and advice as well as great quality yarns at incredible prices! Would you like to use our patterns for other than personal use? You can read what you are allowed to do in the Copyright text at the bottom of all our patterns. Happy crafting!
Post a comment to pattern DROPS 123-39
We would love to hear what you have to say about this pattern!
If you want to leave a question, please make sure you select the correct category in the form below, to speed up the answering process. Required fields are marked *.