
Popular categories
Looking for a yarn?


Comments / Questions (40)
![]() Kath Wilmott wrote:
Kath Wilmott wrote:
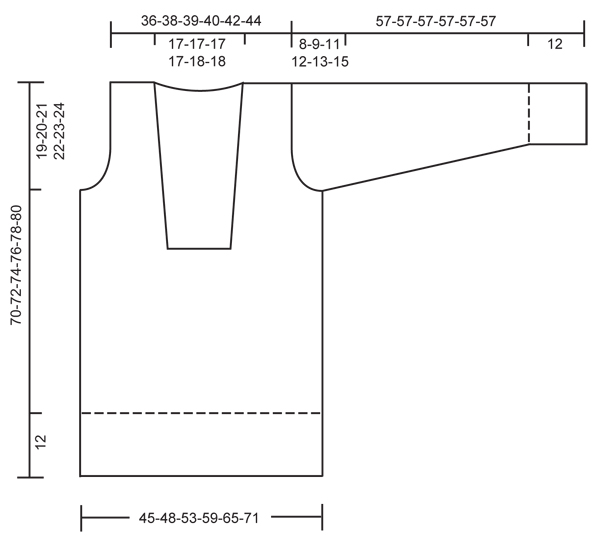
Hi, I am still having a problem with the 'Sleeve Cap'. It is probably because there is no mention of the number of stitches left on the needle after any dec. or inc. I cast off 8sts, then dec. 2sts on each side x 3 times, THIS MAKES THE CAP SIDES UNEVEN. Then 1 stitch, twice, as you say, I have 38 sts left. But then I dec. 2 sts each side, (so 4 sts every row**), until 56cm., now I am left with 6 sts only? This is just not right. ** should this be 2 sts each row, NOT each sIde.
26.10.2019 - 23:34DROPS Design answered:
Hi Kath, You decrease 3 stitches at the beginning of each row on both sides of the sleeve cap - so 6 decreases in total. Then 1 stitch 2 times (so 4 decreases) . When it comes to the 2 stitches on both sides of the cap, you are still only casting off at the beginning of each row, (2 stitches each row). I hope this helps and happy knitting!
28.10.2019 - 07:39
![]() Kath Wilmott wrote:
Kath Wilmott wrote:
On the Cap Sleeve instructions, it says . . Cast off for sleeve cap at the beg of every row each side: 2 sts 3 times (12 sts ) and 1 st 1-2-4-5-6-9 times, (2sts), then 2 sts each side until piece measures 56 cm. Cast off remaining sts. So, with 62 sts on the needle, cast off 8 sts for sleeve cap = 54 sts, then, minus 12st = 42 sts, then 2sts = 40 sts left. Could you tell me if this is correct? I must admit, I am having trouble with this pattern. Thank you so much.
23.10.2019 - 21:30DROPS Design answered:
Hi Kath, It looks like you are working size M, so as you say you have 54 stitches before starting the cap. Then decrease 2 stitches on each side x 3 = 42 stitches and 1 stitch on each side x 2 = 38 stitches. Happy knitting!
24.10.2019 - 07:22
![]() Kath Wilmott wrote:
Kath Wilmott wrote:
I am having trouble with this pattern: page 2 ‘Left front piece’ – the part which says: “Cast off for armhole at the beg of every row from the side…..” I seem to be left with 22 sts instead of 18 sts? I have read it again and again, but don't understand where I've gone wrong, Can you help me please?
20.09.2019 - 11:00DROPS Design answered:
Dear Mrs Wilmott, there were 30 sts for front piece, you decrease 1 stitch 4 times for neck and 4 stitches for armhole (8 stitches in total, 4 on front piece, 4 on back piece), then decrease for armhole: 2 stitches 1 time and 1 stitch 2 times = 30-4-4-2-2= 18 stitches remain for shoulder. Happy knitting!
20.09.2019 - 11:33
![]() Sanna wrote:
Sanna wrote:
Hej! Om jag förstår rätt börjar man med rätstickning efter avmaskningen för halsen, när man stickar fram och tillbaka. Går det att istället sticka slätstickning genom hela arbetet?
11.02.2019 - 20:53DROPS Design answered:
Hej Sanna, du fortsätter i slätstickat, det är bara yttersta kantm som stickas i rätstickning. Lycka till :)
07.05.2019 - 11:45
![]() Anne Marie Lolck wrote:
Anne Marie Lolck wrote:
Kan jeg udelukkende bruge 2 tråde af Drops Delight Print garn ? Venlig hilsen Anne Marie
12.10.2017 - 15:48DROPS Design answered:
Hej Anne Marie, Ja du kan bruge 2 tråde DROPS Delight istedet for 1 tråd af hver af DROPS Delight og DROPS Alpaca. God fornøjelse!
13.10.2017 - 16:08Monica Fernandez wrote:
Hola, me encanta todos los trabajos de esta página. Mi pregunta es : los patrones indican tejer con agujas circulares , se pueden usar dos agujas en vez de circulares ? mantengo las medidas indicadas en el patrón ? . Muchas gracias desde Montevideo ( Uruguay )
28.06.2016 - 20:25DROPS Design answered:
Hola Monica. Las agujas circulares se usan mayormente para tener suficiente espacio para todos los pts en las ag y para trabajar en redondo. En estos casos no se puede sustituir las ag circulares por rectas. Si trabajas con ag rectas y cada parte por separado (por elemplo la espalda y el delantero debes añadir los pts orillo (para la costura) a cada lado de la labor.
05.07.2016 - 10:05
![]() Pat Ellis wrote:
Pat Ellis wrote:
All's fine till the sleeve cap. HELP. PleSe rewrite and give number of stitches. Wasn't able to write specifics because of length.
21.10.2015 - 03:00DROPS Design answered:
Dear Mrs Ellis, for the sleeve cap, bind off at the beg of every row on each side: 2 sts 3 times, then bind off 2 sts at the beg of every row (both from RS and from WS) 2 sts until sleeve measures 56 cm (number of sts remaining will depend on the number of row you will have to work till sleeve measures 56 cm), then bind off 3 sts 1 time on each side and bind off remaining sts. Happy knitting!
21.10.2015 - 09:44
![]() Rebecca Moore wrote:
Rebecca Moore wrote:
Hello, I absolutely love your website and patterns! They are the best I have ever seen. I have one question about this pattern (Autumn Sunset): does this have to be knit using two strands of yarn through the whole sweater? I have never tried this technique before, and it sounds difficult. Is there one single yarn I could use instead? Thank you! -Rebecca
09.03.2015 - 13:33DROPS Design answered:
Dear Mrs Moore, thank you very much for your feedback. You can either work 1 strand in each of both qualities together as there were just 1 or change 2 strands group A into 1 strand group C - click here for more informations. Happy knitting!
09.03.2015 - 16:05
![]() Christel Needs Your Help! wrote:
Christel Needs Your Help! wrote:
Hur räknas storlekarna ? om man tar st M vilka mått ska man ha då ?
12.11.2014 - 17:45DROPS Design answered:
Hej Christel. Nederst paa mönstret finder du en maalskitse med alle maal i cm per störrelse. Du kan sammenligne disse med dine egne maal og vaelge störrelse. God fornöjelse.
13.11.2014 - 15:38
![]() Bouke De Wit wrote:
Bouke De Wit wrote:
Beste drops,ik heb een vraag over deze trui.ik zie in de beschrijving dat er voor maat s 152 steken zijn na de boord. 76 voor het voorpand. later lees ik bij het achterpand dat er 68 steken zijn. Het lijkt mij dat ook voor het achterpand 76 steken zijn.het kan zijn dat ik iets niet begrijp of misschien een foutje?vriendelijke groeten Bouke
19.10.2014 - 21:25DROPS Design answered:
Hoi Bouke. Je kant 8 st af aan beide zijkanten (4 st aan iedere kant van de markeerders) voor de armsgaten. Dan heb je 68 st voor het achterpand.
20.10.2014 - 14:42
|
|
Autumn Sunset#autumnsunsetsweater |
|
|
|
|
Knitted DROPS jumper in ”Delight” and ”Alpaca” with shawl collar. Size S to XXXL
DROPS 122-6 |
|
|
NEW BALL OF YARN TIP: To make the colour transitions in Delight neat when starting a new ball of yarn it is important to use a ball beg with the same shade as finished the previous ball. GARTER ST (back and forth on needle): K all rows. DECREASING TIP (applies to neckline): Make all dec from RS. Dec as follows at beg of row: K1, slip 1 st as if to K, K1, psso. Dec as follows at the end of row: Work row until 3 sts remain, K2 tog and K1. -------------------------------------------------------- BODY PIECE: Worked in the round. See NEW BALL OF YARN TIP! Cast on 228-240-270-300-330-360 sts on circular needle size 4 mm with 1 strand of each quality. Work 1 round stocking st and continue in rib K3/P3. When piece measures 12 cm change to circular needle size 5 mm. K 1 round, AT THE SAME TIME K tog every 2nd and 3rd st across the round = 152-160-180-200-220-240 sts. Continue in stocking st. Insert a marker at beg of round and 1 marker after 76-80-90-100-110-120 sts (to mark the sides). REMEMBER THE KNITTING TENSION! When piece measures 37-38-39-40-41-42 cm work next round as follows: K 27-29-34-39-43-48 sts, P 22-22-22-22-24-24 sts and then K remaining sts on round. Work next round as follows: K 28-30-35-40-44-49 sts, cast off 20-20-20-20-22-22 sts (= for neck mid front), K remaining sts on round to where sts were cast off. Now continue back and forth on needle from mid front with 1 GARTER ST - see above – each side towards neckline. READ ALL OF THE FOLLOWING SECTION BEFORE CONTINUING! DEC FOR NECK: When piece measures 42-43-44-45-46-47 cm dec 1 st each side of neck – SEE DECREASING TIP! Repeat the dec on every 5 cm a total of 4 times. ARMHOLE: At the same time when piece measures 51-52-53-54-55-56 cm cast off 8 sts each side for armhole (i.e. 4 sts each side of marker). Complete each piece separately. LEFT FRONT PIECE: Continue dec for neck – AT THE SAME TIME cast off for armhole at the beg of every row from the side: 2 sts 1-1-2-4-5-6 times and 1 st 1-2-4-4-5-7 times. When all dec are complete there are 17-18-19-20-21-22 sts on shoulder. Continue until piece measures 70-72-74-76-78-80 cm, cast off. RIGHT FRONT PIECE: Like left piece, but mirrored. BACK PIECE: = 68-72-82-92-102-112 sts. Cast off for armhole at the beg of every row each side as described for front piece = 62-64-66-68-72-74 sts. When piece measures 68-70-72-74-76-78 cm cast off the middle 24-24-24-24-26-26 sts for neck and complete each shoulder separately. Dec 2 sts on neckline on next row = 17-18-19-20-21-22 sts left on shoulder. Cast off when piece measures 70-72-74-76-78-80 cm. SLEEVE: Worked in the round. Cast on 48-48-54-54-60-60 sts with 1 strand of each quality on double pointed needles size 4 mm. K 1 round and continue in rib K3/P3. When piece measures 12 cm change to double pointed needles size 5 mm and continue in stocking st. Insert a marker at beg of round = mid under sleeve. When piece measures 14 cm inc 1 st each side of marker, repeat the inc on every 8-5-6-4-4.5-3 cm a total of 5-7-6-8-7-9 times = 58-62-66-70-74-78 sts. When piece measures 49-48-46-45-44-42 cm (less for the larger sizes because of longer sleeve cap and wider shoulder) cast off 8 sts mid under sleeve and complete piece back and forth on needle. Cast off for sleeve cap at the beg of every row each side: 2 sts 3 times and 1 st 1-2-4-5-6-9 times, then 2 sts each side until piece measures 56 cm, now cast off 3 sts 1 time each side. Cast off remaining sts, piece measures approx 57 cm for all sizes. ASSEMBLY: Sew shoulder seams. SHAWL COLLAR: The collar is worked back and forth on circular needle from mid front. Pick up sts with 1 strand of each quality on circular needle size 4 mm inside 1 edge st as follows: approx 60 to 70 sts from where sts were cast off for neck mid front and along right side of neck, approx 30 to 33 sts along neckline on back piece and 60 to 70 sts down along the other side of neck = approx 150 to 173 sts. NOTE: Do not pick up sts on the 20-20-20-20-22-22 sts cast off mid front. K 1 row from WS at the same time adjust no of sts to 167-173-179-185-191-197 sts. Work next row as follows from RS: 1 garter st, * K3, P3 *, repeat from *-* and finish with K3 and 1 garter st. Continue in rib like this – AT THE SAME TIME insert a marker after 43 sts from each side (= 81-87-93-99-105-111 sts between markers). When collar measures 3 cm inc 1 st in each of the 13-14-15-16-17-18 P-sections (as seen from RS) between the markers by P2 in the middle st = 180-187-194-201-208-215 sts. When collar measures 5-5-5-6-6-6 cm inc 1 st in each of the 14-15-16-17-18-19 K-sections (as seen from RS) between markers by K2 in the middle st = 194-202-210-218-226-234 sts. Continue with K over K and P over P until collar measures approx 6-6-6-7-7-7 cm (adjust so that next row is from RS). Work the 25 first sts as before, now slip them on a stitch holder, work row until 25 sts remain and slip these on a stitch holder. Continue as before on the remaining sts, at the same time slip 3 sts at the end of every row on the stitch holders a total of 6 times each side (= a total of 43 sts on each stitch holder). The collar is now 12-12-12-13-13-13 cm wide mid back. On next row (= from WS) work all sts from stitch holder on the right side of piece back on needle (to avoid holes pick up 1 st every time sts were slipped on stitch holder - i.e. every 3 sts – and work this tog with next st). On next row work all sts on stitch holder on the left side of piece back on needle in the same way = 194-202-210-218-226-234 sts. Work next row from WS as follows: Work K over K and P over P until 24 sts remain, now cast on 4 new sts for buttonhole loop, continue until 15 sts remain, cast on 4 new sts for buttonhole loop, continue until 6 sts remain, cast on 4 new sts for buttonhole loop, work remaining sts. On next row cast off all sts with K over K and P over P – cast off the 4 sts on each buttonhole loop with K sts. FURTHER ASSEMBLY: Place the 2 collar parts over one another with the part with buttonhole loops at the top. Sew the collar to the 20-20-20-20-22-22 sts cast off mid front – place the garter st row on collar over garter st row on the opening and sew neatly. Set in sleeves and sew buttons on collar to fit the buttonhole loops. |
|
 |
|
Have you finished this pattern?Tag your pictures with #dropspattern #autumnsunsetsweater or submit them to the #dropsfan gallery. Do you need help with this pattern?You'll find 23 tutorial videos, a Comments/Questions area and more by visiting the pattern on garnstudio.com. © 1982-2026 DROPS Design A/S. We reserve all rights. This document, including all its sub-sections, has copyrights. Read more about what you can do with our patterns at the bottom of each pattern on our site. |


With over 40 years in knitting and crochet design, DROPS Design offers one of the most extensive collections of free patterns on the internet - translated to 17 languages. As of today we count 324 catalogues and 12290 patterns translated into English (UK/cm). 12290
We work hard to bring you the best knitting and crochet have to offer, inspiration and advice as well as great quality yarns at incredible prices! Would you like to use our patterns for other than personal use? You can read what you are allowed to do in the Copyright text at the bottom of all our patterns. Happy crafting!
Post a comment to pattern DROPS 122-6
We would love to hear what you have to say about this pattern!
If you want to leave a question, please make sure you select the correct category in the form below, to speed up the answering process. Required fields are marked *.