DROPS Delight
DROPS Delight
75% Wool, 25% Polyamide
Discontinued
find alternatives
DROPS Alpaca
DROPS Alpaca
100% Alpaca
from 3.40 £ /50g
DROPS SS24

Autumn Sunset

Knitted DROPS jumper in ”Delight” and ”Alpaca” with shawl collar. Size S to XXXL

DROPS 122-6
DROPS design: Pattern no DE-044
--------------------------------------------------------
Size: S - M - L - XL - XXL - XXXL

Materials: DROPS DELIGHT from Garnstudio
300-350-350-400-450-500 g colour no 13, red/orange/grey mix
And use: DROPS ALPACA from Garnstudio
300-350-350-400-450-500 g colour no 3620, red

DROPS DOUBLE POINTED NEEDLES and CIRCULAR NEEDLE (80 cm) size 5 mm - or size needed to get 17 sts x 22 rows in stocking st with 1 strand Delight + 1 strand Alpaca = 10 x 10 cm.
DROPS DOUBLE POINTED NEEDLES AND CIRCULAR NEEDLE (80 cm) size 4 mm for rib.
DROPS BUFFALO HORN BUTTON no 535:
3 pcs..

-------------------------------------------------------

Alternative Yarn – See how to change yarns here
Yarn Groups A to F – Use the same pattern and change the yarn here
Yarn usage using an alternative yarn – Use our yarn converter here

-------------------------------------------------------

DROPS Delight
DROPS Delight
75% Wool, 25% Polyamide
Discontinued
find alternatives
DROPS Alpaca
DROPS Alpaca
100% Alpaca
from 3.40 £ /50g

Pattern instructions

NOTE: This pattern is written in British English. All measurements in charts are in cm. For conversion from cm to inches - click here. There are different terms for crocheting in British and American English. If this pattern includes crochet, click for "crochet terms" here. For this pattern in American English, please click here.
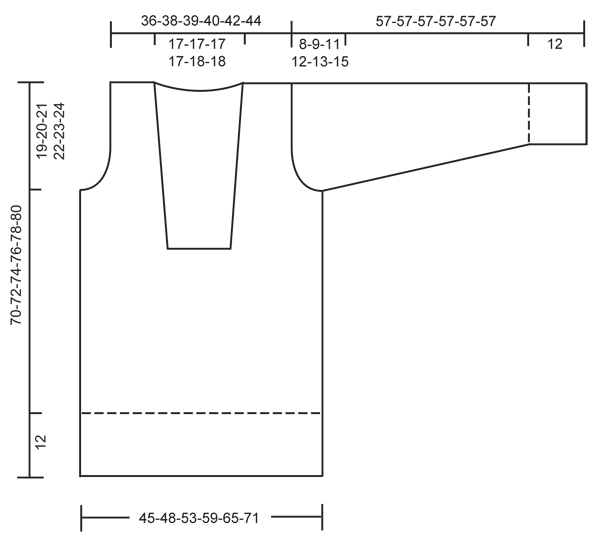
NEW BALL OF YARN TIP:
To make the colour transitions in Delight neat when starting a new ball of yarn it is important to use a ball beg with the same shade as finished the previous ball.

GARTER ST (back and forth on needle): K all rows.

DECREASING TIP (applies to neckline):
Make all dec from RS.
Dec as follows at beg of row: K1, slip 1 st as if to K, K1, psso. Dec as follows at the end of row: Work row until 3 sts remain, K2 tog and K1.
--------------------------------------------------------

BODY PIECE:
Worked in the round.
See NEW BALL OF YARN TIP! Cast on 228-240-270-300-330-360 sts on circular needle size 4 mm with 1 strand of each quality. Work 1 round stocking st and continue in rib K3/P3. When piece measures 12 cm change to circular needle size 5 mm. K 1 round, AT THE SAME TIME K tog every 2nd and 3rd st across the round = 152-160-180-200-220-240 sts. Continue in stocking st. Insert a marker at beg of round and 1 marker after 76-80-90-100-110-120 sts (to mark the sides). REMEMBER THE KNITTING TENSION! When piece measures 37-38-39-40-41-42 cm work next round as follows: K 27-29-34-39-43-48 sts, P 22-22-22-22-24-24 sts and then K remaining sts on round. Work next round as follows: K 28-30-35-40-44-49 sts, cast off 20-20-20-20-22-22 sts (= for neck mid front), K remaining sts on round to where sts were cast off. Now continue back and forth on needle from mid front with 1 GARTER ST - see above – each side towards neckline.
READ ALL OF THE FOLLOWING SECTION BEFORE CONTINUING!
DEC FOR NECK: When piece measures 42-43-44-45-46-47 cm dec 1 st each side of neck – SEE DECREASING TIP! Repeat the dec on every 5 cm a total of 4 times.
ARMHOLE: At the same time when piece measures 51-52-53-54-55-56 cm cast off 8 sts each side for armhole (i.e. 4 sts each side of marker). Complete each piece separately.

LEFT FRONT PIECE:
Continue dec for neck – AT THE SAME TIME cast off for armhole at the beg of every row from the side: 2 sts 1-1-2-4-5-6 times and 1 st 1-2-4-4-5-7 times. When all dec are complete there are 17-18-19-20-21-22 sts on shoulder. Continue until piece measures 70-72-74-76-78-80 cm, cast off.

RIGHT FRONT PIECE:
Like left piece, but mirrored.

BACK PIECE:
= 68-72-82-92-102-112 sts. Cast off for armhole at the beg of every row each side as described for front piece = 62-64-66-68-72-74 sts. When piece measures 68-70-72-74-76-78 cm cast off the middle 24-24-24-24-26-26 sts for neck and complete each shoulder separately. Dec 2 sts on neckline on next row = 17-18-19-20-21-22 sts left on shoulder. Cast off when piece measures 70-72-74-76-78-80 cm.

SLEEVE:
Worked in the round.
Cast on 48-48-54-54-60-60 sts with 1 strand of each quality on double pointed needles size 4 mm. K 1 round and continue in rib K3/P3. When piece measures 12 cm change to double pointed needles size 5 mm and continue in stocking st. Insert a marker at beg of round = mid under sleeve. When piece measures 14 cm inc 1 st each side of marker, repeat the inc on every 8-5-6-4-4.5-3 cm a total of 5-7-6-8-7-9 times = 58-62-66-70-74-78 sts. When piece measures 49-48-46-45-44-42 cm (less for the larger sizes because of longer sleeve cap and wider shoulder) cast off 8 sts mid under sleeve and complete piece back and forth on needle. Cast off for sleeve cap at the beg of every row each side: 2 sts 3 times and 1 st 1-2-4-5-6-9 times, then 2 sts each side until piece measures 56 cm, now cast off 3 sts 1 time each side. Cast off remaining sts, piece measures approx 57 cm for all sizes.

ASSEMBLY:
Sew shoulder seams.

SHAWL COLLAR:
The collar is worked back and forth on circular needle from mid front. Pick up sts with 1 strand of each quality on circular needle size 4 mm inside 1 edge st as follows: approx 60 to 70 sts from where sts were cast off for neck mid front and along right side of neck, approx 30 to 33 sts along neckline on back piece and 60 to 70 sts down along the other side of neck = approx 150 to 173 sts. NOTE: Do not pick up sts on the 20-20-20-20-22-22 sts cast off mid front. K 1 row from WS at the same time adjust no of sts to 167-173-179-185-191-197 sts. Work next row as follows from RS: 1 garter st, * K3, P3 *, repeat from *-* and finish with K3 and 1 garter st. Continue in rib like this – AT THE SAME TIME insert a marker after 43 sts from each side (= 81-87-93-99-105-111 sts between markers). When collar measures 3 cm inc 1 st in each of the 13-14-15-16-17-18 P-sections (as seen from RS) between the markers by P2 in the middle st = 180-187-194-201-208-215 sts. When collar measures 5-5-5-6-6-6 cm inc 1 st in each of the 14-15-16-17-18-19 K-sections (as seen from RS) between markers by K2 in the middle st = 194-202-210-218-226-234 sts. Continue with K over K and P over P until collar measures approx 6-6-6-7-7-7 cm (adjust so that next row is from RS). Work the 25 first sts as before, now slip them on a stitch holder, work row until 25 sts remain and slip these on a stitch holder. Continue as before on the remaining sts, at the same time slip 3 sts at the end of every row on the stitch holders a total of 6 times each side (= a total of 43 sts on each stitch holder). The collar is now 12-12-12-13-13-13 cm wide mid back. On next row (= from WS) work all sts from stitch holder on the right side of piece back on needle (to avoid holes pick up 1 st every time sts were slipped on stitch holder - i.e. every 3 sts – and work this tog with next st). On next row work all sts on stitch holder on the left side of piece back on needle in the same way = 194-202-210-218-226-234 sts. Work next row from WS as follows: Work K over K and P over P until 24 sts remain, now cast on 4 new sts for buttonhole loop, continue until 15 sts remain, cast on 4 new sts for buttonhole loop, continue until 6 sts remain, cast on 4 new sts for buttonhole loop, work remaining sts. On next row cast off all sts with K over K and P over P – cast off the 4 sts on each buttonhole loop with K sts.

FURTHER ASSEMBLY:
Place the 2 collar parts over one another with the part with buttonhole loops at the top. Sew the collar to the 20-20-20-20-22-22 sts cast off mid front – place the garter st row on collar over garter st row on the opening and sew neatly.
Set in sleeves and sew buttons on collar to fit the buttonhole loops.

Diagram

diagram measurements

Each of our patterns has specific tutorial videos to help you.

Do you have a question? See a list of frequently asked questions (FAQ)

Knitting tension is what determines the final measurements of your work, and is usually measured per 10 x 10 cm. It is provided like so: number of stitches in width x number of rows in height - eg: 19 stitches x 26 rows = 10 x 10 cm.

The knitting tension is very individual; some people knit/crochet loosely while others work tightly. You adjust the knitting tension with the needle size, which is why the suggested needle size is only meant as a guide! You need to adjust this (up or down) to ensure that YOUR knitting tension matches the knitting tension provided in the pattern. If you work with a different knitting tension than provided you will have a different yarn consumption, and your work will have different measurements than what the pattern suggests.

The knitting tension also determines which yarns can replace each other. As long as you achieve the same knitting tension you can replace one yarn with another.

See DROPS lesson: How to measure your tension/gauge

See DROPS video: How to make a gauge tension swatch

The required amount of yarn is provided in grams, eg: 450 g. To calculate how many balls you’ll need you first need to know how many grams are in 1 ball (25g, 50g or 100g). This information is available if you click on the individual yarn quality on our pages. Divide the amount required with the amount of each ball. For example, if each ball is 50g (the most common amount), the calculation will be as follows: 450 / 50 = 9 balls.

The important thing when changing from one yarn to another is that the knitting/crochet tension remains the same. This is so that the measurements of the finished piece will be the same as on the sketch provided. It is easier to achieve the same knitting tension using yarns from the same yarn group. It is also possible to work with multiple strands of a thinner yarn to achieve the knitting tension of a thicker one. Please try our yarn converter. We recommend you to always work a test swatch.

Please NOTE: when changing yarn the garment might have a different look and feel to the garment in the photo, due to individual properties and qualities of each yarn.

See DROPS lesson: Can I use a different yarn than the one mentioned in the pattern?

All our yarns are categorised into yarn groups (from A to F) according to thickness and knitting tension – group A contains the thinnest yarns and group F the thickest. This makes it easier for you to find alternative yarns to our patterns, should you wish to switch yarn. All yarns within the same group have a similar knitting tension and can easily replace each other. However, different yarn qualities have different structures and properties which will give the finished work a unique look and feel.

Click here for an overview of the yarns in each yarn group

At the top of all our patterns you’ll find a link to our yarn calculator, which is a helpful tool should you wish to use a different yarn than suggested. By filling in the yarn quality you wish to replace, the amount (in your size) and number of strands, the calculator will present good alternative yarns with the same knitting tension. Additionally it will tell you how much you’ll require in the new qualities and whether you’ll need to work with multiple strands. Most skeins are 50g (some are 25g or 100g).

If the pattern is worked with multiple colours, every colour will have to be calculated separately. Similarly, if the pattern is worked with several strands of different yarns (for example 1 strand Alpaca and 1 strand Kid-Silk) you will have to find alternatives for each, individually.

Click here to see our yarn calculator

Since different yarns have different qualities and textures we have chosen to keep the original yarn in our patterns. However, you can easily find options among our available qualities by using our yarn calculator, or simply pick a yarn from the same yarn group.

It is possible that some retailers still have discontinued yarns in stock, or that someone has a few skeins at home that they would like to find patterns for.

The yarn calculator will provide both alternative yarn as well as required amount in the new quality.

If you think it's hard to decide what size to make, it can be a good idea to measure a garment you own already and like the size of. Then you can pick the size by comparing those measures with the ones available in the pattern's size chart.

You'll find the size chart at the bottom of the pattern.

See DROPS lesson: How to read size chart

The needle size provided in the pattern serves only as a guide, the important thing is to follow the knitting tension. And since knitting tension is very individual, you will have to adjust the needle size to ensure that YOUR tension is the same as in the pattern – maybe you’ll have to adjust 1, or even 2 needle sizes, up or down to achieve the correct tension. For this, we recommend that you work test swatches.

Should you work with a different knitting tension than the one provided, the measurements of the finished garment might deviate from the measurement sketch.

See DROPS lesson: How to measure your tension/gauge

See DROPS video: How to make a tension/gauge swatch

Working a garment top-down provides more flexibility and room for personal adjustment. For example it is easier to try the garment on while working, as well as making adjustments to length of yoke and shoulder caps.

The instructions are carefully explaining every step, in the correct order. Diagrams are adjusted to the knitting direction and are worked as usual.

The diagram depicts all rows/rounds, and every stitch seen from the right side. It is read from bottom to top, from right to left. 1 square = 1 stitch.

When working back and forth, every other row is worked from the right side and every other row is worked from the wrong side. When working from the wrong side, the diagram will have to be worked reversed: from left to right, knit stitches are purled, purl stitches are knit etc.

When working in the round every round is worked from the right side and the diagram are worked from right to left on all rounds.

See DROPS lesson: How to read knitting diagrams

The diagram depicts all rows/rounds, and every stitch seen from the right side. It is worked from bottom to top, from right to left.

When working back and forth every other row is worked from the right side: from right to left and every other row is worked from the wrong side: from left to right.

When working in the round, every row in the diagram are worked from the right side, from right to left.

When working a circular diagram you start in the middle and work your way outwards, counter clockwise, row by row.

The rows usually start with a given number of chain stitches (equivalent to the height of the following stitch), this will either be depicted in the diagram or explained in the pattern.

See DROPS lesson: How to read crochet diagrams

Instructions for working several diagrams after each other on the same row/round, will often be written like so: “work A.1, A.2, A.3 a total of 0-0-2-3-4 times". This means you work A.1 once, then A.2 is worked once, and A.3 is repeated (in width) the number of times provided for your size – in this case like so: S = 0 times, M = 0 times, L=2 times, XL= 3 times and XXL = 4 times.

The diagrams are worked as usual: begin with the first row in A.1, then work the first row in A.2 etc.

See DROPS lesson: How to read knitting diagrams

See DROPS lesson: How to read crochet diagrams

The total width of the garment (from wrist-to-wrist) will be larger in the larger sizes, despite the actual sleeves being shorter. The larger sizes have longer sleeve caps and wider shoulders, so there will be a good fit in all sizes.

The measurement sketch/schematic drawing provides information regarding the full length of the garment. If it’s a jumper or a jacket the length is measured from the highest point on the shoulder closest to the neckline, and straight down to the bottom of the garment. It is NOT measured from the tip of shoulder. Similarly, the length of yoke is measured from the highest point on the shoulder and down to where yoke is split into body and sleeves.

On a jacket measures are never taken along bands, unless specifically stated. Always measure inside band stitches when measuring the length.

See DROPS lesson: How to read a schematic drawing

Diagrams are often repeated on the round or in height. 1 repeat is the diagram the way it appears in the pattern. If it says to work 5 repeats of A.1 in the round, then you work A.1 a total of 5 times after/next to each other in the round. If it says to work 2 repeats of A.1 vertically/in height you work the entire diagram once, then begin again at the start and work the entire diagram one more time.

Chain stitches are slightly narrower than other stitches and to avoid working the cast-on edge too tight, we simply chain more stitches to begin with. The stitch count will be adjusted on the following row to fit the pattern and measurement sketch.

The rib edge is more elastic and will contract slightly compared to, for example, stocking stitch. By increasing before the rib edge, you avoid a visible difference in width between the rib edge and the rest of the body.

It’s very easy to cast off too tightly, and by making yarn overs while casting off (and simultaneously casting these off) you avoid a too tight cast off edge.

See DROPS video: How to bind off with yarn overs (yo)

To achieve an even increase (or decrease) you can increase on, for example: every 3rd and 4th row alternately, like so: work 2 rows and increase on the 3rd row, work 3 rows and increase on the 4th. Repeat this until the increase is complete.

See DROPS lesson: Increase or decrease 1 st on every 3rd and 4th row alternately

Should you prefer to work in the round instead of back and forth, you may of course adjust the pattern. You’ll need to add steeks mid-front (usually 5 stitches), and follow the instructions. When you would normally turn and work from the wrong side, simply work across the steek and continue in the round. At the end you’ll cut the piece open, pick up stitches to work bands, and cover the cut edges.

See DROPS video: How to knit steeks and cut open

Should you prefer to work back and forth instead of in the round, you may of course adjust the pattern so you work the pieces separately and then assemble them at the end. Divide the stitches for the body in 2, add 1 edge stitch in each side (for sewing) and work the front and back pieces separately.

See DROPS lesson: Can I adapt a pattern for circular needles into straight needles?

Pattern repeats can vary slightly in the different sizes, in order to get the correct proportions. If you’re not working the exact same size as the garment in the photo, yours might deviate slightly. This has been carefully developed and adjusted so that the complete impression of the garment is the same in all sizes.

Make sure to follow instructions and diagrams for your size!

If you have found a pattern you like which is available in women’s size it’s not very difficult to convert it to men’s size. The biggest difference will be the length of sleeves and body. Start working on the women size that you think would fit across the chest. The additional length will be worked right before you cast off for the armhole/sleeve cap. If the pattern is worked top-down you can add the length right after the armhole or before the first decrease on sleeve.

Regarding additional yarn amount, this will depend on how much length you add, but it is better with a skein too many than too few.

All yarns will have excess fibres (from production) that might come off as lint or shedding. Brushed yarns (ie hairier yarns) have more of these loose, excess fibres, causing more shedding.

Shedding also depends on what is worn under or over the garment, and whether this pulls at the yarn fibres. It’s therefore not possible to guarantee that there will be no shedding

Below are some tips on how to get the best result when working with hairier yarns:

1. When the garment is finished (before you wash it) shake it vigorously so the looser hairs come off. NOTE: do NOT use a lint roller, brush or any method that pulls at the yarn.

2. Place the garment in a plastic bag and put it in your freezer - the temperature will cause the fibres to become less attached to each other, and excess fibres will come off easier.

3. Leave in the freezer for a few hours before taking it out and shaking it again.

4. Wash the garment according to the instructions on the yarn label.

Pilling is a natural process that happens to even the most exclusive of fibers. It's a natural sign of wear and tear that is hard to avoid, and that is most visible in high friction areas of your garment like a sweater's arms and cuffs.

You can make your garment look as new by removing the pilling, using a fabric comb or a pill/lint remover.

Still can't find the answer you need? Then scroll down and leave your question so one of our experts can try to help you. This will be done normally within 5 to 10 working days.
In the meantime, you can read the questions and answers that others have left to this pattern or join the DROPS Workshop on Facebook to get help from fellow knitters/crocheters!

Post a comment to pattern DROPS 122-6

We would love to hear what you have to say about this pattern!

If you want to leave a question, please make sure you select the correct category in the form below, to speed up the answering process. Required fields are marked *.

Comments / Questions (41)

country flag Beatriz Sánchez wrote:

Referente a este modelo la sisa me gustaría hacerla más ancha, para que no me quede ajustada. ¿Tengo que coger una talla más de la manga o cómo podría hacer la modificación? Haré el jersey de talla L, ¿puedo hacer las mangas con la talla XL? Y la última pregunta, ¿el ancho se mide con la medida del pecho dividiéndola en dos partes iguales? Gracias.

04.11.2023 - 22:49

country flag Sherry wrote:

Thank you for your reply. I assume after casting off the 8 Stitches at underarm I continue in back and forth stocking stitch until the top and THEN decrease to form the cap of the sleeve? I was always taught the cap of the sleeve started at the underarm and went to the shoulder, but I gather this pattern is different.

26.01.2023 - 05:11

DROPS Design answered:

Dear Sherry, you first cast off (not decrease) 8 sts mid under sleeve, then continue back and forth on needle from mid under sleeve casting off at the beginning of each row on each side (= both from RS and WS) for the sleeve cap: 2 sts 3 times (= 2 sts at the beg of next 6 rows), etc.. so that you cast off the same number of sts on each side of the sleeve. So this pattern is not different. Happy knitting!

26.01.2023 - 10:18

country flag Sherry wrote:

It says to continue until sleeve measures 22”, which is less than 3” from start of underarm decrease (19 1/4”.) With all of the decreases ( including the initial 8) this only adds up to 9 rows, which is nowhere near the 7 1/2” to fit into the body of the sweater.

24.01.2023 - 18:27

DROPS Design answered:

Dear Sherry, sleeve should be 22½'' in total minus 19 1/4" when you start sleeve cap - ie a total of 3,25" = ca 8 cm. Hope it can help. Happy knitting!

25.01.2023 - 11:40

country flag Sherry wrote:

Hi Drops Design… Thank you for your prompt reply. At the underarm of the sleeve I had 58 stitches and 19 1/4” in length, as per the pattern. I bound off 8 stitches ( all in 1 row- now 50 stitches) under the arm, then 2 stitches at the beginning of the row 3 times ( 6 rows and now 44 stitches, and 1 stitch once both sides(2 rows-42 stitches).

24.01.2023 - 18:25

DROPS Design answered:

Dear Sherry, the total length of sleeve cap for size S should be 8 cm (see chart) and all the cast off stitches should be sewn along the whole armhole, should you have increased then cast off as in the pattern, then the sleeve should fit nicely around armhole. Happy knitting!

25.01.2023 - 11:37

country flag Sherry wrote:

I am making this sweater in size small and the body piece from the underarm to the shoulder is 7 1/2” , however when I knit the sleeve the length from the underarm to the shoulder is only 3 inches. Is there a correction for the sleeve cap, as 3” is far too small. Thank you and I look forward to your reply.

22.01.2023 - 05:05

DROPS Design answered:

Hi Sherry, The sleeve cap and top of sleeve should fit into the armhole (so be bigger than your 3 inches). Have you followed all the increases correctly and worked the sleeve cap back and forth to finish? Happy knitting!

22.01.2023 - 08:16

country flag Anne wrote:

Hallo! Welche Alternative gibt es zum Garn ALPACA? Dieser ist mir zu fusselig. Vielen herzlichen Dank

10.01.2022 - 11:11

DROPS Design answered:

Liebe Anne, benutzen Sie unseren Garnumrechner, so sehen Sie die unterschiedlichen Möglichkeiten und die neue Garnmenge. Viel Spaß beim stricken!

10.01.2022 - 16:01

country flag Eva-Helena Hall wrote:

Hej ! På denna beskrivning står det att man ska lägga upp maskor från båda garnsorterna samtidigt, då undrar jag varför man tipsar att byta nystan så att färgerna stämmer vid bytet av nystan?????? Eva-Helena

07.01.2022 - 12:51

country flag Janet Ter Meer wrote:

Bij het afslanken voor de mouw staat aan het begin van elke naald. Is dat dan elke heen en teruggaande naald of alleen elke heengaande naald. Dit laatste heb ik namelijk gedaan maar dit lijkt mij niet juist.

10.12.2019 - 21:22

DROPS Design answered:

Dag Janet,

Je kant voor de mouw af aan het begin van elke naald, dus zowel op de heengaande als de teruggaande naald.

12.12.2019 - 09:01

country flag Kath Wilmott wrote:

I hope this is the last question I have to ask, but on the collar instructions, it says "work all sts from stitch holder and every 3 sts work this together with next st." Does this mean knit 2 together on every three sts, which will mean decreasing 6 sts on each stitch holder totalling 12 sts. So why then does it say I should have 202 sts left? because, I had 202 stitches before I started the decreases, therefore, I should have 190 sts left.??

26.11.2019 - 22:16

DROPS Design answered:

Dear Mrs Willmott, when you worked the short rows, you left 3 sts unworked at the end of each row. When working all stitches back, you might have a small gap every third stitch due to the short rows. To avoid these gaps, pick up the thread before the next stitch and put it twisted on needle and work these both stitch (= thread picked up + next stitch) together; this will happen every 3rd stitch = this won't change your number of stitches, you should still have 202 sts at the end of this row. Happy knitting!

27.11.2019 - 07:55

country flag Kath Wilmott wrote:

Sorry, me again! Are you sure you mean dec. '3' stitches because the pattern says '2' stitches 3 times? Also you say 'then 1 stitch 2 times (4 decreaes) ? Surely 1 x 2 is 2, not 4?

28.10.2019 - 17:37

DROPS Design answered:

Hi Kath, Each decrease is at both ends of the row - each time you start a new row you cast off; so decrease 1 two times means 1 at each end x 2, so 4 stitches decreased. Hope this helps.

29.10.2019 - 07:15