
Popular categories
Looking for a yarn?


Comments / Questions (45)
![]() Rita Morin wrote:
Rita Morin wrote:
Modèle à capuche et pantalon beige Pourquoi je n’arrive pas à 50 ? Il me manque 4mailles Rabat 1fois - 3.- 2fois2 et 4fois 1 m Merci
08.08.2022 - 15:16DROPS Design answered:
Bonjour Mme Morin, vous avez 68 m pour le dos, vous rabattez au début de chaque rang de chaque côté pour les emmanchures: 1 x 3 m + 1 x 2 m + 4 x 1 m (soit 3+2+4=9 m de chaque côté x 2 côtés= 18 m au total), ainsi 68-18=50 mailles. Bon tricot!
08.08.2022 - 16:02
![]() Christa Erlebach wrote:
Christa Erlebach wrote:
Wird die Jacke nicht mit Krausrippen begonnen und dann erst glatt rechts gestrickt...? So sieht es auf dem Foto aus..ich habe bereits ein anderes Modell von Ihnen gestrickt mit Krausrippen zu Beginn...allerdings dreht dieser Teil immer nach oben...kann man das verhindern?
30.03.2022 - 21:12DROPS Design answered:
Liebe Frau Erlebach, die Jacke beginnt mit M.1 = 2 Krausrippen (= die 4 ersten Reihen), dann stricken Sie glatt rechts/glatt links wie im Diagram gezeigt: *1 Hinreihe links, 1 Rückreihe rechts, 1 Hinreihe rechts, 1 Rückreihe links*, von *bis* noch einmal stricken, 1 Hinreihe links, 1 Rückreihe rechts. Viel Spaß beim stricken!
31.03.2022 - 09:46
![]() Turid Rennemo Røren wrote:
Turid Rennemo Røren wrote:
Hei Hvordan syr dere buksa pent igjen i skrittet? MVH Turid
04.03.2022 - 14:12DROPS Design answered:
Hej Turid, vi har desværre ingen video som viser sammensyning af bukser, men hvis du kan sy sammen med usynlige maskesting så bliver det fint. Se her: Montere med usynlig maskesting
09.03.2022 - 10:03
![]() Nadja wrote:
Nadja wrote:
Warum werden bei der Hose die Zunahmen an der Vorderseite und die Abnahmen an der Rückseite gemacht? Müssten nicht für den Po hinten die Zunahmen gemacht werden? Kenne das aus allen Drops Anleitungen nur so herum.
08.10.2021 - 10:49DROPS Design answered:
Liebe Nadja, es war falsch, die Zunahmen sollten hinten/beim Rücken sein und die Abnahmen vorne - ie verkehr, eine Korrektur erfolgt, danke für den Hinweis. Viel Spaß beim stricken!
24.11.2021 - 12:08
![]() Nadja wrote:
Nadja wrote:
Könnt ihr das Schlagwort Strumpfhose mit aufnehmen? Habe sie nur durch Zufall gefunden. Danke!
08.10.2021 - 09:48
![]() Gabi Gilles wrote:
Gabi Gilles wrote:
Liebes Drops-Team, Frage zur Kapuze: Wenn ich z. B. 88 M um den Hals aufgenommen habe, muss ich zuerst 1 R stricken und dann 12 neue M anschlagen? Beim wieder zurück stricken und dann gleichmässig verteilt M aufnehmen (um gesamt z. B. 126 M zu bekommen)? Dann am Ende der R weitere 12 M anschlagen? Oder ist die Reihenfolge anders gemeint. Ich verstehe die Anleitung nicht richtig. Vielen Dank für die Hilfe!!
24.03.2021 - 21:40DROPS Design answered:
Liebe Gabi, Sie können zuerst 12 M anschlagen, ca 88 M um den Hals aufnehmen, 12 M anschlagen, wenden, dann die nächste Reihe (= Rückreihe) 12 M rechts stricken, die nächsten 88 M rechts stricken und gleichzeitig 38 M gleichmäßig verteilt zunehmen, 12 M rechts stricken. Bei der nächsten Hinreihe stricken Sie M.3 mit 12 M krausrechts beidseitig. Viel Spaß beim stricken!
25.03.2021 - 08:38
![]() Ss wrote:
Ss wrote:
How do I knit the hood. Do I cast on 12 then pick up from front and back and front and avast on 12?
14.11.2020 - 10:27DROPS Design answered:
Dear Ss, you first knit up all stitches around neckline from the right side, at the end of this row, cast on 12 new stitches, turn, purl next row from WS adjusting the number of sts to 108-114-120-126 sts and casting on 12 sts at the end of this row (this means you should have 84-90-96-102 sts between the new 12 sts sts on each side). Happy knitting!
16.11.2020 - 07:53
![]() Susann wrote:
Susann wrote:
Hej, i det här mönstret och något annat hänvisar ni till FILT I KARISMA SUPERWASH modell 25. Men jag kan inte hitta det mönstret. Var finns det?
19.02.2020 - 17:52
![]() Rachel MacInnes wrote:
Rachel MacInnes wrote:
I am about to start the left front edge and I watched the tutorial video on how to pick up stitches. The video instructs you to pick up one stitch for every hole, but that would be roughly 120 stitches and the range given in the pattern is 60-80. I am knitting the 24 month size so I was planning to aim for 80 stitches, but now I am afraid I need more as I don't want the joint to look bad, or have the edge pulling the sweater short in the middle. What do you recommend?
26.11.2019 - 23:50DROPS Design answered:
Dear Mrs MacInnes, you can try picking up approximately 3 sts for every 4 rows or 2 sts for every 3 rows; when all stitches have been picked up, you can always adjust the number of stitches on first row from WS increasing or decreasing evenly, making sure your number of stitches is divisible by 4 + 2 (to get 1 edge st + K2 in each side). Happy knitting!
27.11.2019 - 08:08
|
|||||||
Little Hadrien#littlehadrienjacket |
|||||||
|
|
|||||||
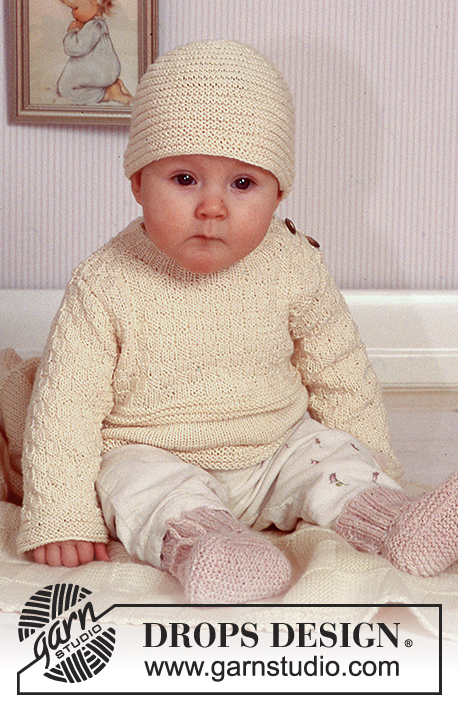
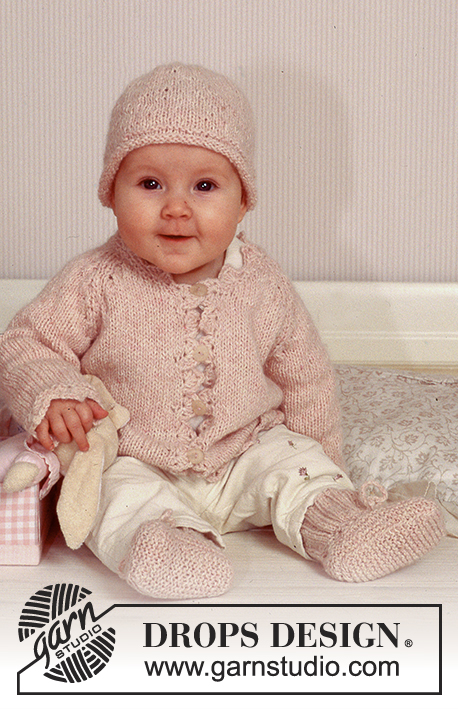
Hooded jacket and trousers in Rib in Safran. Blanket in Karisma Superwash
DROPS Baby 11-9 |
|||||||
|
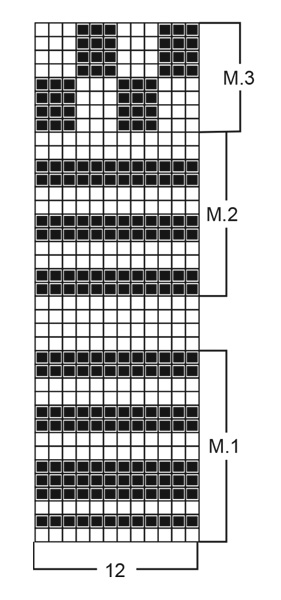
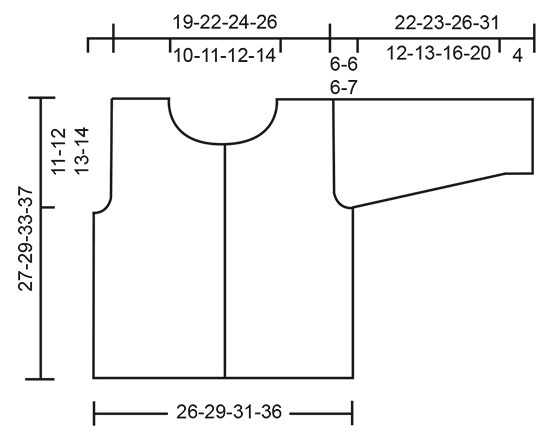
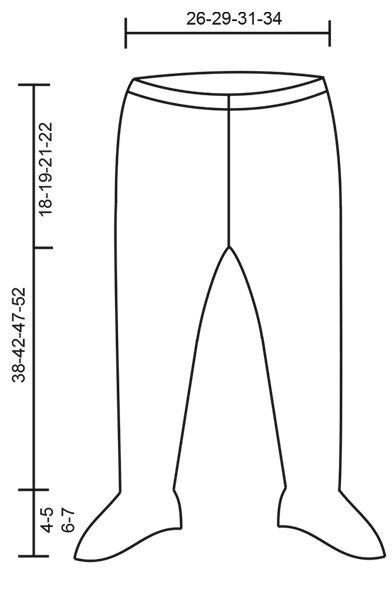
Knitting tension: 25 sts x 34 rows on needle size 2.5mm in stocking sts = 10 x 10 cm. Garter sts (back and forth on needle):: Knit all rows Rib 1: *K2, P2*, repeat from *-*. Rib 2:: *K3, P3*, repeat from *-*. Pattern: See diagram M.1 – M.3. The diagram is seen from the RS. Decreasing tips (apply to trousers): Dec on each side of 3 K sts in garter sts mid front. Dec by P2 tog. Increasing tips (apply to trousers): Inc in the 1st P st on each side of 3 K sts mid back. Inc by picking up st from previous row. ---------------------------------------------------------------------- JACKET: Back piece: Cast on 68-74-80-92 sts (incl 1 edge st each side) on circular needle size 2.5 mm with Safran. Knit M.1 and continue in stocking sts. When piece measures 11-12-15-18 cm knit M.2 and finish the piece in M.3 with 1 edge st in garter sts each side. At the same time when piece measures 16-17-20-23 cm dec for armhole each side on every other row: 3 sts 1 time, 2 sts 1-1-1-2 times and 1 st 4-4-4-5 times = 50-56-62-68 sts. Continue in M.3 with 1 edge st each side in garter sts. When piece measures 26-28-32-36 cm cast off the middle 20-24-26-32 sts for neck and dec 2 sts on neckline on next row = 13-14-16-16 sts left on each shoulder. Cast off when piece measures 27-29-33-37 cm. Right front piece: Cast on 32-38-44-50 sts (incl 1 edge st each side and 1 edge st towards mid front) on circular needle size 2.5 mm with Safran. Knit M.1 and continue in stocking sts. When piece measures 11-12-15-18 cm knit M.2 and finish the piece in M.3 with 1 edge st in garter sts each side and towards mid front. At the same time when piece measures 16-17-20-23 cm dec for armhole on every other row: 3 sts 1 time, 2 sts 1-1-1-2 times and 1 st 4-4-4-5 times = 23-29-35-38 sts. When piece measures 23-24-28-31 cm cast off 6-8-12-13 sts towards mid front for neck and dec to shape the neckline on every other row: 2 sts 1-2-2-3 times and 1 st 2-3-3-3 times = 13-14-16-16 sts left on shoulder. Cast off when piece measures 27-29-33-37 cm. Left front piece: Cast on and knit as right front piece but dec for armhole and neckline opposite sides. Sleeve: Cast on 44-46-48-50 sts (incl 1 edge st each side) on needles size 2.5 mm with Safran. Knit M.1 and continue in M.3 with 1 edge st in garter sts each side. At the same time after M.1 inc 1 st each side on every 7-6-6-7 row a total of 6-7-9-10 times = 56-60-66-70 sts – incorporate the inc sts in pattern as you go along. When piece measures 16-17-20-24 cm cast off for sleeve cap each side on every other row as follows: 3 sts 1 time, 2 sts 2-3-3-3 times, 1 st 4-3-3-4 times, 2 sts 2-2-2-3 times and then 3 sts each side until piece measures 22-23-26-31 cm. Cast off remaining sts. Assembly: Sew shoulder seams. Left front edge: Pick up approx 60-80 sts (divisible by 4) along left front piece on needle size 2.5 mm with Safran. Knit Rib-1 with 1 st in garter st and K2 each side. Cast off in Rib when edge measures 2 cm. Right front edge: Pick up and knit as left but after 1 cm make 5 buttonholes evenly distributed on row – the bottom and top ones approx 1 cm from the edge. 1 buttonhole = cast off 2 sts and cast on 2 new sts on the return row. Hood: Pick up approx 64 to 88 sts round the neck (also over front edges) on needle size 2.5 mm with Safran. Knit 1 row, at the same time casting on 12 new sts each side towards mid front and inc evenly on row to 108-114-120-126 sts in total. Continue in M.3 with 12 sts each side in garter sts. Cast off when hood measures approx 21-23-25-27 cm – adjust after 1 full repeat of M.3. Sew hood tog at the top. Fold the 12 garter sts towards the RS and attach with neat sts. Set in sleeves. Sew sleeve and side seams inside 1 edge st. Sew on buttons. ---------------------------------------------------------------------- TROUSERS: The trousers are knitted from top down. Cast on 132-144-156-168 sts on circular needle size 2.5 mm with Safran and knit Rib-2. Insert a marking thread in the middle of 3 K sts mid front and mid back, i.e. 65-71-77-83 sts between MT. When piece measures 12-13-15-16 cm dec on each side of MT at the front and inc on each side of MT at the back – see Decreasing and Increasing tips – as follows: dec on every 4th row a total of 6 times and inc on every 4th row a total of 6 times – K the first 3 inc sts and P the next 3 inc sts = 132-144-156-168 sts. When piece measures 20-21-23-24 cm cast off the middle 3 sts at front and at back. Put sts on left leg (when worn) on a thread and knit each leg separately. Right leg: Put sts from right leg on double pointed needles size 2.5 mm = 65-71-77-83 sts. Continue round in Rib-2, at the same time casting on 7 new sts between the cast off sts front and back = 72-78-84-90 sts. When piece measures 35-39-43-48 cm dec all P3 to P2 and all K3 to K2 = 48-52-56-60 sts. Knit 3 cm in Rib-1. Now put the back 36-40-40-44 sts on a thread. Knit 4-5-6-7 cm stocking sts back and forth over the remaining 12-12-16-16 sts mid front, at the same time dec 4 sts evenly on the last row = 8-8-12-12 sts. Put the 36-40-40-44 sts from thread back on needle and pick up 10-12-14-16 sts on each side of the piece in stocking sts = 64-72-80-88 sts. Knit 2-2-3-3 cm Rib-1 and cast off all sts except the 10-10-12-12 mid front. Knit 10-11-12-14 cm stocking sts over these = sole. Cast off. Left leg: Knit as right leg. Assembly: Sew the opening between legs and sew the sole to the side of the foot. Fold 2 cm at the top towards the wrong side and attach – leave an opening for the elastic. ---------------------------------------------------------------------- BLANKET: see pattern no 11-25 ---------------------------------------------------------------------- |
|||||||
Diagram explanations |
|||||||
|
|||||||
 |
|||||||
 |
|||||||
 |
|||||||
Have you finished this pattern?Tag your pictures with #dropspattern #littlehadrienjacket or submit them to the #dropsfan gallery. Do you need help with this pattern?You'll find 25 tutorial videos, a Comments/Questions area and more by visiting the pattern on garnstudio.com. © 1982-2026 DROPS Design A/S. We reserve all rights. This document, including all its sub-sections, has copyrights. Read more about what you can do with our patterns at the bottom of each pattern on our site. |
|||||||


With over 40 years in knitting and crochet design, DROPS Design offers one of the most extensive collections of free patterns on the internet - translated to 17 languages. As of today we count 324 catalogues and 12290 patterns translated into English (UK/cm). 12290
We work hard to bring you the best knitting and crochet have to offer, inspiration and advice as well as great quality yarns at incredible prices! Would you like to use our patterns for other than personal use? You can read what you are allowed to do in the Copyright text at the bottom of all our patterns. Happy crafting!
Post a comment to pattern DROPS Baby 11-9
We would love to hear what you have to say about this pattern!
If you want to leave a question, please make sure you select the correct category in the form below, to speed up the answering process. Required fields are marked *.