
Popular categories
Looking for a yarn?


Comments / Questions (12)
![]() Brigitte wrote:
Brigitte wrote:
Alle Abbildungen auf dieser Seite werden auf 3 verschiedenen Browsern nicht angezeigt. Liegt das an meinen oder Ihren Einstellungen? Für eine hilfreiche Antwort wäre ich Ihnen sehr dankbar.
29.04.2026 - 00:40
![]() Aleksandra wrote:
Aleksandra wrote:
Wydaje mi się, że jest błąd w opisie wykonania dziurek na guziki. Mamy przerabiać aż pozostaje 6 oczek, narzut, 2 oczka na prawo (dziurka) i potem opis mówi jak przerobić dwa pozostałe oczka, a przecież na drutach zostaje ich 4. Czy po zrobieniu dziurki mamy przerobić jeszcze 2 oczka ściegiem francuskim i dopiero zdjąć 1 oczko jak do przerobienia na prawo i 1 oczko prawe?
23.04.2026 - 18:10DROPS Design answered:
Witaj Olu, zgadza się. Już zgłaszam korektę. Pozdrawiam!
27.04.2026 - 09:48
![]() Maren wrote:
Maren wrote:
Liebes Drops Team, sind nicht 2Fehler im re Vorderteil? In Reihe 13, müsste 1Umschlag gestrickt werden oder die zwei Maschen zusammen weg gelassen werden. Es funktioniert so nicht in Reihe 15. Es fehlt eine Masche, die irgendwo zugenommen werden muss. Ich denke es fehlt die Rückreihe 16, die gestrickt werden muss, bevor man die Maschen still legt. Am Ende muss man sonst das Muster vorne re auf den Rückreihen Stricken, wenn man alle Maschen aufgenommen hat.
22.04.2026 - 08:15
![]() Patrizia Borreca wrote:
Patrizia Borreca wrote:
Nello schema A2 di destra credo ci sia un errore. Al rigo 13 c'è una diminuzione e al rigo 15 non è possibile eseguire correttamente ciò che è rappresentato.
02.04.2026 - 06:48DROPS Design answered:
Buonasera Patrizia, al momento non sono riportati errori nel diagramma. Buon lavoro!
04.04.2026 - 18:06
![]() Kinga wrote:
Kinga wrote:
Cześć! Czy we wzorze A2, w rzędzie 13 (prawe ramię) nie ma przypadkiem błędu? Są redukowane 2 oczka i wykonywany jeden narzut, przez co nie następnym rzędzie powinno być mniej oczek (39 zamiast 40). Czy możecie proszę wyjaśnić tę część?
29.03.2026 - 16:52DROPS Design answered:
Witaj Kingo, sprawdzimy to. W tym momencie nabierz na dekolt o 1 oczko więcej, aby liczba oczek się zgadzała (by było 40). Pozdrawiamy!
30.03.2026 - 16:01
![]() Marianne wrote:
Marianne wrote:
Hvor mange rettmasker skal jeg strikke før hullmønsteret starter på pinne 3, på bærestykket? Skal starte på rad 11 i A4. Strikker str S. Ser nå at jeg ikke fikk lagt ved bilde i spørsmålet mitt, som jeg først sendte inn. Sender derfor en gang til.
28.03.2026 - 17:37DROPS Design answered:
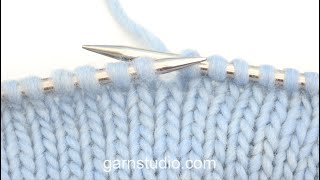
Hei Marianne. Usikker på om jeg skjønner spørsmålet ditt helt, men diagram A.4, rad 3 - da starter man med 4 rettmasker før "hullmønstret". Når rad 11 strikkes, så strikkes det fra vrangen (strikk vrang fra vrangen). mvh DROPS Design
07.04.2026 - 08:57
![]() Marianne wrote:
Marianne wrote:
Hvor mange rettmasker skal jeg strikke før hullmønsteret starter på pinne 3, der jeg har gulet ut i oppskriften? Skal starte på rad 11 i A4.
28.03.2026 - 17:33
![]() Patrizia wrote:
Patrizia wrote:
Buon pomeriggio, dove devo aumentare le 16 maglie per lo scollo? se le aumento alla fine del giro mi trovo con una maglia in meno. grazie
24.03.2026 - 15:15DROPS Design answered:
Buongiorno Patrizia, deve avviare 16 maglie a nuovo alla fine del ferro. Buon lavoro!
25.03.2026 - 08:35
![]() Patrizia wrote:
Patrizia wrote:
Buongiorno. scusate ma non riesco a continuare il lavoro perchè dopo aver aumentato le sedici maglie e seguito le istruzioni fino al quattordicesimo giro dello schema A2 nel fare il quindicesimo giro mi trovo una maglia in meno e non posso realizzare l'ultimo giro. Al quindicesimo mi devo fermare per montare i punti della manica. grazie per il vostro aiuto.
23.03.2026 - 21:15DROPS Design answered:
Buonasera Patrizia, è difficile fornirle un'assistenza così personalizzata in questa sede, ma può rivolgersi al suo rivenditore DROPS di fiducia. Buon lavoro!
23.03.2026 - 22:14
![]() Victoria wrote:
Victoria wrote:
Bonjour, Je suis absolument coincée à cette partie « devant droit »: « Au rang suivant sur l’endroit, monter 15-15-16-16-16-16-16 mailles pour l’encolure à la fin du rang = 40-42-43-45-46-48-50 mailles. ». Je ne comprend pas quelles sont ces mailles que l’on rajoute. Cela ne correspond pas au schéma A2 auquel on rajoute 8 mailles sur la bordure devant. Merci pour votre aide
19.03.2026 - 22:50DROPS Design answered:
Bonjour Victoria, vous montez maintenant les dernières mailles de l'encolure devant, ces mailles correspondent aux dernières mailles montées dans A.2 à la fin de ce rang + 8 mailles de bordure devant. Bon tricot!
20.03.2026 - 07:40
|
||||||||||||||||
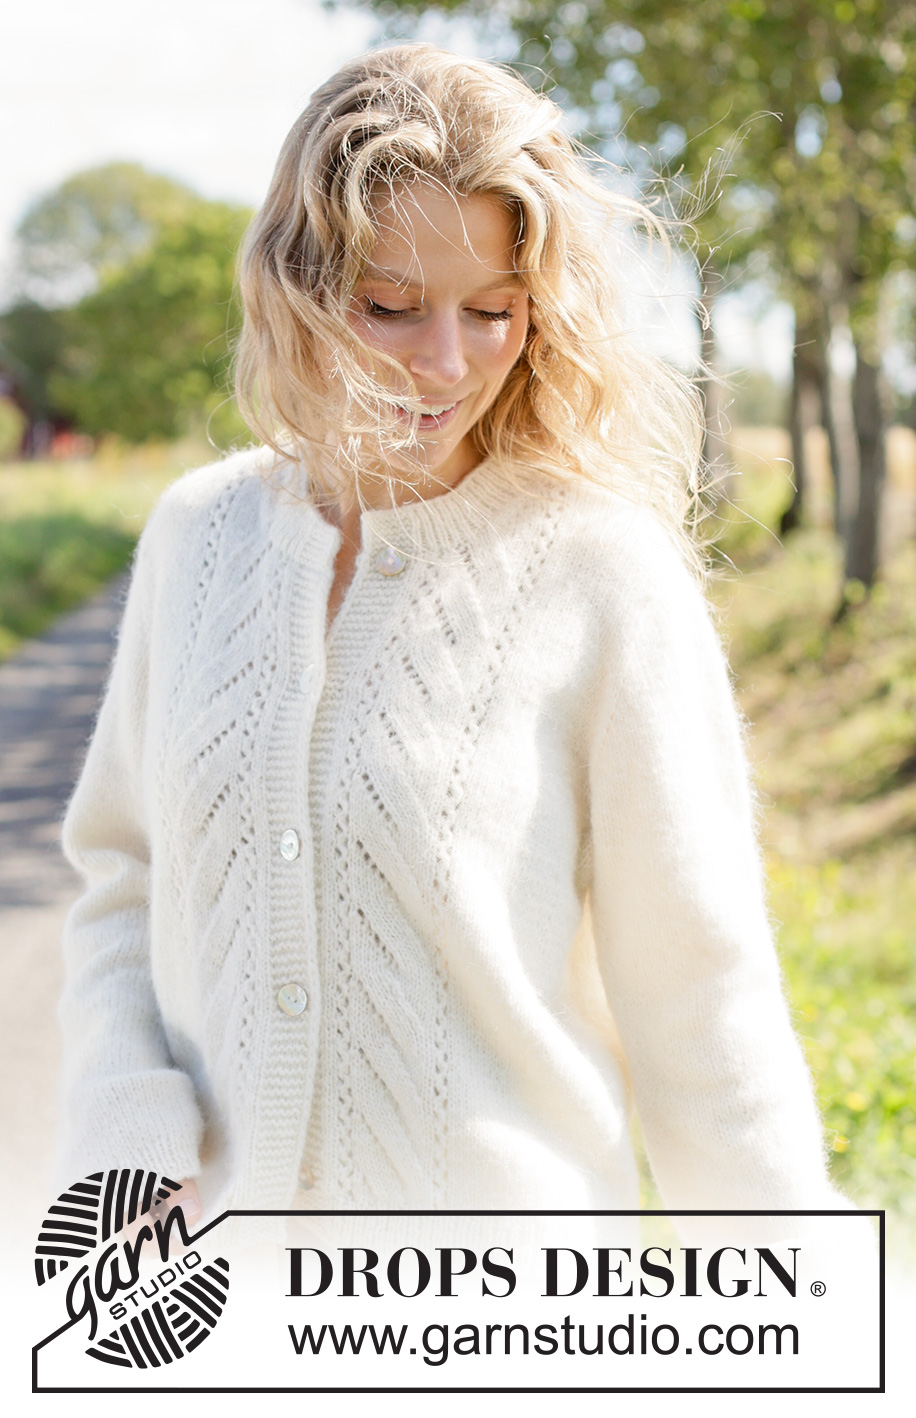
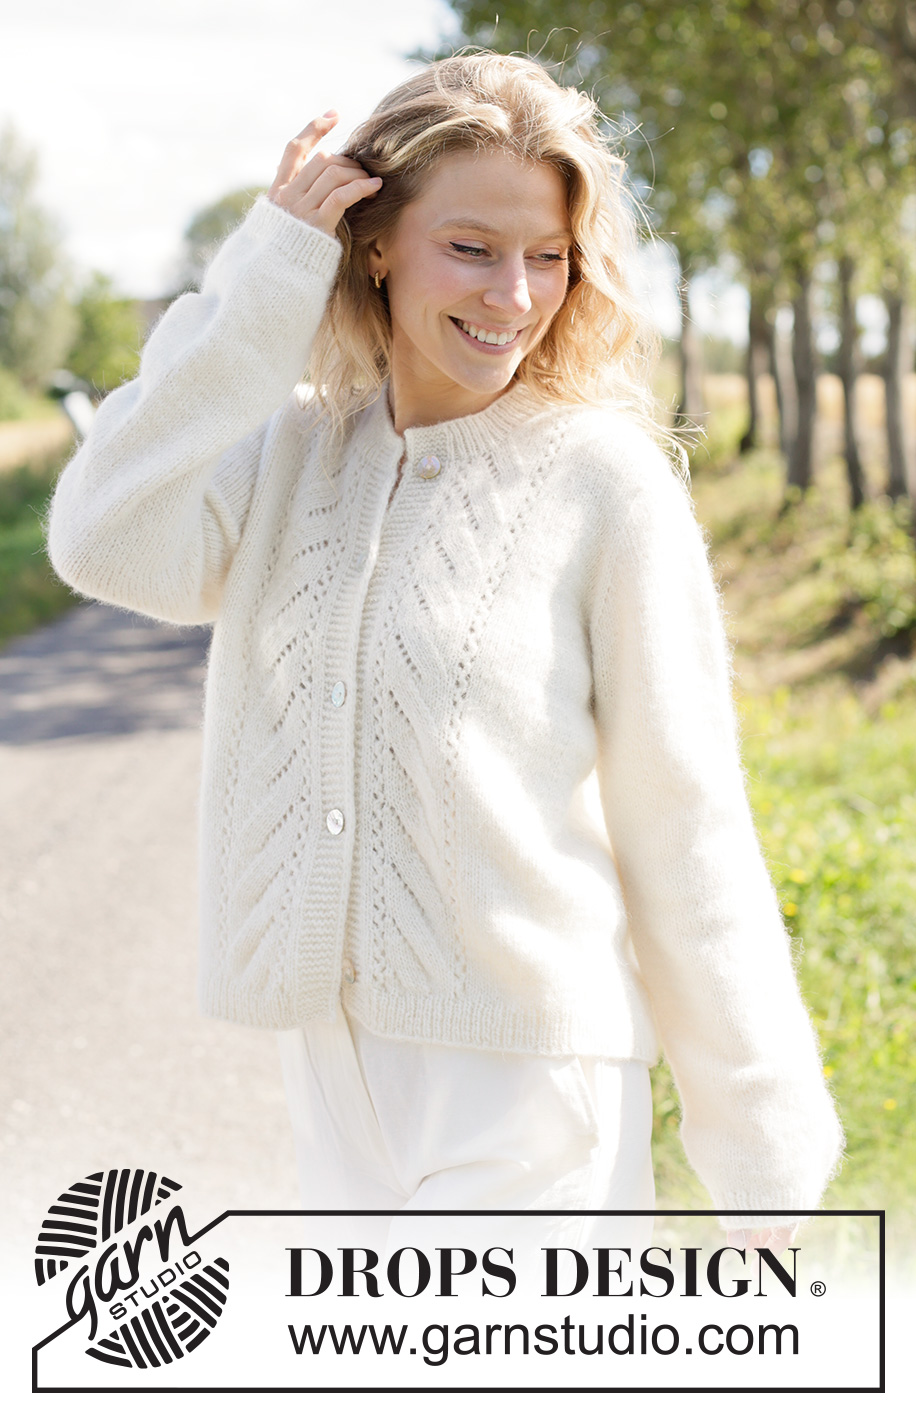
Ivory Leaf Cardigan#ivoryleafcardigan |
||||||||||||||||
 |
 |
|||||||||||||||
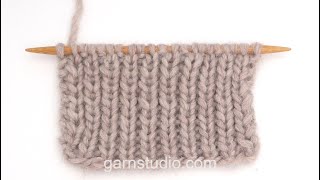
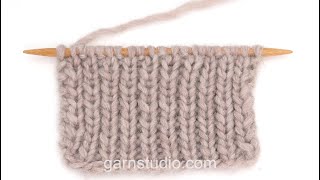
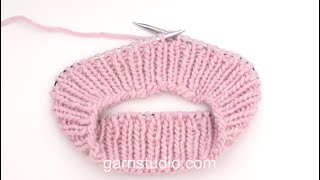
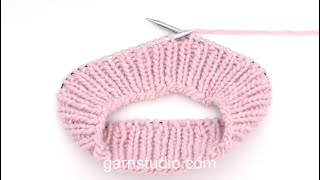
Knitted jacket in DROPS Air. The piece is worked top down in stocking stitch with European yoke, I-cord and lace pattern on the front pieces. Sizes XS - XXXL.
DROPS 266-5 |
||||||||||||||||
|
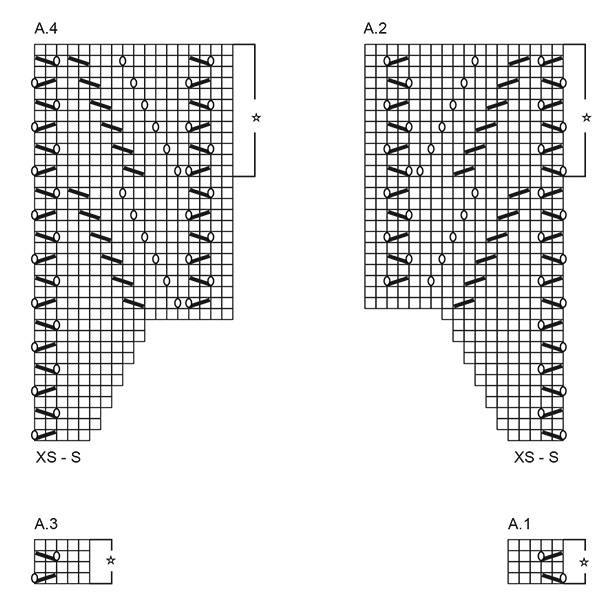
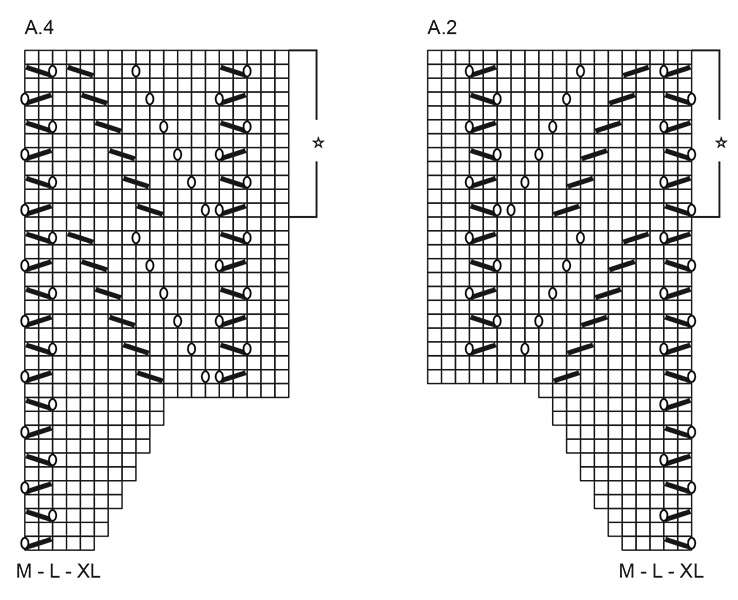
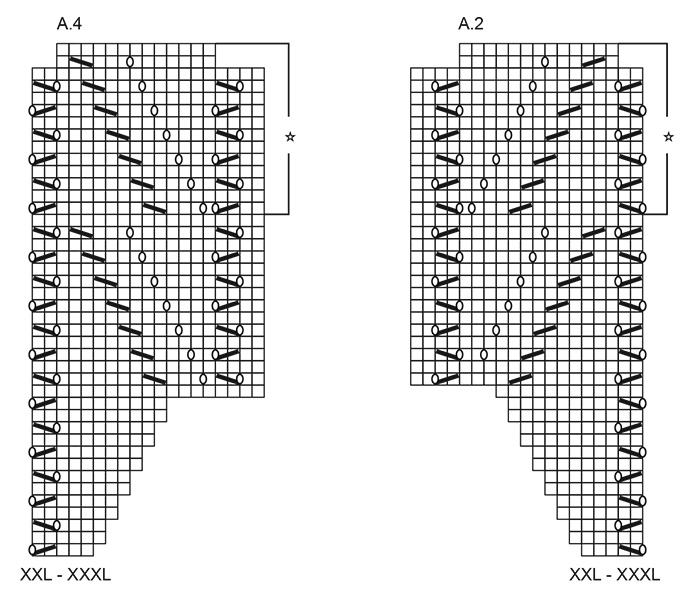
------------------------------------------------------- EXPLANATIONS FOR THE PATTERN: ------------------------------------------------------- PATTERN: See diagrams A.1 to A.4. Choose diagram for your size (applies to A.2 and A.4). The diagrams show all rows in the pattern from the right side. INCREASE TIP-1: INCREASE 1 STITCH TOWARDS LEFT – from RIGHT SIDE: Use the left needle to pick up the strand between 2 stitches from the row below, pick up the strand from the front and knit through the stitch loop that lies on the back of the needle. INCREASE 1 STITCH TOWARDS THE RIGHT- from RIGHT SIDE: Use the left needle to pick up the strand between 2 stitches from the row below, pick up the strand from the back and knit through the stitch loop that lies on the front of the needle. INCREASE TIP-2: INCREASE 1 STITCH TOWARDS THE RIGHT- from WRONG SIDE: Use the left needle to pick up the strand between 2 stitches from the row below, pick up the strand from the back and purl through the stitch loop that lies on the front of the needle. INCREASE 1 STITCH TOWARDS LEFT – from WRONG SIDE: Use the left needle to pick up the strand between 2 stitches from the row below, pick up the strand from the front and purl through the stitch loop that lies on the back of the needle. GARTER STITCH: Knit all rows, from both the right and wrong side. 1 ridge in height = knit 2 rows. BANDS WITH I-CORD: BEGINNING OF ROW: Work the band as follows (8 stitches): Slip 1 stitch purl-wise with yarn in front, knit 1, work 6 garter stitches. END OF ROW: Work the band as follows (8 stitches): Work until there are 8 stitches left on the row, work 6 garter stitches, slip 1 stitch purl-wise with yarn in front, knit 1. Work like this from both the right and wrong side. BUTTONHOLES: Work the buttonholes on the right band (when the piece is worn) from the right side when there are 6 stitches left: ROW 1 (right side): Make 1 yarn over, knit 2 together, slip 1 stitch purl-wise with strand in front, knit 1. ROW 2 (wrong side): Work the band as before, knit the yarn over to leave a hole. The first buttonhole is worked on the first row from the right side when all stitches have been increased for the neckline. Then work the other 4-4-4-5-5-5-5 buttonholes with 10-10½-11-9-9-9-9 cm between each one. The last buttonhole is worked in the transition between the stocking stitch and rib on the body. SLEEVE TIP: When knitting up stitches under the sleeve, you can get a small hole in the transition between stitches on the body and sleeve. This hole can be closed by picking up the strand between 2 stitches and working this strand twisted together with the first stitch between body and sleeve. DECREASE TIP: Decrease 1 stitch on each side of the marker-thread as follows: Work until there are 3 stitches left before the marker-thread, knit 2 together, knit 2 (marker-thread sits in the middle of these 2 stitches), slip 1 stitch knit-wise, knit 1 and pass the slipped stitch over the knitted stitch (2 decreased stitches). ------------------------------------------------------- START THE PIECE HERE: ------------------------------------------------------- JACKET – SHORT OVERVIEW OF THE PIECE. The pattern uses both long and short needles; start with the length which fits the number of stitches and change when necessary. If there is a «0» in your chosen size, skip the information and go straight to the next instruction. Work according to points 1 – 5. 1. BACK PIECE: Cast on stitches for the back of the neck. Work the back piece back and forth, increasing stitches on each side until the shoulder stitch count has been achieved. The back piece has slightly diagonal shoulder. 2. FRONT PIECES: Start by knitting up stitches along one back shoulder, working downwards and increasing for the neckline. Repeat on the other shoulder. 3. YOKE: Join the front and back pieces, working first 1 front piece, knitting up stitches for the sleeve along the side of the front piece, working the back piece, knitting up stitches for the sleeve along the side of the second front piece, then working this front piece. The yoke is continued back and forth from mid-front, with lace pattern on the front pieces and stocking stitch on the back piece. 4. INCREASE FOR BODY AND SLEEVES: While working the yoke, you increase stitches first for the sleeves, then for both the sleeves and body. 5. BODY AND SLEEVES: When all the increases are finished and the yoke is the correct length, it is divided for the body and sleeves. The body is continued back and forth while the sleeves wait. Stitches are knitted up for the bands along each front piece and worked back and forth. The sleeves are worked in the round, top down. Stitches are knitted up along the neckline and the neck is worked back and forth to finish. BACK PIECE: The piece is worked back and forth with circular needle. Cast on 28-28-30-30-32-32-32 stitches with circular needle size 4.5 mm and DROPS Air. ROW 1 (wrong side): Purl. ROW 2 (right side): Read INCREASE TIP-1. Knit 3, increase 1 stitch towards the left, knit until there are 3 stitches left on the row, increase 1 stitch towards the right, knit 3. ROW 3 (wrong side): Read INCREASE TIP-2. Purl 3, increase 1 stitch towards the right, purl until there are 3 stitches left on the row, increase 1 stitch towards the left, purl 3. AFTER ROW 3: Work ROWS 2 and 3 a total of 9-10-10-11-11-12-13 times (18-20-20-22-22-24-26 rows worked) = 64-68-70-74-76-80-84 stitches. The piece measures approx. 8-8-8-9-9-10-11 cm. Remember to maintain the knitting tension. Cut the strand and place the stitches on a stitch holder. RIGHT FRONT: Find the right back shoulder as follows: Lay the back piece flat, right side up, with the stitch holder towards you; right side of piece = right shoulder. Start from the right side by the armhole on the right back shoulder and knit up 1 stitch in the outermost stitch on the shoulder (edge stitch) then 1 stitch in each row worked inside the outermost stitch, as far as the neckline (18-20-20-22-22-24-26 stitches) = 19-21-21-23-23-25-27 shoulder-stitches. Insert 1 marker by the neck. All length-measurements on the front piece are taken from this marker, measured in the knitting direction. Purl 1 row from the wrong side, then work as follows: ROW 1 (right side): Knit 14-16-16-18-18-20-22, work A.1. ROW 2 (wrong side): Work A.1, purl 14-16-16-18-18-20-22. Work ROWS 1 and 2 until the piece measures 4-5-5-7-7-7-9 cm from the marker, finishing after a repeat of A.1 in height. Now increase for the neckline as follows: ROW 1 (right side): Knit until there are 5 stitches left, insert 1 marker, work A.2 but when there are 3 stitches left, increase 1 stitch towards the right – remember INCREASE TIP-1, work the last 3 stitches in A.2. ROW 2 (wrong side): Purl. ROW 3 (right side): Knit to the marker, continue A.2 but when there are 3 stitches left, increase 1 stitch towards the right, work the last 3 stitches in A.2. ROW 4 (wrong side): Purl. Work ROWS 3 and 4, 4-4-4-4-5-5-5 more times (8-8-8-8-10-10-10 rows worked) = 25-27-27-29-30-32-34 stitches. You have increased 6-6-6-6-7-7-7 times for the neckline and the piece measures approx. 9-10-10-12-13-13-15 cm from the marker. On the next row from the right side, cast on 15-15-16-16-16-16-16 stitches for the neckline at the end of the row = 40-42-43-45-46-48-50 stitches. Some of the neckline-depth will lie on the back piece. Neckline-depth in front = 8-8-8-10-11-11-12 cm. Neckline-depth at back = 1-2-2-2-2-2-3 cm. Work the next row from the wrong side as follows: 8 stitches according to BANDS WITH I-CORD – read explanation above, purl to end of row. Work as follows from the right side: Knit to the marker, continue A.2, finish with 8 band-stitches according to bands with I-cord. The piece measures approx. 10-11-11-13-14-14-16 cm from the marker. Cut the strand and place the stitches on a stitch holder. Work the left front shoulder along the left back shoulder. LEFT FRONT: Start from the right side by the neck on the left back shoulder and knit up 1 stitch in every row worked, inside the outermost stitch, as far as the armhole (18-20-20-22-22-24-26 stitches), knit up 1 stitch outermost on the shoulder (edge stitch) = 19-21-21-23-23-25-27 shoulder-stitches. Insert 1 marker by the neck. All length-measurements on the front piece are taken from this marker, measured in the knitting direction. Purl 1 row from the wrong side, then work as follows: ROW 1 (right side): Work A.3, knit 14-16-16-18-18-20-22. ROW 2 (wrong side): Purl 14-16-16-18-18-20-22, work A.3. Work ROWS 1 and 2 until the piece measures 4-5-5-7-7-7-9 cm from the marker, finishing after a repeat of A.3 in height. Now increase for the neckline as follows: ROW 1 (right side): Work the first 3 stitches in A.4, increase 1 stitch towards the left – remember INCREASE TIP-1, work the remaining stitches in A.4, insert 1 marker, knit to end of row. ROW 2 (wrong side): Purl. ROW 3 (right side): Work the first 3 stitches in A.4, increase 1 stitch towards the left, work A.4 to the marker, knit to end of row. ROW 4 (wrong side): Purl. Work ROWS 3 and 4, 4-4-4-4-5-5-5 more times (8-8-8-8-10-10-10 rows worked), = 25-27-27-29-30-32-34 stitches, with the last row from the wrong side and cast on 15-15-16-16-16-16-16 stitches for the neckline at the end of this row = 40-42-43-45-46-48-50 stitches. You have increased 6-6-6-6-7-7-7 times for the neckline in addition to the cast-on stitches and the piece measures approx. 9-10-10-12-13-13-15 cm from the marker. Some of the neckline-depth will lie on the back piece. Neckline-depth in front = 8-8-8-10-11-11-12 cm. Neckline-depth at back = 1-2-2-2-2-2-3 cm. On the next row from the right side, work 8 band stitches according to BANDS WITH I-CORD – remember explanation above, continue A.4 to the marker, knit to end of row. From the wrong side: Purl until there are 8 stitches left, work 8 band-stitches according to bands with I-cord. The piece measures approx. 10-11-11-13-14-14-16 cm from the marker. The front and back pieces are now joined and stitches are knitted up for the sleeves. YOKE: ROW 1 (right side): Start from the right side on the left front piece, work 8 band-stitches as before, work A.4, remove the marker after A.4, knit until there are 2 stitches left on the front piece, slip 1 stitch, knit 1, pass the slipped stitch over (1 stitch decreased), insert 1 marker, knit up 18-20-20-24-26-26-28 stitches along the side of the left front piece (= sleeve-stitches, knitted up inside the outermost stitch), insert 1 marker, knit together the first 2 stitches on the back piece (1 stitch decreased), knit until there are 2 stitches left on the back piece, slip 1 stitch, knit 1, pass the slipped stitch over (1 stitch decreased), insert 1 marker, knit up 18-20-20-24-26-26-28 stitches along the side of the right front piece (= sleeve-stitches, knitted up inside the outermost stitch), insert 1 marker, knit together the first 2 stitches on the right front piece (1 stitch decreased), knit to marker and remove it, work A.2 and the bands as before = 176-188-192-208-216-224-236 stitches. Remember to work the first BUTTONHOLE at the end of the row – read description above. ROW 2 (wrong side): Work the band as before, purl to the first marker, move the marker onto the right needle, increase 1 stitch towards the left, purl to the next marker, increase 1 stitch towards the right, move the marker onto the right needle, purl to the next marker, move the marker onto the right needle, increase 1 stitch towards the left, purl to the next marker, increase 1 stitch towards the right, move the marker onto the right needle, purl until there are 8 stitches left, work the band as before = 180-192-196-212-220-228-240 stitches. ROW 3 (right side): Continue the band, lace pattern and stocking stitch as far as the first marker, move the marker onto the right needle, increase 1 stitch towards the left, knit to next marker, increase 1 stitch towards the right, move the marker onto the right needle, knit to next marker, move the marker onto the right needle, increase 1 stitch towards the left, knit to next marker, increase 1 stitch towards the right, move the marker onto the right needle, continue the stocking stitch, lace pattern and the band = 184-196-200-216-224-232-244 stitches. ROW 4 (wrong side): Purl with 8 band-stitches on each side as before. AFTER ROW 4: Work ROWS 3 and 4, 8-7-5-6-5-3-1 more times (16-14-10-12-10-6-2 rows worked). A total of 10-9-7-8-7-5-3 increases in height on the sleeves: 38-38-34-40-40-36-34 stitches on each sleeve, 39-41-42-44-45-47-49 stitches on each front piece and 62-66-68-72-74-78-82 stitches on the back piece = 216-224-220-240-244-244-248 stitches. Now increase on both the body and sleeves, with the increases on the body inside 2 stitches so there are 2 stitches between increases on body and sleeves:: ROW 1 (right side): Work as before until there are 2 stitches left before the first marker, increase 1 stitch towards the right, knit 2, move the marker onto the right needle, increase 1 stitch towards the left, knit to the next marker, increase 1 stitch towards the right, move the marker onto the right needle, knit 2, increase 1 stitch towards the left, knit to 2 stitches before the next marker, increase 1 stitch towards the right, knit 2, move the marker onto the right needle, increase 1 stitch towards the left, knit to the next marker, increase 1 stitch towards the right, move the marker onto the right needle, knit 2, increase 1 stitch towards the left, work to end of row (8 stitches increased, 1 stitch on each side of 2 stitches in each transition between body and sleeves). ROW 2 (wrong side): Purl with 8 band-stitches on each side. Work ROWS 1 and 2 a total of 4-6-7-10-14-17-19 times (8-12-14-20-28-34-38 rows worked). A total of 14-15-14-18-21-22-22 increases in height on the sleeves and 4-6-7-10-14-17-19 increases in height on the body: 46-50-48-60-68-70-72 stitches on each sleeve, 43-47-49-54-59-64-68 stitches on each front piece and 70-78-82-92-102-112-120 stitches on the back piece = 248-272-276-320-356-380-400 stitches. The increases are finished in sizes XL, XXL and XXXL. Go to ALL SIZES. In sizes XS, S, M and L continue increasing as follows. SIZES XS, S, M and L: Increase every 4th row: ROW 1 (right side): Work as before until there are 2 stitches left before the first marker, increase 1 stitch towards the right, knit 2, move the marker onto the right needle, increase 1 stitch towards the left, knit to the next marker, increase 1 stitch towards the right, move the marker onto the right needle, knit 2, increase 1 stitch towards the left, knit to 2 stitches before the next marker, increase 1 stitch towards the right, knit 2, move the marker onto the right needle, increase 1 stitch towards the left, knit to the next marker, increase 1 stitch towards the right, move the marker onto the right needle, knit 2, increase 1 stitch towards the left, work to end of row (8 stitches increased). ROW 2 (wrong side): Purl with 8 band-stitches on each side. ROW 3 (right side): Continue the bands, lace pattern and stocking stitch. ROW 4 (wrong side): Purl with 8 band-stitches on each side. Work ROWS 1 to 4 a total of 2-2-3-1-0-0-0 times (8-8-12-4-0-0-0 rows worked). A total of 16-17-17-19-21-22-22 increases in height on the sleeves and 6-8-10-11-14-17-19 increases in height on the body: 50-54-54-62-68-70-72 stitches on each sleeve, 45-49-52-55-59-64-68 stitches on each front piece and 74-82-88-94-102-112-120 stitches on the back piece = 264-288-300-328-356-380-400 stitches. ALL SIZES: The sleeves measure approx. 15-15-16-16-17-18-18 cm. When the jacket is folded double at the shoulder it measures approx. 20-21-22-23-24-25-26 cm from outermost on the shoulder and down the armhole. If the piece is shorter than this, continue working without further increases to the correct length. Now divide for the body and sleeves. DIVIDE FOR BODY AND SLEEVES: Work 45-49-52-55-59-64-68 stitches as before (= front piece), place the next 50-54-54-62-68-70-72 stitches on a stitch holder for the sleeve, cast on 8-8-10-10-12-12-14 stitches (mid-under the sleeve), work the next 74-82-88-94-102-112-120 stitches (= back piece), place the next 50-54-54-62-68-70-72 stitches on a stitch holder for the sleeve, cast on 8-8-10-10-12-12-14 stitches (mid-under the sleeve), work the last 45-49-52-55-59-64-68 stitches as before (= front piece). The body and sleeves are finished separately. BODY: = 180-196-212-224-244-264-284 stitches. Continue the bands, lace pattern and stocking stitch back and forth until the piece measures 51-53-55-57-58-60-62 cm from the cast-on edge mid-back. On the next row from the right side, begin the rib. AT THE SAME TIME increase 29-29-31-35-37-41-43 stitches evenly on the row as follows: Change to circular needle size 3 mm, work the band as before, rib (knit 1, purl 1 – remember to increase), until there are 9 stitches left, knit 1 and work the band as before = 209-225-243-259-281-305-327 stitches. When the rib measures 3-3-3-3-4-4-4 cm, cast off with rib or work Italian cast-off. The jacket measures approx. 54-56-58-60-62-64-66 cm from top of shoulder. SLEEVES: Place the 50-54-54-62-68-70-72 sleeve-stitches from one stitch holder onto circular needle size 4.5 mm and knit up 1 stitch in each of the 8-8-10-10-12-12-14 stitches cast on under the sleeve – read SLEEVE TIP = 58-62-64-72-80-82-86 stitches. Insert a marker-thread in the middle of the 8-8-10-10-12-12-14 stitches under the sleeve. The round starts by the marker-thread. Work stocking stitch in the round. AT THE SAME TIME, when the sleeve measures 1 cm from the division, decrease mid-under the sleeve – read DECREASE TIP as follows: Decrease 2 stitches 2-3-3-3-3-3-4 times every 2nd round, then 2 stitches 0-0-0-3-6-6-6 times every 2 cm = 54-56-58-60-62-64-66 stitches. Continue working until the sleeve measures 39-39-39-39-37-36-36 cm from the division. Change to double pointed needles size 3 mm. Work rib (knit 1, purl 1), AT THE SAME TIME increase 8-8-8-8-8-10-10 stitches evenly on the first round = 62-64-66-68-70-74-76 stitches. When the rib measures 3-3-3-3-4-4-4 cm, cast off with rib or work Italian cast-off. The sleeve measures approx. 42-42-42-42-41-40-40 cm from the division. NECK: Use circular needle size 3 mm. Start from the right side, mid-front and knit up 93-95-105-109-115-115-119 stitches along the neckline, inside 1 stitch (stitch count should be divisible by 2 + 1). Work the first row from the wrong side: The band as before, rib (purl 1, knit 1) until there are 9 stitches left, purl 1 and work the band as before. From the right side: The band as before, rib (knit 1, purl 1) until there are 9 stitches left, knit 1 and work the band as before. Continue this rib for 3-3-3-3½-3½-4-4 cm. Cast off with rib or work Italian cast-off. ASSEMBLY: Sew the buttons onto the left band. |
||||||||||||||||
Diagram explanations |
||||||||||||||||
|
||||||||||||||||
 |
||||||||||||||||
 |
||||||||||||||||
 |
||||||||||||||||
 |
||||||||||||||||
Have you finished this pattern?Tag your pictures with #dropspattern #ivoryleafcardigan or submit them to the #dropsfan gallery. Do you need help with this pattern?You'll find 53 tutorial videos, a Comments/Questions area and more by visiting the pattern on garnstudio.com. © 1982-2026 DROPS Design A/S. We reserve all rights. This document, including all its sub-sections, has copyrights. Read more about what you can do with our patterns at the bottom of each pattern on our site. |
||||||||||||||||


With over 40 years in knitting and crochet design, DROPS Design offers one of the most extensive collections of free patterns on the internet - translated to 17 languages. As of today we count 324 catalogues and 12291 patterns translated into English (UK/cm). 12291
We work hard to bring you the best knitting and crochet have to offer, inspiration and advice as well as great quality yarns at incredible prices! Would you like to use our patterns for other than personal use? You can read what you are allowed to do in the Copyright text at the bottom of all our patterns. Happy crafting!
Post a comment to pattern DROPS 266-5
We would love to hear what you have to say about this pattern!
If you want to leave a question, please make sure you select the correct category in the form below, to speed up the answering process. Required fields are marked *.