Comments / Questions (46)
![]() Margreet wrote:
Margreet wrote:
In het patroon stasn volledig zwarte vakjes,bij A2 loop ik er meteen tegenaan, ook bij a1, a3 a4 en a6 staan ze. In de patroonuitleg vind ik dit niet terug, wat moet ik daar doen?
15.04.2024 - 14:53DROPS Design answered:
Dag Margreet,
De zwarte vakjes zijn geen steken. Als je het telpatroon uit zou knippen, dan zou je de zwarte vakjes er a.h.w. ook uit moeten knippen. Je gaat dus gelijk verder met de volgende steek.
15.04.2024 - 21:03
![]() Margreet wrote:
Margreet wrote:
In het patroon staat bijA2 en ook bij A1 en A3 een volledig zwart vakje, wat wordt daarmee bedoeld? Ik vind dat niet terug in de payroonuitleg
15.04.2024 - 14:51
![]() Orru Nathalie wrote:
Orru Nathalie wrote:
Bonjour Depuis la correction du 5 avril, les diagrammes A1 et A3 n’apparaissent plus Cordialement
13.04.2024 - 16:26DROPS Design answered:
Bonjour Mme Orru, vous devriez pouvoir les afficher, pensez à rafraîchir la page (Ctrl + F5), nettoyez les cookies/le cache de votre navigateur si besoin. Bon tricot!
15.04.2024 - 08:41
![]() Melanie wrote:
Melanie wrote:
Wo finde ich denn die Angaben wann wie gezopft wird? Weder in den Diagrammen noch in dem schriftlichen Teil finde ich die Informationen.
05.04.2024 - 20:48DROPS Design answered:
Liebe Melanie, das finden Sie mit der Diagrambeschreibung. Viel Spaß beim Stricken!
08.04.2024 - 09:20
![]() Jutta wrote:
Jutta wrote:
Wird beim Rippenmuster am Rumpfteil nicht auf Nadelstärke 3 gewechselt, wie bei am Ärmel und Hals.?
03.04.2024 - 14:12DROPS Design answered:
Liebe Jutta, ja genau, das wird auch dazugeschrieben, danke für den Hinweis. Viel Spaß beim Stricken!
05.04.2024 - 10:01
![]() Nicole wrote:
Nicole wrote:
Disregard my first question about row 29. But, I am still confused that once you complete A.1 and A.3, how do you continue with the pattern?
02.04.2024 - 01:21DROPS Design answered:
Dear Nicole, just repeat the lace pattern to continue the V and repeat the small cables as before. Happy knitting!
03.04.2024 - 08:00
![]() Nicole wrote:
Nicole wrote:
I'm confused. I'm making the size small and I am on row 29 of A.1/A.3 and am still doing the raglan increases up to the 19 times. So I should be adding an increase into that row, however they are not built into the pattern anymore. Why is that? Also, when A.1 and A.3 are completed in their entirety what rows do we repeat for the body? I feel like the pattern is not clear on how to continue the pattern for the body.
01.04.2024 - 19:54DROPS Design answered:
Dear Nicole, work the new stitches as shown in diagrams A.1/A.3 then work the new stitches for raglan in stocking stitch - see RAGLAN at the beginning of the written pattern. continue lace pattern and small cables just as before to keep the V lace pattern and the same rythm for the cables. Happy knitting!
02.04.2024 - 15:41
![]() Riinlaht wrote:
Riinlaht wrote:
Kuviossa A3 ensimmäisellä rivillä puuttuu yksi langankierto. Merkki löytyy myöhemmin kaaviossa rivillä 7, siellä se on ylimääräinen. Voitteko korjata virheen. There is a mistake on pattern A3 round 1 and 7, yarn rotation is on wrong place. Could You correct it, please.
29.03.2024 - 15:17
![]() Jutta wrote:
Jutta wrote:
Bitte die Reihen 1,3,5 und 7 korrigieren. Da sind die Umschläge an der falschen Stelle. Haben schon einige geschrieben, aber wurde leider nicht korrigiert.
27.03.2024 - 18:49
![]() Jutta wrote:
Jutta wrote:
In A3 wird in der ersten Runde nach dem zusammenstricken kein Umschlag gemacht. Der fehlt aber dann beim weiterstricken.da passt es mit den Maschen nicht mehr. Fehlt dann eine. Außerdem werden in Runde 7 dann 2 Umschläge gemacht. In A1 ist es anders. Sind das Fehler oder ist es so wie im Schema gezeichnet, richtig?
27.03.2024 - 08:45DROPS Design answered:
Liebe Jutta, danke für den Hinweis, Diagram A.3 wurde korrigiert. Viel Spaß beim Stricken!
05.04.2024 - 10:00
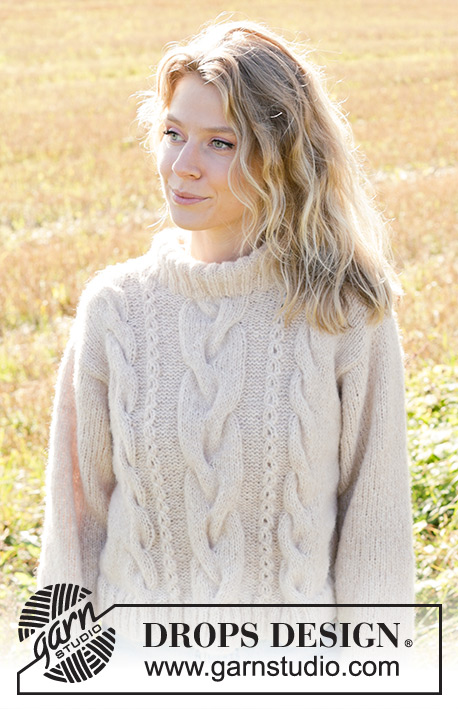
Pink Paradise#pinkparadisesweater |
||||||||||||||||||||||||||||||||||
 |
 |
|||||||||||||||||||||||||||||||||
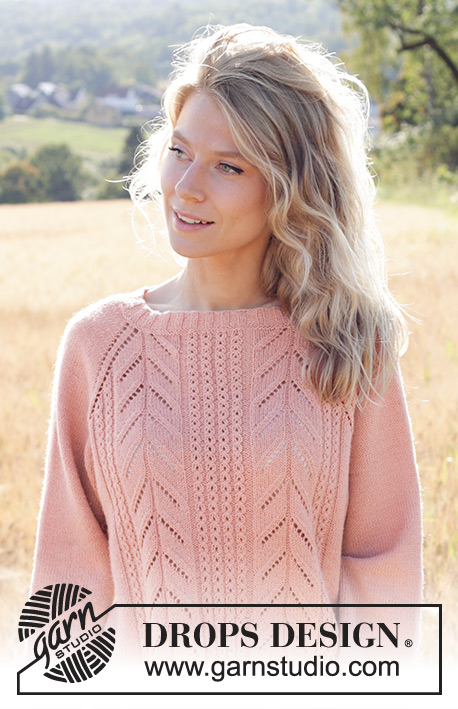
Knitted jumper in DROPS Flora or DROPS BabyMerino. The piece is worked top down with raglan, lace pattern and cables. Sizes S - XXXL.
DROPS 248-14 |
||||||||||||||||||||||||||||||||||
|
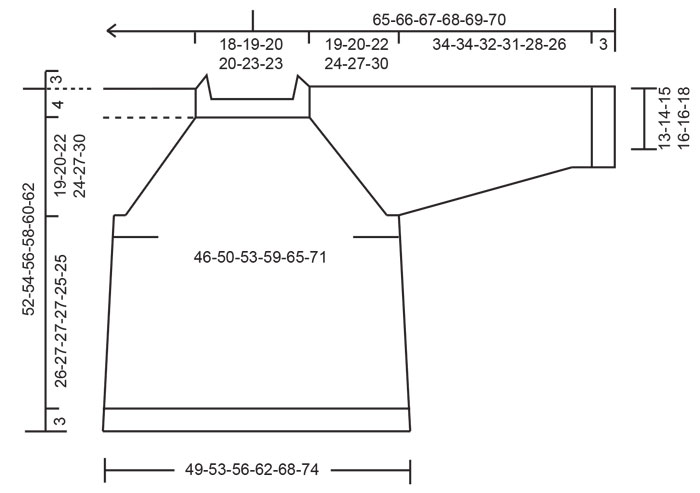
------------------------------------------------------- EXPLANATIONS FOR THE PATTERN: ------------------------------------------------------- GARTER STITCH (worked in the round): Alternate rounds of knit and purl. 1 ridge vertically = 2 rounds. PATTERN: See diagrams A.1 to A.6. Choose diagram for your size (applies to A.2 and A.5). The stitch count varies in A.1, A.2 and A.3 because the cables vary from 2 to 3 stitches. The stitch count is based on a 3-stitch cable. RAGLAN: Increase 1 stitch by making 1 yarn over, which is knitted on the next round to leave a hole. On the back piece and sleeves, the increased stitches are worked in stocking stitch, on the front piece as shown in diagrams A.1 and A.3. When the diagrams have been worked as far as the arrow, work subsequent new stitches in stocking stitch. INCREASE TIP (sides of body): Increase 4 stitches on the round by working as follows: Start 1 stitch before the first marker-thread, make 1 yarn over, knit 2 (marker-thread sits between these 2 stitches), make 1 yarn over. Repeat at the second marker-thread. DECREASE TIP (for sleeves): Decrease 2 stitches on the round as follows: Work until there are 3 stitches left before the marker-thread, knit 2 together, knit 2 (marker-thread sits between these 2 stitches), slip 1 stitch knit-wise, knit 1 and pass the slipped stitch over the knitted stitch. ------------------------------------------------------- START THE PIECE HERE: ------------------------------------------------------- JUMPER – SHORT OVERVIEW OF THE PIECE: The pattern uses both long and short needles; start with the length which fits the number of stitches and change when necessary. The piece is worked in the round with circular needle, top down. When the neck and yoke are finished, the piece is divided for the body and sleeves. The body is continued in the round, while the sleeves wait. The sleeves are worked in the round, top down. NECK: Cast on 124-128-132-136-148-148 stitches with circular needle size 3 mm and DROPS Flora or DROPS Baby Merino. Work rib in the round (knit 2, purl 2) for 3 cm. Work 2 ridges – see GARTER STITCH above. AT THE SAME TIME increase 4-0-6-2-0-0 stitches evenly on the first round = 128-128-138-138-148-148 stitches. Insert 1 marker at the beginning of the round (= mid-back), the yoke is measured from here. YOKE: Insert 4 marker-threads, without working the stitches, which will be used when increasing for raglan: Count 22-22-25-25-27-27 stitches (= half back piece), insert 1 marker-thread, count 19 stitches (= sleeve), insert 1 marker-thread, count 45-45-50-50-55-55 stitches (= front piece), insert 1 marker-thread, count 19 stitches (= sleeve), insert 1 marker-thread. There are 23-23-25-25-28-28 stitches left after the last marker-thread (= half back piece). Work PATTERN – read description above, starting from the marker-thread mid-back as follows: Change to circular needle size 3.5 mm, knit until there is 1 stitch left before the next marker-thread (= half back piece), increase for RAGLAN – read description above, 2 stocking stitches, increase for raglan, knit until there is 1 stitch left before the next marker-thread (= sleeve), increase for raglan, 2 stocking stitches, increase for raglan, work A.1, A.2 over 17-17-22-22-27-27 stitches, A.3, there is 1 stitch left before the next marker-thread (= front piece), increase for raglan, 2 stocking stitches, increase for raglan, knit until there is 1 stitch left before the next marker-thread (= sleeve), increase for raglan, 2 stocking stitches, increase for raglan, and knit to end of round (= half back piece). Continue this pattern and increase for raglan on each side of 2 stocking stitches in each transition between the body and sleeves, every 2nd round a total of 19-18-26-29-27-24 times = 280-272-346-370-364-340 stitches – remember the stitch count is based on 3-stitch cables in A.1, A.2 and A.3 (= 8 stitches increased on the round). REMEMBER THE KNITTING TENSION! Now continue increasing for raglan as follows: Increase every 2nd round on the front and back pieces but every 4th round on the sleeves (= alternately 4 and 8 increased stitches). Increase a total of 8-14-6-10-16-24 times on the front and back pieces and 4-7-3-5-8-12 times on the sleeves. After the last increase there are 328-356-382-430-460-484 stitches and the yoke measures approx. 17-20-20-24-27-30 cm from the marker on the neck. Continue working without further increases until the yoke measures 19-20-22-24-27-30 cm – adjusting so the last round is either round 3 or 4 in A.2 (2 stitches and 1 yarn over or 3 stitches in each cable). DIVIDE FOR BODY AND SLEEVES: Work 49-54-57-64-70-75 stitches (= half back piece), place the next 65-69-77-87-89-91 stitches on 1 thread for the sleeve, cast on 12-12-14-14-16-20 stitches (= in side under sleeve), work 99-109-114-128-141-151 stitches (= front piece), place the next 65-69-77-87-89-91 stitches on 1 thread for the sleeve, cast on 12-12-14-14-16-20 stitches (= in side under sleeve), work the last 50-55-57-64-71-76 stitches (= half back piece). The body and sleeves are finished separately. The piece is now measured from here! BODY: = 222-242-256-284-314-342 stitches. Insert 1 marker-thread in the middle of the 12-12-14-14-16-20 cast-on stitches under each sleeve. Allow the threads to follow your work onwards; they are used when increasing in the sides. Start at one marker-thread and work stocking stitch/pattern in the round as before. When the body measures 3 cm, increase 1 stitch on each side of both marker-threads – read INCREASE TIP (= 4 increased stitches). Increase like this every 8-8-8-8-7-7 cm a total of 3 times = 234-254-268-296-326-354 stitches. Work until the body measures 26-27-27-27-25-25 cm – adjusting so the last round is a round marked with a black star in A.2. Insert a marker on each side of the middle 76-76-80-80-84-84 stitches in pattern A.1 to A.3 (NOTE! There are now 14-14-18-18-22-22 stitches in A.2). The next round begins by the marker-thread before the front piece: Change to needle size 3 and work rib (knit 2, purl 2), AT THE SAME TIME increase 5-4-7-8-7-8 stitches evenly over the first 17-22-23-30-35-42 stitches (= 22-26-30-38-42-50 ribbed stitches which finish with knit 2), first marker here, work A.4, A.5, A.6 over the 76-76-80-80-84-84 stitches between the markers (= 2 decreased stitches, the rib matches the pattern), second marker here. Work rib (knit 2, purl 2) over the next 17-22-23-30-35-42 stitches and increase 5-4-7-8-7-8 stitches evenly (= 22-26-30-38-42-50 ribbed stitches which finish with knit 2), marker-thread here, work rib (purl 2, knit 2), and increase 37-39-40-42-47-49 stitches evenly over the last 117-127-134-148-163-177 stitches (154-166-174-190-210-226 ribbed stitches which finish with purl 2) = 272-292-312-344-376-408 stitches. The rib (knit 2, purl 2) now fits over all stitches. Continue this rib for 3 cm. Cast off a little loosely. The jumper measures approx. 52-54-56-58-60-62 cm from the shoulder. SLEEVES: Place the 65-69-77-87-89-91 sleeve-stitches from the thread on one side of the piece on short circular needle size 3.5 mm and knit up 1 stitch in each of the 12-12-14-14-16-20 stitches cast on under the sleeve = 77-81-91-101-105-111 stitches. Insert a marker-thread in the middle of the 12-12-14-14-16-20 stitches under the sleeve. Start at the marker-thread and work stocking stitch in the round. When the sleeve measures 3-3-4½-3-4½-4 cm, decrease mid-under the sleeve – read DECREASE TIP. Decrease like this every 4½-4½-2½-2-1½-1½ cm a total of 7-7-10-13-13-13 times = 63-67-71-75-79-85 stitches. Continue working until the sleeve measures 34-34-32-31-28-26 cm from the division. Change to double pointed needles size 3 mm. Work rib (knit 2, purl 2), AT THE SAME TIME increase 9-9-9-9-9-11 stitches evenly on the first round = 72-76-80-84-88-96 stitches. When the rib measures 3 cm, cast off a little loosely. The sleeve measures approx. 37-37-35-34-31-29 cm. |
||||||||||||||||||||||||||||||||||
Diagram explanations |
||||||||||||||||||||||||||||||||||
|
||||||||||||||||||||||||||||||||||
 |
||||||||||||||||||||||||||||||||||
 |
||||||||||||||||||||||||||||||||||
 |
||||||||||||||||||||||||||||||||||
Have you finished this pattern?Tag your pictures with #dropspattern #pinkparadisesweater or submit them to the #dropsfan gallery. Do you need help with this pattern?You'll find 30 tutorial videos, a Comments/Questions area and more by visiting the pattern on garnstudio.com. © 1982-2026 DROPS Design A/S. We reserve all rights. This document, including all its sub-sections, has copyrights. Read more about what you can do with our patterns at the bottom of each pattern on our site. |
||||||||||||||||||||||||||||||||||








Post a comment to pattern DROPS 248-14
We would love to hear what you have to say about this pattern!
If you want to leave a question, please make sure you select the correct category in the form below, to speed up the answering process. Required fields are marked *.