
Popular categories
Looking for a yarn?


Comments / Questions (49)
![]() Marianne wrote:
Marianne wrote:
Jeg strikker xxl, og masketallet passer med mønstret. Jeg er kommet til slutning af diagrammet, til pilen, MEN skal jeg så starte forfra med 2 snoninger - 13 masker A1, og derefter glatstrik - A2 - A3 13 masker glat 2 snoninger. Kan slet ikke se det lignier billedet af blusen......
23.04.2026 - 07:33DROPS Design answered:
Hej Marianne du fortsætter med hulmønstret midt foran og de 2 snoninger i hver side, de nye masker du tager ud til raglan strikkes i glatstrik :)
23.04.2026 - 14:29
![]() Marianne wrote:
Marianne wrote:
Jeg forstår slet ikke hvordan jeg kommer videre, når jeg er færdig med A1 A2og A3. Der står jeg skal strikke glat, men hvad så med mønster på resten af blusen😟. Mvh Marianne
21.04.2026 - 16:28DROPS Design answered:
Hej Marianne, du strikker kun mønsteret over forstykket, alle de andre masker strikkes i glatstrik også de nye raglanmasker strikkes i glatstrik. Hvis du har yderligere spørgsmål, så skriv hvilken størrelse du strikker, hvor du er i opskriften og hvor mange masker du har, så kan vi hjælpe dig med at komme videre :)
22.04.2026 - 14:16
![]() Kerstin wrote:
Kerstin wrote:
Hej! Jag är lite förvirrad, hur fortsätter jag mönstret när jag har stickat färdigt A1, A2 och A3.
14.02.2026 - 16:10DROPS Design answered:
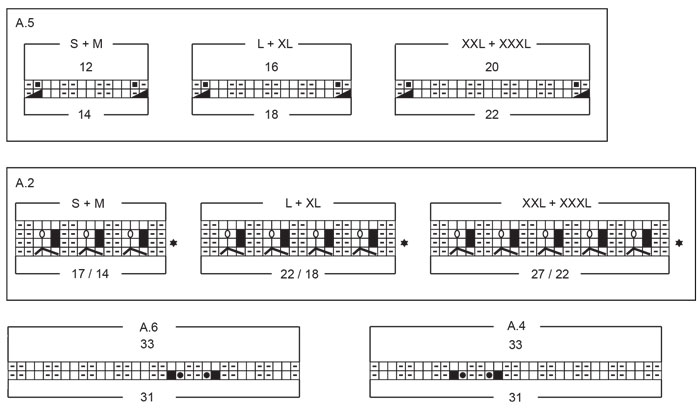
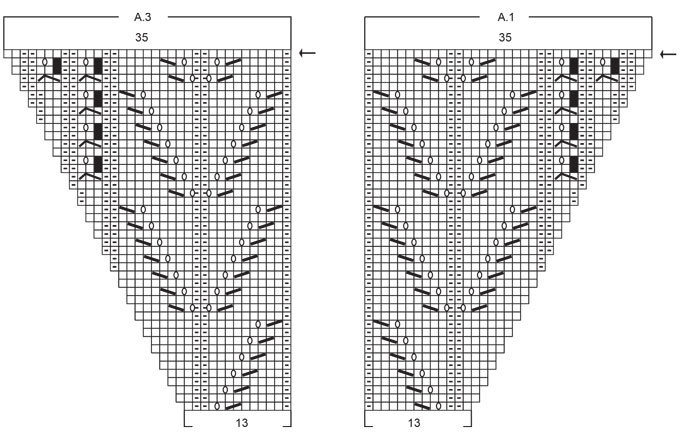
Hei Kerstin. På framstycket stickas de nya maskorna som visas i diagram A.1 och A.3. När det har stickats till pilen i diagrammet, stickas de nya maskorna i slätstickning. Når A.1 / A.2 består av 35 masker, gjentar du mønstret slik at det stemmer i høyden (slik at det blir 2 små fletter i siden og hullmønster på hver siden av A.2 midt på). mvh DROPS Design
16.02.2026 - 14:00
![]() Gosset wrote:
Gosset wrote:
Très joli modèle
27.10.2025 - 09:47
![]() Gosset wrote:
Gosset wrote:
Très joli modèle
27.10.2025 - 09:46
![]() Andrea Igen wrote:
Andrea Igen wrote:
Tack för superbra och snabbt svar på min tidigare fråga! Har en till angående mönstret; Det finns helt ifyllda svarta rutor i mönstret och jag undrar vad dom avser. I diagrammet redovisas en svart cirkel och en svart fyrkant men jag vet inte om någon av dessa = helt ifylld fyrkant.
23.10.2025 - 09:23DROPS Design answered:
Hej Andrea. Helt ifylld fyrkant är symbolen för svart fyrkant, dvs "ingen maska, hoppa till nästa ruta i diagrammet". Mvh DROPS Design
23.10.2025 - 11:17
![]() Andrea wrote:
Andrea wrote:
Jag har kanske tagit mig vatten över huvud här men har en fråga. Om jag stickar tröjan i XL och inför steg OK har 138 maskor. Hur ska jag på första varvet (då när jag ökar för raglan) också kunna sticka A1+A3 (35 maskor x2) samt A2 (22 maskor i XL) på ett framstycke som endast mäter 50 maskor. Sen undrar jag om inte jag läser mönstret upp och ner, om man tittar på A1+A2 så ser dom inte ut som tröjan om man inte vänder på dom. Med vänlig hälsning, Nybörjaren.
22.10.2025 - 09:24DROPS Design answered:
Hej Andrea. Du stickar diagrammen nerifrån och upp och från höger till vänster. Det innebär att framstyckets 50 maskor stickas såhär: 1a maskan efter märktråden är slätstickad, 1 omslag (till raglan), sticka A.1 (=13 m), A.2 (=22 m), A.3 (=13 m). Nu har du 1 maska kvar innan nästa märktråd och då gör du 1 omslag (ökning till raglan) och stickar sedan 2 maskor slätstickning (märktråden sitter mellan dessa 2 maskor). Mvh DROPS Design
22.10.2025 - 09:41
![]() Marie B wrote:
Marie B wrote:
Est-il mieux de faire un col avec des rangs raccourci (réhausse) ? merci
02.10.2025 - 22:37DROPS Design answered:
Bonjour Marie B, c'est une question de choix personnel, dans ce modèle, nous n'avons pas de réhausse, l'encolure dos et devant sont alors identiques. Bon tricot!
03.10.2025 - 08:01
![]() Veera wrote:
Veera wrote:
Onkohan ohjeessa mainittu neuletiheys puikoilla 3 vai 3,5?
06.07.2025 - 19:25DROPS Design answered:
Hei, neuletiheys on puikoille nro 3,5.
07.07.2025 - 17:36
![]() Caroline wrote:
Caroline wrote:
J'avais bien compris ce que vous m'expliquiez la question est: au niveau des manches un rang sur 2 on ne doit pas augmenter les mailles seulement le raglan doit se poursuivre. comment continuer le jour au niveau du raglan sans augmenter les mailles. Merci(avez vous une video)
09.06.2025 - 10:26DROPS Design answered:
Bonjour Caroline, pour conserver les jours tous les 2 tours côté manche quand on augmente tous les 4 tours seulement, vous pouvez faire 1 jeté comme avant mais diminuez en plus 1 m pour éviter de changer le nombre de mailles, par exemple comme dans les diagrammes A.6/A.67 de ce modèle. Bon tricot!
09.06.2025 - 13:47
|
||||||||||||||||||||||||||||||||||
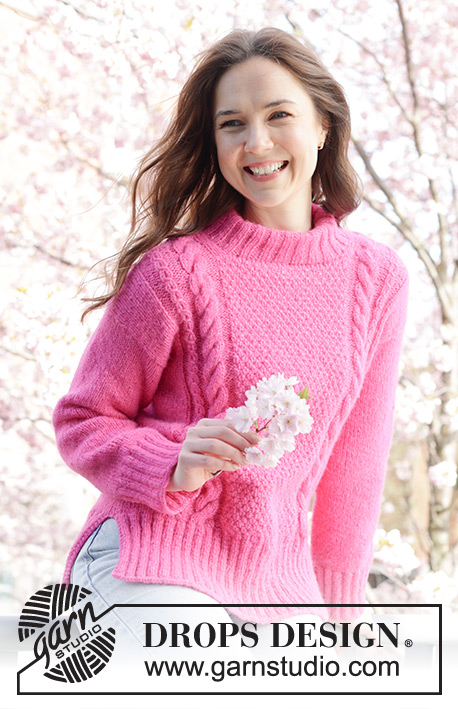
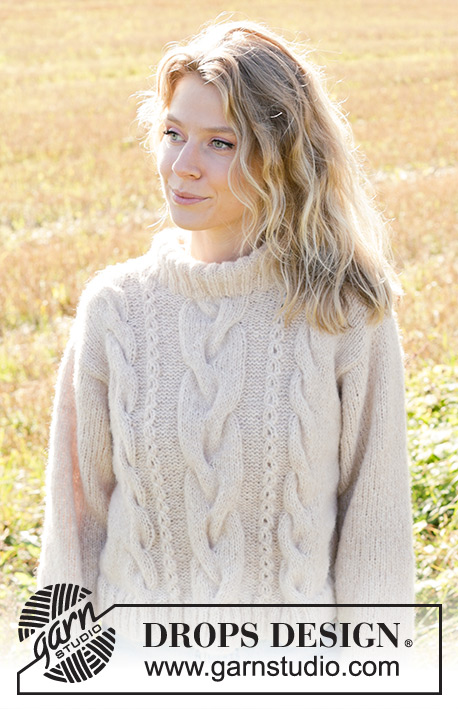
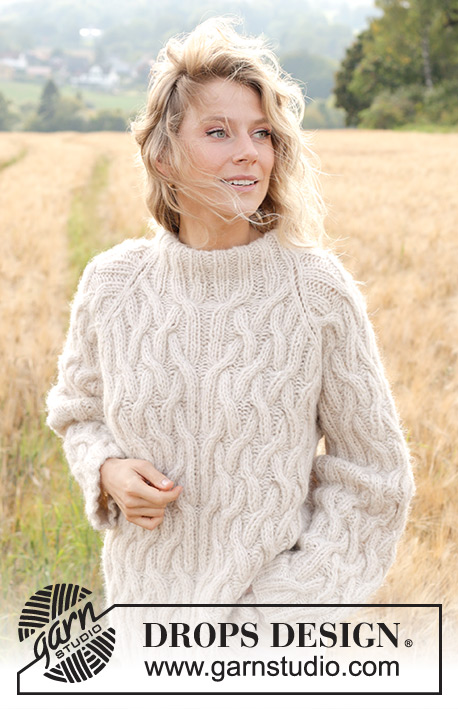
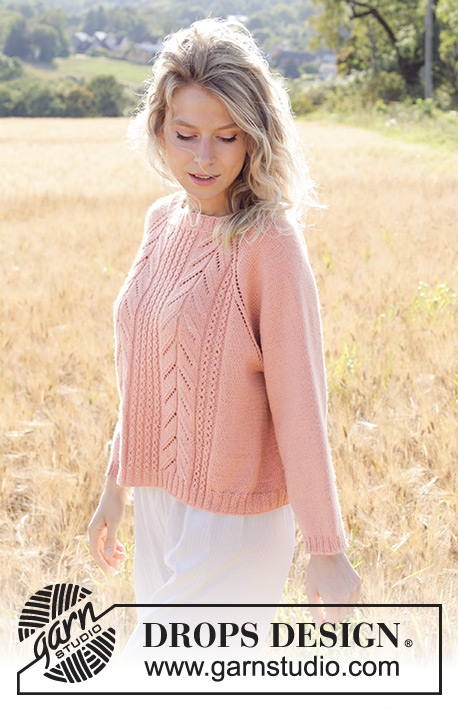
Pink Paradise#pinkparadisesweater |
||||||||||||||||||||||||||||||||||
 |
 |
|||||||||||||||||||||||||||||||||
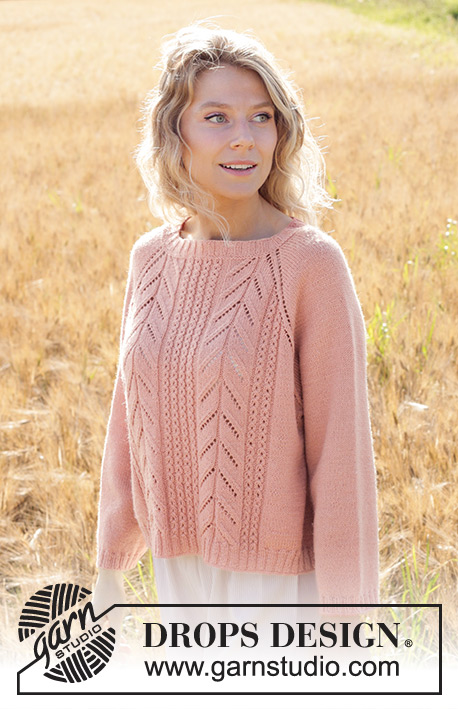
Knitted jumper in DROPS Flora or DROPS BabyMerino. The piece is worked top down with raglan, lace pattern and cables. Sizes S - XXXL.
DROPS 248-14 |
||||||||||||||||||||||||||||||||||
|
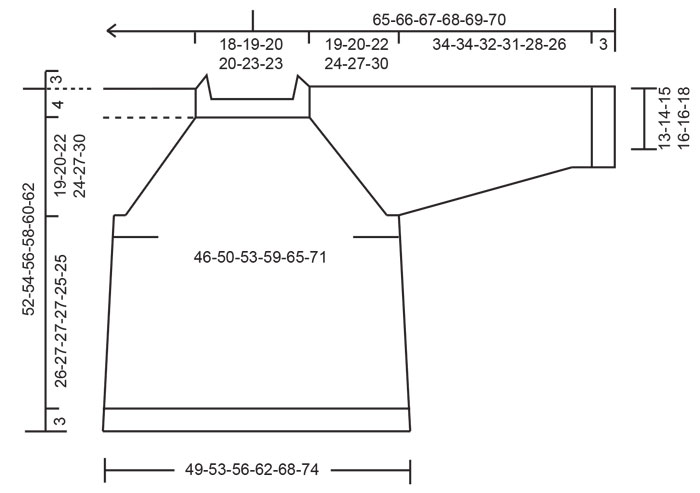
------------------------------------------------------- EXPLANATIONS FOR THE PATTERN: ------------------------------------------------------- GARTER STITCH (worked in the round): Alternate rounds of knit and purl. 1 ridge vertically = 2 rounds. PATTERN: See diagrams A.1 to A.6. Choose diagram for your size (applies to A.2 and A.5). The stitch count varies in A.1, A.2 and A.3 because the cables vary from 2 to 3 stitches. The stitch count is based on a 3-stitch cable. When A.1/A.3 are done, continue lace pattern as before. This means: Over the last 33 stitches in A.1 work A.1x over 12 stitches and A.1y over 21 stitches, work A.2 as before over the middle 17-17-22-22-27-27 stitches and work the first 33 stitches in A.3 work A.3x over 21 stitches and A.3y over 12 stitches. Repeat diagrams in height. RAGLAN: Increase 1 stitch by making 1 yarn over, which is knitted on the next round to leave a hole. On the back piece and sleeves, the increased stitches are worked in stocking stitch, on the front piece as shown in diagrams A.1 and A.3. When the diagrams have been worked as far as the arrow, work subsequent new stitches in stocking stitch. INCREASE TIP (sides of body): Increase 4 stitches on the round by working as follows: Start 1 stitch before the first marker-thread, make 1 yarn over, knit 2 (marker-thread sits between these 2 stitches), make 1 yarn over. Repeat at the second marker-thread. DECREASE TIP (for sleeves): Decrease 2 stitches on the round as follows: Work until there are 3 stitches left before the marker-thread, knit 2 together, knit 2 (marker-thread sits between these 2 stitches), slip 1 stitch knit-wise, knit 1 and pass the slipped stitch over the knitted stitch. ------------------------------------------------------- START THE PIECE HERE: ------------------------------------------------------- JUMPER – SHORT OVERVIEW OF THE PIECE: The pattern uses both long and short needles; start with the length which fits the number of stitches and change when necessary. The piece is worked in the round with circular needle, top down. When the neck and yoke are finished, the piece is divided for the body and sleeves. The body is continued in the round, while the sleeves wait. The sleeves are worked in the round, top down. NECK: Cast on 124-128-132-136-148-148 stitches with circular needle size 3 mm and DROPS Flora or DROPS Baby Merino. Work rib in the round (knit 2, purl 2) for 3 cm. Work 2 ridges – see GARTER STITCH above. AT THE SAME TIME increase 4-0-6-2-0-0 stitches evenly on the first round = 128-128-138-138-148-148 stitches. Insert 1 marker at the beginning of the round (= mid-back), the yoke is measured from here. YOKE: Insert 4 marker-threads, without working the stitches, which will be used when increasing for raglan: Count 22-22-25-25-27-27 stitches (= half back piece), insert 1 marker-thread, count 19 stitches (= sleeve), insert 1 marker-thread, count 45-45-50-50-55-55 stitches (= front piece), insert 1 marker-thread, count 19 stitches (= sleeve), insert 1 marker-thread. There are 23-23-25-25-28-28 stitches left after the last marker-thread (= half back piece). Work PATTERN – read description above, starting from the marker-thread mid-back as follows: Change to circular needle size 3.5 mm, knit until there is 1 stitch left before the next marker-thread (= half back piece), increase for RAGLAN – read description above, 2 stocking stitches, increase for raglan, knit until there is 1 stitch left before the next marker-thread (= sleeve), increase for raglan, 2 stocking stitches, increase for raglan, work A.1, A.2 over 17-17-22-22-27-27 stitches, A.3, there is 1 stitch left before the next marker-thread (= front piece), increase for raglan, 2 stocking stitches, increase for raglan, knit until there is 1 stitch left before the next marker-thread (= sleeve), increase for raglan, 2 stocking stitches, increase for raglan, and knit to end of round (= half back piece). Continue this pattern and increase for raglan on each side of 2 stocking stitches in each transition between the body and sleeves, every 2nd round a total of 19-18-26-29-27-24 times = 280-272-346-370-364-340 stitches – remember the stitch count is based on 3-stitch cables in A.1, A.2 and A.3 (= 8 stitches increased on the round). REMEMBER THE KNITTING TENSION! Now continue increasing for raglan as follows: Increase every 2nd round on the front and back pieces but every 4th round on the sleeves (= alternately 4 and 8 increased stitches). Increase a total of 8-14-6-10-16-24 times on the front and back pieces and 4-7-3-5-8-12 times on the sleeves. After the last increase there are 328-356-382-430-460-484 stitches and the yoke measures approx. 17-20-20-24-27-30 cm from the marker on the neck. Continue working without further increases until the yoke measures 19-20-22-24-27-30 cm – adjusting so the last round is either round 3 or 4 in A.2 (2 stitches and 1 yarn over or 3 stitches in each cable). DIVIDE FOR BODY AND SLEEVES: Work 49-54-57-64-70-75 stitches (= half back piece), place the next 65-69-77-87-89-91 stitches on 1 thread for the sleeve, cast on 12-12-14-14-16-20 stitches (= in side under sleeve), work 99-109-114-128-141-151 stitches (= front piece), place the next 65-69-77-87-89-91 stitches on 1 thread for the sleeve, cast on 12-12-14-14-16-20 stitches (= in side under sleeve), work the last 50-55-57-64-71-76 stitches (= half back piece). The body and sleeves are finished separately. The piece is now measured from here! BODY: = 222-242-256-284-314-342 stitches. Insert 1 marker-thread in the middle of the 12-12-14-14-16-20 cast-on stitches under each sleeve. Allow the threads to follow your work onwards; they are used when increasing in the sides. Start at one marker-thread and work stocking stitch/pattern in the round as before. When the body measures 3 cm, increase 1 stitch on each side of both marker-threads – read INCREASE TIP (= 4 increased stitches). Increase like this every 8-8-8-8-7-7 cm a total of 3 times = 234-254-268-296-326-354 stitches. Work until the body measures 26-27-27-27-25-25 cm – adjusting so the last round is a round marked with a black star in A.2. Insert a marker on each side of the middle 76-76-80-80-84-84 stitches in pattern A.1 to A.3 (NOTE! There are now 14-14-18-18-22-22 stitches in A.2). The next round begins by the marker-thread before the front piece: Change to needle size 3 and work rib (knit 2, purl 2), AT THE SAME TIME increase 5-4-7-8-7-8 stitches evenly over the first 17-22-23-30-35-42 stitches (= 22-26-30-38-42-50 ribbed stitches which finish with knit 2), first marker here, work A.4, A.5, A.6 over the 76-76-80-80-84-84 stitches between the markers (= 2 decreased stitches, the rib matches the pattern), second marker here. Work rib (knit 2, purl 2) over the next 17-22-23-30-35-42 stitches and increase 5-4-7-8-7-8 stitches evenly (= 22-26-30-38-42-50 ribbed stitches which finish with knit 2), marker-thread here, work rib (purl 2, knit 2), and increase 37-39-40-42-47-49 stitches evenly over the last 117-127-134-148-163-177 stitches (154-166-174-190-210-226 ribbed stitches which finish with purl 2) = 272-292-312-344-376-408 stitches. The rib (knit 2, purl 2) now fits over all stitches. Continue this rib for 3 cm. Cast off a little loosely. The jumper measures approx. 52-54-56-58-60-62 cm from the shoulder. SLEEVES: Place the 65-69-77-87-89-91 sleeve-stitches from the thread on one side of the piece on short circular needle size 3.5 mm and knit up 1 stitch in each of the 12-12-14-14-16-20 stitches cast on under the sleeve = 77-81-91-101-105-111 stitches. Insert a marker-thread in the middle of the 12-12-14-14-16-20 stitches under the sleeve. Start at the marker-thread and work stocking stitch in the round. When the sleeve measures 3-3-4½-3-4½-4 cm, decrease mid-under the sleeve – read DECREASE TIP. Decrease like this every 4½-4½-2½-2-1½-1½ cm a total of 7-7-10-13-13-13 times = 63-67-71-75-79-85 stitches. Continue working until the sleeve measures 34-34-32-31-28-26 cm from the division. Change to double pointed needles size 3 mm. Work rib (knit 2, purl 2), AT THE SAME TIME increase 9-9-9-9-9-11 stitches evenly on the first round = 72-76-80-84-88-96 stitches. When the rib measures 3 cm, cast off a little loosely. The sleeve measures approx. 37-37-35-34-31-29 cm. |
||||||||||||||||||||||||||||||||||
Diagram explanations |
||||||||||||||||||||||||||||||||||
|
||||||||||||||||||||||||||||||||||
 |
||||||||||||||||||||||||||||||||||
 |
||||||||||||||||||||||||||||||||||
 |
||||||||||||||||||||||||||||||||||
Have you finished this pattern?Tag your pictures with #dropspattern #pinkparadisesweater or submit them to the #dropsfan gallery. Do you need help with this pattern?You'll find 31 tutorial videos, a Comments/Questions area and more by visiting the pattern on garnstudio.com. © 1982-2026 DROPS Design A/S. We reserve all rights. This document, including all its sub-sections, has copyrights. Read more about what you can do with our patterns at the bottom of each pattern on our site. |
||||||||||||||||||||||||||||||||||


With over 40 years in knitting and crochet design, DROPS Design offers one of the most extensive collections of free patterns on the internet - translated to 17 languages. As of today we count 324 catalogues and 12290 patterns translated into English (UK/cm). 12290
We work hard to bring you the best knitting and crochet have to offer, inspiration and advice as well as great quality yarns at incredible prices! Would you like to use our patterns for other than personal use? You can read what you are allowed to do in the Copyright text at the bottom of all our patterns. Happy crafting!
Post a comment to pattern DROPS 248-14
We would love to hear what you have to say about this pattern!
If you want to leave a question, please make sure you select the correct category in the form below, to speed up the answering process. Required fields are marked *.