
Popular categories
Looking for a yarn?


Comments / Questions (28)
![]() Ranja wrote:
Ranja wrote:
Hei, det gir ikke helt menig at det er så få masker for ermet. Det endte opp mye smalere enn på bilde. Bilde viser et erme som er videre lengst ned, Men i oppskriften feller man langs ermet. Burde jeg øke istedenfor, hvis jeg ønsker videre ermer?
21.01.2026 - 14:27DROPS Design answered:
Hei Ranja. Man skal felle under ermet. Om strikkefastheten din stemmer skal ermet ditt måle ca 32 - 40 cm i omkrets (avhengig av hvilken str. du strikker). Det stemmer med bildet og den orginale genseren (som er målt i forbinnelse med spørsmålet ditt). Men ønsker du en bredere erm, kan du velge å ikke felle, bare pass på at du har et riktig maskeantall som vil stemme med vrangborden. mvh DROPS Design
21.01.2026 - 15:34
![]() Albie wrote:
Albie wrote:
Hello ! I was wondering what needle size we are supposed to use for the gauge swatch ? Since we are using several needles in the project I wasn't sure which one I was supposed to use as reference for the swatch to adjust the rest.
08.01.2026 - 14:38DROPS Design answered:
Dear Albie, tension should be checked with larger needle, ie with needle size 7 mm here. Happy knitting!
09.01.2026 - 08:20
![]() Susanne Roy wrote:
Susanne Roy wrote:
Er det korrekt, at garn til denne opskrift kan erstattes med 300g DROPS Brushed Alpaca Silk (2 tråde), str. M? Oprindeligt forslag er DROPS MELODY, 300 g (1 tråd). Det der forvirre mig er, at det med 1-2 tråde. Ville tro, at når man skifter fra 1 tråd til 2 tråde, så skal der dobbelt (600g og ikke 300g) så meget garn til, eller???
24.11.2025 - 12:22DROPS Design answered:
Hej Susanne, hvis du vælger DROPS Melody skal du bruge 300 gram, du har 140 meter på 50 gram. Hvis du vælger DROPS Brushed Alpaca Silk skal du bruge 300 gram, du har 140 meter på 25 gram (= dobbelt så mange meter på 50 gram) :)
25.11.2025 - 14:10
![]() Eva wrote:
Eva wrote:
Hallo, ich würde den Pullover gern in einer grünen Farbe stricken. Bsp. in der Farbe 67 der Wolle Kid Silk. Die Anleitung ist mit Garngruppe D angegeben, ist es auch möglich mit einer anderen Garngruppe zu stricken und worauf muss ich dann achten?
05.10.2025 - 16:09DROPS Design answered:
Hallo, Entscheidend bei der Wahl eines anderen Garnes ist, dass die Maschenprobe gleich bleibt. Dies ist wichtig, damit die fertige Arbeit die in der Maßskizze genannten Maß erhält. Es ist einfacher, die in der Anleitung genannte Maschenprobe einzuhalten, wenn ein Garn aus derselben Garngruppe verwendet wird. Grüße!
05.10.2025 - 18:02
![]() Natasja wrote:
Natasja wrote:
What is the size of the sweater on the picture?
26.03.2025 - 22:19DROPS Design answered:
Dear Natasja, most of the time our models wear either a size S or a size M; but to find the right size, measure a similar garment you have and like the shape and compare these measurements to the ones in the chart - read more here. Happy knitting!
27.03.2025 - 08:25
![]() Agnès L'HERMITTE wrote:
Agnès L'HERMITTE wrote:
Bonjour, je ne comprends pas pourquoi dans les explications il y a un devant droit et un devant gauche alors qu'il s'agit d'un pull. Pouvez vous m'envoyer les bonnes explications pour le modèle 250-24 ? merci
14.03.2025 - 18:26DROPS Design answered:
Bonjour Mme L'hermitte, ce pull se tricote de haut en bas avec une construction dite "épaules européennes": on tricote d'abord le dos, puis le devant en commençant par l'épaule gauche, puis on tricote l'épaule droite, et on monte les mailles de l'encolure entre les 2 devants. On termine ensuite le bas du pull en rond, après les emmanchures. Retrouvez des photos et des vidéos montrant les différentes étapes de ce type de construction sous les onglets "Vidéos" et "Leçons" à droite de l'onglet "Explications" en haut de page. Bon tricot!
17.03.2025 - 07:15
![]() Natasja wrote:
Natasja wrote:
Jeg undrer mig lidt over, hvordan skulderen bliver skrå? Derudover hvilken størrelse er modellens strikket i?
28.02.2025 - 14:53
![]() Marie wrote:
Marie wrote:
Hi! Could you please help explain how to do the split hems for the body? I finished with the front piece (end of the yarn thread), but my problem is that I want to start the back part but how do I add a yarn to knot with? Currently all the stitches are on a stitch holder. Thank you!
12.01.2025 - 00:39DROPS Design answered:
Dear Marie, are you referring to the lower splits? You can put a new thread as when you pick up stitches, like in this video: https://www.garnstudio.com/video.php?id=59&lang=en. Happy knitting!
12.01.2025 - 18:16
![]() Panna Kvell wrote:
Panna Kvell wrote:
Hi. I am really not sure about the front piece of the pattern. Why do we need to the 3 stich and the begging when we leave 5 at the end? Its not going to be equal. What does At the same time mean? I need to increase 12 stitches on those 5 leftover stich? What type of increase should this Be? How do I knit the leftover 5 stich?
05.01.2025 - 15:07DROPS Design answered:
Dear Panna, the pattern is the same. You have 3 stitches in garter stitch at the start, then work rib until 5 stitches are left. The next 2 stitches are still in rib, it's a knit 2, but we specify it so that we ensure that the pattern ends with knit 2; this will help us align the rib in the next row. Then you finish with 3 stitches in garter stitch. So you have 3 stitches in garter stitch on each side and the rest is in rib stitch. You work rib and at the same time increase 12 stitches over the ribbed stitches, so you increase with yarn overs over the rib stitches between the 3 initial stitches and the 5 remaining stitches. Happy knitting!
05.01.2025 - 20:25
![]() Manuela wrote:
Manuela wrote:
Wie viel Garn wird denn benötigt? Ich finde leider keine Angabe. Vielen Dank
15.12.2024 - 18:52DROPS Design answered:
Liebe Manuela, Garnmenge für jede Größe finden Sie oben unter Tab "Anleitung", so in XS z.B. brauchen Sie 250 g DROPS Melody/50 das Knäuel = 5 Knäuel Melody. Viel Spaß beim Stricken!
16.12.2024 - 11:04
|
|
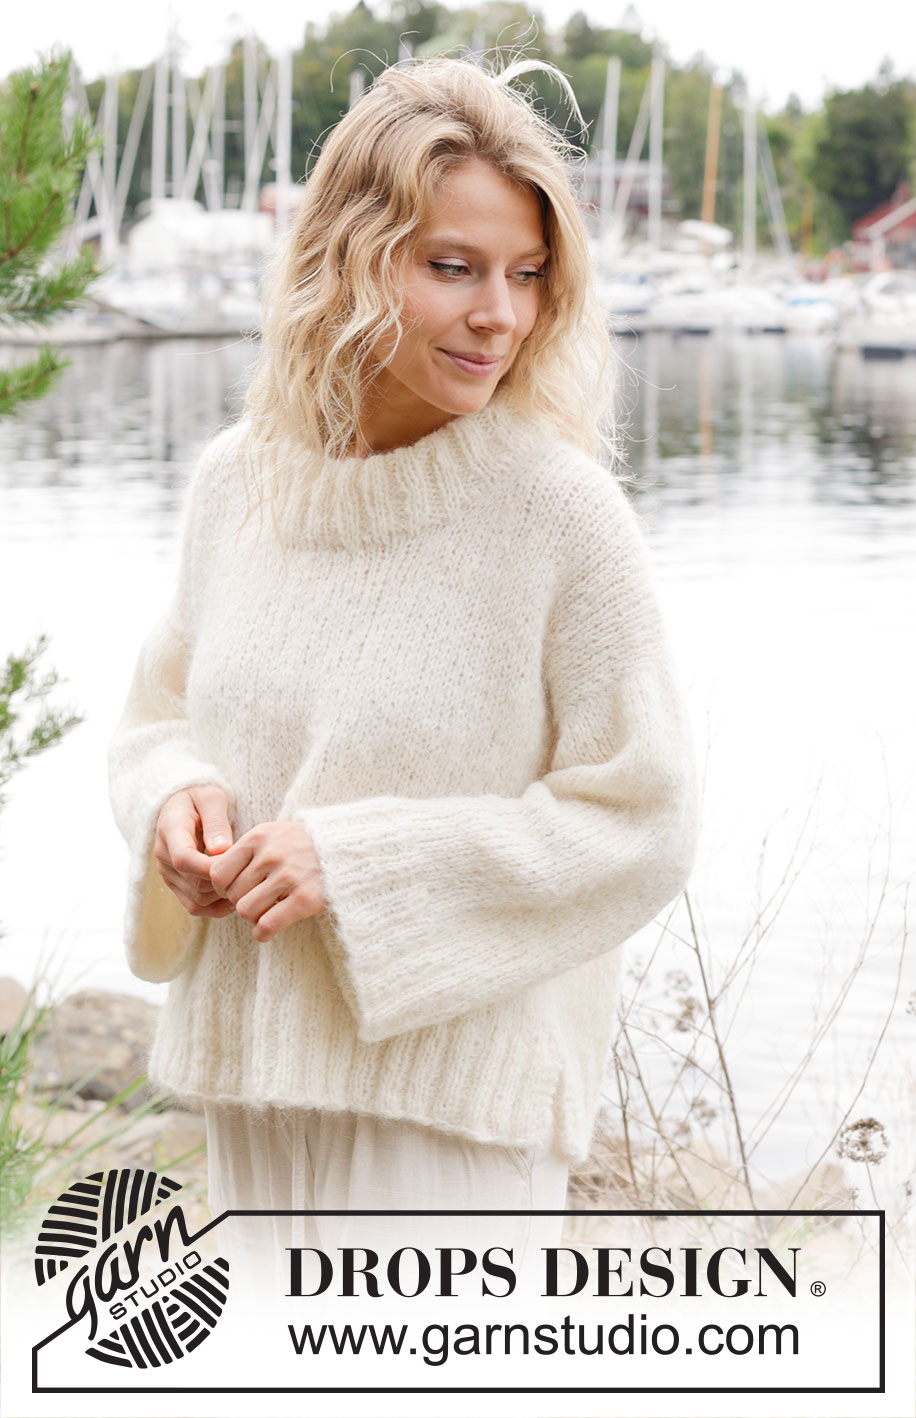
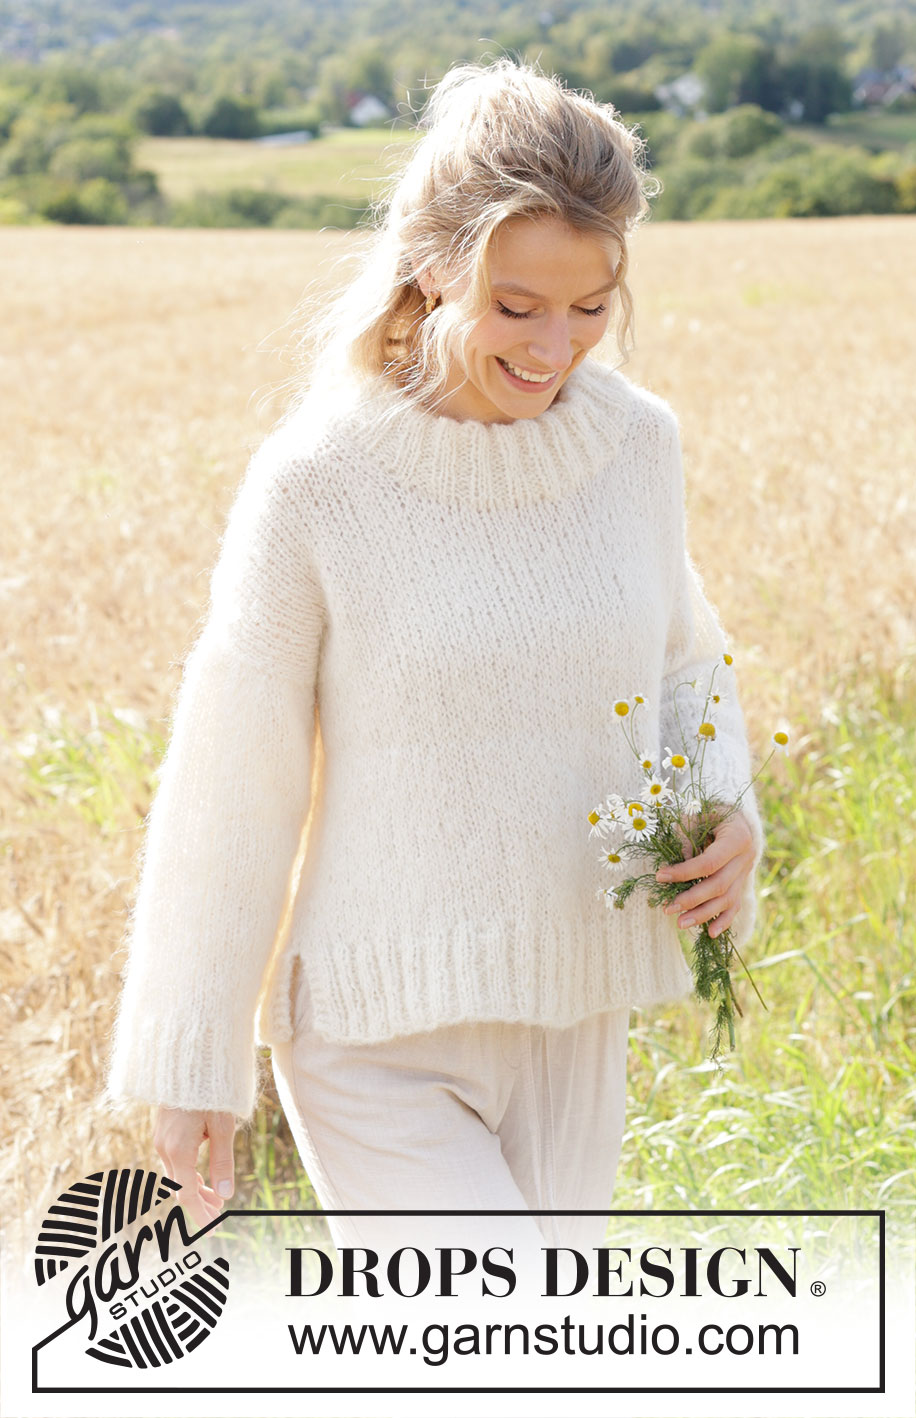
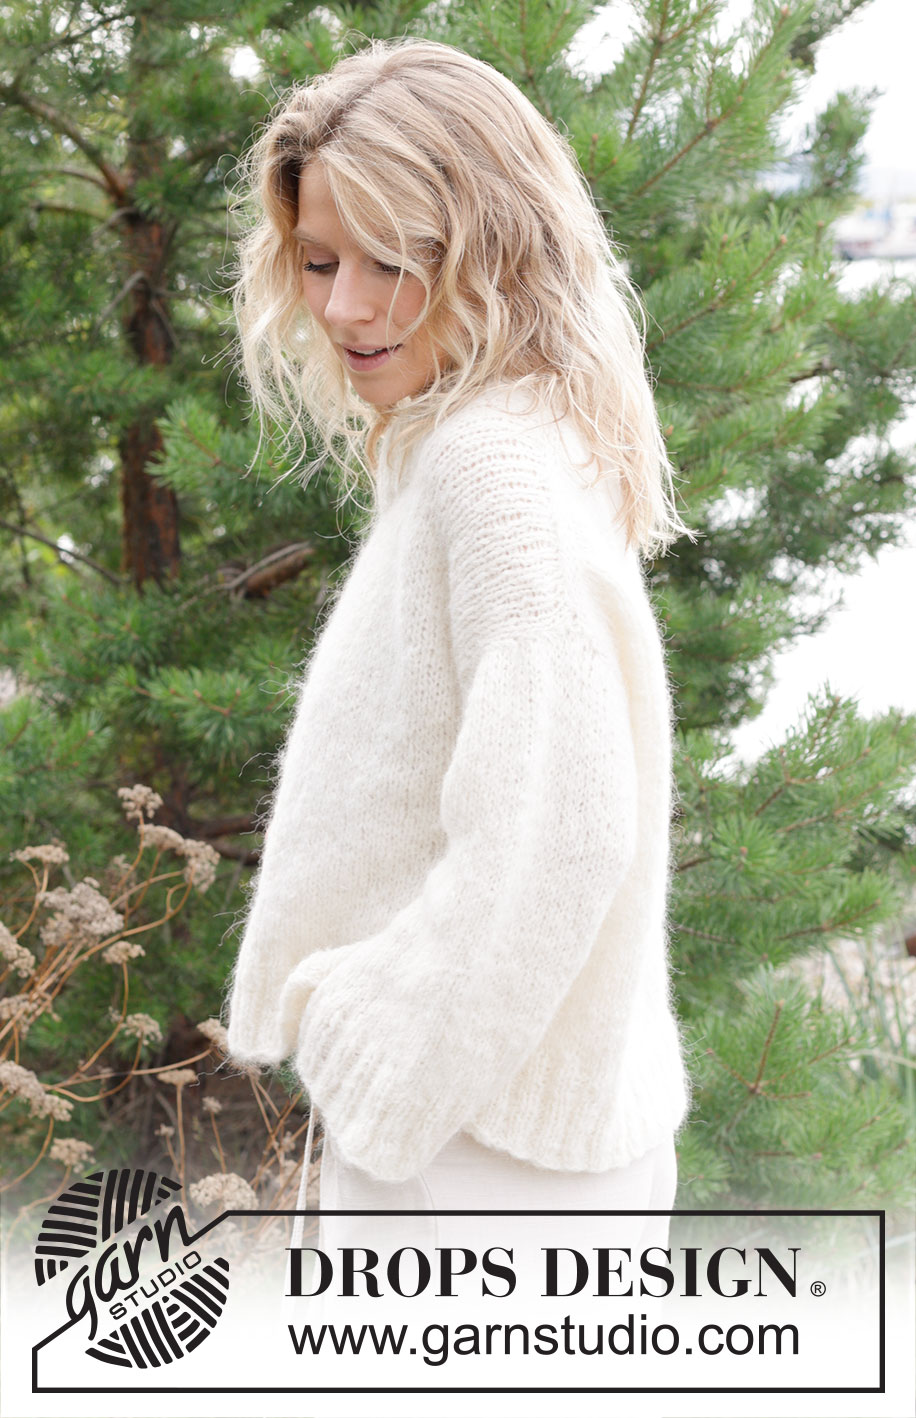
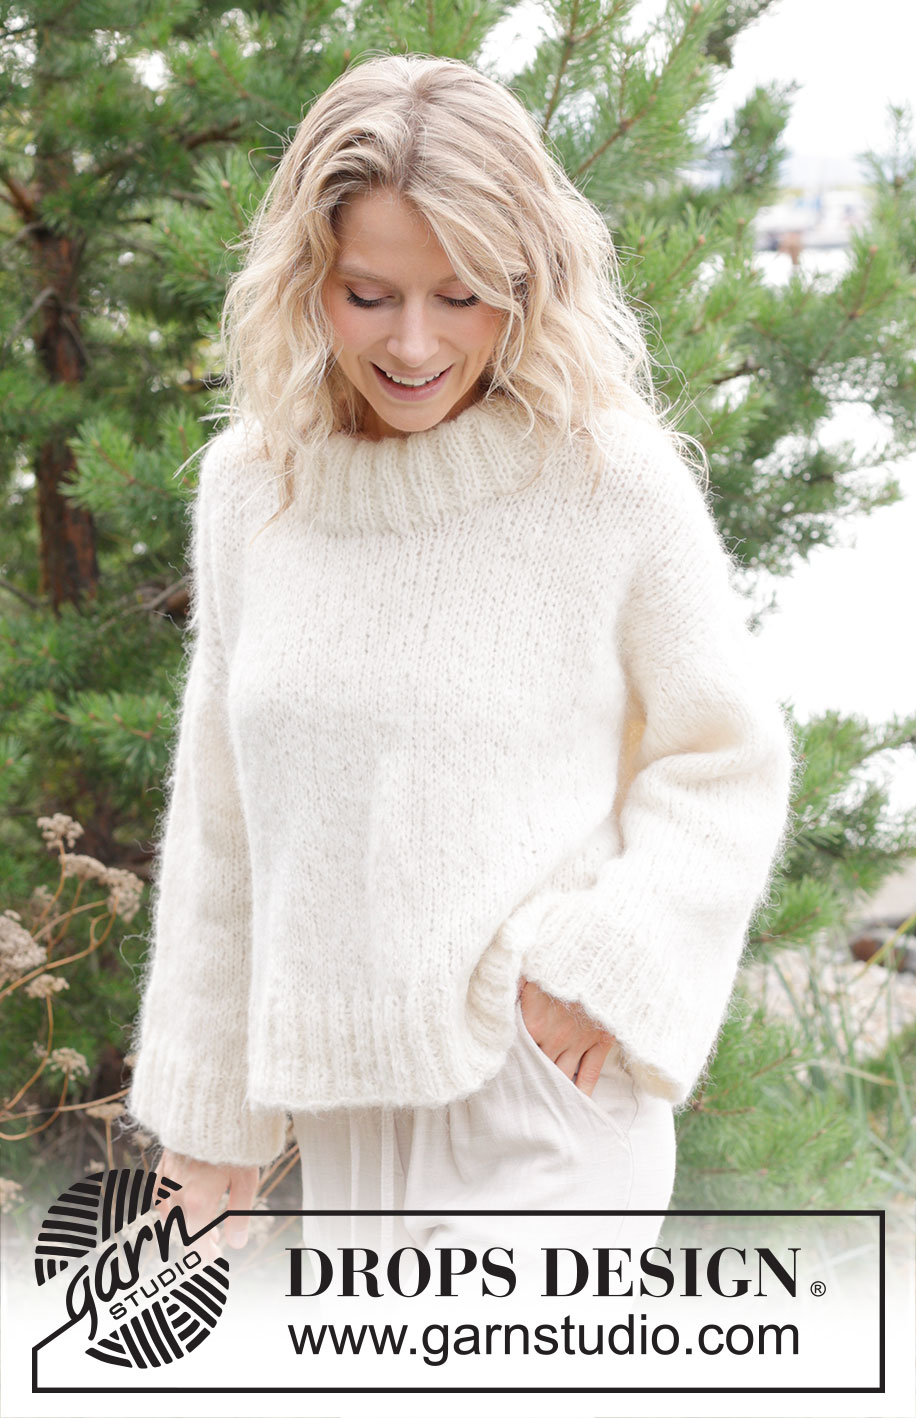
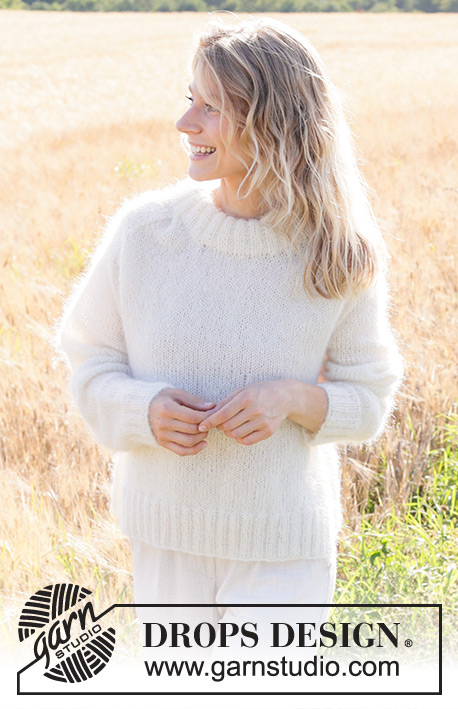
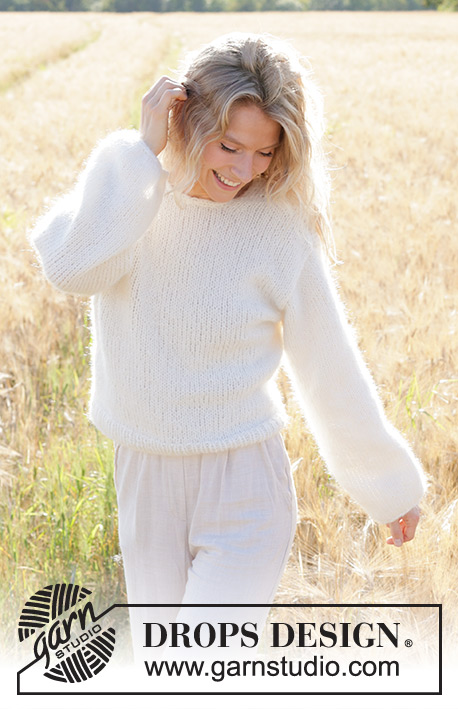
White Bay Ridge#whitebayridgesweater |
|
 |
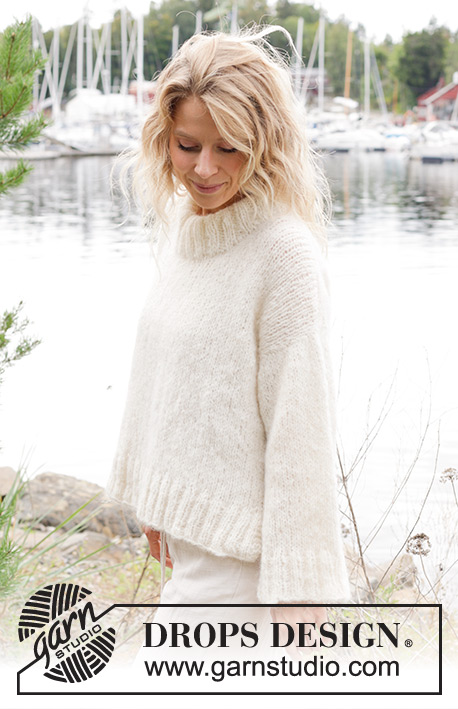 |
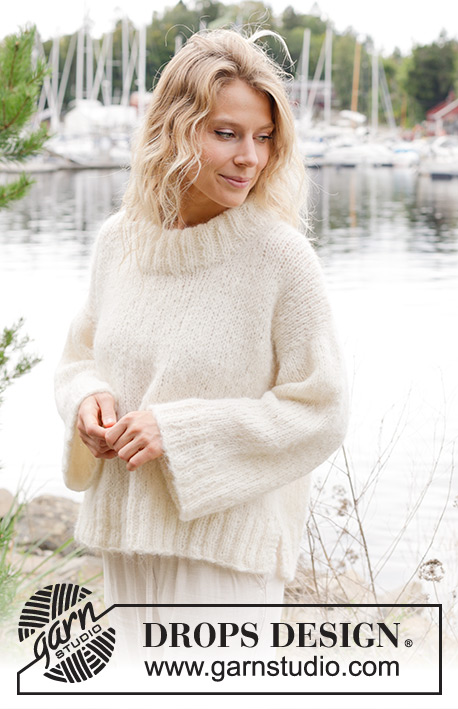
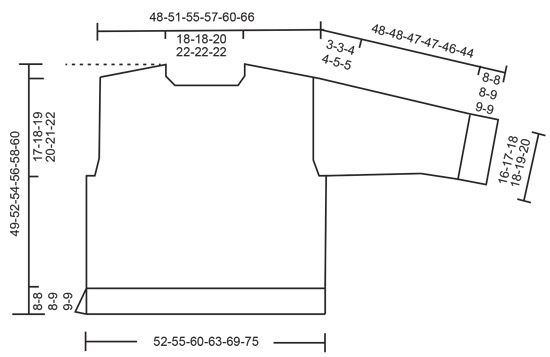
Knitted jumper in DROPS Melody. The piece is worked top down with diagonal/ European shoulders, split in sides and double neck. Sizes XS - XXL.
DROPS 250-24 |
|
|
------------------------------------------------------- EXPLANATIONS FOR THE PATTERN: ------------------------------------------------------- GARTER STITCH (worked back and forth): Knit all rows, from both right and wrong side. 1 ridge in height = knit 2 rows. INCREASE TIP-1: INCREASE 1 STITCH TOWARDS THE LEFT - from RIGHT SIDE: Use left needle to pick up yarn between 2 stitches from row below, pick up yarn from the front and knit in the stitch loop that is on the back of the needle. INCREASE 1 STITCH TOWARDS THE RIGHT - from RIGHT SIDE: Use left needle to pick up yarn between 2 stitches from row below, pick up yarn from the back and knit in the stitch loop that is on the front side of the needle. . INCREASE TIP-2: INCREASE 1 STITCH TOWARDS THE RIGHT - from WRONG SIDE: Use left needle to pick up yarn between 2 stitches from row below, pick up yarn from the back and purl in the stitch loop that is on the front side of the needle. INCREASE 1 STITCH TOWARDS THE LEFT - from WRONG SIDE: Use left needle to pick up yarn between 2 stitches from row below, pick up yarn from the front and purl in the stitch loop that is on the back side of the needle. DECREASE TIP (for sleeves): Decrease 1 stitch on each side of the marker-thread as follows: Work until there are 3 stitches left before the marker-thread, knit 2 together, knit 2 (marker-thread sits between these 2 stitches), slip 1 stitch knit-wise, knit 1 and pass the slipped stitch over the knitted stitch. ------------------------------------------------------- START THE PIECE HERE: ------------------------------------------------------- JUMPER – SHORT OVERVIEW OF THE PIECE: The pattern uses both long and short needles; start with the length which fits the number of stitches and change when necessary. The piece is started back and forth, casting on stitches for the back of the neck. The back piece is worked top down and stitches are increased for slightly diagonal shoulders. When you have worked the armholes, put back piece aside. Work front piece in 2 piece. Stitches are knitted up along the back shoulders for the front pieces, which are worked separately to begin with. Pattern is worked and stitches increased for the neckline on both shoulders. The front piece is joined when the neckline is finished and continued back and forth until the armholes are finished. The front and back pieces are placed on the same circular needle and continued in the round. Stitches are knitted up around the armholes and the sleeves are first worked back and forth, then finished in the round. Stitches are knitted up around the neckline and the neck worked in the round, folded double and fastened down. BACK PIECE: Work back and forth. Cast on 26-26-28-30-30-30 stitches with circular needle size 7 mm and DROPS Melody. ROW 1 (= wrong side): Purl. ROW 2 (= right side): Read INCREASE TIP-1. Knit 3, increase 1 stitch towards the left, knit until there are 3 stitches left, increase 1 stitch towards the right, knit 3. ROW 3 (= wrong side): Read INCREASE TIP-2. Purl 3, increase towards the right, purl until there are 3 stitches left, increase towards the left, purl 3. Work ROWS 2 and 3 a total of 9-10-11-11-12-14 times = 62-66-72-74-78-86 stitches. Insert 1 marker outermost on one side. The piece is now measured from here! Continue with stocking stitch – REMEMBER THE KNITTING TENSION - until the piece measures 8-9-9-9-10-10 cm from the marker. Now increase on each side for the armholes. INCREASE FOR ARMHOLES: ROW 1 (= right side): Remember INCREASE TIP-1. Knit 3, increase 1 stitch towards the left, knit until there are 3 stitches left, increase 1 stitch towards the right, knit 3. ROW 2 (= wrong side): Purl. Work ROWS 1 and 2 a total of 2-2-2-3-3-3 times = 66-70-76-80-84-92 stitches. Work until the piece measures 11-12-12-13-14-14 cm along the armhole from the marker, finishing after a row from the wrong side. Cut the strand, place the stitches on a stitch holder and work the front pieces. LEFT FRONT PIECE: To find the left back shoulder, lay the back piece flat, right side up, with the stitch holder nearest you; left-hand side is left shoulder. Start from the right side and knit up 18-20-22-22-24-28 stitches along the left back shoulder, from the neck to the shoulder, knitting up 1 stitch in each row, inside the outermost stitch. All lengths measured on the front piece are from these knitted-up stitches. Work stocking stitch (first row from wrong side). When the piece measures 9 cm, increase for the neckline as follows: ROW 1 (= right side): Remember INCREASE TIP-1. Knit 3, increase 1 stitch towards the left, work to end of row. ROW 2 (= wrong side): Purl. Work ROWS 1 and 2 a total of 4 times = 22-24-26-26-28-32 stitches, (next row is from right side). Cut the strand, place the stitches on a stitch holder and work the right front piece. RIGHT FRONT PIECE: Start from the right side and knit up 18-20-22-22-24-28 stitches along the right back shoulder, from the shoulder to the neck, knitting up 1 stitch in each row inside the outermost stitch. All lengths measured on the front piece are from these knitted-up stitches. Work stocking stitch (first row from wrong side). When the piece measures 9 cm, increase for the neckline as follows: ROW 1 (= right side): Work until there are 3 stitches left, increase towards the right, knit 3 - remember INCREASE TIP-1. ROW 2 (= wrong side): Purl. Work ROWS 1 and 2 a total of 4 times = 22-24-26-26-28-32 stitches, (next row is from right side). Now join the 2 front pieces. FRONT PIECE (joining right and left front pieces): Work from the right side as follows: Work the 22-24-26-26-28-32 stitches from the right front piece, cast on 18-18-20-22-22-22 stitches for the neckline, work the 22-24-26-26-28-32 stitches from the left front piece = 62-66-72-74-78-86 stitches. Work stocking stitch back and forth until the piece measures 20-21-23-23-24-26 cm. Now increase for the armholes. INCREASE FOR ARMHOLES: ROW 1 (= right side): Remember INCREASE TIP-1. Knit 3, increase 1 stitch towards the left, knit until there are 3 stitches left, increase 1 stitch towards the right, knit 3. ROW 2 (= wrong side): Purl. Work ROWS 1 and 2 a total of 2-2-2-3-3-3 times = 66-70-76-80-84-92 stitches. Work until the piece measures 23-24-26-27-28-30 cm, finishing after a row from the wrong side Now join the front and back piece for the body. The piece is now measured from here! BODY: Work the 66-70-76-80-84-92 stitches from the front piece, cast on 2-2-2-2-6-6 stitches (= in side under sleeve – insert a marker-thread in the middle of these stitches), work the 66-70-76-80-84-92 stitches from the back piece, cast on 2-2-2-2-6-6 stitches (= in side under sleeve – insert a marker-thread in the middle of these stitches) = 136-144-156-164-180-196 stitches. Allow the marker-threads to follow your work onwards, they are used for the split in each side. Start at one marker-thread and work stocking stitch in the round. When the piece measures 24-26-27-27-28-29 cm from the armhole, divide at the marker-threads for the split in each side, placing the back piece stitches on a stitch holder and working the front piece. FRONT PIECE: = 68-72-78-82-90-98 stitches. Continue with needle size 6 mm and work back and forth as follows: ROW 1 (right side): Work 3 GARTER STITCHES – read description above, rib (knit 2, purl 2) until there are 5 stitches left – AT THE SAME TIME increase 12-12-14-14-18-18 stitches evenly over these ribbed stitches, knit 2 and 3 garter stitches = 80-84-92-96-108-116 stitches. Continue this rib for 8-8-8-9-9-9 cm. Cast off a little loosely with rib. The jumper measures approx. 49-52-54-56-58-60 cm from the shoulder. BACK PIECE: Work in the same way as the front piece. SLEEVES: Lay the jumper flat and insert 1 marker at the top of the armhole = mid-top of shoulder (NOTE! This is not where you knitted up stitches for the front piece, but approx 6-6-7-7-7-8 cm down the front piece). Use circular needle size 7 mm, start mid-under the sleeve (in the middle of the cast-on stitches) and knit up 46-48-52-56-60-64 stitches around the armhole, with the same number of stitches on each side of the marker. Work stocking stitch back and forth with short rows as follows for the sleeve cap, to give a better fit, starting mid-under the sleeve: ROW 1 (right side): Work 6-6-7-7-8-8 stitches past the marker, turn. ROW 2 (wrong side): When you turn there might be a small hole – this can be closed by tightening the strand or using the technique GERMAN SHORT ROWS – search our videos, work 6-6-7-7-8-8 stitches past the marker, turn. ROW 3 (right side): Work 8-9-6-7-6-6 stitches past where you turned the previous time, turn. ROW 4 (wrong side): Work 8-9-6-6-6-6 stitches past where you turned the previous time, turn. Repeat rows 3 and 4 until you have turned 0-0-1-1-2-2 more times on each side (turned a total of 2-2-3-3-4-4 times on each side). AFTER LAST TURN: After the final repeat of row 4, turn, work back from the right side to the beginning of the round (mid-under sleeve). Insert 1 marker-thread at the beginning of the round, which is used when decreasing under the sleeve. Allow the thread to follow your work onwards. Work stocking stitch in the round and decrease under the sleeve as follows: When the sleeve measures 4-4-5-5-6-6 cm (measured under the sleeve), decrease 2 stitches – read DECREASE TIP. Decrease like this every 18-18-12-8-6-5 cm a total of 2-2-3-4-5-6 times = 42-44-46-48-50-52 stitches. Continue working until the sleeve measures 40-40-39-38-37-35 cm from the shoulder. Change to circular needle size 6 mm and work rib (knit 2, purl 2), AT THE SAME TIME increase 10-8-10-8-10-8 stitches evenly on round 1 = 52-52-56-56-60-60 stitches. When the rib measures 8-8-8-9-9-9 cm cast off a little loosely with rib. The sleeve measures approx. 48-48-47-47-46-44 cm from top of shoulder. DOUBLE NECK: Use circular needle/double pointed needles size 6 mm. Start from the right side on one shoulder and knit up 76 to 88 stitches, inside 1 stitch around the neckline. Knit 1 round and adjust the stitch count so it is divisible by 4. Work rib in the round (knit 2, purl 2) for 16-16-16-18-18-18 cm. Change to circular needle size 7 mm and cast off a little loosely. Fold the neck double to the inside and sew down to get a double neck of approx. 8-8-8-9-9-9 cm. To avoid the neck being tight and rolling outwards, it is important that the seam is elastic. |
|
 |
|
Have you finished this pattern?Tag your pictures with #dropspattern #whitebayridgesweater or submit them to the #dropsfan gallery. Do you need help with this pattern?You'll find 34 tutorial videos, a Comments/Questions area and more by visiting the pattern on garnstudio.com. © 1982-2026 DROPS Design A/S. We reserve all rights. This document, including all its sub-sections, has copyrights. Read more about what you can do with our patterns at the bottom of each pattern on our site. |
|


With over 40 years in knitting and crochet design, DROPS Design offers one of the most extensive collections of free patterns on the internet - translated to 17 languages. As of today we count 325 catalogues and 12298 patterns translated into English (UK/cm). 12298
We work hard to bring you the best knitting and crochet have to offer, inspiration and advice as well as great quality yarns at incredible prices! Would you like to use our patterns for other than personal use? You can read what you are allowed to do in the Copyright text at the bottom of all our patterns. Happy crafting!
Post a comment to pattern DROPS 250-24
We would love to hear what you have to say about this pattern!
If you want to leave a question, please make sure you select the correct category in the form below, to speed up the answering process. Required fields are marked *.