
Popular categories
Looking for a yarn?


Comments / Questions (50)
![]() Amalie wrote:
Amalie wrote:
Hej. Jeg er ved at strikke bagsiden af denne sweater og den bliver for stor ift. forsiden (omkring hvad der svarer til 4 masker på hver side) - sikkert på grund af at snoningerne foran har strammet forsiden mere. Er dette noget der vil have en stor effect på den færdige sweater eller burde jeg justere mønstret? Tak på forhånd :)
15.01.2025 - 22:04DROPS Design answered:
Hej Amalie, der er taget højde for flere masker på forstykket, hvor der er snoninger og færre på bagstykket :)
16.01.2025 - 14:45
![]() Saundra wrote:
Saundra wrote:
Hi. I am confused at the start of the pattern. It states to cast on, then purl 1 row from the wrong side. The first row after casting on is typically the right side. If I purl 1 row immediately, my cast on tail will be on the left on the right side. Is this correct? Also, the pattern notes to start A4 (+A1) on the right side and increasing neckline on the wrong side. But the diagram shows the increase on the right side (row 3). Thank you.
03.01.2025 - 03:57DROPS Design answered:
Hi Saundra, Yes, the first row is purled and this is then the wrong side of the piece onwards. You begin with the left shoulder for the front piece, which is worked first according to A.2 + A.1, so the increases are from the right side. When A.2 is finished, you work A.4 and cast on for the neckline at the end of each row from the wrong side. Happy knitting!
03.01.2025 - 08:18
![]() Mia wrote:
Mia wrote:
Hi, It's my first time working with knitting patterns and I noticed your patterns have A2 and A1 throughout the written instructions. Does A2 and A1 refer to the right and wrong side rows for knit and purl stitches?
12.12.2024 - 15:36DROPS Design answered:
Dear Mia, A.1 and A.2 are the charts at the bottom of the pattern, as are charts A.3 to A.7. You can read more about our knitting charts here: https://www.garnstudio.com/lesson.php?id=68&cid=19. Happy knitting!
15.12.2024 - 19:43
![]() Susan LB wrote:
Susan LB wrote:
Re previous question. I am looking for chest measurements. Also, could the body be knitted in the round, from the point where armhole (armpit) starts? To the point where the side slips require different lengths? Rather than separately.
01.12.2024 - 13:41DROPS Design answered:
Dear Susan, the chest measurements are at the bottom of the size chart: 55-58-62-69-73-80. Please see here more information on how to interpret this size chart: https://www.garnstudio.com/lesson.php?id=24&cid=19. And yes, if you want, you can make the necessary adaptations to work the body in the round, from the armholes downwards up to the side splits. Happy knitting!
07.12.2024 - 22:46
![]() Susan LB wrote:
Susan LB wrote:
Can someone advise where the size guide please? That either shows the body measurements or actual jumper dimensions. I can only see S,M,L etc..
01.12.2024 - 13:30DROPS Design answered:
Hi Susan, You will find a size chart at the bottom of the pattern, with all the measurements for the different sizes. Happy crafting!
02.12.2024 - 07:23
![]() Katherina wrote:
Katherina wrote:
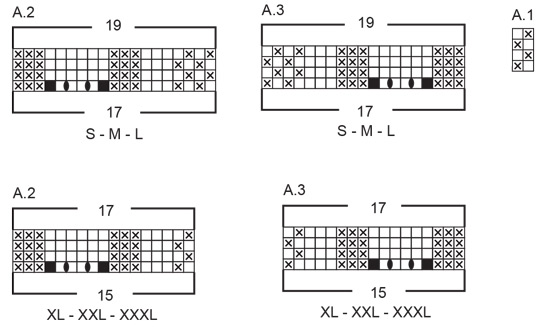
Hallo, eine Frage zum Maschenanschlag: In Grösse M werden für die linke Schulter 24 Maschen angeschlagen - sind da die Randmaschen mit dabei? Es folgt das Muster A2 über 17 Maschen, A 1 über 6 maschen , die letzte wie die erste Masche von a1. Macht insgesamt 24 Maschen - also plus Randmasche?
04.11.2024 - 20:59DROPS Design answered:
Liebe Katherina, es wird in M nur 22 Maschen angeschlagen und diese 22 Maschen werden so gestrickt: 17 M A.2, 4 Maschen A.1 + die erste Masche A.1 (= 17+4+1=22); bei der 1. Reihe A.2 wird man 2 Maschen zunehmen (siehe Umschläge bei der 1. REihe A.2), so sind es am Ende der 1. Reihe 24 Maschen. (keine zusätzliche Masche dazu rechnen sonnst wird Ihre Maschenanzahl nicht stimmen). Viel Spaß beim Stricken!
05.11.2024 - 09:37
![]() Lea wrote:
Lea wrote:
Hallo, ich habe eine Frage zu dem Umschlag in der ersten Reihe bei A.2: Was muss ich mit der Masche im schwarzen Kästchen machen? links oder rechts stricken? Oder sogar weglassen? Ich verstehe auch nicht, ob ich dann in der nächsten rück-Reihe einfach links-Verschränkt stricken soll? Verstehe ich das richtig in der Strickschrift, dass die Schulter in Hin- und Rück- Reihen immer das umgekehrte voneinander braucht? Also wenn links Masche in hin, dann heisst es rechts Masche in Rück?
03.11.2024 - 22:47DROPS Design answered:
Liebe Lea, die schwarze Kästchen bei der 1. Reihe A.2 und A.3 sind noch keine Masche; da diese Maschen noch nicht zugenommen wurden = die 2 Umschläge, die beschrieben sind, so beim A.2 strickt man 1 M re, 1 Umschlag, 2 M re, 1 Umschlag, 1 M re = so sind es 4 Maschen + 2 Zunahmen = 6 Maschen. Die Umschläge stricken Sie verschränkt, um Löcher zu vermeiden. Die Rückreihen stricken Sie wie bei der Zeichnungerklärung beschrieben: 1 weisses Kästchen = links bei den Rückreihen; 1 x = rechts bei den Rückreihen. Viel Spaß beim Stricken!
04.11.2024 - 10:17
![]() Cecilia wrote:
Cecilia wrote:
How do I estimate the skeins of yarn required for this sweater?
03.09.2024 - 06:45DROPS Design answered:
Hi Cecilia!This pattern is in DROPS Snow. DROPS Snow is available in balls of 50 g. Simply divide the grams of yarn for the size you need by 50 to get the number of balls (e.g. For M you need 1100 g : 50 = 22. So for M you need 22 balls of DROPS Snow). Happy knitting!
03.09.2024 - 10:13
![]() Amanda wrote:
Amanda wrote:
Im loving this pattern but Im used to knitting in the round not piecing a sweater together. And Im confused by the sleeves. When it is finished there will be a small flap on both front and back under the arm, from the section before I connect it and knit in the round. Is there video to explain how to sew that to the body. I see the diagram but dont fully understand it. Or is there any addition advice you can provide? Thank you!
02.06.2024 - 00:48
![]() Carlyn wrote:
Carlyn wrote:
Nog een vraag over het achterpand bij 56 cm in XL: de steken combinatie zoals aangegeven moet aan de goede kant gebreid worden. Wat doe ik dan aan de verkeerde kant? Gewoon A.1 breien of recht over averecht en averecht over recht (en dus eigenlijk hetzelfde als aan de goede kant) Alvast bedankt voor de reactie!
01.04.2024 - 11:56DROPS Design answered:
Dag Carlyn,
In de telpatronen staat ook aangegeven hoe je de steken aan de verkeerde kant breit. (Dus recht aan de goede kant, averecht aan de verkeerde kant etc. In he telpatroon staan alle naalden weergegeven. Dus zowel de heengaande als de teruggaande naalden.
03.04.2024 - 20:58
|
||||||||||||||||||||||||||||
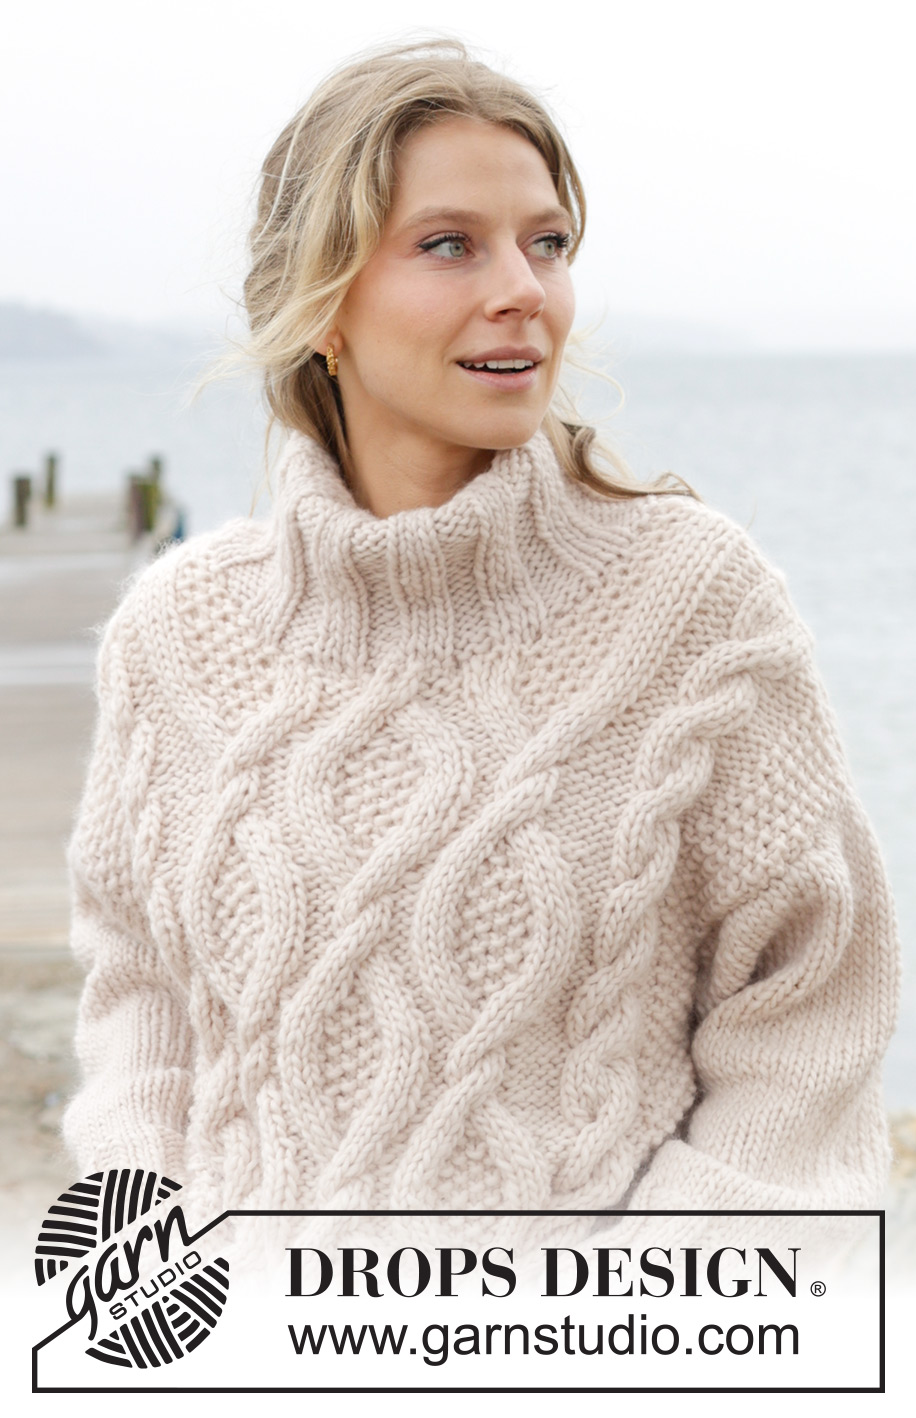
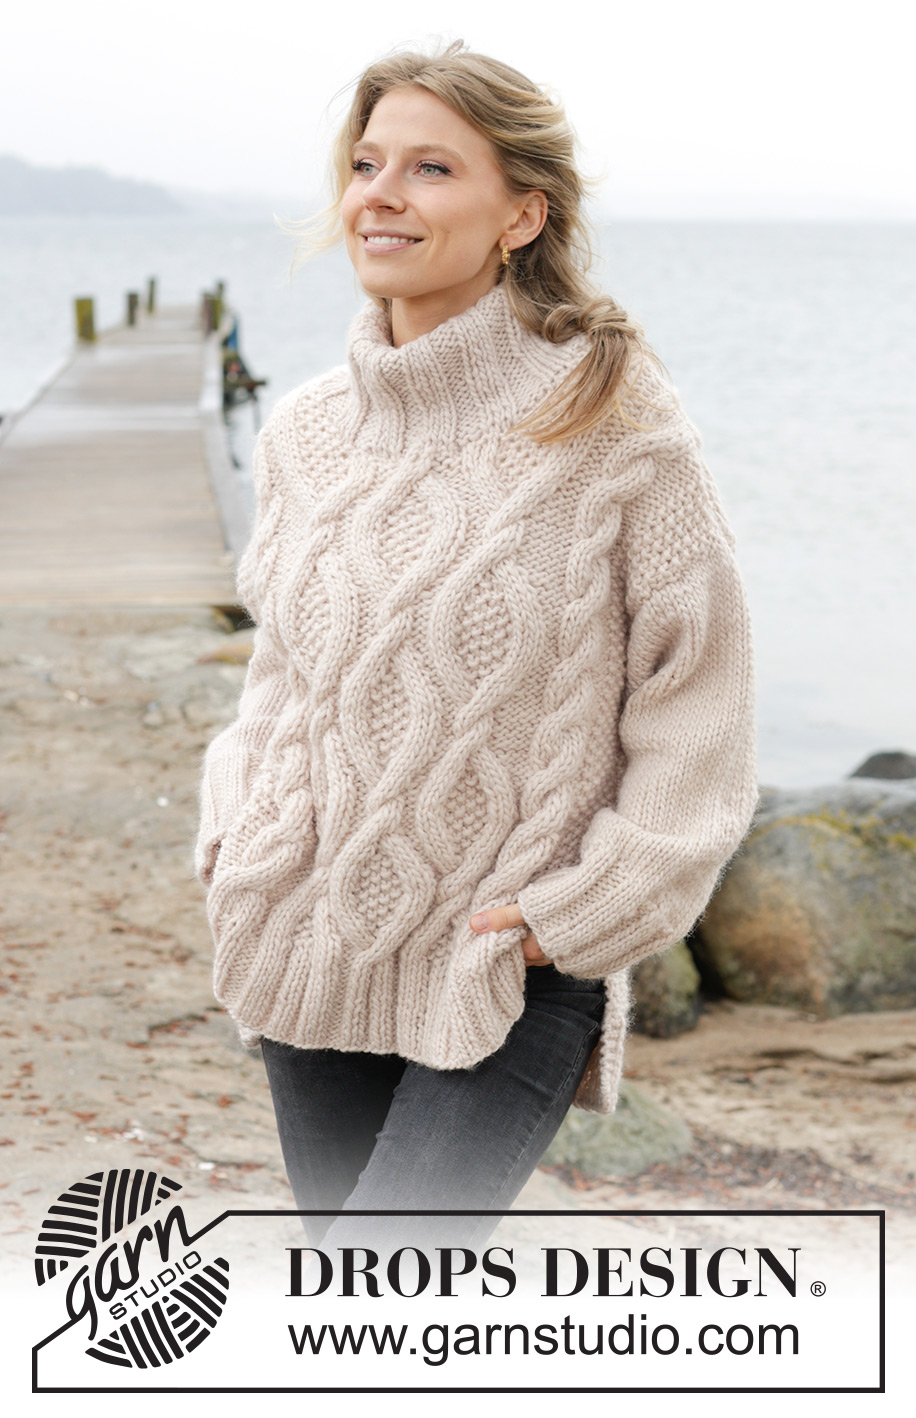
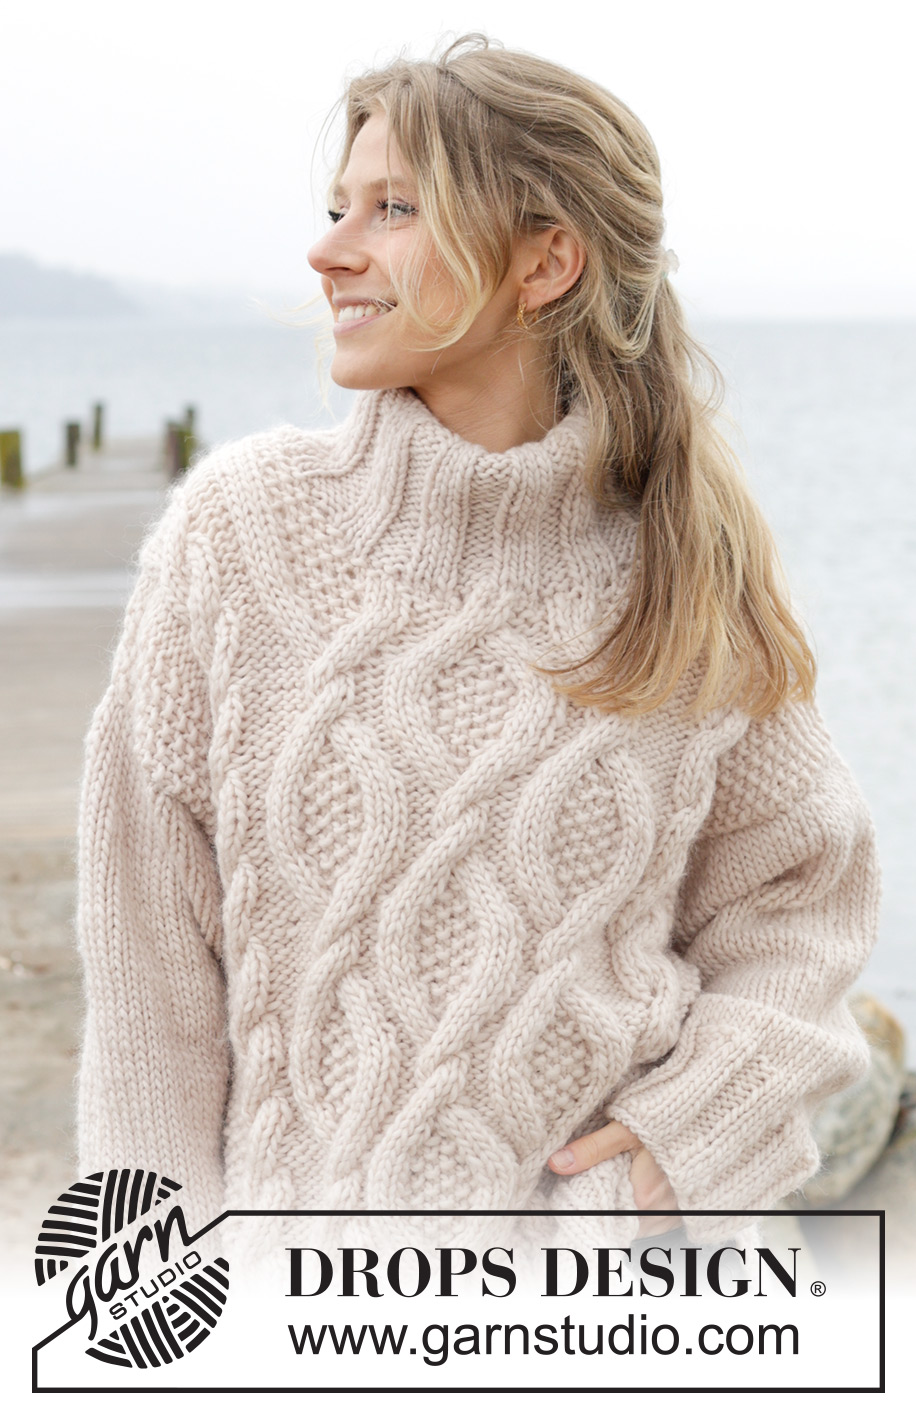
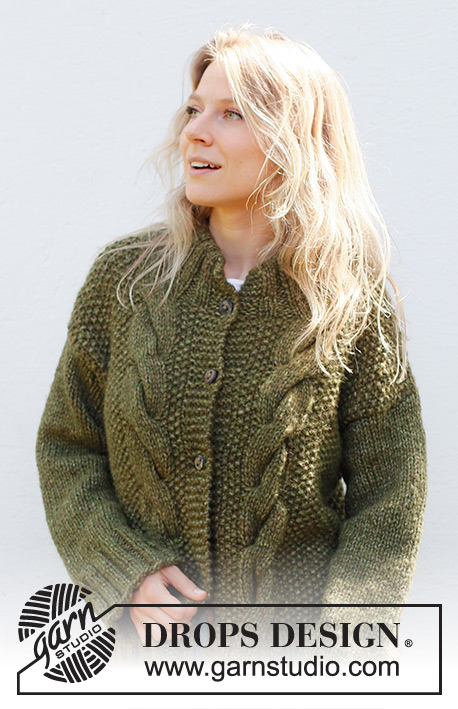
Cable Beach Sweater#cablebeachsweater |
||||||||||||||||||||||||||||
 |
 |
|||||||||||||||||||||||||||
Knitted over-sized jumper in DROPS Snow. The piece is worked top down with cables, split in sides and double neck. Sizes S - XXXL.
DROPS 243-23 |
||||||||||||||||||||||||||||
|
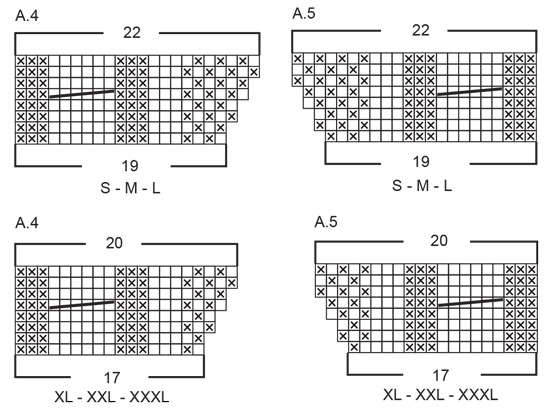
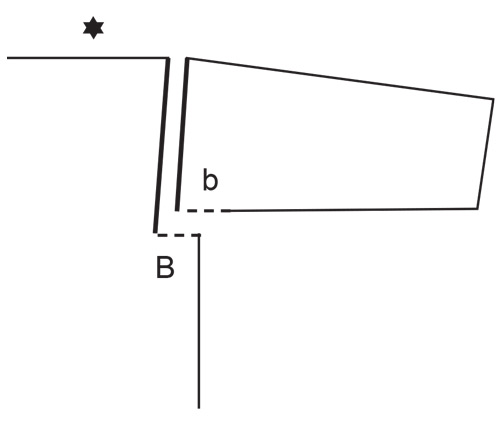
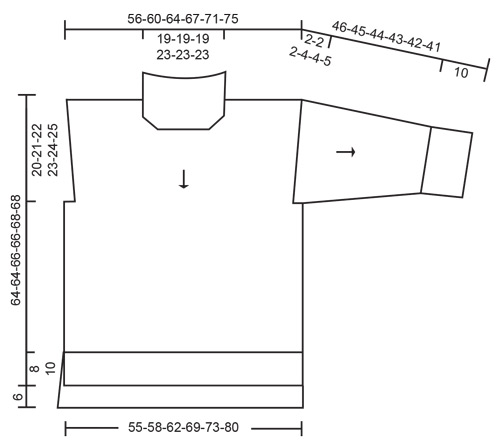
------------------------------------------------------- EXPLANATIONS FOR THE PATTERN: ------------------------------------------------------- PATTERN: See diagrams A.1 to A.7. Choose diagram for your size (applies to A.2 – A.5). The diagrams show all rows in the pattern from the right side. DECREASE TIP-1 (for armholes on back piece): Decrease 1 stitch outermost on each side by working the outermost 2 stitches together. The stitches are knitted together if the next/last stitch is purled or purled together if the next/last stitch is knitted. DECREASE TIP-2: Start 3 stitches before the marker-thread, knit 2 together, knit 2 (marker-thread sits between these 2 stitches), slip 1 stitch knit-wise, knit 1 and pass the slipped stitch over the knitted stitch (2 stitches decreased). ------------------------------------------------------- START THE PIECE HERE: ------------------------------------------------------- JUMPER – SHORT OVERVIEW OF THE PIECE: The front piece is worked top down, with moss stitch and cables. The back piece is worked top down with moss stitch. The back piece is 6 cm longer than the front piece. Stitches are knitted up along the armholes and the sleeves are worked in the round with double pointed needles/short circular needle, top down in stocking stitch. The edges are worked in rib. Pieces are sewn together as explained below. The high neck is worked in the round to finish. FRONT PIECE: Start with the left shoulder (when the garment is worn), then work the right shoulder before the two are joined together for the front piece. LEFT SHOULDER: Cast on 20-22-24-24-26-28 stitches with circular needle size 8 mm and DROPS Snow. Purl 1 row from the wrong side. Work as follows from the right side: A.2 over the first 17-17-17-15-15-15 stitches, A.1 over the next 2-4-6-8-10-12 stitches and work the first stitch in A.1. There are 22-24-26-26-28-30 stitches. Continue the pattern. When A.2 is finished, possibly repeat the last 2 rows in A.2 until the piece measures 3-3-4-3-4-5 cm from the cast-on edge. Work as follows from the right side: A.4 over the first 19-19-19-17-17-17 stitches, continue A.1 over the last 3-5-7-9-11-13 stitches. Continue this pattern. AT THE SAME TIME, cast on stitches for the neckline at the end of each row from the wrong side as follows: 1 stitch 3 times, then cast on 16-16-16-20-20-20 stitches at the end of the last row = 41-43-45-49-51-53 stitches. Lay the piece to one side and work the right shoulder. RIGHT SHOULDER: Cast on 20-22-24-24-26-28 stitches with circular needle size 8 mm and DROPS Snow. Purl 1 row from the wrong side. Work as follows from the right side: A.1 over the first 2-4-6-8-10-12 stitches, work the first stitch in A.1, work A.3 over the last 17-17-17-15-15-15 stitches. There are 22-24-26-26-28-30 stitches. Continue the pattern. When A.3 is finished, repeat possibly the last 2 rows in A.3 until the piece measures 3-3-4-3-4-5 cm from the cast-on edge. Work as follows from the right side: Continue A.1 over the first 3-5-7-9-11-13 stitches, work A.5 over the last 19-19-19-17-17-17 stitches and cast on 1 stitch for the neckline at the end of the first row from the right side. Continue the pattern. AT THE SAME TIME, cast on stitches for the neckline at the end of each row from the right side as follows: 1 stitch 2 times = 25-27-29-29-31-33 stitches. When A.5 is finished (last row is from the wrong side), join the 2 shoulders together for the front piece. FRONT PIECE: Place the stitches from both shoulders on circular needle size 8 mm (the 16-16-16-20-20-20 cast-on stitches are for the neckline mid-front) = 66-70-74-78-82-86 stitches. Work as follows from the right side: Continue A.1 over the first 3-5-7-9-11-13 stitches, purl over purl and knit over knit across the next 15 stitches, A.1 over the middle 30 stitches (making sure you continue the pattern correctly over A.4 and A.5), knit over knit and purl over purl across the next 15 stitches and continue A.1 over the last 3-5-7-9-11-13 stitches. Work this pattern back from the wrong side. Now start cabling mid-front from the right side: Continue A.1 over the first 3-5-7-9-11-13 stitches, work A.6A, A.6B, A.6C and continue A.1 over the last 3-5-7-9-11-13 stitches. Continue this pattern. REMEMBER THE KNITTING TENSION! When the piece measures 20-21-22-23-24-25 cm from the cast-on edge on the shoulder, cast on 2-2-2-4-4-6 stitches for the armholes at the end of the next 2 rows = 70-74-78-86-90-98 stitches. Work the new stitches in A.1 (= 5-7-9-13-15-19 stitches in A.1 on each side of A.6). Continue until A.6 has been worked 3 times in height. The piece measures approx. 56-56-57-56-57-58 cm from the cast-on edge on the shoulder. Continue working until the piece measures 56-56-58-56-58-58 cm, i.e., in sizes L and XXL you can work 2 or 4 more rows at the beginning of A.6, finishing after a row from the wrong side – AT THE SAME TIME, on the last row from the wrong side (all sizes), increase 4-2-4-4-2-2 stitches evenly over both the first 5-7-9-13-15-19 and the last 5-7-9-13-15-19 stitches = 78-78-86-94-94-102 stitches. Change to circular needle size 6 mm. Work rib back and forth as follows: A.1 over the first 3 stitches, * knit 2, purl 2 *, work from *-* 1-1-2-3-3-4 times in total, knit 2, A.7A, A.7B, A.7C, * knit 2, purl 2 *, work from *-* 1-1-2-3-3-4 times in total, knit 2, A.1 over the last 3 stitches. Continue this rib for 8-8-8-10-10-10 cm. Cast off a little loosely. The front piece measures approx. 64-64-66-66-68-68 cm from the shoulder. BACK PIECE: Start with the left shoulder (when the garment is worn), then the right shoulder before the two are joined together for the back piece. LEFT SHOULDER: Cast on 20-22-24-24-26-28 stitches with circular needle size 8 mm and DROPS Snow. Purl 1 row from the wrong side. Then work A.1 back and forth over all stitches. When the piece measures 3 cm, and the next row is from the right side, cast on 2 stitches for the neckline at the end of the row = 22-24-26-26-28-30 stitches. Work back from the wrong side. Lay the piece to one side and work the right shoulder. RIGHT SHOULDER: Cast on 20-22-24-24-26-28 stitches with circular needle size 8 mm and DROPS Snow. Purl 1 row from the wrong side. Then work A.1 back and forth over all stitches but start A.1 with purl 1 (so the pattern fits after stitches are cast on for the neckline mid-back). When the piece measures 2 cm and the next row is from the wrong side, cast on for the neckline at the end of each row from the wrong side as follows: 2 stitches 1 time and 17-17-17-21-21-21 stitches 1 time = 39-41-43-47-49-51 stitches. Now join the 2 shoulders together for the back piece. BACK PIECE: Place the stitches from both shoulders on circular needle size 8 mm (the 17-17-17-21-21-21 cast-on stitches = neckline mid-back) = 61-65-69-73-77-81 stitches. Start from the right side and continue A.1 back and forth over all stitches, with knit over purl and purl over knit. When the piece measures 6-5-7-6-8-6 cm from the cast-on edge, decrease 1 stitch on each side – read DECREASE TIP-1. Decrease like this every 6-5-7-6-8-6 cm a total of 2-3-2-3-2-3 times = 57-59-65-67-73-75 stitches. NOTE: This gives the back piece the same shape as the front piece. When the piece measures 20-21-22-23-24-25 cm from the cast-on edge on the shoulder, cast on 2-2-2-4-4-6 stitches for the armholes at the end of the next 2 rows = 61-63-69-75-81-87 stitches. Work the new stitches in A.1. When the piece measures 56-58-58-56-58-58 cm, work the outermost 9 stitches on each side as follows from the right side: 3 stitches in A.1, knit 2, purl 2, knit 2 – the other stitches are continued in A.1. When the piece measures 62-62-64-62-64-64 cm, work as follows from the right side: 3 stitches in A.1, knit 2, purl 2, knit 2, stocking stitch over the next 43-45-51-57-63-69 stitches and increase 26-30-30-30-30-36 stitches evenly over these stitches, knit 2, purl 2, knit 2, A.1 over the last 3 stitches = 87-93-99-105-111-123 stitches. Change to circular needle size 6 mm and work as follows from the wrong side: 3 stitches in A.1, purl 2, knit 2, purl 2, * knit 3, purl 3 *, work from *-* a total of 11-12-13-14-15-17 times, knit 3, purl 2, knit 2, purl 3, 3 stitches in A.1. Continue this rib for 8-8-8-10-10-10 cm. Cast off a little loosely. The back piece measures approx. 70-70-72-72-74-74 cm. ASSEMBLY-1: Sew the shoulder seams inside the cast-on edge. SLEEVES: Use short circular needle size 8 mm and DROPS Snow. Knit up 44-46-48-50-52-54 stitches from the right side, inside 1 stitch along the armhole. Work stocking stitch back and forth for 2-2-2-4-4-5 cm. Now join the sleeve and finish working in the round. Insert 1 marker-thread mid-under the sleeve and allow it to follow your work onwards. When the sleeve measures 6-6-6-8-7-8 cm from the knitted-up stitches, decrease 2 stitches under the sleeve – read DECREASE TIP-2. Decrease like this every 6-6-4½-4½-3½-3½ cm a total of 5-5-6-6-7-7 times = 34-36-36-38-38-40 stitches. Work until the sleeve measures 36-35-34-33-32-31 cm. There is 10 cm left; try the jumper on and work to desired length. Knit 1 round and increase 14-12-18-16-16-20 stitches evenly spaced = 48-48-54-54-54-60 stitches. Change to double pointed needles size 6 mm. Work rib (knit 3, purl 3) for 10 cm. Cast off a little loosely. Work the other sleeve in the same way. ASSEMBLY-2: Sew the side seams in the outermost loop of the outermost stitch – starting at the armhole and working as far as the rib on the front piece (split of 8-8-8-10-10-10 cm on the front piece and 14-14-14-16-16-16 cm on the back piece). Sew the openings under each sleeve – see sketch. NECK: Use short circular needle size 6 mm and DROPS Snow. Knit up from the right side 72-72-78-84-84-90 stitches, inside 1 edge stitch, around the neckline (stitch number must be divisible by 6). Work rib in the round (knit 3, purl 3) for 20-20-20-22-22-22 cm. Cast off a little loosely. Fold the neck double to the inside and fasten with a couple of stitches on each shoulder. |
||||||||||||||||||||||||||||
Diagram explanations |
||||||||||||||||||||||||||||
|
||||||||||||||||||||||||||||
 |
||||||||||||||||||||||||||||
 |
||||||||||||||||||||||||||||
 |
||||||||||||||||||||||||||||
 |
||||||||||||||||||||||||||||
 |
||||||||||||||||||||||||||||
Have you finished this pattern?Tag your pictures with #dropspattern #cablebeachsweater or submit them to the #dropsfan gallery. Do you need help with this pattern?You'll find 30 tutorial videos, a Comments/Questions area and more by visiting the pattern on garnstudio.com. © 1982-2026 DROPS Design A/S. We reserve all rights. This document, including all its sub-sections, has copyrights. Read more about what you can do with our patterns at the bottom of each pattern on our site. |
||||||||||||||||||||||||||||


With over 40 years in knitting and crochet design, DROPS Design offers one of the most extensive collections of free patterns on the internet - translated to 17 languages. As of today we count 324 catalogues and 12290 patterns translated into English (UK/cm). 12290
We work hard to bring you the best knitting and crochet have to offer, inspiration and advice as well as great quality yarns at incredible prices! Would you like to use our patterns for other than personal use? You can read what you are allowed to do in the Copyright text at the bottom of all our patterns. Happy crafting!
Post a comment to pattern DROPS 243-23
We would love to hear what you have to say about this pattern!
If you want to leave a question, please make sure you select the correct category in the form below, to speed up the answering process. Required fields are marked *.