
Popular categories
Looking for a yarn?


Comments / Questions (23)
![]() Pham Van wrote:
Pham Van wrote:
Bonjour le modèle indique A1 = 8cm ok Mais A2 combien de cm / rangs avant de faire A3 ? Merci de votre réponse
15.02.2024 - 12:01DROPS Design answered:
Bonjour Mme Pham Van, après les 8 cm de A.1, tricotez A.2 (1 seule fois en hauteur), puis A.3 (une seule fois en hauteur également). Quand les 8 rangs de A.3 ont été tricotés, répéter les 2 derniers rangs de A.3 (cf étoile) jusqu'à ce que l'ouvrage mesure 15 cm (en S et M). Bon tricot!
15.02.2024 - 15:27
![]() E Bou wrote:
E Bou wrote:
Bonjour, je suis en train de réaliser ce beau modèle très agréable à tricoter. Je ne souhaite pas faire la séparation en bas du dos et du devant. Dois-je quand même faire les augmentations qui précèdent ? Avez-vous des conseils à me donner pour réaliser des côtes sans fentes sur les côtés ? Merci beaucoup pour votre réponse. Bien cordialement
10.01.2024 - 07:48
![]() E Bou wrote:
E Bou wrote:
Bonjour, je suis en train de réaliser ce beau modèle très agréable à tricoter. Je souhaite ne pas séparer le devant et le dos au niveau des côtes du bas. Dois-je faire les augmentations avant les côtes ? Avez-vous un conseil? Merci de votre réponse. Bien cordialement
10.01.2024 - 07:46DROPS Design answered:
Bonjour Mme Bou, les augmentations sont nécessaires quoi qu'il arrive pour éviter que les côtes ne soient trop serrées, ajustez juste le nombre d'augmentations pour pouvoir tricoter les côtes en bas (= nombre pair). Bon tricot!
10.01.2024 - 09:33
![]() Agata Plantamura wrote:
Agata Plantamura wrote:
Buongiorno, sto realizzando questo modello. Lavoro il collo per 8/9 cm poi i 3 cm prima dello sprone come li realizzo?
07.12.2023 - 11:24DROPS Design answered:
Buonasera Agata, una volta finito il collo deve lavorare lo sprone come indicato, lavorando A.1 per i cm indicati. Buon lavoro!
09.12.2023 - 10:12
![]() Ans Fafiani Eefting wrote:
Ans Fafiani Eefting wrote:
Goedemorgen, Ik zie een foutje in het tel patroon. De lege vakjes geven aan dat je die steken recht moet breien. Maar deze steken moeten averecht worden gebreid. Dat is wel goed uit gelegd in het filmpje.
12.10.2023 - 08:59
![]() Donatella Onesti wrote:
Donatella Onesti wrote:
Vorrei realizzare questo modello lavorando dal basso verso l'alto, non sapendo fare il topdown. Potete suggerirmi come fare le diminuzioni nello sprone ottenendo lo stesso effetto di costa inglese un po' allargata?? Grazie
25.09.2023 - 19:11DROPS Design answered:
Buonasera Donatella, non serve saper lavorare top-down, le basta seguire le istruzioni. Se invece sta cercando modelli lavorati dal basso verso l'alto, sul nostro sito troverà tantissimi modelli gratuiti con questa costruzione (bottom-up). Buon lavoro!
25.09.2023 - 23:01
![]() Agnes Mayer wrote:
Agnes Mayer wrote:
Hallo! Stricke gerade den Pullover und bin gerade am Schluß der Ärmel vor dem Stützchen. Mir kommt komisch vor, dass ich vor dem Stützchen Maschen zunehme. Sollte es nicht abnehmen heißen? Danke für ihre rasche Antwort und Grüße aus Wien
25.02.2023 - 09:50
![]() Silvia wrote:
Silvia wrote:
Quando è indicato "Lavorare 2 giri (sul 1° giro lavorare i gettati a diritto ritorto per evitare buchi)." si intende 2 giri di rasato o di A1? grazie
03.01.2023 - 15:38
![]() Lieve wrote:
Lieve wrote:
Wat betekent het zwarte cirkeltje bij A3?
23.12.2022 - 12:28DROPS Design answered:
Dag Lieve,
Dit is beschreven naast het vierde symbool van de symboolverklaring. Deze vind je vlak boven de telpatronen.
04.01.2023 - 21:20
![]() Marianna wrote:
Marianna wrote:
Buonasera, nelle maniche c’è scritto di lavorare per meno cm all’aumentare della taglia (la S ha una lunghezza finale di 44cm mentre la XXXL ha una lunghezza finale di 36cm): è corretto? Grazie
18.12.2022 - 18:01DROPS Design answered:
Buonasera Marianna, con questa costruzione le taglie più grandi hanno misure più piccole. Buon lavoro!
21.12.2022 - 19:53
|
|||||||||||||||||||
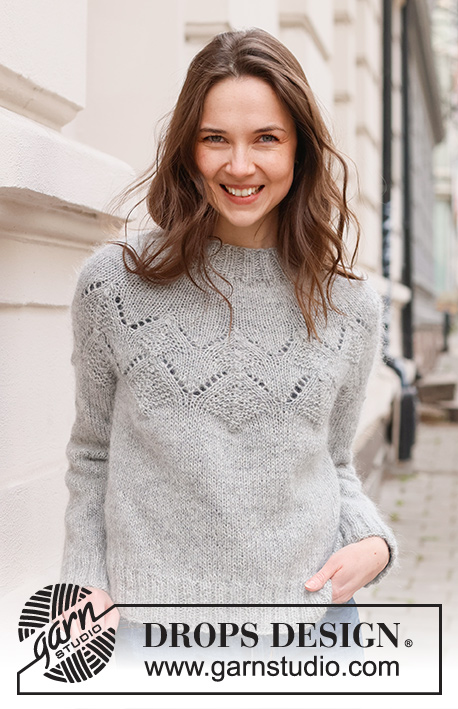
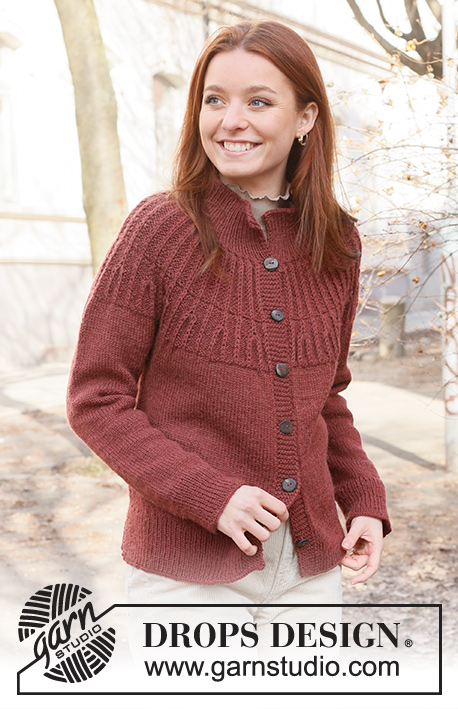
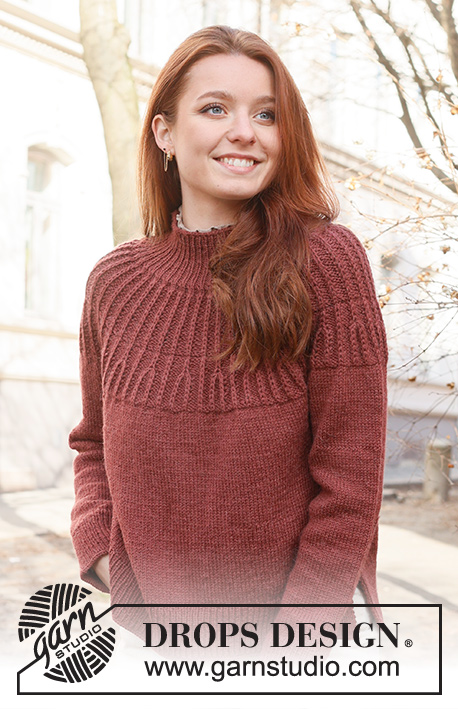
Autumn Cardinal#autumncardinalsweater |
|||||||||||||||||||
 |
 |
||||||||||||||||||
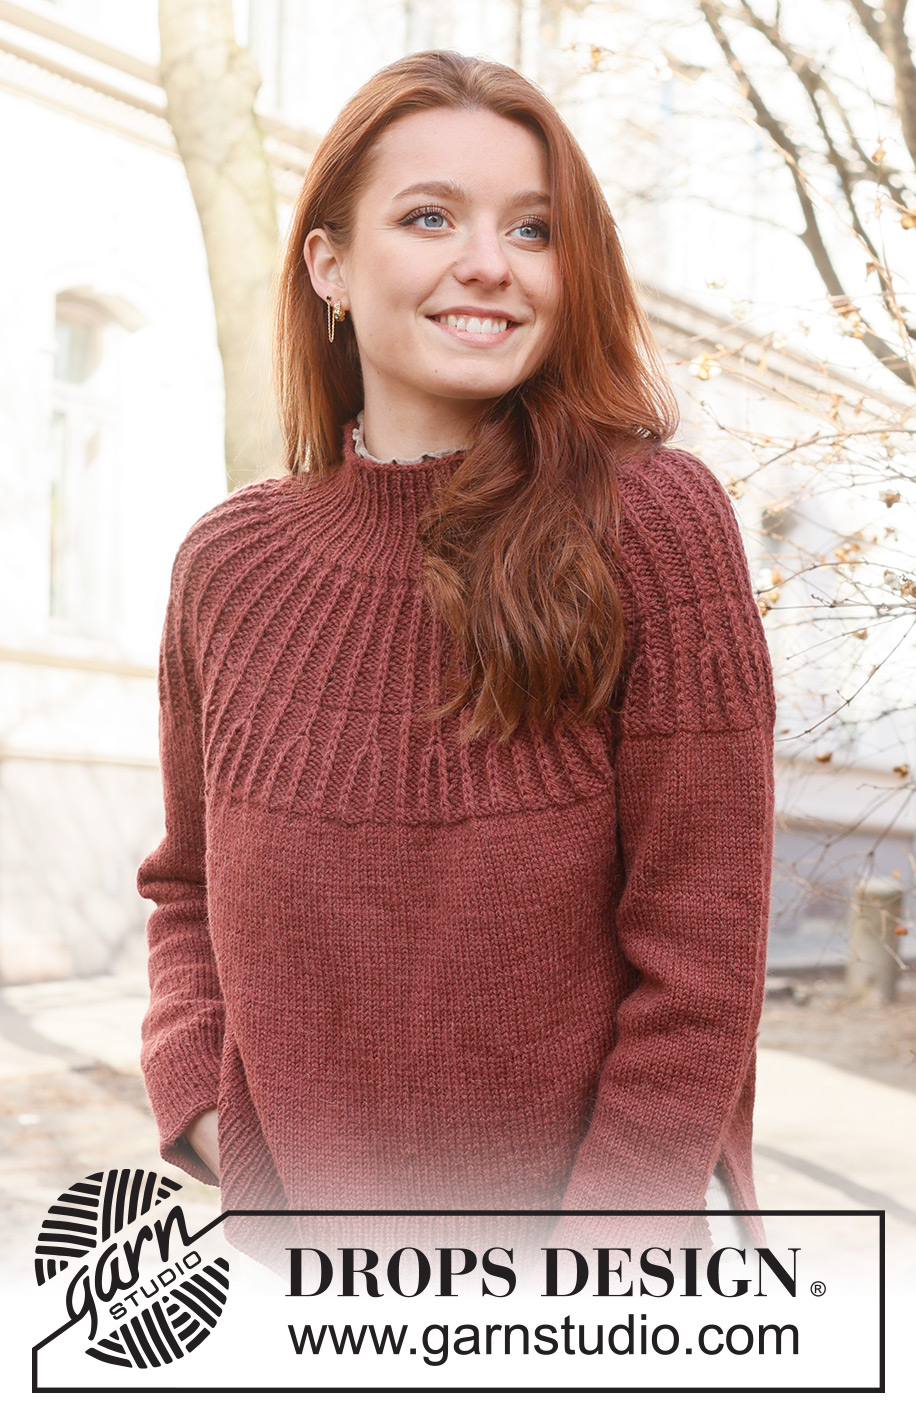
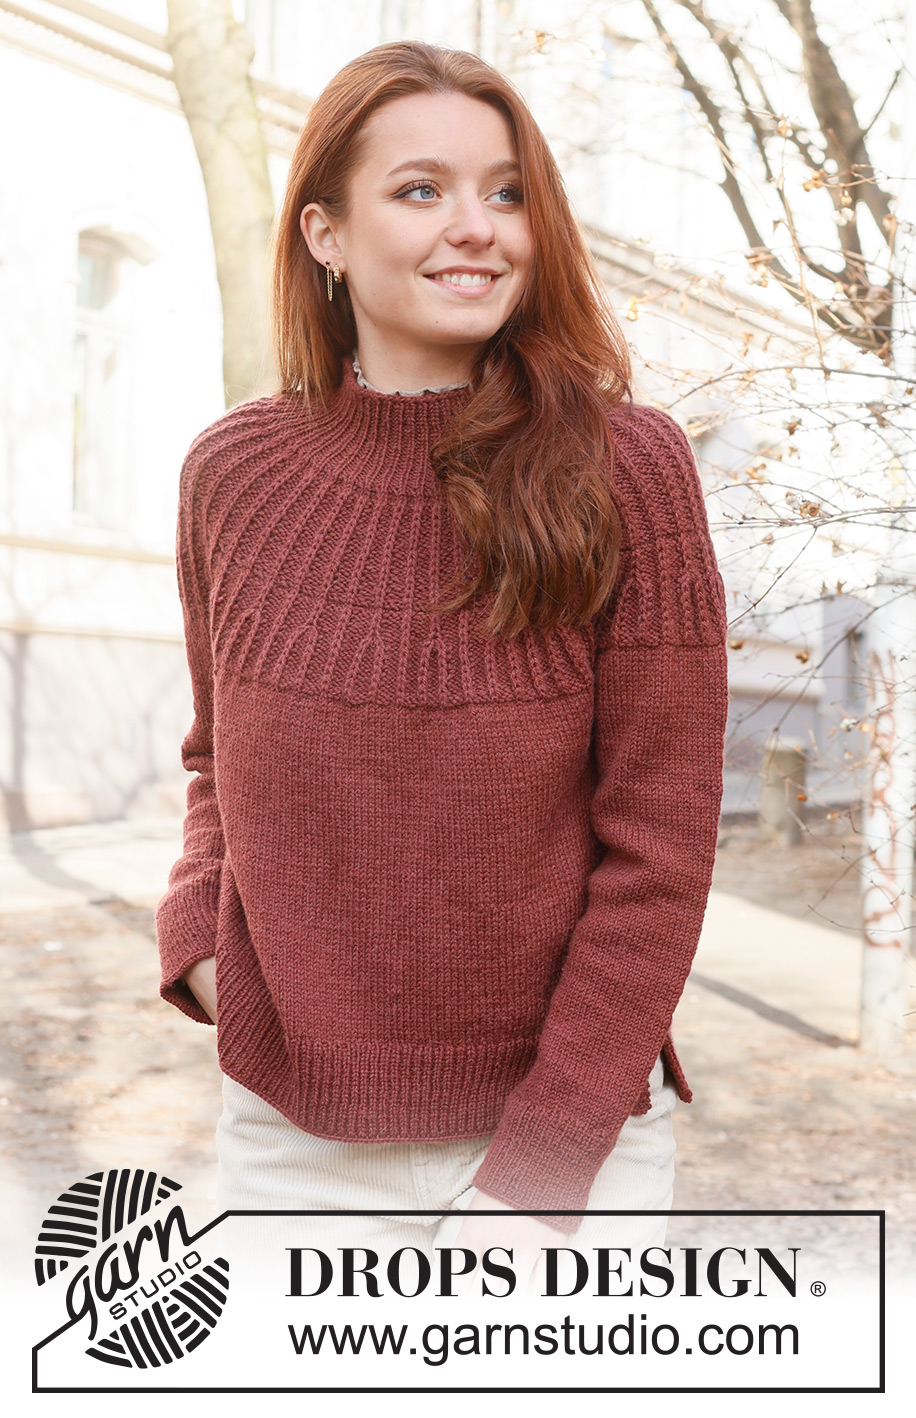
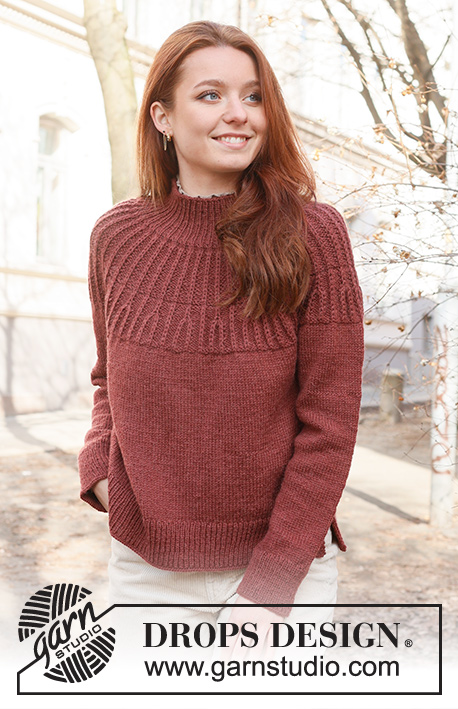
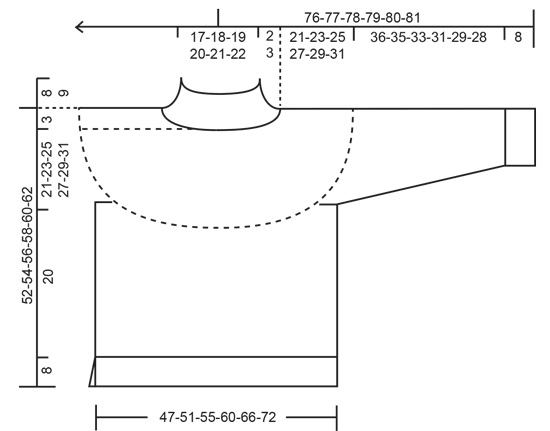
Knitted jumper in DROPS Lima. The piece is worked top down with round yoke and Fisherman’s rib. Sizes S - XXXL.
DROPS 235-24 |
|||||||||||||||||||
|
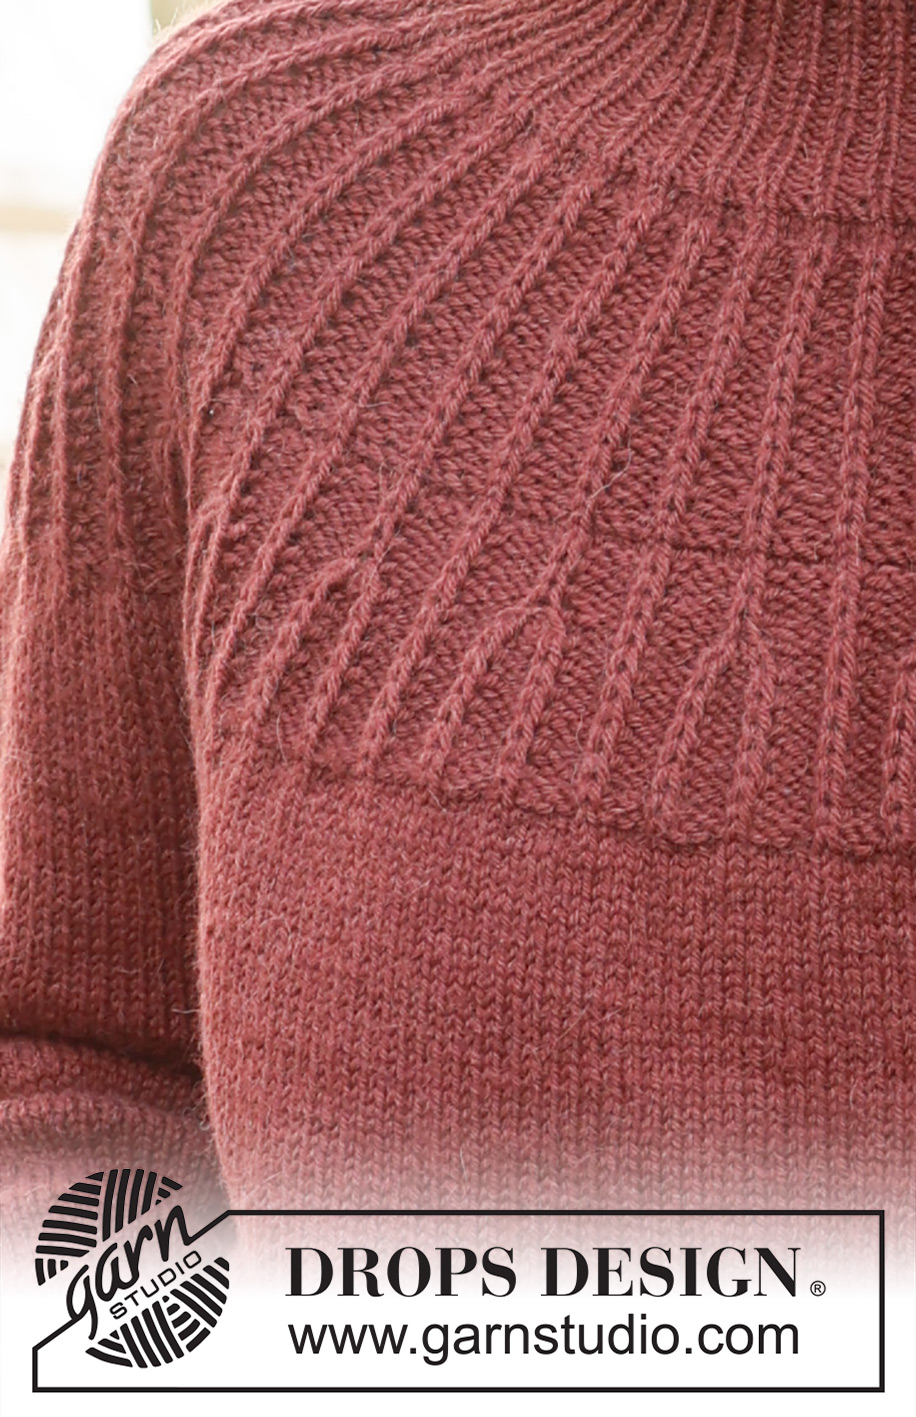
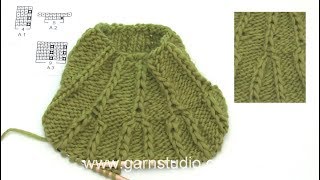
------------------------------------------------------- EXPLANATIONS FOR THE PATTERN: ------------------------------------------------------- RIDGE/GARTER STITCH (worked back and forth): Knit all rows. 1 ridge = knit 2 rows. PATTERN: See diagrams A.1 to A.3. Choose diagram for your size (applies to A.3). DECREASE TIP (for sleeves): Decrease 1 stitch on either side of the marker as follows: Work until there are 3 stitches left before the marker, knit 2 together, knit 2 (marker sits between these 2 stitches), slip 1 stitch as if to knit, knit 1 and pass the slipped stitch over the knitted stitch. ------------------------------------------------------- START THE PIECE HERE: ------------------------------------------------------- JUMPER – SHORT OVERVIEW OF THE PIECE: The neck and yoke are worked in the round with circular needle, from mid back and top down. The yoke is divided for body and sleeves and the body is continued in the round with circular needle. The sleeves are worked with short circular needle/double pointed needles. NECK: Cast on 104-110-114-118-124-128 stitches with short circular needle size 4 mm and DROPS Lima. Change to circular needle size 3 mm and knit 1 round. Then work rib (knit 1, purl 1) for 8-8-8-9-9-9 cm. Insert 1 marker in the middle of the round; the yoke is measured from this marker. YOKE: Change to circular needle size 4 mm. Knit 2 rounds and increase 34-34-36-38-38-40 stitches evenly on the first round = 138-144-150-156-162-168 stitches. Now work A.1 until the yoke measures 8-8-9-9-10-11 cm from the marker. On the next round increase all purl-2 to purl-3 by making 1 yarn over between the two purled stitches = 184-192-200-208-216-224 stitches. Knit 2 rounds (on the first round knit the yarn overs twisted to avoid holes). Work A.2 over all stitches. When A.2 has been completed in height, work A.3 over all stitches. When A.3 has been completed in height there are 276-288-300-338-351-364 stitches. Repeat the two rounds marked with a star in A.3 until the yoke measures 15-15-17-18-19-21 cm from the marker. Continue with stocking stitch. REMEMBER THE KNITTING TENSION! AT THE SAME TIME on the first round after A.3 increase 23-24-25-39-40-42 stitches evenly spaced = 299-312-325-377-391-406 stitches. When the yoke measures 18-18-21-22-23-26 cm from the marker increase 5-20-31-15-25-46 stitches evenly spaced = 304-332-356-392-416-452 stitches. Work until the yoke measures 21-23-25-27-29-31 cm from the marker. Now divide for the body and sleeves: Knit 45-50-53-58-63-70, place the next 62-66-72-80-82-86 stitches on 1 thread for the sleeve, cast on 8-8-10-10-12-12 stitches (in side under sleeve), knit 90-100-106-116-126-140 stitches, place the next 62-66-72-80-82-86 stitches on 1 thread for the sleeve, cast on 8-8-10-10-12-12 stitches (in side under sleeve), knit the last 45-50-53-58-63-70 stitches. The body and sleeves are finished separately and both are measured from here! BODY: = 196-216-232-252-276-304 stitches. Insert 1 marker in each side – in the middle of the 8-8-10-10-12-12 stitches under the sleeves. Allow the markers to follows your work onwards. Continue with stocking stitch for a further 20 cm. Now divide the piece at each marker = 98-108-116-126-138-152 stitches on both the front and the back piece. Finish each piece separately to give a split in each side. FRONT PIECE: Knit 1 row from the right side and increase 29-33-35-37-41-45 stitches evenly spaced = 127-141-151-163-179-197 stitches. Change to circular needle size 3 mm. Work as follows from the wrong side: 1 stitch in GARTER STITCH – read description above, * purl 1, knit 1 *, work from *-* until there are 2 stitches left, purl 1 and 1 stitch in garter stitch. Continue this rib for 8 cm. Cast off a little loosely. The jumper measures approx. 52-54-56-58-60-62 cm from the shoulder down. BACK PIECE: Work in the same way as the front piece. SLEEVES: Place the 62-66-72-80-82-86 stitches from the thread on the one side of the piece on short circular needle/double pointed needles size 4 mm and knit up 1 stitch in each of the 8-8-10-10-12-12 stitches cast on under the sleeve = 70-74-82-90-94-98 stitches. Insert a marker thread in the middle of the new stitches under the sleeve. Allow the thread to follow your work onwards; it will be used when decreasing under the sleeve. Start at the marker and work stocking stitch in the round for 3-3-2-2-2-2 cm. Now decrease 2 stitches under the sleeve – read DECREASE TIP. Decrease like this every 4-3½-2½-1½-1½-1½ cm a total of 9-10-13-16-17-18 times = 52-54-56-58-60-62 stitches. Continue working until the sleeve measures 36-35-33-31-29-28 cm from the division. Change to double pointed needles size 3 mm. Work rib (knit 1, purl 1) for 8 cm. Cast off a little loosely. The sleeve measures approx. 44-43-41-39-37-36 cm from the division. Work the other sleeve in the same way. |
|||||||||||||||||||
Diagram explanations |
|||||||||||||||||||
|
|||||||||||||||||||
 |
|||||||||||||||||||
 |
|||||||||||||||||||
Have you finished this pattern?Tag your pictures with #dropspattern #autumncardinalsweater or submit them to the #dropsfan gallery. Do you need help with this pattern?You'll find 33 tutorial videos, a Comments/Questions area and more by visiting the pattern on garnstudio.com. © 1982-2026 DROPS Design A/S. We reserve all rights. This document, including all its sub-sections, has copyrights. Read more about what you can do with our patterns at the bottom of each pattern on our site. |
|||||||||||||||||||


With over 40 years in knitting and crochet design, DROPS Design offers one of the most extensive collections of free patterns on the internet - translated to 17 languages. As of today we count 324 catalogues and 12290 patterns translated into English (UK/cm). 12290
We work hard to bring you the best knitting and crochet have to offer, inspiration and advice as well as great quality yarns at incredible prices! Would you like to use our patterns for other than personal use? You can read what you are allowed to do in the Copyright text at the bottom of all our patterns. Happy crafting!
Post a comment to pattern DROPS 235-24
We would love to hear what you have to say about this pattern!
If you want to leave a question, please make sure you select the correct category in the form below, to speed up the answering process. Required fields are marked *.