
Popular categories
Looking for a yarn?


Comments / Questions (98)
![]() Micheline Léonard wrote:
Micheline Léonard wrote:
Bonjour,comment faire les A 1,2,3,4,5 l un après l autre ou à la suite , j ai du mal à suivre Merci (Championnes les tricoteuses💪👏)
29.10.2023 - 18:45DROPS Design answered:
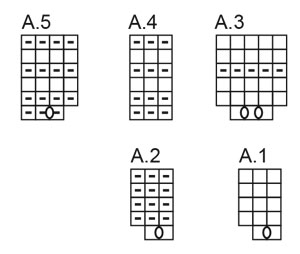
Bonjour Mme Léonard, les diagrammes se tricotent comme détaillé dans les explications, autrement dit, on tricote au début les diagrammes (A.1, A.2) en répétant ainsi de (à) entre les mailles de bordure des devants et en terminant (sur 'endroit) par A.1. Sur l'envers, tricotez A.1, répétez (A.2, A.1). Au 1er rang de ces diagrammes, vous allez augmenter comme indiqué dans le diagramme. Puis, en fonction de la taille, vous tricoterez soit (A.3, A.4) soit (A.3, A.5) de la même façon. Retrouvez ici comment lire les diagrammes. Bon tricot!
30.10.2023 - 16:49
![]() Patti Shields wrote:
Patti Shields wrote:
Please explain the diagram in pattern 43-6. I am getting either too many stitches or too few so I am not doing it correctly. For A-1 and A-2, I K1, y/o, K2; P1, y/o, P2, which gave me too few stitches. Then I tried K1, y/o, K1, y/o, K1; P1, y/o, P1, y/o, P1, which gave me too many stitches. Thank you for your advice.
07.09.2023 - 17:37DROPS Design answered:
Dear Mrs Shields, you will increase 1 stitch on first row in A.1 and in A.2 as follows: A.1 = K1, YO, K1; A.2 = K1, YO, K1 - on the next row, work the yarn over twisted to avoid a hole. Happy knitting!
08.09.2023 - 08:04
![]() Carin Dernjé wrote:
Carin Dernjé wrote:
Forklar mig hvordan jeg får 126 m. på pinden m. A1 +A2 fra 84 masker.?? Nu har jeg prøvet 10 gange! Starter nedefra og opefter?? = 42masker? - Sammenlign med Foto af trøjen ser det ud som A1 er 3 ret og A2 3 vrang!?? - Kan I lave et diagram efter ribben og ned f.eks. over 3 x A1 -A2 i bredden og 14cm i højden??
16.08.2023 - 16:15DROPS Design answered:
Hej Carin, du starter oppefra der hvor der står HALSKANT og strikker nedad.
18.08.2023 - 10:38
![]() Inge wrote:
Inge wrote:
Habe die Jacke mit dem Garn Sky in Gr. 68/74 genau nach Anleitung gestrickt, die angegebenen 100 g reichten leider nicht aus, beim zweiten Ärmel ging vor den letzten ca. 5 cm das Garn aus. Habe mir wie folgt geholfen, etwas aufgezogen, 3,5 cm andersfarbigen Streifen rein, den ersten Ärmel entsprechend auch ein Stück aufgezogen und Streifen rein, jeweils die 3 letzten Reihen in der Original Farbe gestrickt. Also lieber 1 Knäuel mehr bestellen für 68/74.
03.08.2023 - 15:16
![]() Ofelia Alcalde wrote:
Ofelia Alcalde wrote:
Hola, Estoy siguiendo este patrón y creo que hay una errata en el diagrama A1 y A2.. Tiene 5 vueltas y debería tener 6, para poder seguir bien la siguiente instrccion, que es hacer 3 derechos, 3 revés.. si cumples a rajatabla sel diagrama, en la,siguiente vuelta ( de revés) deberías continuar con 3 revés, 3 dichos.
22.07.2023 - 23:02
![]() Jacqueline Larsen wrote:
Jacqueline Larsen wrote:
Jeg har nu fulgt opskriften 100% og jeg får intet mønster som på fotoet. Jeg vil sige det er langt fra ens. A1 og A2 giver ikke et rib-mønster på bærestykket. Så jeg vil sige der er fejl på opskriften (måske det ligger i A1 og A2.)
20.07.2023 - 17:15
![]() Lise Girard wrote:
Lise Girard wrote:
Bonjour, Pour le drops baby 43-6 je fais la grandeur 2 ans et je suis rendu à faire* A3, A5* après avoir tricoter les 4 mailles de bordure est-ce que je dois tricoter la maille qui suis une maille et faire un jeté ? Merci
26.05.2023 - 03:14DROPS Design answered:
Bonjour Mme Girard, tricotez le 1er rang de A.3 ainsi: *1 m end, 1 jeté, 1 m end, 1 jeté, 1 m end* (on augmente 2 mailles dans chaque A.3) et tricotez le 1er rang de A.5 ainsi:*1 m env, 1 jeté, 2 m env* (on augmente 1 m dans chaque A.5). Bon tricot!
26.05.2023 - 10:15
![]() Andrea Jander wrote:
Andrea Jander wrote:
Liebes Team, muss nicht zwischen dem Teil der Passe mit A1, A2 und dem Teil mit A3,A5 eine kraus rechte Reihe gestrickt werden? Liebe Grüße
23.05.2023 - 18:03DROPS Design answered:
Liebe Frau Jander, diese Reihe wird bei der 4. Reihe in A.3 und A.5 gestrickt = bei dieser Rückreihe stricken Sie alle Maschen rechts. Viel Spaß beim stricken!
24.05.2023 - 08:13
![]() Dominique wrote:
Dominique wrote:
Bonjour, merci pour ce très joli modèle ! Pour les augmentations dans le col "dans une section une maille envers sur deux", le jeté doit-il suivre la maille envers ou la précéder ? merci pour votre aide
11.05.2023 - 22:35DROPS Design answered:
Bonjour Dominique et merci; vous pouvez faire ce jeté soit au début soit à la fin des mailles envers, au choix. Bon tricot!
12.05.2023 - 07:52
![]() Catherine wrote:
Catherine wrote:
Can you explain what A1 is and A3 please I’m totally confused.
28.03.2023 - 00:15DROPS Design answered:
Hi Catherine, A.1 and A.2 refer to the diagrams at the bottom of the pattern, these diagrams are worked alternately on the yoke. Then you work A.3 and A.4/A.5 as described in the text, depending on which size you are working. Happy knitting!
28.03.2023 - 06:48
|
||||||||||
Sweet Gleam Cardigan#sweetgleamcardigan |
||||||||||
 |
 |
|||||||||
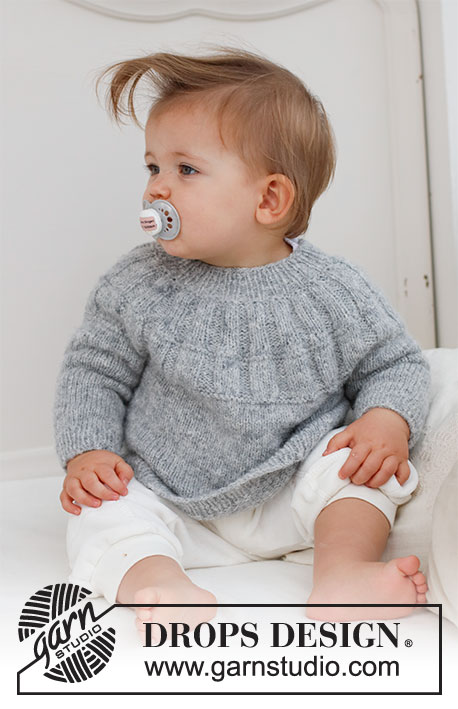
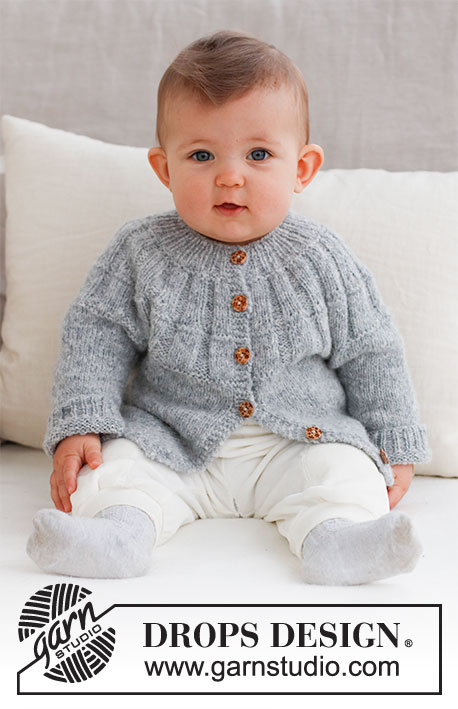
Knitted jacket for baby in DROPS Sky. The piece is worked top down, with round yoke and ribbing on the yoke. Sizes: Premature to 2 years.
DROPS Baby 43-6 |
||||||||||
|
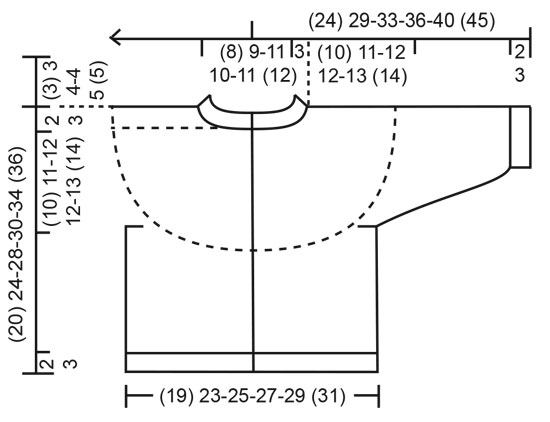
------------------------------------------------------- EXPLANATIONS FOR THE PATTERN: ------------------------------------------------------- RIDGE/GARTER STITCH (worked back and forth): Knit all rows. 1 ridge = knit 2 rows. PATTERN: See diagrams A.1 to A.5. The diagrams show all rows in the pattern from the right side. DECREASE TIP (for sleeves): Start 3 stitches left before the marker, knit 2 together, knit 2 (marker sits between these 2 stitches), slip 1 stitch as if to knit, knit 1 and pass the slipped stitch over the knitted stitch. BUTTONHOLES: Work the buttonholes on the right band (when the garment is worn). Work from the right side when there are 3 stitches left: Make 1 yarn over, knit 2 together and knit 1. On the next row (wrong side) knit the yarn over to leave a hole. The first buttonhole is worked when the neck measures 1½-2 cm, the other (3) 4-5-5-5 (5) buttonholes are worked with (5) 5-5-5-5½ (6) cm between each one. ------------------------------------------------------- START THE PIECE HERE: ------------------------------------------------------- JACKET – SHORT OVERVIEW OF THE PIECE. The neck and yoke are worked back and forth with circular needle, from mid front and top down. The yoke is divided for body and sleeves and the body continued back and forth. The sleeves are worked in the round with double pointed needles. NECK: Cast on (59) 63-71-75-79 (83) stitches with circular needle size 3 mm and DROPS Sky. Purl 1 row from the wrong side, then work the next row as follows: 4 band stitches in GARTER STITCH – read description above, * knit 1, purl 1 *, work from *-* until there are 5 stitches left, knit 1 and 4 band stitches in garter stitch. Work this rib for (2) 2-3-3-4 (4) cm – remember the BUTTONHOLES on the right band – read description above. On the next row from the right side increase every other purl-1 to purl-2 by making 1 yarn over – start to increase in the 2nd purled stitch after the band (knit the yarn overs twisted on the next row to avoid holes) = (12) 13-15-16-17 (18) increased stitches and (71) 76-86-91-96 (101) stitches. Continue the new rib until the neck measures (3) 3-4-4-5 (5) cm. Insert 1 marker after the band; the yoke is measured from this marker! YOKE: Change to circular needle size 4 mm and work 1 ridge over all stitches – AT THE SAME TIME on the first row increase (3) 2-0-3-2 (1) stitches evenly spaced = (74) 78-86-94-98 (102) stitches. After the ridge work as follows from the right side: 4 band stitches in garter stitch, * A.1, A.2 *, work from *-* until there are 6 stitches left, A.1 and 4 band stitches in garter stitch. After the first row there are (107) 113-125-137-143 (149) stitches. Complete A.1 and A.2, then continue with knit 3 /purl 3 until the yoke measures (4) 5-5-5-6 (6) cm from the marker on the neck. Work the next row from the right side as follows: SIZE (<0): 4 band stitches in garter stitch, * A.3, A.4 *, work from *-* until there are 7 stitches left, A.3 and 4 band stitches in garter stitch. SIZES 0/1 – 1/3 – 6/9 – 12/18 months (2 years): 4 band stitches in garter stitch, * A.3, A.5 *, work from *-* until there are 7 stitches left, A.3 and 4 band stitches in garter stitch. After the first row there are (141) 166-184-202-211 (220) stitches. Complete A.3 and A.4/A.5, then continue with knit 5 / purl 3 in size (<0) and knit 5 / purl 4 in the other sizes until the yoke measures (8) 10-10-10-12 (12) cm from the marker. Knit 1 row from the right side where you adjust the number of stitches to (139) 163-175-191-195 (207) stitches. Knit 1 row from the wrong side. Continue with stocking stitch and 4 band stitches in garter stitch on each side until the yoke measures (10) 11-12-12-13 (14) cm from the marker. On the next row divide for the body and sleeves as follows: Work the first (22) 26-28-30-31 (33) stitches as before, place the next (30) 34-36-40-40 (42) stitches on a thread for the sleeve, cast on (4) 4-6-6-8 (8) stitches (in side under sleeve), work (35) 43-47-51-53 (57) stitches, place the next (30) 34-36-40-40 (42) stitches on a thread for the sleeve, cast on (4) 4-6-6-8 (8) stitches (in side under sleeve), work the last (22) 26-28-30-31 (33) stitches. The body and sleeves are finished separately. The piece is now measured from here! BODY: = (87) 103-115-123-131 (139) stitches. Continue with stocking stitch and 4 band stitches in garter stitch on each side for a further (6) 9-12-12-15 (16) cm. Knit 1 row from the right side where you increase (12) 14-16-18-18 (20) stitches evenly spaced = (99) 117-131-141-149 (159) stitches. Change to circular needle size 3 mm and work as follows from the wrong side: 4 band stitches in garter stitch, * purl 1, knit 1 *, work from *-* until there are 5 stitches left, purl 1 and 4 band stitches in garter stitch. Continue this rib for (2) 2-2-3-3 (3) cm. Cast off a little loosely. The jacket measures approx. (20) 24-28-30-34 (36) cm from the shoulder down. SLEEVES: Place the (30) 34-36-40-40 (42) stitches from the thread on the one side of the piece on double pointed needles size 4 mm and knit up 1 stitch in each of the (4) 4-6-6-8 (8) stitches cast on under the sleeve = (34) 38-42-46-48 (50) stitches. Insert a marker in the middle of the (4) 4-6-6-8 (8) stitches under the sleeve. Start at the marker and work stocking stitch in the round for 1 cm. Now decrease 2 stitches under the sleeve (does not apply to sizes <0 and 0/1 month) – read DECREASE TIP. Decrease like this every 4th round a total of (0) 0-1-1-1 (2) times = (34) 38-40-44-46 (46) stitches. Continue working until the sleeve measures (5) 8-10-13-15 (19) cm from the division. There is approx. (2) 2-2-3-3 (3) cm to finished length; try the jacket on and work to desired length. Knit 1 round where you decrease (0) 0-0-4-4 (2) stitches evenly spaced = (34) 38-40-40-42 (44) stitches. Change to double pointed needles size 3 mm and work rib (knit 1, purl 1) for (2) 2-2-3-3 (3) cm. Cast off a little loosely The sleeve measures approx. (7) 10-12-16-18 (22) cm from the division. Work the other sleeve in the same way. ASSEMBLY: Sew the buttons onto the left band. |
||||||||||
Diagram explanations |
||||||||||
|
||||||||||
 |
||||||||||
 |
||||||||||
Have you finished this pattern?Tag your pictures with #dropspattern #sweetgleamcardigan or submit them to the #dropsfan gallery. Do you need help with this pattern?You'll find 30 tutorial videos, a Comments/Questions area and more by visiting the pattern on garnstudio.com. © 1982-2026 DROPS Design A/S. We reserve all rights. This document, including all its sub-sections, has copyrights. Read more about what you can do with our patterns at the bottom of each pattern on our site. |
||||||||||


With over 40 years in knitting and crochet design, DROPS Design offers one of the most extensive collections of free patterns on the internet - translated to 17 languages. As of today we count 324 catalogues and 12290 patterns translated into English (UK/cm). 12290
We work hard to bring you the best knitting and crochet have to offer, inspiration and advice as well as great quality yarns at incredible prices! Would you like to use our patterns for other than personal use? You can read what you are allowed to do in the Copyright text at the bottom of all our patterns. Happy crafting!
Post a comment to pattern DROPS Baby 43-6
We would love to hear what you have to say about this pattern!
If you want to leave a question, please make sure you select the correct category in the form below, to speed up the answering process. Required fields are marked *.